


 本文围绕Spring框架展开,介绍入门案例,包括对象实现方式、依赖配置与注入。阐述用注解创建对象和注入依赖的方法,还讲解代理思想,如横向扩展、动态代理和CGLIB代理。最后介绍AOP思想,其基于动态代理实现目标类功能的横向扩展。
Spring框架
参考资料
字段和属性的区别:https://blog.youkuaiyun.com/chenchunlin526/article/details/71424844
java动态代理中的invoke方法是如何被自动调用的:https://blog.youkuaiyun.com/zcc_0015/article/details/22695647
InvocationHandler中invoke方法中的第一个参数proxy的用途:https://blog.youkuaiyun.com/bu2_int/article/details/60150319
spring框架配置文件我们一般取名为applicationContext.xml,约束头信息如下
<beans xmlns="http://www.springframework.org/schema/beans"
xmlns:xsi="http://www.w3.org/2001/XMLSchema-instance"
xsi:schemaLocation="
http://www.springframework.org/schema/beans
http://www.springframework.org/schema/beans/spring-beans.xsd">
<!-- 配置信息写在这里,通过这个配置,让容器加载此文件时,会根据此配置来创建对象 -->
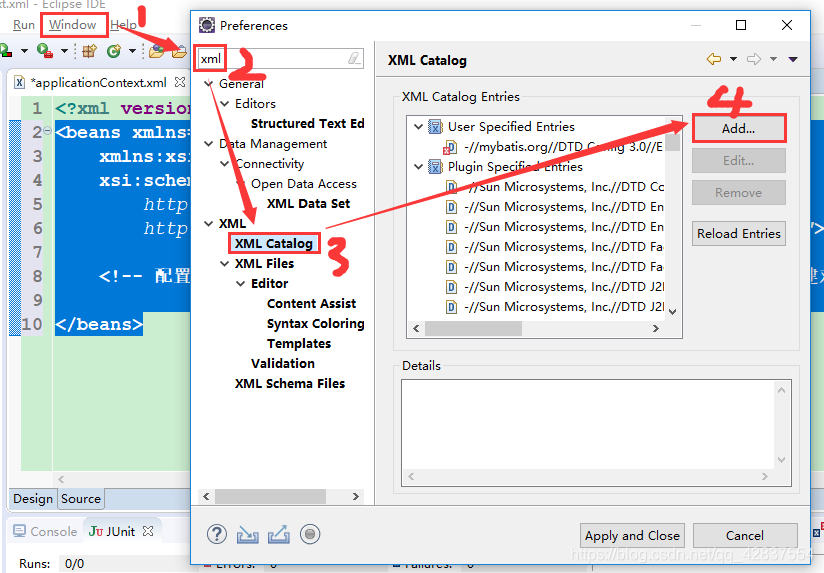
</beans>当我们写了约束头也不生效时,可以通过修改eclipse配置来解决:
入门案例
注意点
- 配置文件:建议名称为:applicationContext.xml
- 要导入的包有:
注意log包也是必须的,spring默认需要日志文件。
配置文件
<?xml version="1.0" encoding="UTF-8"?>
<beans xmlns="http://www.springframework.org/schema/beans"
    xmlns:xsi="http://www.w3.org/2001/XMLSchema-instance"
    xsi:schemaLocation="
        http://www.springframework.org/schema/beans
        http://www.springframework.org/schema/beans/spring-beans.xsd">

    <!-- 配置信息写在这里,通过这个配置,让容器加载此文件时,会根据此配置来创建对象 -->
	<!-- 创建对象我们用bean标签,id方便测试类找到指定的唯一的那个对象,class是我们要创建对象的那个类,名称用全名 -->
	<bean id="str1" class="java.lang.String"></bean>
</beans>
测试类
package com.offcn.test;

import org.junit.Test;
import org.springframework.context.ApplicationContext;
import org.springframework.context.support.ClassPathXmlApplicationContext;

public class Test1 {

	@Test
	public void createStringTest() {
		//先创建一个容器对象,通过此对象加载配置文件
		ApplicationContext context = new ClassPathXmlApplicationContext("applicationContext.xml");
		//可以从容器中根据ID值获取制定的被创建的对象
		String s = (String) context.getBean("str1");
		System.out.println(s.length());//因为我们在配置文件中创建的是一个空的对象,所以长度为0
	}
}
对象的实现方式---配置方案对象的实现方式---配置方案
<?xml version="1.0" encoding="UTF-8"?>
<beans xmlns="http://www.springframework.org/schema/beans"
    xmlns:xsi="http://www.w3.org/2001/XMLSchema-instance"
    xsi:schemaLocation="
        http://www.springframework.org/schema/beans
        http://www.springframework.org/schema/beans/spring-beans.xsd">

	<!-- 配置Person,当加载此配置文件时,可以创建Person对象出来 -->
	<bean id="p1" class="com.offcn.bean.Person"></bean>


</beans>
package com.offcn.test;
import org.junit.Test;
import org.springframework.context.ApplicationContext;
import org.springframework.context.support.ClassPathXmlApplicationContext;
import com.offcn.bean.Person;
public class Test1 {
@Test
public void test1() {
//把配置文件作为参数传入创建容器,并且当容器创建成功置换,配置文件中的对象会被自动创建
@SuppressWarnings("resource")
ApplicationContext context = new ClassPathXmlApplicationContext("applicationContext.xml");
//从容器中根据唯一ID拿对象
Person p1 = (Person) context.getBean("p1");
//还是需要构造方法,默认的是无参构造方法
System.out.println(p1);
}
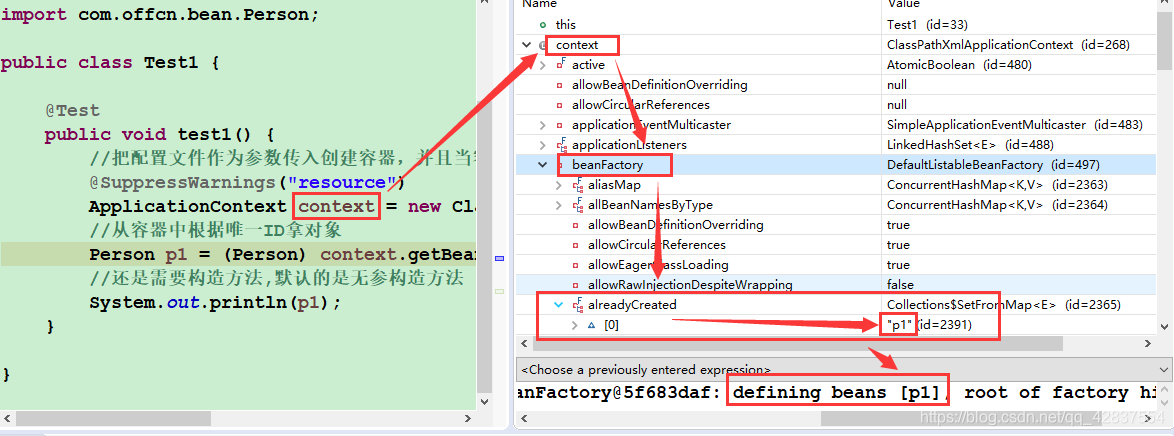
}1.在spring的核心配置文件中通过bean标签实现配置,当创建对象的时候,借助的是默认构造方法
通过debug我们发现当容器对象创建之后,在context中确实有p1对象创建成功了
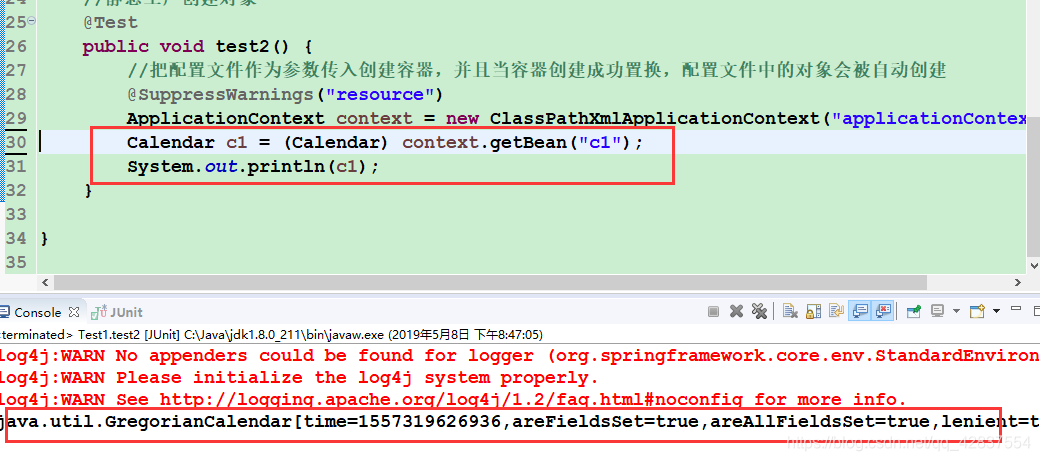
2.利用静态工厂创建对象----静态的方法,方法能够返回对象
当我们配置文件中的类是抽象类的时候,抽象类不能直接创建对象,如果我们还向上面那样会报这样的错误:

这时候我们需要在配置文件中设置<factory-method>标签的值为该工具类中获取对象的那个方法名。

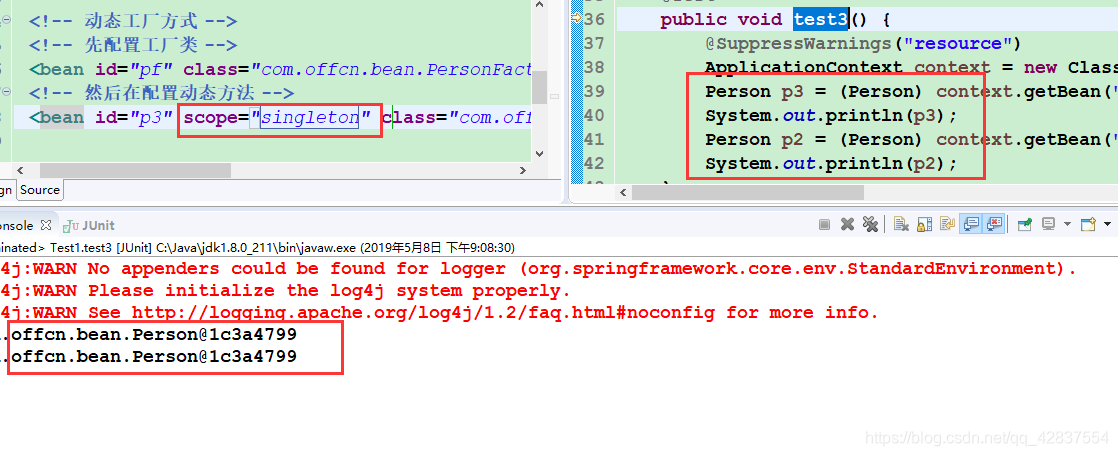
3.动态工厂方式----一个非静态的方法,方法能够返回对象
动态工厂要先配置工厂类的对象然后才能配置我们想要的那个对象
配置文件
<!-- 动态工厂方式 -->
<!-- 先配置工厂类 -->
<bean id="pf" class="com.offcn.bean.PersonFactory"></bean>
<!-- 然后在配置动态方法 -->
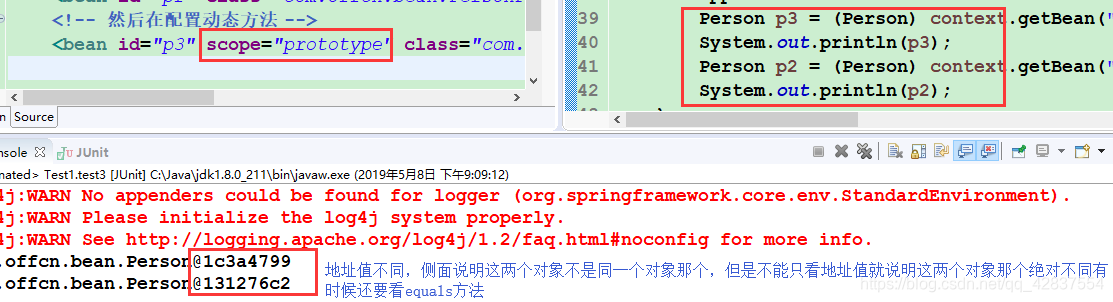
<bean id="p3" class="com.offcn.bean.Person" factory-bean="pf" factory-method="getPerson1"></bean>测试类
	@Test
	public void test3() {
		@SuppressWarnings("resource")
		ApplicationContext context = new ClassPathXmlApplicationContext("applicationContext.xml");
		Person p3 = (Person) context.getBean("p3");
		System.out.println(p3);
	}
bean标签的属性总结:
- id属性----给容器的对象定义一个唯一标识,可以通过这个唯一标识获得这个对象
- class属性----设置对象所属类型
- factory-method----设置一个方法,方法能够返回一个对象
- factory-bean----设置一个id,另一个对象的id,通过这个id可以找到一个动态工厂对象,进而调用方法实现功能
- scope----设置当前对象是单例的还是多例的,默认是单例的,值有singleton--单例、prototype--多例;web环境下,可以将对象设置到域对象中去request、session,默认单例,即我们创建两个或多个同id的对象(在配置文件中是同一个bean标签下的),他们的地址值也是相同的。
依赖的配置----依赖注入---DI
1.借助构造方法实现依赖的设置
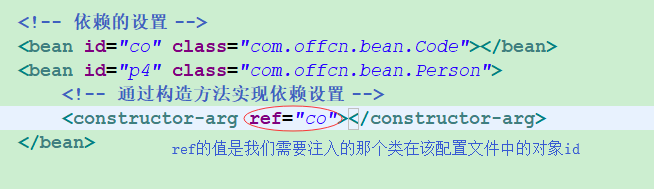
<!-- 依赖的设置 -->
	<bean id="co" class="com.offcn.bean.Code"></bean>
	<bean id="p4" class="com.offcn.bean.Person">
		<!-- 通过构造方法实现依赖设置 -->
		<constructor-arg ref="co"></constructor-arg>
	</bean>
//依赖的配置
@Test
public void test4() {
// //代码的方式实现依赖
// Code co = new Code();
// Person p = new Person();
// //set方法实现了依赖设置
// p.setCode(co);
// //也可以通过构造方法实现依赖
// Person p2 = new Person(co);
//测试配置文件实现依赖设置
@SuppressWarnings("resource")
ApplicationContext context = new ClassPathXmlApplicationContext("applicationContext.xml");
Person person = (Person) context.getBean("p4");
Code co = person.getCode();//获取Person中的co属性的值
System.out.println(co);//结果com.offcn.bean.Code@1f7030a6说明注入生效
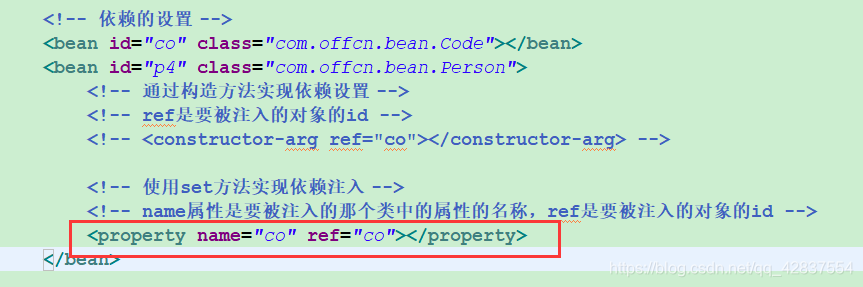
}2.借助set方法实现
测试方法不变。
3.在一个对象中的所有的属性,不论是简单类型还是复杂类型都可以做依赖注入
- 简单的类型的属性如何实现注入
一般我们使用set方法,因为当属性过多时,我们不能每一个都创建单独的构造方法
使用set方法实现
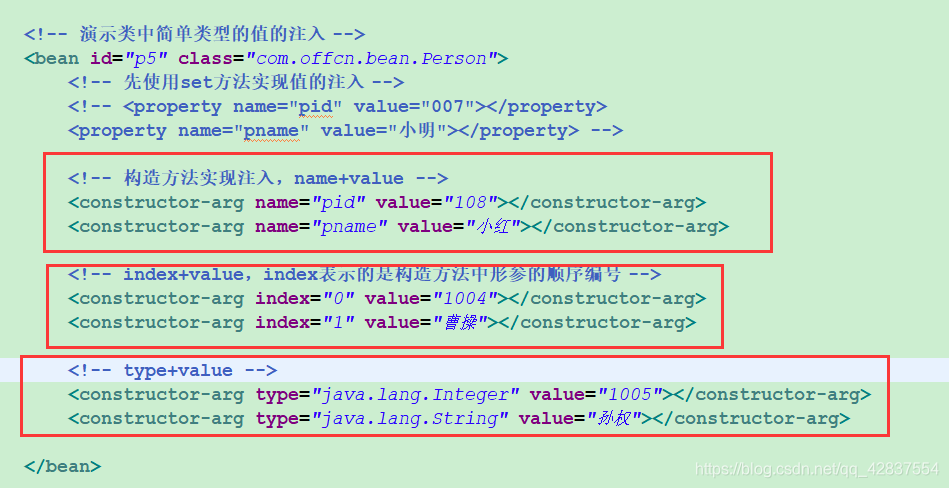
<!-- 演示类中简单类型的值的注入 -->
	<bean id="p5" class="com.offcn.bean.Person">
		<!-- 先使用set方法实现值的注入 -->
		<property name="pid" value="007"></property>
		<property name="pname" value="小明"></property>
	</bean>
//简单类型值的注入--set方法
@Test
public void test5() {
@SuppressWarnings("resource")
ApplicationContext context = new ClassPathXmlApplicationContext("applicationContext.xml");
Person person = (Person) context.getBean("p5");
System.out.println(person);//com.offcn.bean.Person@36b4cef0注入成功
}使用构造方法实现
构造方法中的ref属性只有当配置文件中存在对象的时候才使用,这里我们给普通类型赋值所以使用name和value属性,name是该类中的属性名,value是我们要给他赋的值,name还可以有index和type
index表示的是构造方法中形参的顺序编号
type是按照属性的类型进行赋值,但是当有多个同类型的属性的时候仅仅靠type是不行的,要配合index或者name使用,一般我们使用name,比较省事。
测试方法不变,结果如图。
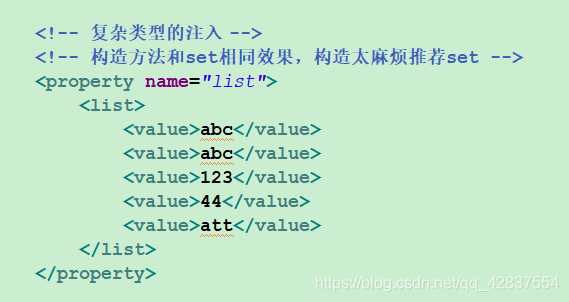
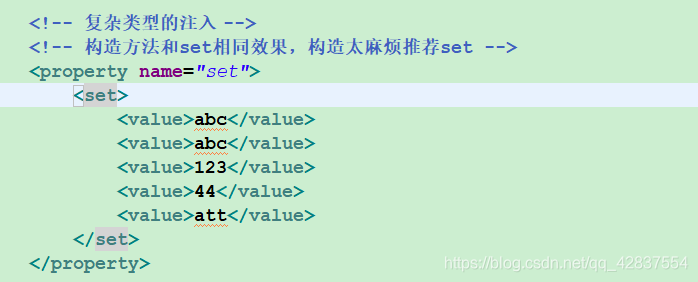
2.复杂的类型---集合类型
<property>标签中的内容: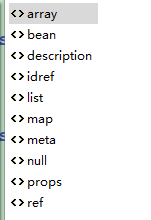
list注入:有序可重复
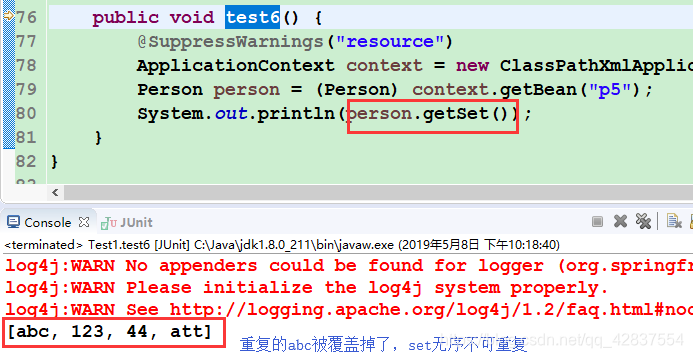
set集合:无序不可重复,只需要把name属性的值改为set即可
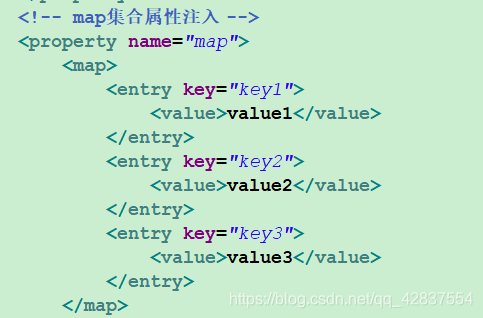
map集合属性注入
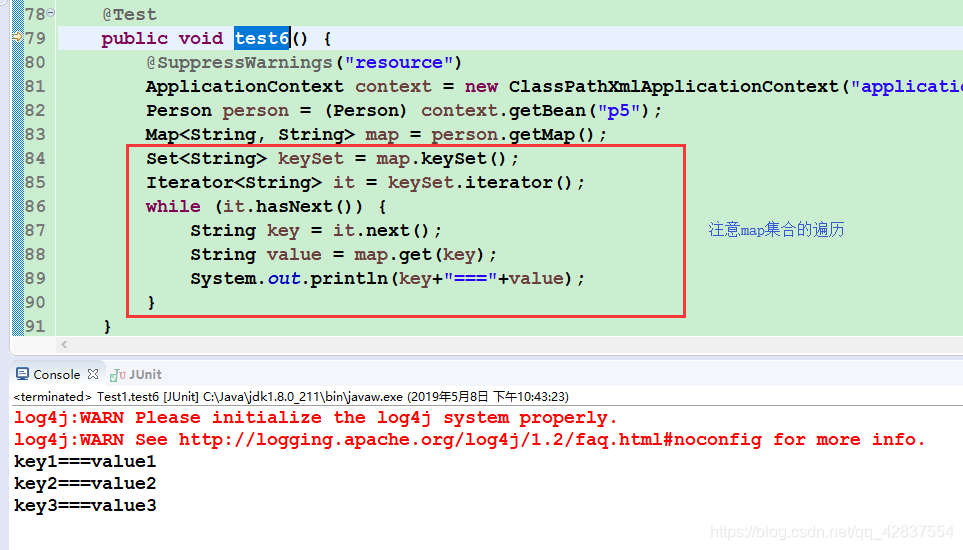
注意:map是键值对,键值对整体是属于entry,所以要先写entry标签然后在entry标签中写key-value,key写在entry中。
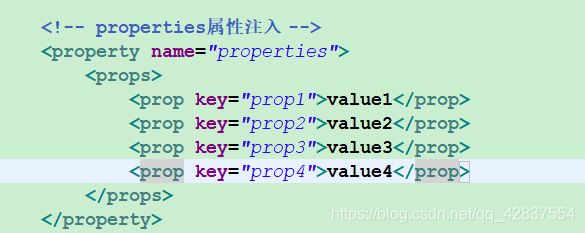
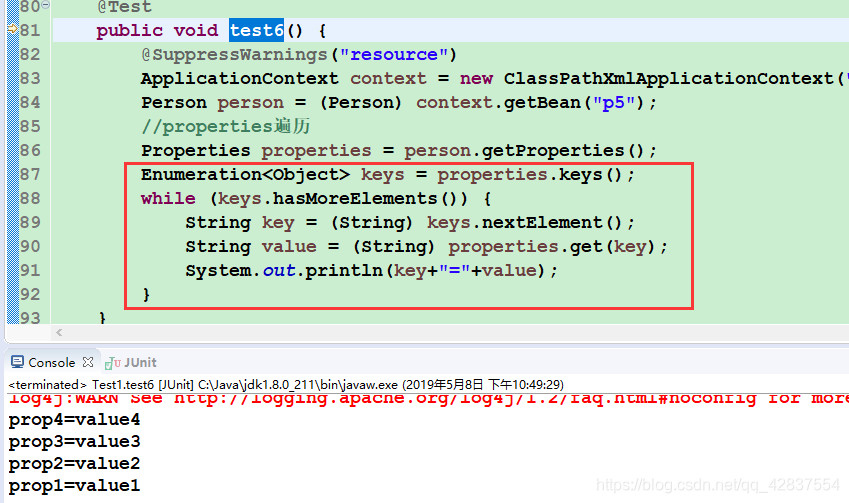
properties属性注入
properties也是键值对形式,遍历用Enumeration
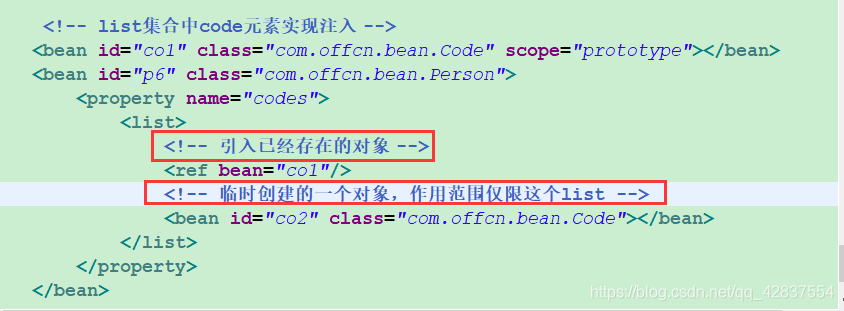
list集合中是code元素的属性注入
配置文件
<?xml version="1.0" encoding="UTF-8"?>
<beans xmlns="http://www.springframework.org/schema/beans"
xmlns:xsi="http://www.w3.org/2001/XMLSchema-instance"
xsi:schemaLocation="
http://www.springframework.org/schema/beans
http://www.springframework.org/schema/beans/spring-beans.xsd">
<!-- 此文件演示的是配置文件实现IOC操作 -->
<!-- 配置Person,当加载此配置文件时,可以创建Person对象出来 -->
<bean id="p1" class="com.offcn.bean.Person"></bean>
<!-- 配置一个日历类,目的是容器可以获取一个日历对象 -->
<bean id="c1" class="java.util.Calendar" factory-method="getInstance"></bean>
<!-- 动态工厂方式 -->
<!-- 先配置工厂类 -->
<bean id="pf" class="com.offcn.bean.PersonFactory"></bean>
<!-- 然后在配置动态方法 -->
<bean id="p3" scope="prototype" class="com.offcn.bean.Person" factory-bean="pf" factory-method="getPerson1"></bean>
<!-- 依赖的设置 -->
<bean id="co" class="com.offcn.bean.Code"></bean>
<bean id="p4" class="com.offcn.bean.Person">
<!-- 通过构造方法实现依赖设置 -->
<!-- ref是要被注入的对象的id -->
<!-- <constructor-arg ref="co"></constructor-arg> -->
<!-- 使用set方法实现依赖注入 -->
<!-- name属性是要被注入的那个类中的属性的名称,ref是要被注入的对象的id -->
<property name="co" ref="co"></property>
</bean>
<!-- 演示类中简单类型的值的注入 -->
<bean id="p5" class="com.offcn.bean.Person">
<!-- 先使用set方法实现值的注入 -->
<!-- <property name="pid" value="007"></property>
<property name="pname" value="小明"></property> -->
<!-- 构造方法实现注入,name+value -->
<!-- <constructor-arg name="pid" value="108"></constructor-arg>
<constructor-arg name="pname" value="小红"></constructor-arg> -->
<!-- index+value,index表示的是构造方法中形参的顺序编号 -->
<!-- <constructor-arg index="0" value="1004"></constructor-arg>
<constructor-arg index="1" value="曹操"></constructor-arg> -->
<!-- type+value -->
<!-- <constructor-arg type="java.lang.Integer" value="1005"></constructor-arg>
<constructor-arg type="java.lang.String" value="孙权"></constructor-arg> -->
<!-- 复杂类型的注入 -->
<!-- 构造方法和set相同效果,构造太麻烦推荐set -->
<property name="list">
<list>
<value>abc</value>
<value>abc</value>
<value>123</value>
<value>44</value>
<value>att</value>
</list>
</property>
<!-- set集合属性注入 -->
<property name="set">
<set>
<value>abc</value>
<value>abc</value>
<value>123</value>
<value>44</value>
<value>att</value>
</set>
</property>
<!-- map集合属性注入 -->
<property name="map">
<map>
<entry key="key1">
<value>value1</value>
</entry>
<entry key="key2">
<value>value2</value>
</entry>
<entry key="key3">
<value>value3</value>
</entry>
</map>
</property>
<!-- properties属性注入 -->
<property name="properties">
<props>
<prop key="prop1">value1</prop>
<prop key="prop2">value2</prop>
<prop key="prop3">value3</prop>
<prop key="prop4">value4</prop>
</props>
</property>
</bean>
<!-- list集合中code元素实现注入 -->
<bean id="co1" class="com.offcn.bean.Code" scope="prototype"></bean>
<bean id="p6" class="com.offcn.bean.Person">
<property name="codes">
<list>
<!-- 引入已经存在的对象 -->
<ref bean="co1"/>
<!-- 临时创建的一个对象,作用范围仅限这个list -->
<bean id="co2" class="com.offcn.bean.Code"></bean>
</list>
</property>
</bean>
</beans>实体类person类
package com.offcn.bean;
import java.io.Serializable;
import java.util.List;
import java.util.Map;
import java.util.Properties;
import java.util.Set;
public class Person implements Serializable{
private static final long serialVersionUID = 787965764957360011L;
private Integer pid;
private String pname;
//创建Code类字段
private Code co;
//复杂的类型
private List<String> list;
private Set<String> set;
private Map<String, String> map;
private Properties properties;
//集合中有code元素
private List<Code>codes;
public List<Code> getCodes() {
return codes;
}
public void setCodes(List<Code> codes) {
this.codes = codes;
}
public Set<String> getSet() {
return set;
}
public List<String> getList() {
return list;
}
public void setList(List<String> list) {
this.list = list;
}
public Map<String, String> getMap() {
return map;
}
public void setMap(Map<String, String> map) {
this.map = map;
}
public Properties getProperties() {
return properties;
}
public void setProperties(Properties properties) {
this.properties = properties;
}
public void setSet(Set<String> set) {
this.set = set;
}
public Person(Integer pid, String pname) {
super();
this.pid = pid;
this.pname = pname;
}
public Code getCo() {
return co;
}
public void setCo(Code co) {
this.co = co;
}
public Person(Code co) {
super();
this.co = co;
}
public Person() {
super();
// TODO Auto-generated constructor stub
}
public Integer getPid() {
return pid;
}
public void setPid(Integer pid) {
this.pid = pid;
}
public String getPname() {
return pname;
}
public void setPname(String pname) {
this.pname = pname;
}
@Override
public String toString() {
return "Person [pid=" + pid + ", pname=" + pname + ", co=" + co + "]";
}
public Person(Integer pid, String pname, Code co) {
super();
this.pid = pid;
this.pname = pname;
this.co = co;
}
public Person(String pname, Code co) {
super();
this.pname = pname;
this.co = co;
}
}
实体类code类
package com.offcn.bean;
public class Code {
private Integer cid;
private Integer pid;
private String pname;
public Integer getCid() {
return cid;
}
public void setCid(Integer cid) {
this.cid = cid;
}
public Integer getPid() {
return pid;
}
public void setPid(Integer pid) {
this.pid = pid;
}
public String getPname() {
return pname;
}
public void setPname(String pname) {
this.pname = pname;
}
}
工厂类
package com.offcn.bean;
public class PersonFactory {
public Person getPerson1() {
return new Person();
}
}
测试类
package com.offcn.test;
import java.util.Calendar;
import java.util.Enumeration;
import java.util.Iterator;
import java.util.List;
import java.util.Map;
import java.util.Properties;
import java.util.Set;
import org.junit.Test;
import org.springframework.context.ApplicationContext;
import org.springframework.context.support.ClassPathXmlApplicationContext;
import com.offcn.bean.Code;
import com.offcn.bean.Person;
public class Test1 {
@Test
public void test1() {
//把配置文件作为参数传入创建容器,并且当容器创建成功置换,配置文件中的对象会被自动创建
@SuppressWarnings("resource")
ApplicationContext context = new ClassPathXmlApplicationContext("applicationContext.xml");
//从容器中根据唯一ID拿对象
Person p1 = (Person) context.getBean("p1");
//还是需要构造方法,默认的是无参构造方法
System.out.println(p1);
}
//静态工厂创建对象
@Test
public void test2() {
//把配置文件作为参数传入创建容器,并且当容器创建成功置换,配置文件中的对象会被自动创建
@SuppressWarnings("resource")
ApplicationContext context = new ClassPathXmlApplicationContext("applicationContext.xml");
Calendar c1 = (Calendar) context.getBean("c1");
System.out.println(c1);
}
@Test
public void test3() {
@SuppressWarnings("resource")
ApplicationContext context = new ClassPathXmlApplicationContext("applicationContext.xml");
Person p3 = (Person) context.getBean("p3");
System.out.println(p3);
Person p2 = (Person) context.getBean("p3");
System.out.println(p2);
}
//依赖的配置
@Test
public void test4() {
// //代码的方式实现依赖
// Code co = new Code();
// Person p = new Person();
// //set方法实现了依赖设置
// p.setCode(co);
// //也可以通过构造方法实现依赖
// Person p2 = new Person(co);
//测试配置文件实现依赖设置
@SuppressWarnings("resource")
ApplicationContext context = new ClassPathXmlApplicationContext("applicationContext.xml");
Person person = (Person) context.getBean("p4");
Code co = person.getCo();//获取Person中的co属性的值
System.out.println(co);//结果com.offcn.bean.Code@646d64ab说明注入生效
}
//简单类型值的注入--set方法
	@Test
	public void test5() {
		@SuppressWarnings("resource")
		ApplicationContext context = new ClassPathXmlApplicationContext("applicationContext.xml");
		Person person = (Person) context.getBean("p5");
		System.out.println(person);//com.offcn.bean.Person@36b4cef0注入成功
	}
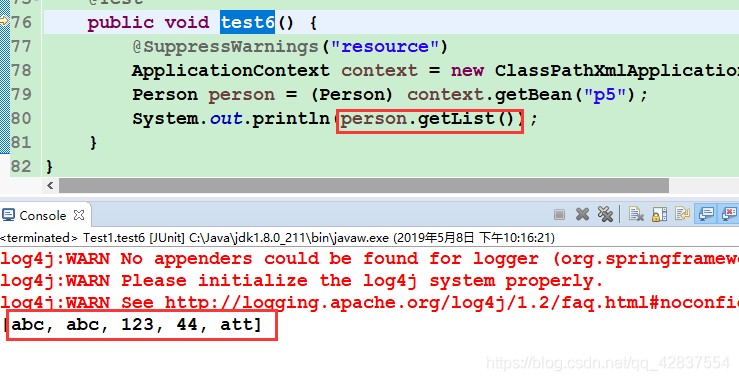
//复杂类型注入之list注入测试
@Test
public void test6() {
@SuppressWarnings("resource")
ApplicationContext context = new ClassPathXmlApplicationContext("applicationContext.xml");
Person person = (Person) context.getBean("p5");
System.out.println(person.getList());//list
System.out.println(person.getSet());//set
//map遍历=============================================
Map<String, String> map = person.getMap();
Set<String> keySet = map.keySet();
Iterator<String> it = keySet.iterator();
while (it.hasNext()) {
String key = it.next();
String value = map.get(key);
System.out.println(key+"==="+value);
}
//properties遍历==============================
Properties properties = person.getProperties();
Enumeration<Object> keys = properties.keys();
while (keys.hasMoreElements()) {
String key = (String) keys.nextElement();
String value = (String) properties.get(key);
System.out.println(key+"="+value);
}
}
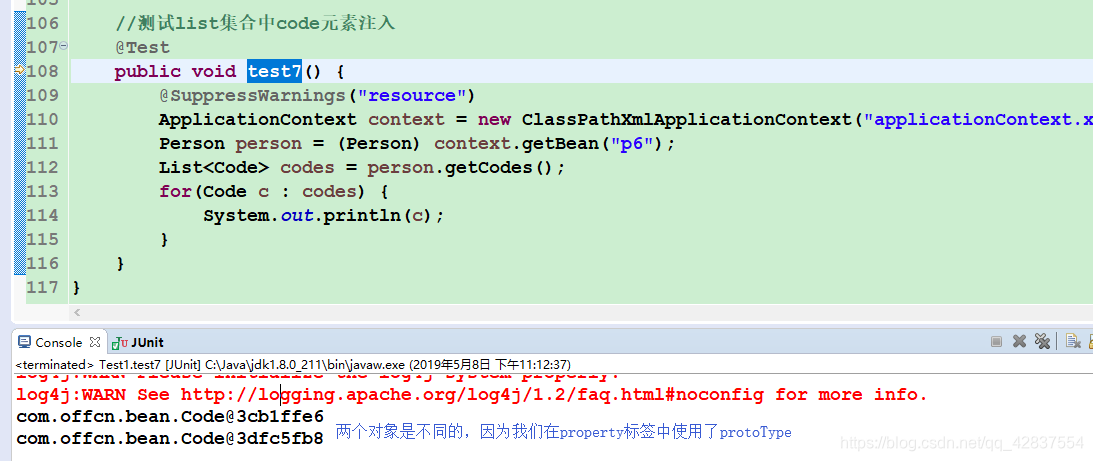
//测试list集合中code元素注入
@Test
public void test7() {
@SuppressWarnings("resource")
ApplicationContext context = new ClassPathXmlApplicationContext("applicationContext.xml");
Person person = (Person) context.getBean("p6");
List<Code> codes = person.getCodes();
for(Code c : codes) {
System.out.println(c);
}
}
}
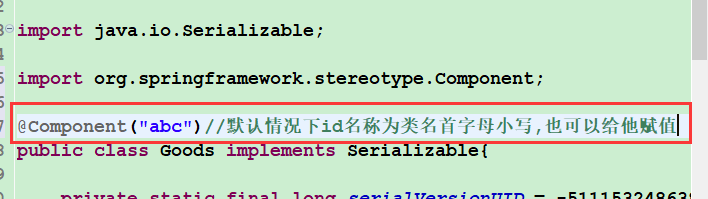
注解实现对象的创建和依赖的注入
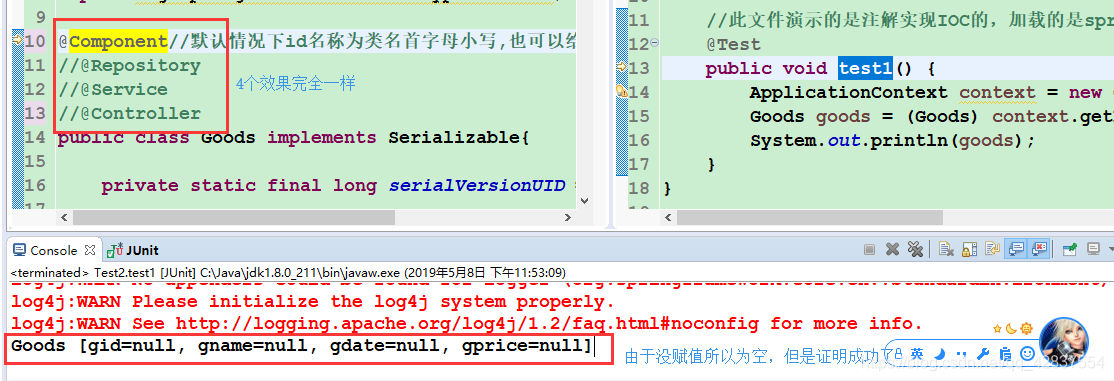
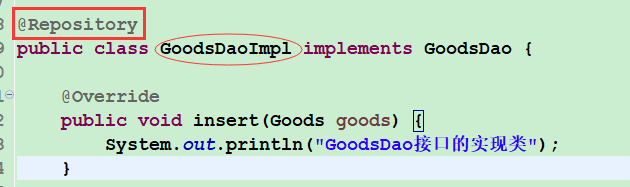
实现对象创建的注解(等价于配置文件中的bean标签):@Component @Controller @Service @Repository
实现注入的注解(等价于set方法和构造方法实现注入):@Autowired + @Qualifier @Resource @Value
对象创建的几个注解的功能完全相同,只不过在spring设计的时候采用了分层的思想,不同的层使用不同的注解
模型层(M)---实体类、dao、service、servlet
dao层使用@Repository注解
业务层使用@Service注解
控制层使用@Controller注解
除了以上三层之外的其他层可以选用@Component
@Scope注解用于实现单例或是多例,默认值是singleton,想要实现多例对象可以写成@Scope("prototype")
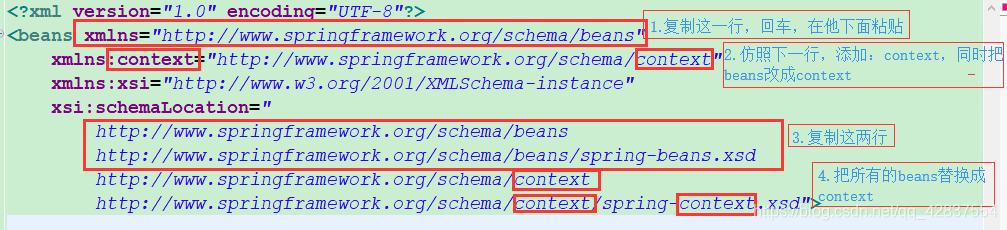
如果要是使用注解实现IOC操作,那么需要在配置文件中进行扫描,扫描当前项目中指定的包,由容器负责扫描添加了注解的类,根据扫描到的注解实现相应的功能。
如何扫描?
扫描需要的标签需要先修改约束头
需要导包:
@Autowired注解
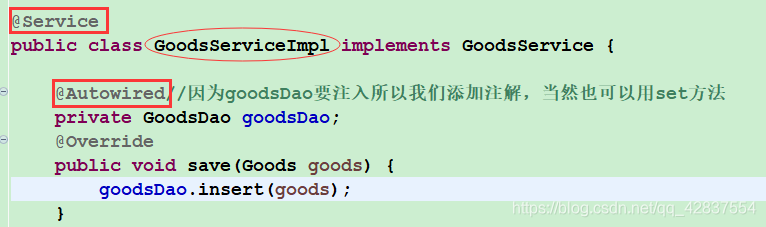
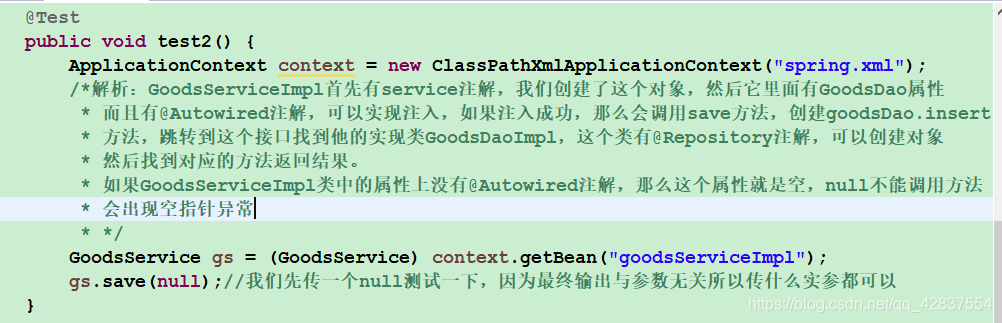
功能实现属性值的注入,注入的是对象;按照的是类型注入;意思是当容器在扫描的时候,看到此注解然后到容器查找当前属性的类型所对应的对象,如果找到就将对象实现注入;如果要是没有扫描到,报异常;如果扫描到多个此类的对象,同样出异常;此时可以使用@Qualifier注解与autowired结合使用,用来明确要注入哪个对象
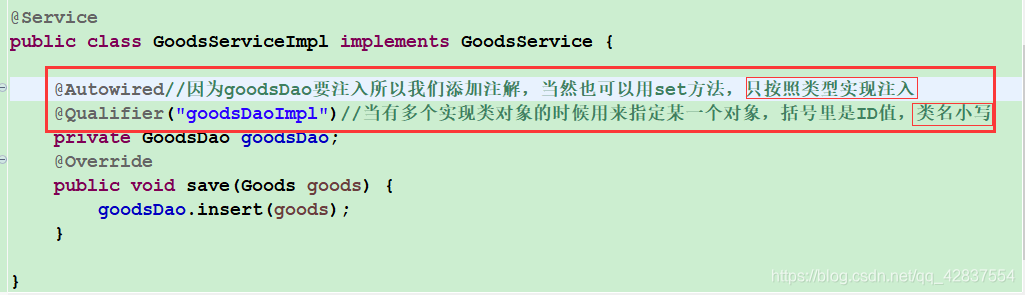
@Resource注解
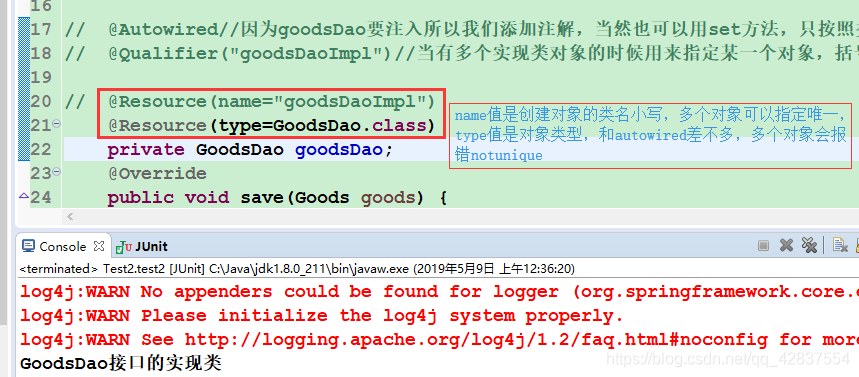
- 实现的对象的注入,和@Autowired功能类似
- 可以通过name属性和type属性来设置对象的id名称或者对象的所属类型
- 如果设置对象id名称,那么就会到容器中按照id名找对象,找到了就注入,如果没有找到再按照类型找. name和type两个属性可以都省略,先找名,再找类型
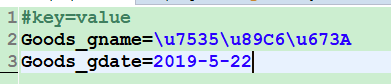
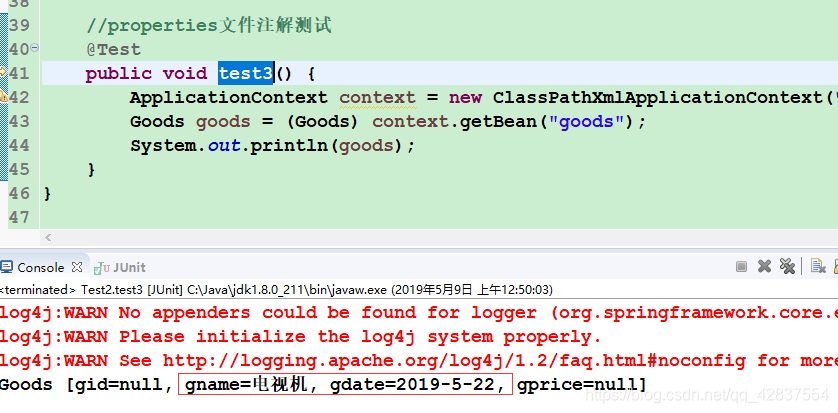
@Value注解
- 创建一个properties文件,需要注意的是和前面相同,key值不能和实体类中的属性名相同
- 在配置文件中导入properties文件。
- 在实体类中对应的属性上面加注解@Value(value="${Goods_gname}")形式类似于el表达式
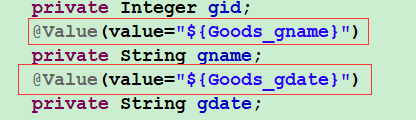

通常使用@Value注解实现的是程序中所使用的一些硬编码的字符串,从程序中抽离到配置文件,再由此注解注入回来,这种注解方式不仅限于实体类。
代理的思想
功能扩展所导致的问题
当我们需要扩展功能的时候,比如在数据库中多插入一个字段,如果我们直接在原表中添加,那么其他依赖这个类的类也就会出现问题,牵一发而动全身。这时候我们可以写一个类继承这个类,然后在把需要这个字段的类引用继承的类即可,但是问题是如果我们只是想用其中的某些方法时,这样就很不方便,这样的扩展称为纵向扩展。
横向的扩展
class Class2{
    Class1 cl1;
    method(){
        cl1.method();
        ccc;
    }
}此格式是静态代理格式,一个代理类对应一个被代理类,一个代理对象对应一个被代理对象,如果被代理过多那么代理就会过多,
实现原来功能的时候class1.method();
现在有了新功能的时候class2.method();
动态代理
动态代理有两种:JDK代理(基于接口的动态代理)和CGLIB代理(基于类的动态代理)
JDK代理实现
- 准备一个接口,被代理类(目标类)的接口,可以创建其实现类。目标类即持久层、业务层的这些接口
准备一个类,一级代理类,类需要实现一个接口InvocationHandler
创建二级代理对象,完成功能
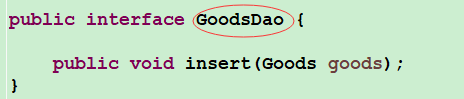
目标类接口
package com.offcn.jdk;

public interface UserDao {

	public void insert();
}
目标类实现类
package com.offcn.jdk;
public class UserDaoImpl implements UserDao {
@Override
public void insert() {
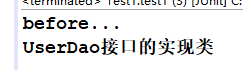
System.out.println("UserDao接口的实现类");
}
}代理类
package com.offcn.jdk;

import java.lang.reflect.InvocationHandler;
import java.lang.reflect.Method;
import java.lang.reflect.Proxy;

public class FirstProxy implements InvocationHandler {

	/*这是属性是被代理对象,因为Object类型的,可以指向所有类型,所以我们用他来表示UserDaoImpl对象*/
	private Object userDaoImpl;
	public Object getUserDaoImpl() {
		return userDaoImpl;
	}
	public void setUserDaoImpl(Object userDaoImpl) {
		this.userDaoImpl = userDaoImpl;
	}
	@Override
	public Object invoke(Object obj, Method method, Object[] objs) throws Throwable {
		/**
		 * 理解:这句话是调用method方法第一个参数是谁调用的他,第二个参数是传进来的参数
		 * 数组相当于可变参数,可以是0个,一个也可以是多个,所以这句话相当于
		 * userDaoImpl.insert()
		 */
		before();//新添加的功能直接写就可以,如果有返回值可以正好到一个对象里返回
		Object o = method.invoke(userDaoImpl, objs);
		return o;
	}
	public void before() {
		System.out.println("before...");
	}
	//获取二级代理对象
	public Object getSecondProxy() {
		/**
		 * 参数1:类加载器,直接用任意类名.class.getClassLoader即可
		 * 参数2:接口,是我们代理的对象的实现类所实现的接口,可以 代理对象.getClass.getInstance获得
		 * 参数3:当前一级代理对象,即这个类自己,用this表示即可
		 * 返回值:返回的就是一个二级代理对象
		 */
		Object secondProxy = Proxy.newProxyInstance(FirstProxy.class.getClassLoader(), userDaoImpl.getClass().getInterfaces(), this);
		return secondProxy;
	}

}
测试类
package com.offcn.jdk;

import org.junit.Test;

public class Test1 {

	@Test
	public void test1() {
		//测试jdk代理
		//先有被代理对象
		UserDaoImpl udi = new UserDaoImpl();
		//然后再有一级代理对象
		FirstProxy firstProxy = new FirstProxy();
		//设置两者的关系
		firstProxy.setUserDaoImpl(udi);
		//再获取二级代理对象
		UserDao secondProxy = (UserDao) firstProxy.getSecondProxy();
		//最后由二级代理对象代替被代理对象(目标对象)
		secondProxy.insert();
	}
}
CGLIB代理实现
1.首先先准备被代理类
package com.offcn.cglib;

//被代理类---目标类
public class FilmDaoImpl {

	public void insert() {
		System.out.println("CGLIB代理模式");
	}
}
2.然后准备一级代理类
package com.offcn.cglib;
import java.lang.reflect.Method;
import org.springframework.cglib.proxy.Enhancer;
import org.springframework.cglib.proxy.MethodInterceptor;
import org.springframework.cglib.proxy.MethodProxy;
public class FirstProxy implements MethodInterceptor {
private Object obj;
public Object getObj() {
return obj;
}
// 此方法调用实现将被代理类对象传入到此类的对象中来
public void setObj(Object obj) {
this.obj = obj;
}
@Override
public Object intercept(Object obj, Method method, Object[] objs, MethodProxy mproxy) throws Throwable {
before();
Object o = method.invoke(obj, objs);
return o;
}
//如果有新增功能
public void before() {
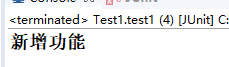
System.out.println("新增功能");
}
//获取二级代理对象
public Object getSecondProxy() {
//Enhancer是一个字节码增强器,可以用来为无接口的类创建代理。它的功能与java自带的Proxy类挺相似的。
//它会根据某个给定的类创建子类,并且所有非final的方法都带有回调钩子。
Enhancer en = new Enhancer();
//设置超类
en.setSuperclass(FilmDaoImpl.class);
//设置一级代理对象
en.setCallback(this);
//创建二级代理对象
Object secondProxy = en.create();
return secondProxy;
}
}3.获取二级代理对象,完成功能
package com.offcn.cglib;

import org.junit.Test;

public class Test1 {

	@Test
	public void test1() {
		//测试jdk代理
		//先有被代理对象
		FilmDaoImpl fdi = new FilmDaoImpl();
		//然后再有一级代理对象
		FirstProxy firstProxy = new FirstProxy();
		//设置两者的关系
		firstProxy.setObj(fdi);
		//再获取二级代理对象
		FilmDaoImpl secondProxy = (FilmDaoImpl) firstProxy.getSecondProxy();
		//最后由二级代理对象代替被代理对象(目标对象)
		secondProxy.insert();
	}
}
AOP思想
AOP(Aspect Oriented Programming),即面向切面编程
spring中的AOP思想的实现就是动态代理的实现,AOP的实现底层就是JDK或者CGLIB的实现
什么是AOP思想---面向切面编程思想,在目标类的功能的基础之上实现横向的功能扩展,切入实现
接口
package com.offcn.aop;

public interface StudentDao {

	public void insert();
}
实现类
package com.offcn.aop;
//目标类
public class StudentDaoImpl implements StudentDao{
@Override
public void insert() {
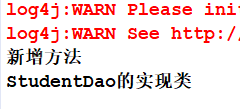
System.out.println("StudentDao的实现类");
}
}一级代理对象
package com.offcn.aop;

//一级代理
public class FirstProxy {

	public void before() {
		System.out.println("新增方法");
	}
}
配置文件
<?xml version="1.0" encoding="UTF-8"?>
<beans xmlns="http://www.springframework.org/schema/beans"
	xmlns:context="http://www.springframework.org/schema/context"
	xmlns:aop="http://www.springframework.org/schema/aop"
    xmlns:xsi="http://www.w3.org/2001/XMLSchema-instance"
    xsi:schemaLocation="
        http://www.springframework.org/schema/beans
        http://www.springframework.org/schema/beans/spring-beans.xsd
        http://www.springframework.org/schema/context
        http://www.springframework.org/schema/context/spring-context.xsd
        http://www.springframework.org/schema/aop
        http://www.springframework.org/schema/aop/spring-aop.xsd">

		<!-- aop的实现,包括配置和注解 -->
		<!-- 源对象 -->
		<bean id="studentDao" class="com.offcn.aop.StudentDaoImpl"></bean>
		<!-- 一级代理对象 -->
		<bean id="fp" class="com.offcn.aop.FirstProxy"></bean>
		<!-- 配置切入功能的实现 -->
		<aop:config>
			<!-- 切面对象 -->
			<aop:pointcut expression="execution(* com.offcn.aop.StudentDaoImpl.insert(..))" id="p1"/>
			<aop:aspect ref="fp">
			<!-- 在切入对象方法之前执行的方法 -->
				<aop:before method="before" pointcut-ref="p1"/>
			</aop:aspect>
		</aop:config>
</beans>
测试类
package com.offcn.aop;

import org.junit.Test;
import org.springframework.context.ApplicationContext;
import org.springframework.context.support.ClassPathXmlApplicationContext;

public class Test1 {

	@Test
	public void test1() {
		ApplicationContext context = new ClassPathXmlApplicationContext("spring-aop.xml");
		StudentDao sd = (StudentDao) context.getBean("studentDao");
		sd.insert();
	}
}
输出结果


 被折叠的 条评论
为什么被折叠?
被折叠的 条评论
为什么被折叠?
 到【灌水乐园】发言


