


<url-pattern>/</url-pattern> 会匹配到/login这样的路径型url,不会匹配到模式为*.jsp这样的后缀型url
<url-pattern>/*</url-pattern> 会匹配所有url:路径型的和后缀型的url(包括/login,*.jsp,*.js和*.html等)
加 / 与不加 / 的区别:https://blog.youkuaiyun.com/baidu_37107022/article/details/75578394,加 / 表示绝对路径,永远都会加上这样的前缀http://localhost:8080/项目名/,推荐这种写法,不加 / 表示相对路径,相对于当前项目的路径,可能会出错,不推荐。
AOP思想
概念介绍
AOP的基本概念
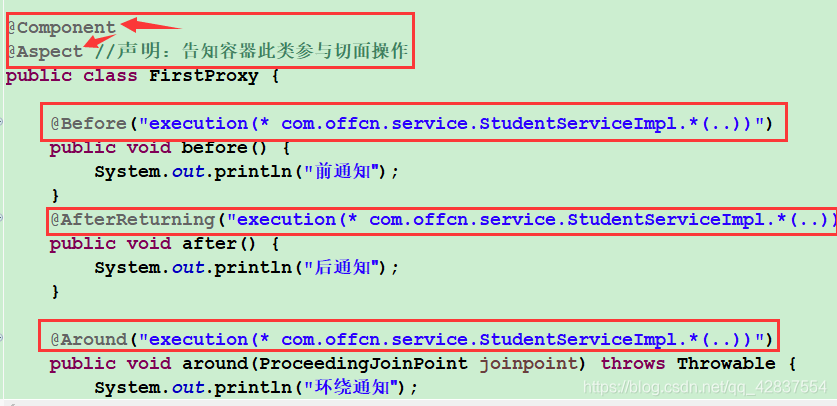
@Aspect(切面): 新增功能所在类的对象,里面可以定义切入点和通知,pointcut标签定义在他里面,也可以定义在他外面。
JointPoint(连接点): 程序执行过程中明确的点,一般是方法的调用,是指目标类中所有可以被添加新功能的方法
Pointcut(切入点): 带有通知的连接点,在程序中主要体现为书写切入点表达式(execution(xxxxx)),是指目标类中已经被添加了新功能的方法
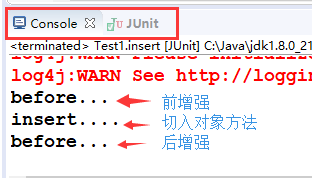
Advice(通知): AOP在特定的切入点上执行的增强处理:
@Before: 标识一个前置增强方法,相当于BeforeAdvice的功能
@After: final增强,不管是抛出异常或者正常退出都会执行。
@AfterReturning: 后置增强,似于AfterReturningAdvice, 方法正常退出时执行
@AfterThrowing: 异常抛出增强,相当于ThrowsAdvice
@Around: 环绕增强,相当于MethodInterceptor
AOP Proxy:AOP框架创建的对象,代理就是目标对象的加强。Spring中的AOP代理可以使JDK动态代理,也可以是CGLIB代理,前者基于接口,后者基于子类。
Pointcut配置使用:
表示式(expression)和签名(signature)
//Pointcut表示式
@Pointcut("execution(* com.savage.aop.MessageSender.*(..))") *是通配符,表示该类下的所有方法,报名的位置也可以是*表示该包下的所有类都切入
作者:Saxon_323e
链接:https://www.jianshu.com/p/830e799e099b
来源:简书
简书著作权归作者所有,任何形式的转载都请联系作者获得授权并注明出处。
接口
package com.offcn.service;

//一级代理---切面类
public class FirstProxy {

	//主要是所有新增的功能
	public void before() {
		System.out.println("before...");
	}

	public void after() {
		System.out.println("after...");
	}
}
实现类
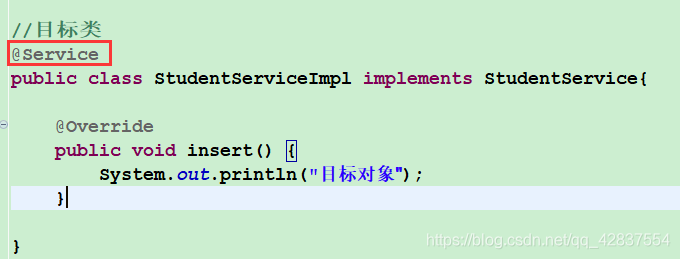
package com.offcn.service;
//目标实现类
public class StudentServiceImpl implements StudentService{
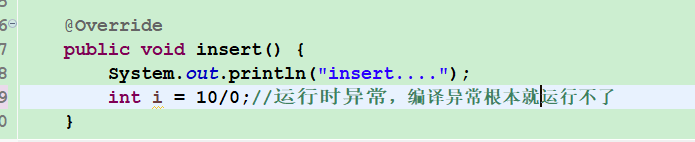
@Override
public void insert() {
System.out.println("insert....");
}
@Override
public void delete() {
System.out.println("delete.....");
}
}配置
<?xml version="1.0" encoding="UTF-8"?>
<beans xmlns="http://www.springframework.org/schema/beans"
xmlns:context="http://www.springframework.org/schema/context"
xmlns:aop="http://www.springframework.org/schema/aop"
xmlns:xsi="http://www.w3.org/2001/XMLSchema-instance"
xsi:schemaLocation="
http://www.springframework.org/schema/beans
http://www.springframework.org/schema/beans/spring-beans.xsd
http://www.springframework.org/schema/context
http://www.springframework.org/schema/context/spring-context.xsd
http://www.springframework.org/schema/aop
http://www.springframework.org/schema/aop/spring-aop.xsd">
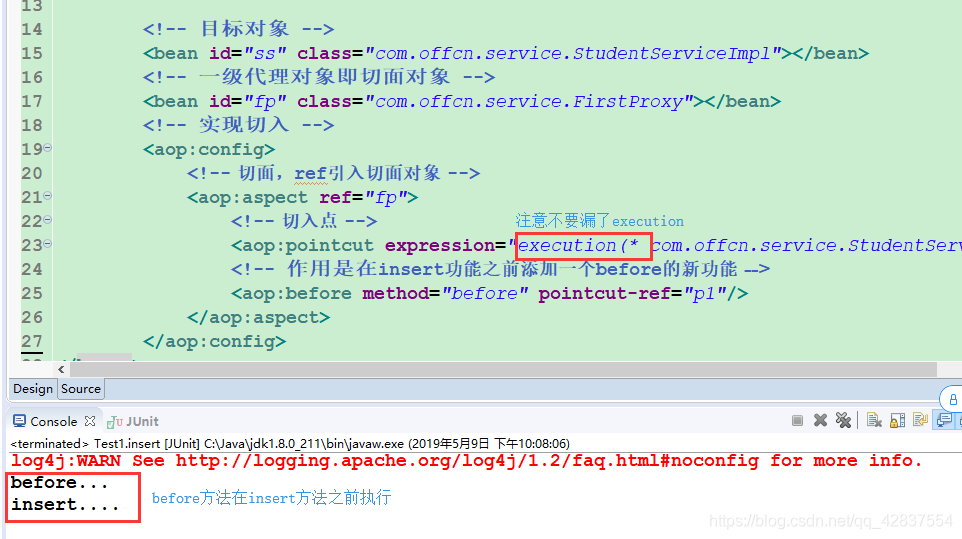
<!-- 目标对象 -->
<bean id="ss" class="com.offcn.service.StudentServiceImpl"></bean>
<!-- 一级代理对象即切面对象 -->
<bean id="fp" class="com.offcn.service.FirstProxy"></bean>
<!-- 实现切入 -->
<aop:config>
<!-- 切面,ref引入切面对象 -->
<aop:aspect ref="fp">
<!-- 切入点 -->
<aop:pointcut expression="execution(* com.offcn.service.StudentServiceImpl.insert(..))" id="p1"/>
<!-- 作用是在insert功能之前添加一个before的新功能 -->
<aop:before method="before" pointcut-ref="p1"/>
</aop:aspect>
</aop:config>
</beans>测试
package com.offcn.service;

import org.junit.Test;
import org.springframework.context.ApplicationContext;
import org.springframework.context.support.ClassPathXmlApplicationContext;

public class Test1 {

	@Test
	public void insert() {
		ApplicationContext context = new ClassPathXmlApplicationContext("spring.xml");
		//获取的是二级代理对象
		StudentService studentService = (StudentService) context.getBean("ss");
		studentService.insert();
	}
}
1.实现切入点的时候,要使用表达式:表达式是被写在一个方法中的:方法execution
- 此表达式:就是一个方法格式方法的返回值类型就是*表示所有类型方法的名称需要写包名.类名.方法名,形参就是..表示所有,不确定个数的形参(类似于可变参数,但是只有两个点)
- 在方法名称部分:可以使用通配符*
com.offcn.service.StudentServiceImpl.insert --- 给insert方法添加了新功能
com.offcn.service.StudentServiceImpl.* --- 给所有的方法添加新功能
com.offcn.service.*.* --- 给service包中所有的类的所有的方法添加新功能
*.*.* --- 给所有包的所有类所有方法添加新功能
after-returning后增强

注意:当有运行时异常时,后增强报错,不会输出,但程序仍可运行。
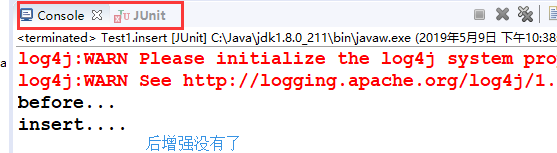
其他类似,After相当于final,不管切入对象是否输出成功,after都会输出,AfterThrowing只有异常抛出的时候才会生效
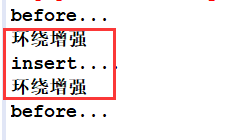
环绕增强@Around
注意点:
- 方法需要传参ProceedingJoinPoint joinpoint,会有异常,抛出即可
- joinpoint.proceed();相当于调用原功能,且要环绕实现环绕的方法包围这个原功能
package com.offcn.service;

import org.aspectj.lang.ProceedingJoinPoint;

//一级代理---切面类
public class FirstProxy {

	//主要是所有新增的功能
	public void before() {
		System.out.println("before...");
	}

	public void after() {
		System.out.println("after...");
	}

	//环绕增强
	public void around(ProceedingJoinPoint joinpoint) throws Throwable {
		System.out.println("环绕增强");
		joinpoint.proceed();//相当于调用原功能
		System.out.println("环绕增强");
	}
}
使用注解实现通知配置
1.配置类只需要扫描包和设置自动代理即可。
2.目标实现类要创建对象,配置文件里没有,所有我们也要用注解@Service,引用名就是类名小写
3.代理类要创建对象所以要用@Component注解,然后代理类还需要实现切面操作所以加@Aspect注解,方法中每个注解都要加execution(。。。)表达式,否则会报这样的错误。
AOP思想的应用场景
事务控制、拦截器、登录认证、权限验证
spring-jdbc----演示事务的管理控制
- 事务管理----在进行crud操作时候,特别是数据的更新操作,如果发生了异常,那么应该让数据进行回滚,如果没有发生异常,那么数据可以提交;应该放在业务层实现回滚和提交操作
- 当对于回滚和提交要求没有那么严格的时候,或者不是特别的细致,此时可以采用声明式事务管理----是指通过配置实现事务管理,实现的是粗粒度的事务管理;如果要求较为细致,那么应该采用编程式事务管理---实现细粒度的事务管理
使用spring的配置实现声明式事务管理
spring自带的获取数据源的方式并实现CRUD。
queryRowSet方法返回一个rowset就相当于我们平时用的ResultSet,遍历取值是按照在表中的位置以及参数类型取值的,从1开始
package com.offcn.test;

import org.junit.Test;
import org.springframework.jdbc.core.JdbcTemplate;
import org.springframework.jdbc.datasource.DriverManagerDataSource;
import org.springframework.jdbc.support.rowset.SqlRowSet;

public class Test1 {

	@Test
	public void test1() {
		//获取数据源
		DriverManagerDataSource datasource = new DriverManagerDataSource();
		datasource.setDriverClassName("com.mysql.jdbc.Driver");
		datasource.setUrl("jdbc:mysql://localhost:3306/mybatis?characterEncoding=utf8");
		datasource.setUsername("root");
		datasource.setPassword("root");

		//spring的jdbc如何实现crud
		//创建一个模板对象
		JdbcTemplate temp = new JdbcTemplate(datasource);
		String sql1 = "update classes set class_name= ?,class_address=? where class_id = ?";
		int i = temp.update(sql1,"钢七连","部队",31);
		if(i > 0)
			System.out.println("修改成功");

		//实现查询操作,queryRowSet方法返回一个rowset就相当于我们平时用的ResultSet
		String sql2 = "select * from classes where class_id = ?";
		SqlRowSet rs = temp.queryForRowSet(sql2, 1);
		if(rs.next()) {
			//按照类型取值参数为在表中的位置
			int class_id = rs.getInt(1);
			String class_name = rs.getString(2);
			String class_address = rs.getString(3);
			System.out.println(class_id+"-"+class_name+"-"+class_address);
		}
	}
}
案例
情景描述:
小花和小草,小花当前账号下有10000元,小草当前账号有2000元,小草相中一款口红,口红的价格是3000元,所以从小花借点1000元;此时小花要给小草转账;
转账这件事情属于是一次事务:在这次事务中发生什么事?发生修改操作,两个修改操作,分别是小花减少,小草要增加,
对于sql实现:
事务的开始----begin
修改---小花----update 表 set money = ? where name = 小花
修改---小草-----update 表 set money = ? where name = 小草
事务的结束----commit/rollback
如果在业务层发生异常,以上的代码是没有事务管理的,所以会出现数据不安全问题,考虑添加事务管理
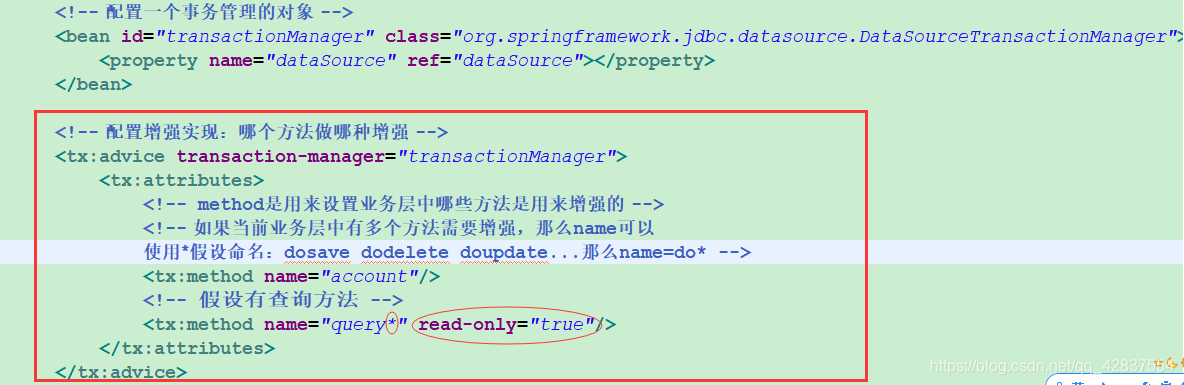
- 先有一个事务管理对象--此对象需要数据源,class可以先在一个类中输入DataSourceTransctionManager然后复制他的全路径名,id我们截取其中一段即可
- 配置事务管理的实现方式---业务层哪些方法做何种增强,<tx:method name="account*"/>默认是有read-only="false"属性的,意思是开启事务,因为查询不需要开启事务,所以设置为只读,那么事务就不会开启了,节约了系统资源
- 进行切入
- 测试


代码
配置文件
<?xml version="1.0" encoding="UTF-8"?>
<beans xmlns="http://www.springframework.org/schema/beans"
	xmlns:context="http://www.springframework.org/schema/context"
	xmlns:aop="http://www.springframework.org/schema/aop"
	xmlns:tx="http://www.springframework.org/schema/tx"
    xmlns:xsi="http://www.w3.org/2001/XMLSchema-instance"
    xsi:schemaLocation="
        http://www.springframework.org/schema/beans
        http://www.springframework.org/schema/beans/spring-beans.xsd
        http://www.springframework.org/schema/context
        http://www.springframework.org/schema/context/spring-context.xsd
        http://www.springframework.org/schema/aop
        http://www.springframework.org/schema/aop/spring-aop.xsd
        http://www.springframework.org/schema/tx
        http://www.springframework.org/schema/tx/spring-tx.xsd">

		<bean id="moneyService" class="com.offcn.service.MoneyServiceImpl">
			<property name="dao" ref="moneyDao"></property>
		</bean>
		<bean id="moneyDao" class="com.offcn.dao.MoneyDaoImpl">
			<property name="temp" ref="temp"></property>
		</bean>
		<bean id="temp" class="org.springframework.jdbc.core.JdbcTemplate">
			<constructor-arg index="0" ref="dataSource"></constructor-arg>
		</bean>
		<!-- 数据源 -->
		<bean id="dataSource" class="org.springframework.jdbc.datasource.DriverManagerDataSource">
			<property name="driverClassName" value="com.mysql.jdbc.Driver"></property>
			<property name="url" value="jdbc:mysql:///mybatis?characterEncoding=utf8"></property>
			<property name="username" value="root"></property>
			<property name="password" value="root"></property>
		</bean>

		<!-- 配置一个事务管理的对象,事务对象就相当于aspect切面对象 -->
		<bean id="transactionManager" class="org.springframework.jdbc.datasource.DataSourceTransactionManager">
			<property name="dataSource" ref="dataSource"></property>
		</bean>

		<!-- 配置增强实现:哪个方法做哪种增强 -->
		<tx:advice id="txadvice" transaction-manager="transactionManager">
			<tx:attributes>
				<!-- method是用来设置业务层中哪些方法是用来增强的 -->
				<!-- 如果当前业务层中有多个方法需要增强,那么name可以
				使用*假设命名:dosave dodelete doupdate...那么name=do* -->
				<tx:method name="account"/>
				<!-- 假设有查询方法 -->
				<tx:method name="query*" read-only="true"/>
			</tx:attributes>
		</tx:advice>

		<!-- 实现切入操作 -->
		<aop:config>
			<!-- 切入点的表达式 -->
			<aop:pointcut expression="execution(* com.offcn.service.*.*(..))" id="p1"/>
			<!-- 把上面的事务引入到此 -->
			<aop:advisor advice-ref="txadvice" pointcut-ref="p1"/>
		</aop:config>

</beans>
实体类
package com.offcn.bean;

import java.io.Serializable;

public class Person implements Serializable{

	private static final long serialVersionUID = -5899876299633766855L;

	private Integer pid;
	private String pname;
	private Double money;
	public Integer getPid() {
		return pid;
	}
	public void setPid(Integer pid) {
		this.pid = pid;
	}
	public String getPname() {
		return pname;
	}
	public void setPname(String pname) {
		this.pname = pname;
	}
	public Double getMoney() {
		return money;
	}
	public void setMoney(Double money) {
		this.money = money;
	}

}
业务层接口
package com.offcn.service;

import com.offcn.bean.Person;

public interface MoneyService {

	public void account(Person p1,Person p2);
}
业务层实现类
package com.offcn.service;

import com.offcn.bean.Person;
import com.offcn.dao.MoneyDao;

public class MoneyServiceImpl implements MoneyService {
	private MoneyDao dao;
	public MoneyDao getDao() {
		return dao;
	}
	public void setDao(MoneyDao dao) {
		this.dao = dao;
	}
	@Override
	public void account(Person p1, Person p2) {
		//事务的开始----begin
		//修改---小花----update 表  set money = ? where name = 小花
		//修改---小草-----update 表 set money = ? where name = 小草
		//事务的结束----commit/rollback

		//小花的转出操作
		dao.updateOdd(p1);
//		int i = 10/0;//如果有错误就会实现会滚操作
		//小草的转入操作
		dao.updateAdd(p2);
	}

}
测试类
package com.offcn.test;

import org.junit.Test;
import org.springframework.context.ApplicationContext;
import org.springframework.context.support.ClassPathXmlApplicationContext;

import com.offcn.bean.Person;
import com.offcn.service.MoneyService;

public class Test2 {

	@Test
	public void test1() {
		Person hua = new Person();
		hua.setPname("小花");
		hua.setMoney(1000.0);
		Person cao = new Person();
		cao.setPname("小草");
		cao.setMoney(1000.0);
		@SuppressWarnings("resource")
		ApplicationContext context = new ClassPathXmlApplicationContext("spring.xml");
		MoneyService ms = (MoneyService) context.getBean("moneyService");
		ms.account(hua, cao);
	}
}
注解实现事务管理
步骤
1.统一使用注解实现---业务层-持久层都添加注解,扫描包。持久层用@Repository注解,业务层用@Service注解,控制层用@Controller注解,注入对象用@Autowired或@Resource注解,体现分层思想。
2.配置文件中预定义的类不能缺少---数据源、模板类、事务管理对象,最重要的还有注解驱动扫描,扫描的是上级目录,这样所有的类都会被扫描到了,不然注解不会生效。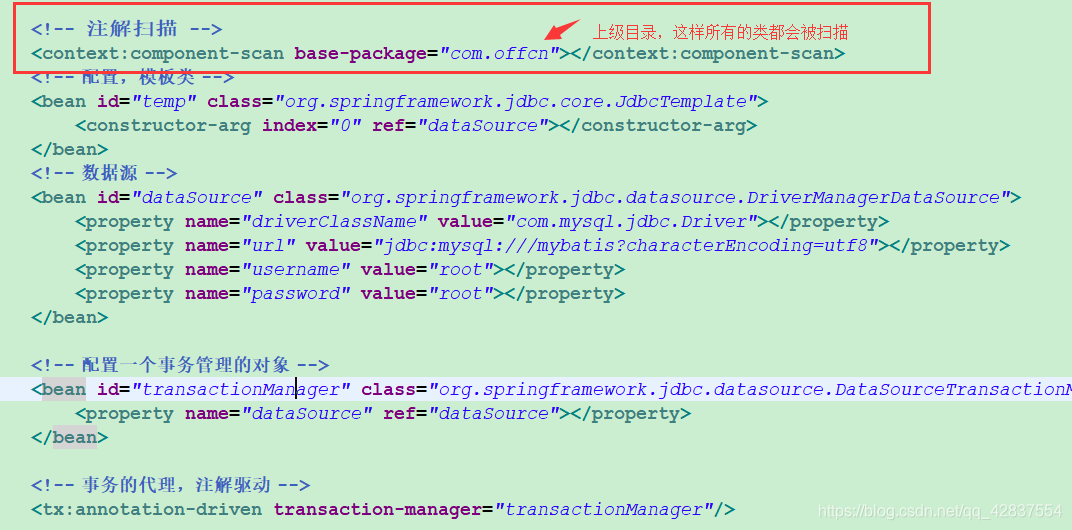
3.需要在配置中添加一个事务代理---注解驱动

4.到业务层中添加注解@Transactional --- 此注解即可以添加在某个方法上面,也可以添加在类上面;如果添加在方法上面,那么只有这个方法参与事务管理;如果添加在类上,那么类中所有方法都参与事务管理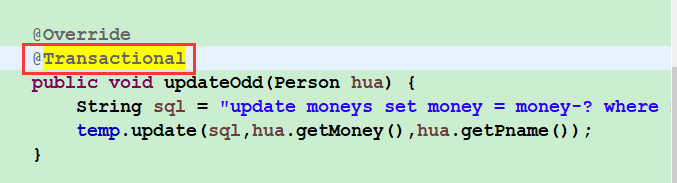
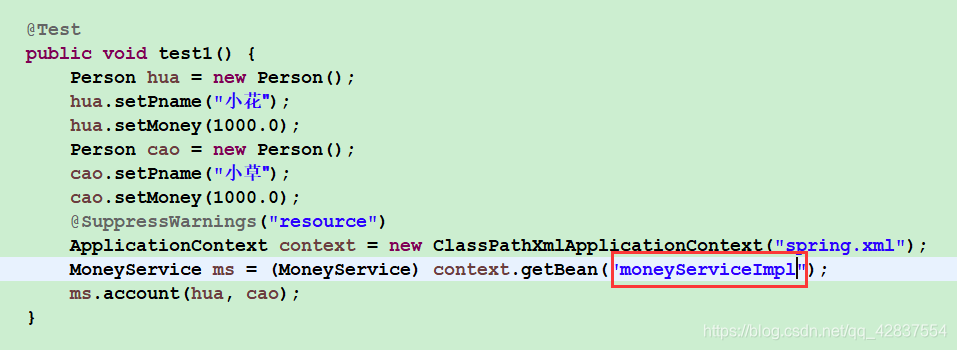
5.测试类,基本不用变动,除了把划线地方getBean中的名字改成我们注解的类名小写,因为我们没有在配置文件中配置他,用的都是注解
SpringMVC介绍
<url-pattern>/</url-pattern> 会匹配到/login这样的路径型url,不会匹配到模式为*.jsp这样的后缀型url
<url-pattern>/*</url-pattern> 会匹配所有url:路径型的和后缀型的url(包括/login,*.jsp,*.js和*.html等)
加 / 与不加 / 的区别:https://blog.youkuaiyun.com/baidu_37107022/article/details/75578394,加 / 表示绝对路径,永远都会加上这样的前缀http://localhost:8080/项目名/,推荐这种写法,不加 / 表示相对路径,相对于当前项目的路径,可能会出错,不推荐。
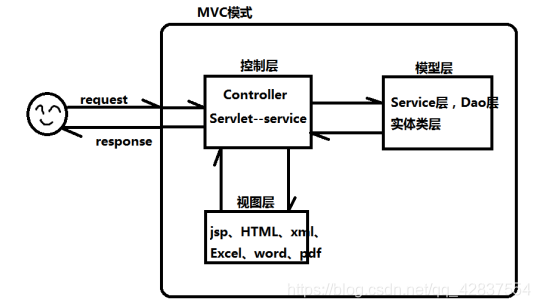
- 是spring的子模块,主要实现web操作的,基于mvc的思想
- MVC模式的执行流程
- springmvc的执行流程:https://blog.youkuaiyun.com/u014191220/article/details/81387596
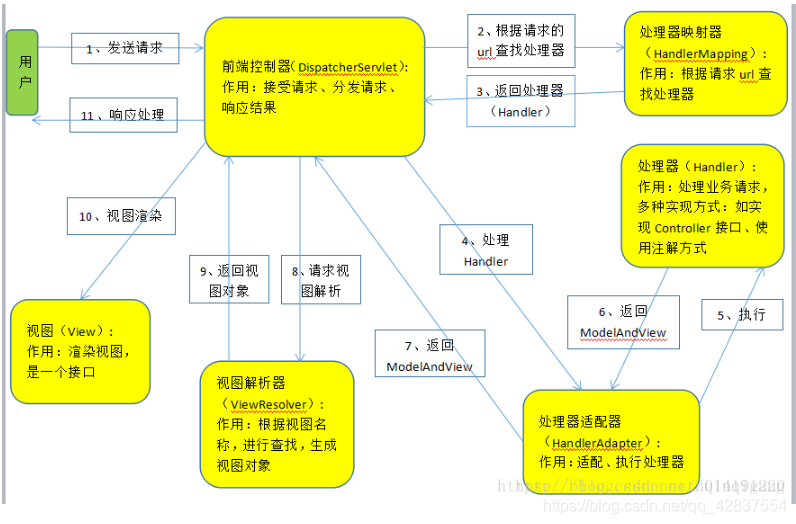
主要环节:前端控制器、处理器映射器、处理器适配器、后端控制器、视图解析器,
需要实现的:前端控制器、映射器、适配器、解析器---配置后端控制器(处理器)的实现---操作
入门案例
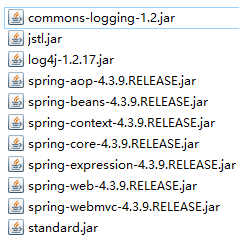
- jar包,配置文件
- 发出请求---index.jsp页面
 WEB-INF文件夹的作用
摘自:https://www.cnblogs.com/chen-lhx/p/4464525.html
WEB-INF简介
TomCat 服务器下的WEB-INF文件夹是一个非常安全的文件,在页面中不能直接访问其中的文件,必须通过web.xml文件对要访问的文件进行相应映射才能访问。
WEB-INF文件夹下除了web.xml外,还存一个classes文件夹,用以放置 *.class文件,这些 *.class文件是网站设计人员编写的类库,实现了jsp页面前台美工与后台服务的分离,使得网站的维护非常方便。web.xml文件为网站部署描述XML文件,对网站的部署非常重要。
WEB-INF是用来存储服务端配置文件信息和在服务端运行的类文件的,它下面的东西不允许客户端直接访问的。
WEB-INF的存在以及其下的lib和classes目录的作用都是大师门规定的。
WEB-INF不允许客户端访问是用来放置配置文件的..类文件放在WEB-INF下的LIB或CLASSES文件夹下...WEB-INF是一个站点的配置文件目录...一个WEB应用程序的标志就是有这个目录...
一般如果你要提供模板下载等功能时,将你的模板放在WEB-INF下面,这样可以防止被人直接访问到模板
- 前端控制器
创建完web工程之后一定要先导入服务器,因为我们需要的两个jar包
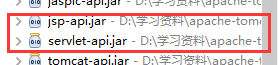 在里面,不然jsp页面编辑的时候会报错,因为没有导包
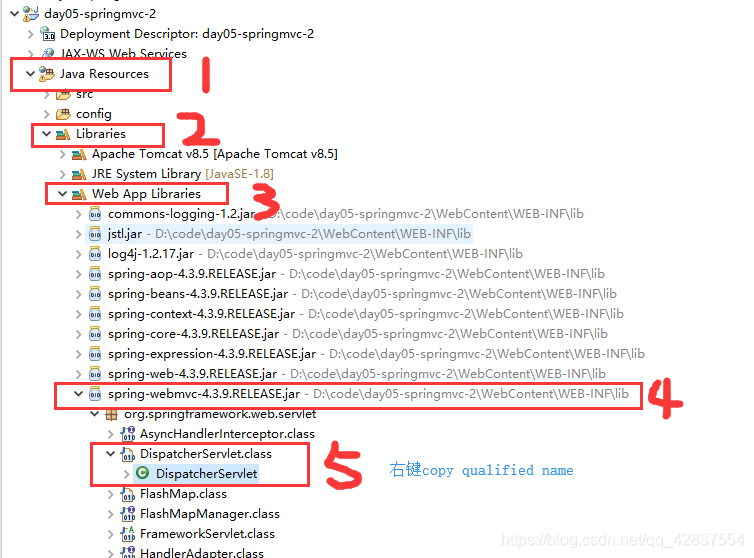
设置和我们上一阶段设置servlet相同,但是mvc中通配不能使用 /*,只能使用 /
这里的<servlet-class>我们可以这样找到,<servlet-name>我们取其中的一段且首字母小写
-
映射器

class地址为:
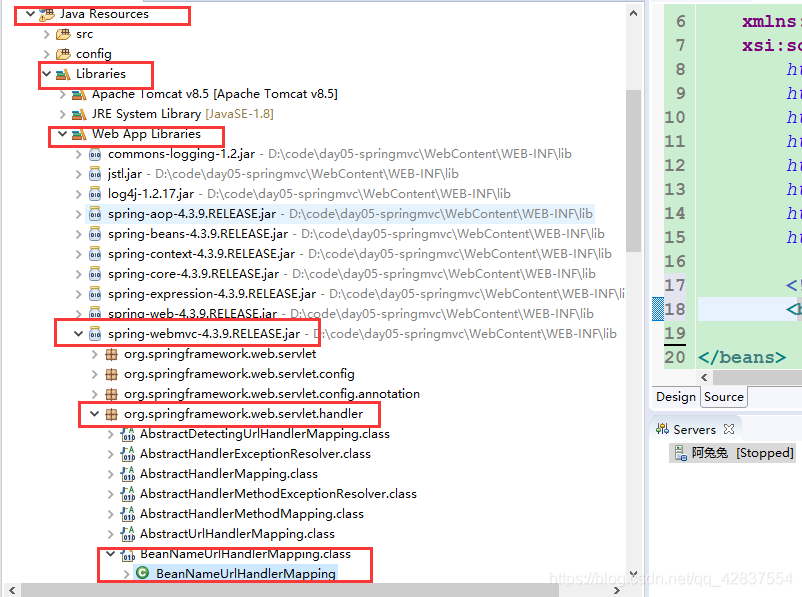
-
适配器

class地址为:
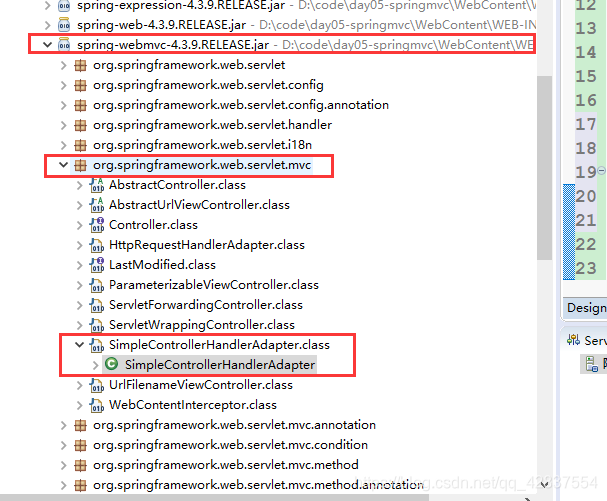
-
后端控制器---自定义
- 创建对应的jsp页面

- 后端控制器对象

- 视图解析器对象

流程:index.jsp首页操作-->通过web.xml创建一个前端控制器-->创建前端控制器的时候加载配置文件(init-param)-->前端服务器作为总指挥找到处理器映射器-->处理器映射器帮忙找到适配器-->适配器帮忙找到对应的处理器(我们自己编写的)-->处理器帮忙找到对应的视图解析器-->返回视图
代码:
index.jsp
<%@ page language="java" contentType="text/html; charset=UTF-8"
    pageEncoding="UTF-8"%>
<!DOCTYPE html>
<html>
<head>
<meta charset="UTF-8">
<title>Insert title here</title>
</head>
<body>
	<!-- 完整路径是:http://localhost:8080/day05-springmvc/first.action -->
	<a href="first.action">第一个案例</a>
</body>
</html>
web.xml
<?xml version="1.0" encoding="UTF-8"?>
<web-app xmlns:xsi="http://www.w3.org/2001/XMLSchema-instance" xmlns="http://java.sun.com/xml/ns/javaee" xsi:schemaLocation="http://java.sun.com/xml/ns/javaee http://java.sun.com/xml/ns/javaee/web-app_3_0.xsd" id="WebApp_ID" version="3.0">
<display-name>day05-springmvc</display-name>
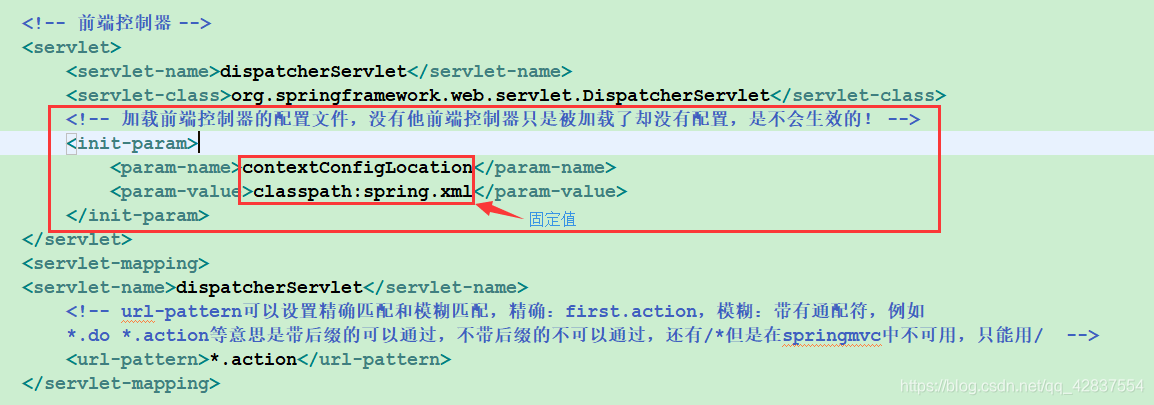
<!-- 前端控制器 -->
<servlet>
<servlet-name>dispatcherServlet</servlet-name>
<servlet-class>org.springframework.web.servlet.DispatcherServlet</servlet-class>
<!-- 加载前端控制器的配置文件,没有他前端控制器只是被加载了却没有配置,是不会生效的! -->
<init-param>
<param-name>contextConfigLocation</param-name>
<param-value>classpath:spring.xml</param-value>
</init-param>
</servlet>
<servlet-mapping>
<servlet-name>dispatcherServlet</servlet-name>
<!-- url-pattern可以设置精确匹配和模糊匹配,精确:first.action,模糊:带有通配符,例如
*.do *.action等意思是带后缀的可以通过,不带后缀的不可以通过,还有/*但是在springmvc中不可用,只能用/ -->
<url-pattern>*.action</url-pattern>
</servlet-mapping>
<welcome-file-list>
<welcome-file>index.html</welcome-file>
<welcome-file>index.htm</welcome-file>
<welcome-file>index.jsp</welcome-file>
<welcome-file>default.html</welcome-file>
<welcome-file>default.htm</welcome-file>
<welcome-file>default.jsp</welcome-file>
</welcome-file-list>
</web-app>spring.xml前端控制器配置文件
<?xml version="1.0" encoding="UTF-8"?>
<beans xmlns="http://www.springframework.org/schema/beans"
	xmlns:context="http://www.springframework.org/schema/context"
	xmlns:aop="http://www.springframework.org/schema/aop"
	xmlns:tx="http://www.springframework.org/schema/tx"
    xmlns:xsi="http://www.w3.org/2001/XMLSchema-instance"
    xsi:schemaLocation="
        http://www.springframework.org/schema/beans
        http://www.springframework.org/schema/beans/spring-beans.xsd
        http://www.springframework.org/schema/context
        http://www.springframework.org/schema/context/spring-context.xsd
        http://www.springframework.org/schema/aop
        http://www.springframework.org/schema/aop/spring-aop.xsd
        http://www.springframework.org/schema/tx
        http://www.springframework.org/schema/tx/spring-tx.xsd">

		<!-- 映射器 -->
		<bean class="org.springframework.web.servlet.handler.BeanNameUrlHandlerMapping"></bean>
		<!-- 适配器 -->
		<bean class="org.springframework.web.servlet.mvc.SimpleControllerHandlerAdapter"></bean>
		<!-- 后端控制器对象 -->
		<!-- 请求的路径由某个controller来处理,此处是由映射器来查找 -->
		<bean id="/first.action" class="com.offcn.controller.StudentController"></bean>
		<!-- 视图解析器 -->
		<bean class="org.springframework.web.servlet.view.InternalResourceViewResolver"></bean>
</beans>
返回的视图页面
<%@ page language="java" contentType="text/html; charset=UTF-8"
    pageEncoding="UTF-8"%>
<%@ taglib uri="http://java.sun.com/jsp/jstl/core" prefix="c" %>
<!DOCTYPE html>
<html>
<head>
<meta charset="UTF-8">
<title>main</title>
</head>
<body>
	<c:forEach items="${ps }" var="person">
		${person.pid }~${person.pname }~${person.money }
	</c:forEach>
</body>
</html>
实体类
package com.offcn.bean;

import java.io.Serializable;

public class Person implements Serializable{

	private static final long serialVersionUID = -5899876299633766855L;

	private Integer pid;
	private String pname;
	private Double money;
	public Integer getPid() {
		return pid;
	}
	public void setPid(Integer pid) {
		this.pid = pid;
	}
	public String getPname() {
		return pname;
	}
	public void setPname(String pname) {
		this.pname = pname;
	}
	public Double getMoney() {
		return money;
	}
	public void setMoney(Double money) {
		this.money = money;
	}

}
处理器处理并返回视图页面
package com.offcn.controller;
import java.util.ArrayList;
import java.util.List;
import javax.servlet.http.HttpServletRequest;
import javax.servlet.http.HttpServletResponse;
import org.springframework.web.servlet.ModelAndView;
import org.springframework.web.servlet.mvc.Controller;
import com.offcn.bean.Person;
public class StudentController implements Controller {
@Override
public ModelAndView handleRequest(HttpServletRequest arg0, HttpServletResponse arg1) throws Exception {
//调用业务层-->业务层调dao层
List<Person> ps = new ArrayList<Person>();
Person p1 = new Person();
p1.setPid(1001);
p1.setPname("张飞");
p1.setMoney(30000.0);
Person p2 = new Person();
p2.setPid(1002);
p2.setPname("刘备");
p2.setMoney(60000.0);
Person p3 = new Person();
p3.setPid(1003);
p3.setPname("关羽");
p3.setMoney(90000.0);
ps.add(p1);
ps.add(p2);
ps.add(p3);
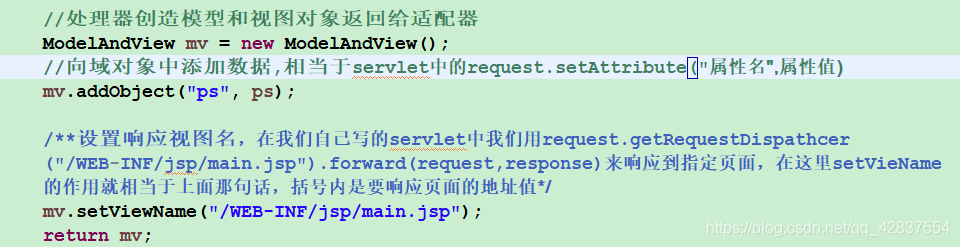
//处理器创造模型和视图对象返回给适配器
ModelAndView mv = new ModelAndView();
//向域对象中添加数据,相当于servlet中的request.setAttribute("属性名",属性值)
mv.addObject("ps", ps);
/**设置响应视图名,在我们自己写的servlet中我们用request.getRequestDispathcer
("/WEB-INF/jsp/main.jsp").forward(request,response)来响应到指定页面,在这里setVieName
的作用就相当于上面那句话,括号内是要响应页面的地址值*/
mv.setViewName("/WEB-INF/jsp/main.jsp");
return mv;
}
}


 被折叠的 条评论
为什么被折叠?
被折叠的 条评论
为什么被折叠?
 到【灌水乐园】发言


