


 本文详细介绍如何在Linux环境下安装配置SonarQube,并集成PostgreSQL数据库,包括用户管理、环境变量设定、SonarQube及数据库安装步骤等。
前提条件
- 带有您首选发行版的新安装的 Linux 服务器。
一、添加新用户sonar
1.添加一个新的用户帐户
使用命令创建一个新的用户帐户sonar。
# adduser sonar 使用 为新用户设置强密码passwd。
# passwd sonar
Changing password for user sonar.
New password:
Retype new password:
passwd: all authentication tokens updated successfully.
2.将用户添加到轮组
使用 将新用户添加到轮组usermod。
# usermod -aG wheel sonar3. 编辑 Sudoers 文件
使用 . 检查 sudoers 文件visudo。
# visudo寻找轮组。如果该行被禁用,请删除注释。当您准备好保存文件时,它应该看起来像这样。
## Allows people in group wheel to run all commands
%wheel  ALL=(ALL)       ALL
保存并退出 vi。键入ESC,然后:WQ,然后ENTER。
二、安装sonarqube
前置条件:
环境设置:
sudo sysctl -w vm.max_map_count=524288
sudo sysctl -w fs.file-max=131072
sudo ulimit -n 131072
sudo ulimit -u 8192
1.以sonar的用户身份,登录CentOS
$ su sonar2、安装openJDK11(必须安装这个版本)
$ sudo yum install java-11-openjdk
3、下载并配置 SonarQube
下方链接为模板,建议去官网获取最新链接:sonarqube官网:Download | SonarQube
$ sudo wget https://binaries.sonarsource.com/Distribution/sonarqube/sonarqube-9.2.4.50792.zip4、使用以下命令解压缩存档。
$ sudo unzip sonarqube-9.2.4.50792.zip -d /opt5、重命名目录:
$ sudo mv /opt/sonarqube-9.2.4.50792 /opt/sonarqube6、更改权限
更新权限:$ chown -R sonar:sonar /opt/sonarqube
修改/opt/sonarqube/bin/linux-x86-64/sonar.sh,找到#RUN_AS=,改为RUN_AS=sonar”。
7、启动sonaqube,查看是否OK。
$ sudo cd /opt/sonarqube/bin/linux-x86-64
$ sudo ./sonar.sh console
出现以下日志,表示OK

三、安装postgreSQL(sonarqube7以上不支持mysql)
1、安装postgreSQL
# 安装存储库 RPM:
sudo yum install -y https://download.postgresql.org/pub/repos/yum/reporpms/EL-7-x86_64/pgdg-redhat-repo-latest.noarch.rpm

#
yum -qy module disable postgresql

# 安装 PostgreSQL:
sudo yum install -y postgresql14-server

# 可选择初始化数据库并启用自动启动:
sudo /usr/pgsql-14/bin/postgresql-14-setup initdb
sudo systemctl 启用 postgresql-14
sudo systemctl 启动 postgresql-14</span></span>

# 初始化数据库并启用自动启动:
sudo /usr/pgsql-14/bin/postgresql-14-setup initdb
sudo systemctl enable postgresql-14
sudo systemctl start postgresql-14

#编辑/var/lib/pgsql/14/data/pg_hba.conf以启用基于 MD5 的身份验证。

sudo vim/var/lib/pgsql/14/data/pg_hba.conf
#找到以下行并更改peer为trust和。idnetmd5

# TYPE  DATABASE        USER            ADDRESS                 METHOD

# "local" is for Unix domain socket connections only
local   all             all                                     peer
# IPv4 local connections:
host    all             all             127.0.0.1/32            ident
# IPv6 local connections:
host    all             all             ::1/128                 ident

# 更新后,配置应如下所示。

# TYPE  DATABASE        USER            ADDRESS                 METHOD

# "local" is for Unix domain socket connections only
local   all             all                                     trust
# IPv4 local connections:
host    all             all             127.0.0.1/32            md5
# IPv6 local connections:
host    all             all             ::1/128                 md5


# 更改默认 PostgreSQL 用户的密码。
sudo passwd postgres

# 切换到postgres用户。
su - postgres

# 通过键入以下内容创建新用户:
createuser sonar

# 切换到 PostgreSQL
psql

# 为新创建的 SonarQube 数据库用户设置密码。
ALTER USER sonar WITH ENCRYPTED password 'StrongPassword'

# 通过运行以下命令为 PostgreSQL 数据库创建一个新数据库:
CREATE DATABASE sonar OWNER sonar;

# 退出psql
\q

# 通过运行命令切换回 sudo 用户
exit。
安装过程中,若出现如下图所示错误:
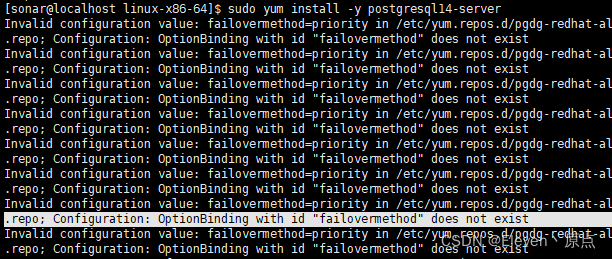
请按照以下方法矫正
1、修改文件 #sudo vim /etc/yum.repos.d/pgdg-redhat-all.repo,将failovermethod全部注释
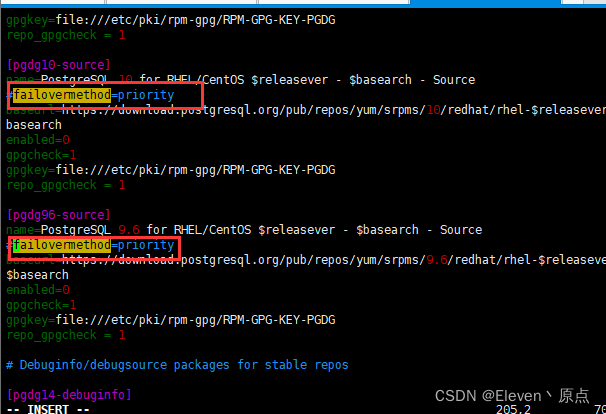
2、重新执行安装postgreSQL的步骤
四、编辑 SonarQube与postgresql的关联。
sudo vim /opt/sonarqube/conf/sonar.properties找到以下几行。
#sonar.jdbc.username=
#sonar.jdbc.password=
取消注释并提供我们之前创建的数据库的 PostgreSQL 用户名和密码。
sonar.jdbc.username=sonar
sonar.jdbc.password=StrongPassword
sonar.jdbc.url=jdbc:postgresql://localhost/sonar
取消注释行,保存文件并退出编辑器。
然后重启sonarqube,如果一切OK,就表示sonarqube+postgresql安装OK了
未完待续。。。。。。
五、安装配置Sonar-scannar、Cppcheck、各个插件安装
Cxx插件下载:https://github.com/SonarOpenCommunity/sonar-cxx


 被折叠的 条评论
为什么被折叠?
被折叠的 条评论
为什么被折叠?
 到【灌水乐园】发言


