


 本文介绍如何在Eclipse中通过Maven搭建Spring和Hibernate的联合开发环境。首先确保正确安装并配置Spring和Maven,接着基于之前Spring项目的基础上引入Hibernate,详细讲解项目目录结构和必要的配置文件如beans.xml、hibernate.cfg.xml。同时,提到了关键的代码文件如User.java、HibernateUtil.java等,并强调了正确导入和配置Hibernate及MySQL的依赖包。在完成所有设置后,调整数据库连接,运行HelloProgram.java进行测试。适合初学者跟随步骤实践,遇到问题耐心检查配置,多尝试即可解决。
先按照步骤创建一个这个项目,如果你选的没有我的选项你进去百度一下怎么把spring和Maven安装到ecplise上,如果都有的话你就可以直接按照步骤做了是否建立正确看图标画了一个M 和S。只有建立正确的项目下面架包里面你才不会出错。


这里这个beans.xml是我自己加的 新建好的项目 要有除了 beans.xml 外的所有东西。


我这个案例是基于我上一篇文章 “第一个Spring项目"做出来的在那个基础之上把Hibernate添进去了;
话不多说先上项目目录

这个是项目目录
这里我在说一下我的开发工具是 Ecplise 数据库是mysql Ecplise的东西放到MyEcplise里面也是能用的。
然后就没啥好说的了 开始贴代码吧
为了方便看,我把那个类名字写大点这个顺序也是从上往下贴的
SpringHelloWorld.java
package com.impl;

import org.hibernate.Session;

import com.model.User;
import com.util.HibernateUtil;
import com.xynet.HelloWorld;

public class SpringHelloWorld implements HelloWorld {

	public void getHello() {
		this.get();
	}

	public void get() {
		Session session = HibernateUtil.getSession();
		User book = (User) session.get(User.class, 1);
		System.out.println(book);
	}

	@Override
	public void saveHello(String username, String password) {

	}
}
StrutsHelloWorld.java
package com.impl;

import org.hibernate.Session;
import org.hibernate.Transaction;
import com.model.User;
import com.util.HibernateUtil;
import com.xynet.HelloWorld;

public class StrutsHelloWorld implements HelloWorld {

	public void sayHello() {
		System.out.println("Struts测试成功!!");
	}

	@Override
	public void getHello() {
		get();

	}

	@Override
	public void saveHello(String username, String password) {
		save(username, password);
	}

	public void save(String username, String password) {
		Session session = HibernateUtil.getSession();
		User book = new User(username, password);
		Transaction tx = session.beginTransaction();
		session.save(book);
		tx.commit();// 提交事物
		HibernateUtil.CloseSession();
		System.out.println("添加成功!");
	}

	public void get() {
		Session session = HibernateUtil.getSession();
		User book = (User) session.get(User.class, 1);
		System.out.println(book);
	}

}
User.java
package com.model;

public class User {

	private int id;
	private String UserName;
	private String password;

	public User() {
		super();

	}

	public User(String userName, String password) {
		this.UserName = userName;
		this.password = password;
	}

	public String getUserName() {
		return UserName;
	}

	public void setUserName(String userName) {
		UserName = userName;
	}

	public String getPassword() {
		return password;
	}

	public void setPassword(String password) {
		this.password = password;
	}

	public int getId() {
		return id;
	}

	public void setId(int id) {
		this.id = id;
	}

	@Override
	public String toString() {
		return "User [id=" + id + ", UserName=" + UserName + ", password=" + password + "]";
	}

}
User.hbm.xml
<?xml version="1.0"?>
<!DOCTYPE hibernate-mapping PUBLIC
        "-//Hibernate/Hibernate Mapping DTD 3.0//EN"
        "http://www.hibernate.org/dtd/hibernate-mapping-3.0.dtd">

<hibernate-mapping package="com.model">

	<class name="User" table="Usertools">
		<id name="id" column="id">
			<generator class="native"></generator>
		</id>
		<property name="userName" column="userName" length="40"></property>
		<property name="password" column="password" length="40"></property>
	</class>

</hibernate-mapping>
HelloProgram.java
package com.spring;

import org.springframework.context.ApplicationContext;
import org.springframework.context.support.ClassPathXmlApplicationContext;

import com.xynet.HelloWorld;
import com.xynet.HelloWorldService;

public class HelloProgram {

	public static void main(String[] args) {

		ApplicationContext context = new ClassPathXmlApplicationContext("beans.xml");

		HelloWorldService service2 = (HelloWorldService) context.getBean("helloWorldService2");
		HelloWorld hw2 = service2.getHelloWorld();
		hw2.saveHello("zhangsan", "123");


		HelloWorldService service = (HelloWorldService) context.getBean("helloWorldService");
		HelloWorld hw = service.getHelloWorld();
		hw.getHello();
	}
}
HibernateUtil.java
package com.util;

import org.hibernate.Session;
import org.hibernate.SessionFactory;
import org.hibernate.cfg.Configuration;

public class HibernateUtil {
	private static Configuration cf = new Configuration().configure();
	private static SessionFactory sf = cf.buildSessionFactory();

	public static Session getSession() {
		return sf.openSession();
	}

	public static void CloseSession() {
		getSession().close();
	}

}
HelloWorld.java
package com.xynet;

public interface HelloWorld {

	public void getHello();

	public void saveHello(String username, String password);
}
HelloWorldService.java
package com.xynet;

public class HelloWorldService {

	private HelloWorld helloWorld;

	public HelloWorldService() {

	}

	public void setHelloWorld(HelloWorld helloWorld) {
		this.helloWorld = helloWorld;

	}

	public HelloWorld getHelloWorld() {
		return this.helloWorld;
	}
}
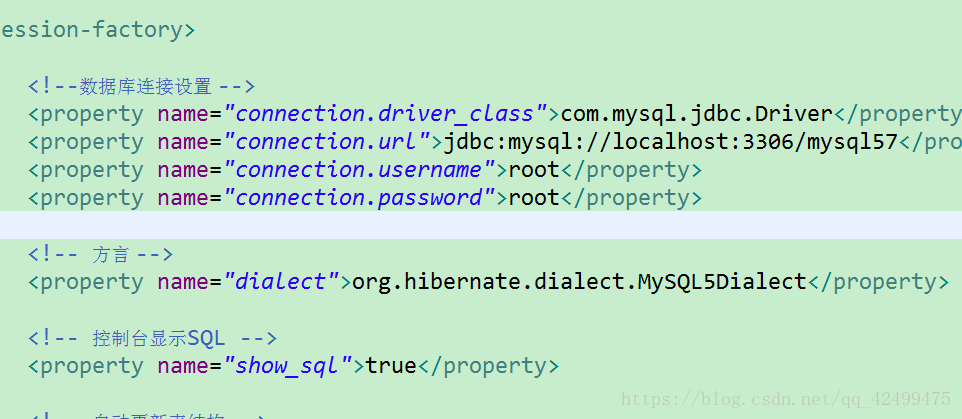
hibernate.cfg.xml
<?xml version='1.0' encoding='utf-8'?>
<!DOCTYPE hibernate-configuration PUBLIC
        "-//Hibernate/Hibernate Configuration DTD 3.0//EN"
        "http://www.hibernate.org/dtd/hibernate-configuration-3.0.dtd">

<hibernate-configuration>

	<session-factory>

		<!--数据库连接设置 -->
		<property name="connection.driver_class">com.mysql.jdbc.Driver</property>
		<property name="connection.url">jdbc:mysql://localhost:3306/mysql57</property>
		<property name="connection.username">root</property>
		<property name="connection.password">root</property>

		<!-- 方言 -->
		<property name="dialect">org.hibernate.dialect.MySQL5Dialect</property>

		<!-- 控制台显示SQL -->
		<property name="show_sql">true</property>

		<!-- 自动更新表结构 -->
		<property name="hbm2ddl.auto">update</property>

		<mapping resource="com/model/User.hbm.xml" />


	</session-factory>

</hibernate-configuration>
beans.xml
<?xml version="1.0" encoding="UTF-8"?>

<beans xmlns="http://www.springframework.org/schema/beans"
    xmlns:xsi="http://www.w3.org/2001/XMLSchema-instance"
    xsi:schemaLocation="http://www.springframework.org/schema/beans
    http://www.springframework.org/schema/beans/spring-beans-3.0.xsd">

    <bean id="springHelloWorld"
        class="com.impl.SpringHelloWorld"></bean>


    <bean id="strutsHelloWorld"
        class="com.impl.StrutsHelloWorld"></bean>


    <bean id="helloWorldService"
        class="com.xynet.HelloWorldService">
        <property name="helloWorld" ref="springHelloWorld"/>
    </bean>


     <bean id="helloWorldService2"
        class="com.xynet.HelloWorldService">
        <property name="helloWorld" ref="strutsHelloWorld"/>
    </bean>

</beans>
代码贴完了离完成还早着呢。
架包当然是必不可少的了
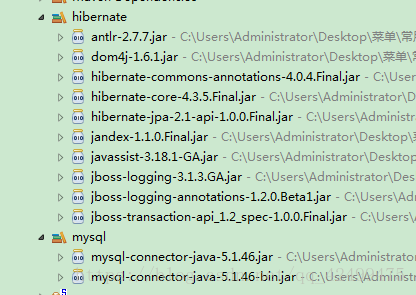
这俩个架包一个是mysql的大家应该都有,然后hibernate架包一般学这俩组合的话都应该以前也学过hibernate什么的那个架包就可以用,如果实在什么都没有的话,1、去hibernate官网随便下一个架包全部导进去就完成了2、等我把这些上传到网盘。
这里架包搞好了之后,然后就是修改hibernate.cfg.xml里面的数据库链接了
这些都仔细检查检查,确定无误后在运行 HelloProgram.java
测试成功的截图
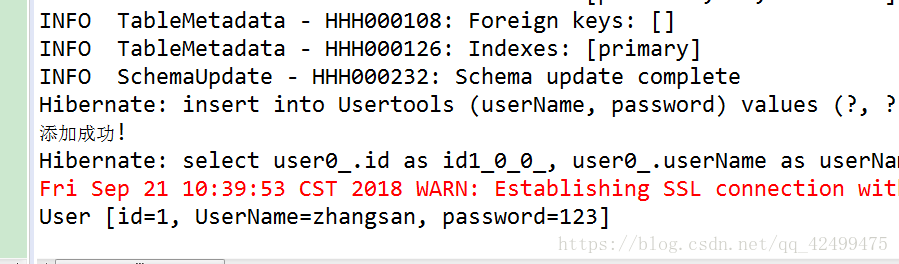
懂一点点基础的话很容易就完成了因为你只是不会步骤里面没有什么逻辑可言,所有就算报错了也是步骤报错了。你多试几次总会成功的,不要着急。我这个也是试了一天搞出来的。然后就贴上来分享给大家。还有互粉互相学习。我后续会把struts2也加进来。然后在发一篇文章!!


 1189
1189

 被折叠的 条评论
为什么被折叠?
被折叠的 条评论
为什么被折叠?
 到【灌水乐园】发言


