


 本文介绍SpringBoot提供的应用监控和管理功能,包括通过HTTP、JMX、SSH协议操作,自动获取审计、健康及指标信息。详细讲解了actuator、autoconfig等端点的使用,以及如何定制和自定义端点。
Spring Boot提供了运行时的应用监控和管理的功能。我们可以通过http、JMX、SSH协议来进行操作。审计、健康及指标信息将会自动得到。
Spring Boot提供了监控和管理端点,如表
| 端点名 | 描述 |
|---|---|
| actuator | 所有EndPoint的列表,需加入spring HATEOAS支持 |
| autoconfig | 当前应用的所有自动配置 |
| beans | 当前应用中所有Bean的信息 |
| configprops | 当前应用中所有的配置属性 |
| dump | 显示当前应用线程状态信息 |
| env | 显示当前应用当前环境信息 |
| health | 显示当前应用健康状况 |
| info | 显示当前应用信息 |
| metrics | 显示当前应用的各项指标信息 |
| mappings | 显示所有的@RequestMapping映射的路径 |
| shutdown | 关闭当前应用(默认关闭) |
| trace | 显示追踪信息(默认最新的http请求) |
我们可以通过http实现对应用的监控和管理,我们只需在pom.xml中增加下面依赖即可:
<dependency>
	<groupId>org.springframework.boot</groupId>
	<artifactId>spring-boot-starter-actuator</artifactId>
</dependency>
既然通过http监控和管理,那我们的项目中必然需要Web的依赖。本节需新建Spring Boot项目,依赖选择为:Actuator、Web、HATEOAS。
11.1.1 新建Spring Boot项目
新建Spring Boot项目,依赖为Actuator(spring-boot-starter-actuator)、Web(spring-boot-starter-web)、HATEOAS(spring-hateoas)。
groupId:com.wisely
arctifactId:ch11_1
package:com.wisely.ch11_1
11.1.2 测试端点
项目建立好之后我们即可测试各个端点。
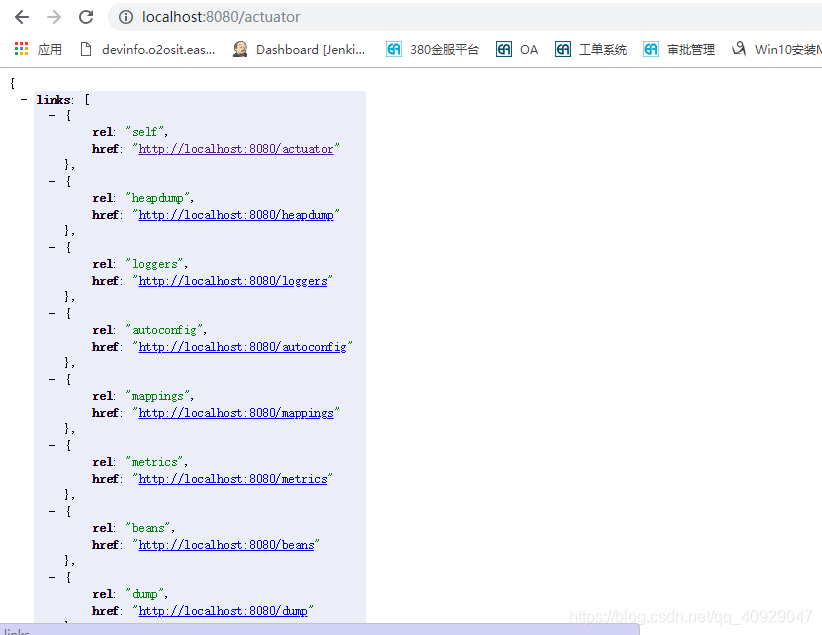
(1)actuator
访问http://localhost:8080/actuator
(2)autoconfig
访问http://localhost:8080/autoconfig,效果如图

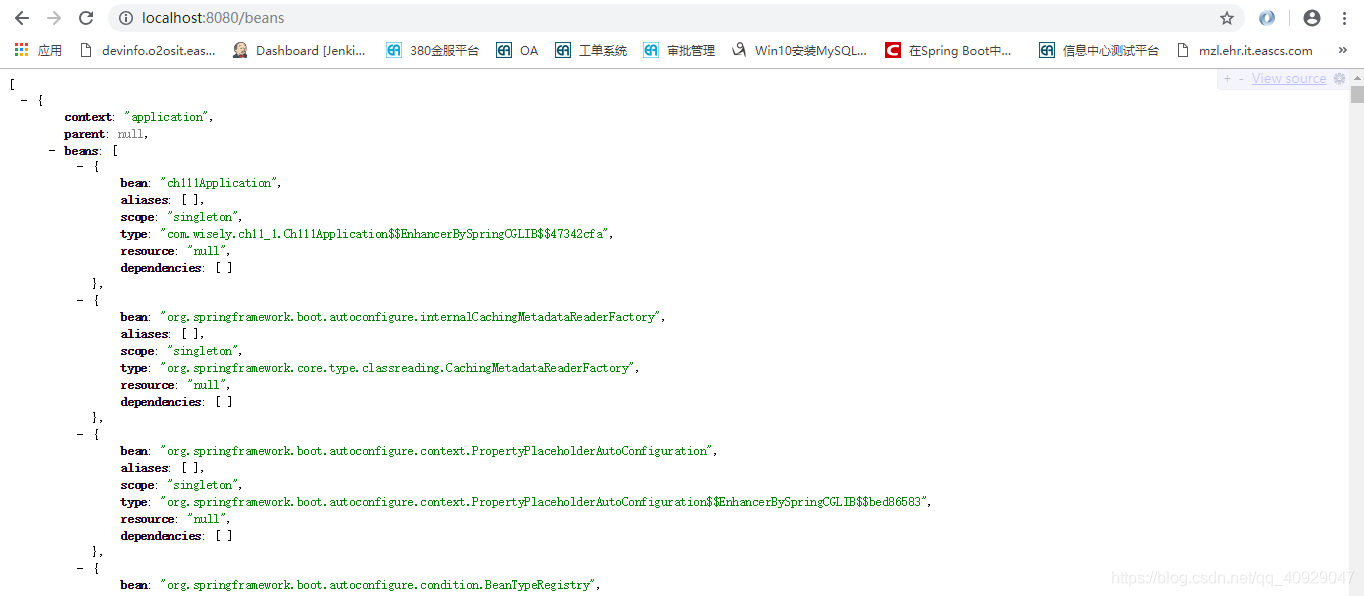
(3)beans
访问http://localhost:8080/beans,效果如图
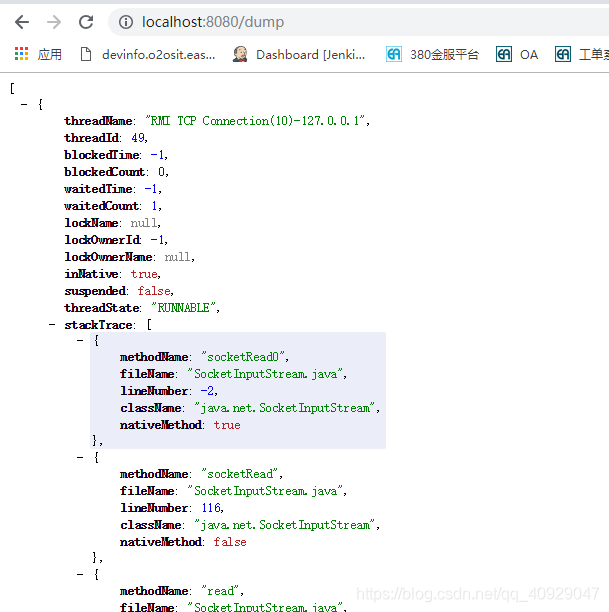
(4)dump
访问http://localhost:8080/dump,效果如图
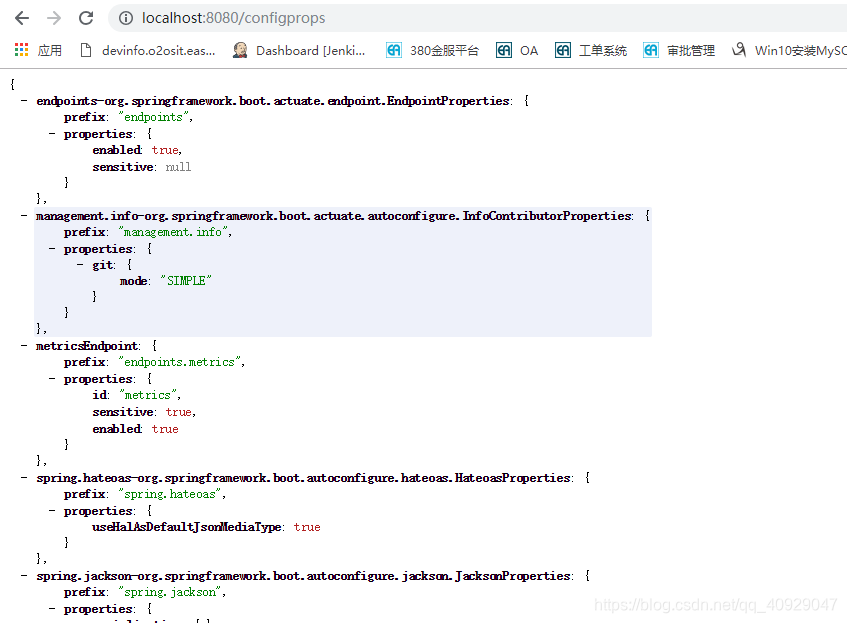
(5)configprops
(6)health
(7)info

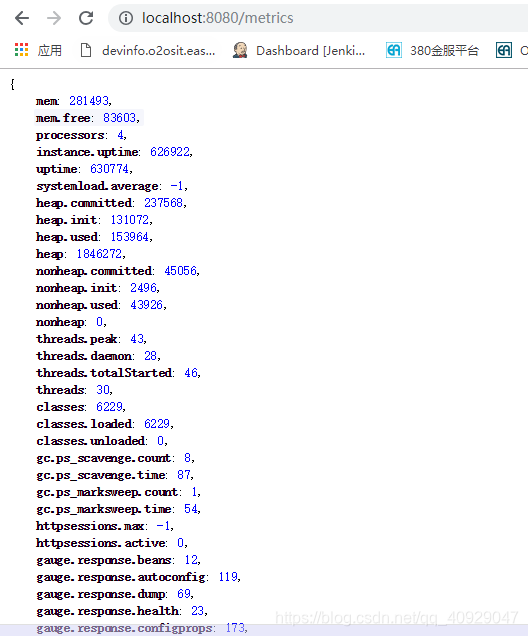
(8)metrics
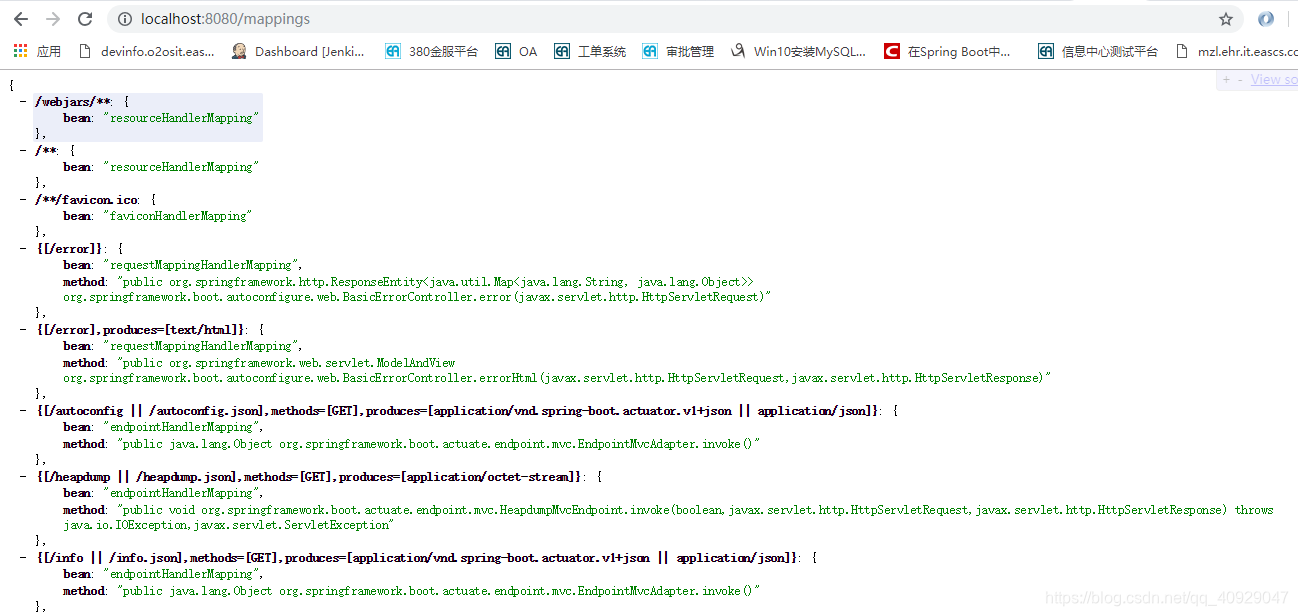
(9)mappings
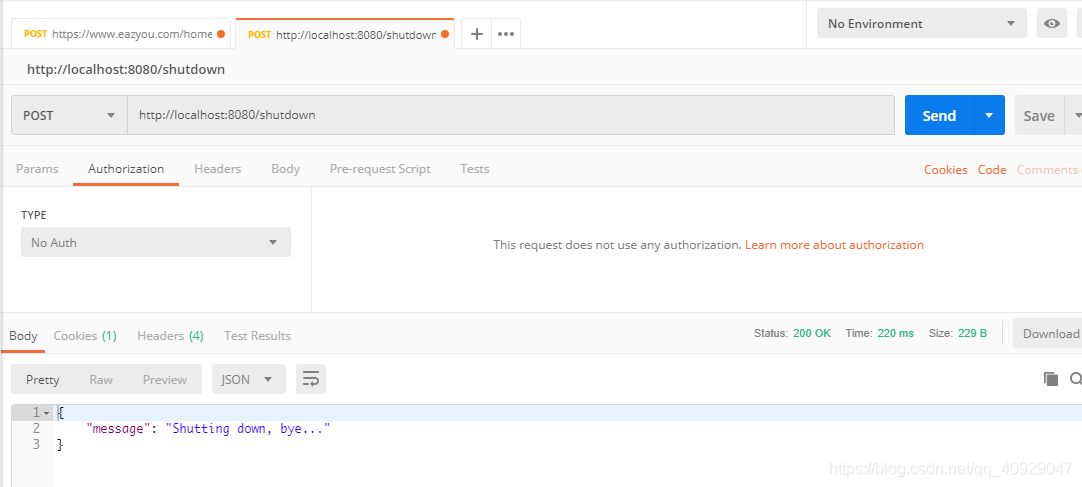
(10)shutdown
shutdown端点默认是关闭的,我们可以在application.properties中开启:
endpoints.shutdown.enabled=true
shutdown端点不支持GET提交,不可以直接在浏览器上访问地址,所以我们使用PostMan来测试。用POST方式访问http://localhost:8080/shutdown,效果如图
查看控制台

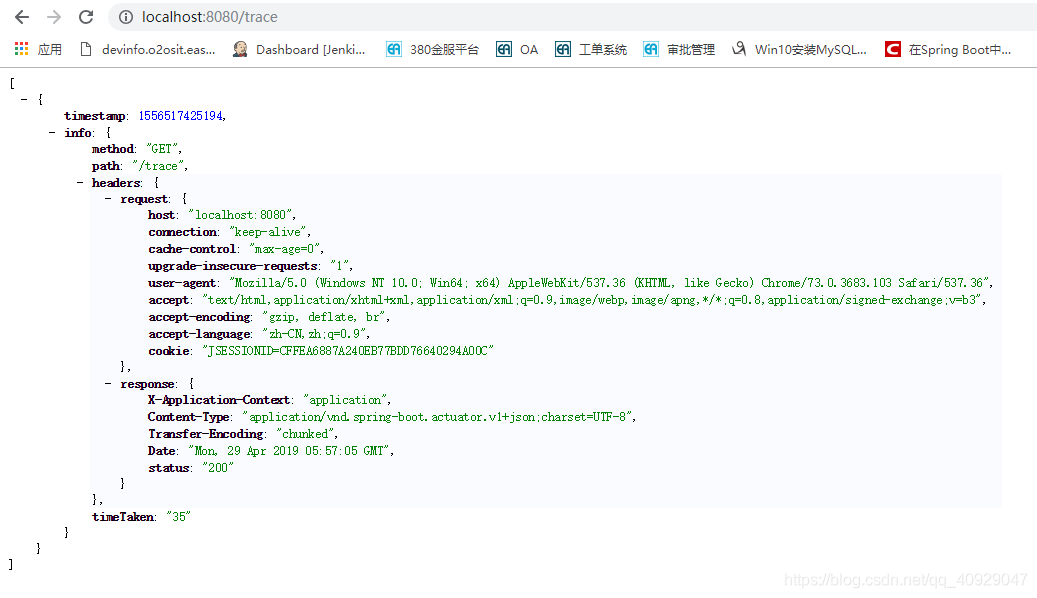
(11)trace
11.1.3 定制端点
定制端点一般通过endpoints+端点名+属性名来设置,每段之间用.隔开
(1)修改端点id
endpoints.beans.id=mybeans
此时我们访问的端点地址就变成了了:http://localhost:8080/mybeans。
(2)开启端点
例如我们开启shutdown端点:
endpoints.shutdown.enabled=true
(3)关闭端点
关闭beans端点:
endpoints.beans.enabled-=false
(4)只开启所需端点
若只开启所需端点的话,我们可以通过关闭所有的端点,然后再开启所需端点来实现,例如
endpoints.enabled=false
endpoints.beans.enabled=true
(5)定制端点访问路径
默认的端点访问路径是在根目录下的,如http://localhost:8080/beans。我们可以通过下面配置修改:
management.context-path=/manage
此时我们的访问地址就变成了:http://localhost:8080/manage/beans
(6)定制端点访问端口
当我们基于安全的考虑,不暴露端点的端口到外部时,就需要应用本身的业务端口和端点所用的端口使用不同的端口。我们可以通过如下配置改变端点访问的端口:
management.port=8081
(7)关闭http端点
关闭http端点可使用下面配置实现:
management.port=-1
11.1.4 自定义端点
当Spring Boot提供的端点不能满足我们的特殊的需求,而我们又需要对特殊的应用状态进行监控的时候,就需要自定义一个端点。
本例演示当应用改变了一个变量的状态时,我们可以通过端点监控变量的状态。
我们只需继承一个AbstracEndpoint的实现类,并将其注册为Bean即可。
1.状态服务
package com.wisely.ch11_1;

import org.springframework.stereotype.Service;

@Service
public class StatusService {

	private String status;

	public String getStatus() {
		return status;
	}

	public void setStatus(String status) {
		this.status = status;
	}


}
2.自定义端点
package com.wisely.ch11_1;

import org.springframework.beans.BeansException;
import org.springframework.boot.actuate.endpoint.AbstractEndpoint;
import org.springframework.boot.context.properties.ConfigurationProperties;
import org.springframework.context.ApplicationContext;
import org.springframework.context.ApplicationContextAware;
@ConfigurationProperties(prefix = "endpoints.status",ignoreUnknownFields = false) //通过@ConfigurationProperties的设置,我们可以在application.properties中通过endpoints.status配置我们的端点
public class StatusEndPoint extends AbstractEndpoint<String> implements ApplicationContextAware {//继承AbstractEndpoint类,AbstractEndpoint是Endpoint接口的抽象实现,当前类一定要重写invoke方法。实现ApplicationContextAware接口可以让当前类对Spring容器的资源有意识,即可访问容器的资源

	ApplicationContext context;

	public StatusEndPoint() {
		super("status");

	}

	@Override
	public String invoke() {  //通过重写invoke方法,返回我们要监控的内容
		StatusService statusService = context.getBean(StatusService.class);
		return "THe Current Status is:"+ statusService.getStatus();
	}

	@Override
	public void setApplicationContext(ApplicationContext applicationContext) throws BeansException {
		this.context=applicationContext;

	}

}
3.注册端点并定义演示控制器
package com.wisely.ch11_1;

import org.springframework.beans.factory.annotation.Autowired;
import org.springframework.boot.SpringApplication;
import org.springframework.boot.actuate.endpoint.Endpoint;
import org.springframework.boot.autoconfigure.SpringBootApplication;
import org.springframework.context.annotation.Bean;
import org.springframework.web.bind.annotation.RequestMapping;
import org.springframework.web.bind.annotation.RestController;

@SpringBootApplication
@RestController
public class Ch111Application {

	@Autowired
	StatusService statusService;

	public static void main(String[] args) {
		SpringApplication.run(Ch111Application.class, args);
	}

	@Bean //注册端点的Bean
	public Endpoint<String> status(){
		Endpoint<String>status = new StatusEndPoint();
		return status;
	}
	@RequestMapping("/change")//定义控制器方法来改变status
	public String changeStatus(String status) {
		statusService.setStatus(status);
		return "OK";
	}

}
4.运行
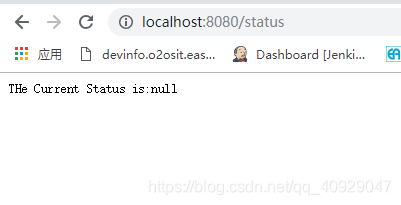
启动程序,访问http://localhost:8080/status,此时效果如图
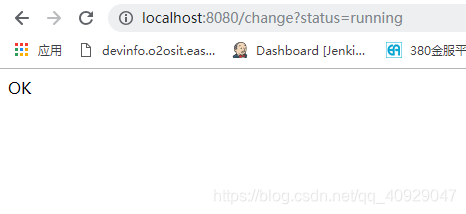
当我们通过控制器访问http://localhost:8080/change?status=running,改变status的值的时候如图
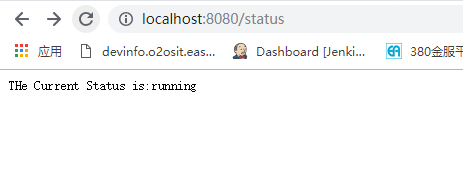
我们再通过访问http://localhost:8080/status查看status的状态时,结果如图
11.1.5 自定义HealthIndicator
Health信息都是从ApplicationContext中所有的HealthIndicator的Bean中收集的,Spring中内置了一些HealthIndicator,如表
| 名称 | 描述 |
|---|---|
| DiskSpacheHealthIndicator | 检测低磁盘空间 |
| DataSourceHealthIndicator | 检测DataSource连接是否能获得 |
| ElasticsearchHealthIndicator | 检测ElasticSearch集群是否运行 |
| JmsHealthIndicator | 检测JMS消息代理是否在运行 |
| MailHealthIndicator | 检测邮件服务器是否在运行 |
| MongoHealthIndicator | 检测MongoDB是否在运行 |
| RabbitHealthIndicator | 检测RabbitMQ是否在运行 |
| RedisHealthIndicator | 检测Redistribute是否在运行 |
| SolrHealthIndicator | 检测Solr是否在运行 |
在本节我们讲述了如何 制定自己的HealthIndicator,定制自己的HealthIndicator我们只需定一个实现HealthIndicator接口的类,并注册为Bean即可。接着上面的例子,我们依然通过上例的status值决定健康情况,只有当status的值为running时才为健康。
1.HealthIndicator实现类
package com.wisely.ch11_1;

import org.springframework.beans.factory.annotation.Autowired;
import org.springframework.boot.actuate.health.Health;
import org.springframework.boot.actuate.health.HealthIndicator;
import org.springframework.stereotype.Component;

@Component
public class StatusHealth implements HealthIndicator {  //实现HealthIndicator接口并重写health()方法。

	@Autowired
	StatusService statusService;

	@Override
	public Health health() {
		String status = statusService.getStatus();
		if(status == null || !status.equals("running")) {
			return Health.down().withDetail("Error", "Not Running").build(); //当status的值为非running时构造失败
		}
		return Health.up().build();  //其余情况运行成功
	}

}
2.运行
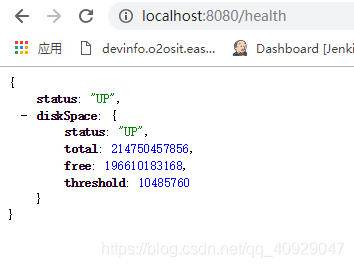
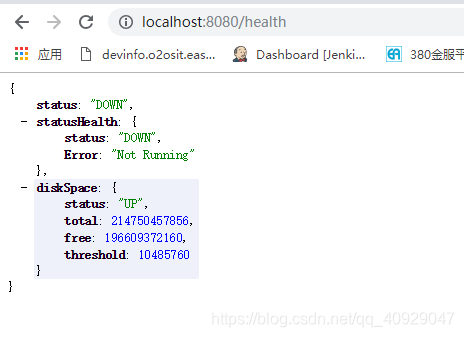
运行程序,访问http://localhost:8080/health,如图
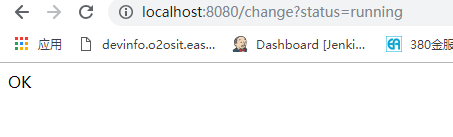
这时我们修改status的值为running,访问http://localhost:8080/change?status=running,如图
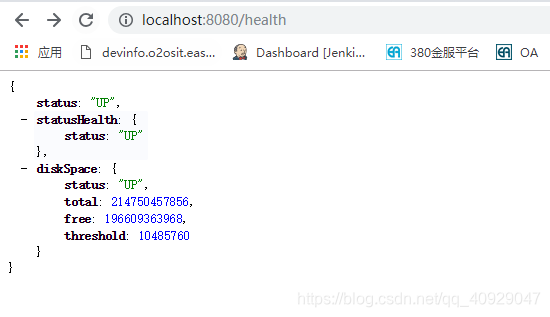
再次访问http://localhost:8080/health,显示如图


 527
527

 被折叠的 条评论
为什么被折叠?
被折叠的 条评论
为什么被折叠?
 到【灌水乐园】发言


