spring boot健康检测

此前系列文章介绍了Spring Boot应用功能开发与测试,实际开发还需对应用监控管理。程序员需了解应用运行指标,老板和业务人员希望通过图表查看。验证项目是否正常工作,添加依赖后访问特定地址,正常则会返回字符串。

摘要生成于 C知道 ,由 DeepSeek-R1 满血版支持, 前往体验 >


Spring Boot项目健康检测

在之前的系列文章中我们学习了如何进行Spring Boot应用的功能开发,以及如何写单元测试、集成测试等,然而,在实际的软件开发中需要做的不仅如此:还包括对应用程序的监控和管理。

正如飞行员不喜欢盲目飞行,程序员也需要实时看到自己的应用目前的运行情况。如果给定一个具体的时间,我们希望知道此时CPU的利用率、内存的利用率、数据库连接是否正常以及在给定时间段内有多少客户请求等指标;不仅如此,我们希望通过图表、控制面板来展示上述信息。最重要的是:老板和业务人员希望看到的是图表,这些比较直观易懂。

我们需要验证项目是否正常工作,只需要添加一个依赖就行了,

    <!--通过http://localhost:8080/health来查看 UP代表正常 用来测试程序是否安全 -->
    <dependency>
      <groupId>org.springframework.boot</groupId>
      <artifactId>spring-boot-starter-actuator</artifactId>
    </dependency>


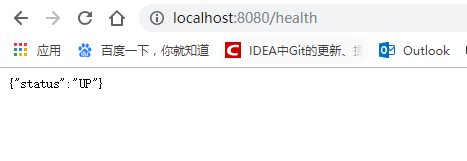
访问如下地址:http://localhost:8080/health ,若项目正常,则会返回如下字符串。

 
### 配置 Kubernetes 中 Spring Boot 健康检查的完整指南 在 Kubernetes 环境中,健康检查是确保应用程序稳定运行的关键机制。Spring Boot Actuator 提供了内置的端点来支持健康检查功能[^3],而 Kubernetes 则通过 `livenessProbe` 和 `readinessProbe` 来检测容器的状态。以下是配置 Spring Boot 应用程序在 Kubernetes 上进行健康检查的详细方法。 #### 1. 启用 Spring Boot Actuator 首先,在 Spring Boot 项目中引入 Actuator 依赖。可以通过在 `pom.xml` 或 `build.gradle` 文件中添加以下内容实现: ```xml <!-- Maven --> <dependency> <groupId>org.springframework.boot</groupId> <artifactId>spring-boot-starter-actuator</artifactId> </dependency> ``` ```gradle // Gradle implementation 'org.springframework.boot:spring-boot-starter-actuator' ``` 启用后,Actuator 将提供 `/actuator/health` 端点,用于返回应用程序的健康状态。 #### 2. 配置健康检查端点 默认情况下,Spring Boot Actuator 的健康检查端点只暴露基本的健康信息。如果需要更详细的健康状态,可以在 `application.yml` 或 `application.properties` 中进行如下配置: ```yaml # application.yml management: endpoints: web: exposure: include: health # 暴露健康检查端点 endpoint: health: show-details: always # 显示详细健康信息 ``` 此外,可以根据需求自定义健康检查逻辑。例如,添加对数据库连接、外部服务或其他资源的检查: ```java import org.springframework.boot.actuate.health.Health; import org.springframework.boot.actuate.health.HealthIndicator; import org.springframework.stereotype.Component; @Component public class CustomHealthIndicator implements HealthIndicator { @Override public Health health() { // 自定义健康检查逻辑 boolean status = checkDatabaseConnection(); // 示例:检查数据库连接 if (status) { return Health.up().withDetail("db-status", "OK").build(); } else { return Health.down().withDetail("db-status", "Error").build(); } } private boolean checkDatabaseConnection() { // 实现具体的检查逻辑 return true; // 示例返回值 } } ``` #### 3. 配置 Kubernetes 健康检查探针 在 Kubernetes 中,可以通过 `livenessProbe` 和 `readinessProbe` 来配置健康检查探针。以下是一个示例 YAML 文件,展示如何为 Spring Boot 应用配置探针: ```yaml apiVersion: apps/v1 kind: Deployment metadata: name: springboot-app spec: replicas: 2 selector: matchLabels: app: springboot template: metadata: labels: app: springboot spec: containers: - name: springboot-container image: your-docker-image ports: - containerPort: 8080 livenessProbe: # 活跃性探针 httpGet: path: /actuator/health port: 8080 initialDelaySeconds: 30 periodSeconds: 10 readinessProbe: # 就绪探针 httpGet: path: /actuator/health port: 8080 initialDelaySeconds: 10 periodSeconds: 5 ``` - **`livenessProbe`**:用于检测容器是否正常运行。如果失败,Kubernetes 将重启容器。 - **`readinessProbe`**:用于检测容器是否准备好接收流量。如果失败,Kubernetes 将从服务中移除该 Pod。 #### 4. 安全配置(可选) 为了防止敏感信息泄露,可以使用 Spring Security 对健康检查端点进行保护。例如,仅允许内部网络访问健康检查接口: ```yaml # application.yml server: servlet: context-path: /app management: endpoints: web: base-path: /management exposure: include: health endpoint: health: show-details: when_authorized server: port: 8081 # 使用独立端口 ``` 然后,在 Kubernetes 配置中指定正确的路径和端口: ```yaml livenessProbe: httpGet: path: /management/health port: 8081 ``` --- ### 注意事项 - 如果健康检查失败,可能是因为 Actuator 端点未正确暴露或网络问题。请检查日志以排查问题[^1]。 - 在生产环境中,建议限制对健康检查端点的访问范围,并结合安全策略防止未授权访问[^4]。 ---
评论
添加红包

请填写红包祝福语或标题

红包个数最小为10个

红包金额最低5元

当前余额3.43前往充值 >
需支付:10.00
成就一亿技术人!
领取后你会自动成为博主和红包主的粉丝 规则
hope_wisdom
发出的红包
实付
使用余额支付
点击重新获取
扫码支付
钱包余额 0

抵扣说明:

1.余额是钱包充值的虚拟货币,按照1:1的比例进行支付金额的抵扣。
2.余额无法直接购买下载,可以购买VIP、付费专栏及课程。

余额充值