


学习笔记@代码随想录day4:链表part01&&链表part02
链表定义补充
以下代码用于个人理解链表定义及调用过程。
#定义节点
class Node(object):
    def __init__(self,item):
        self.item=item
        self.next=None
#定义链表
class singlelikelist(object):
    def __init__(self):
        self._head= Node

if __name__=="__main__":
    #创建链表
    link_list=singlelikelist()
    node1=Node(1)
    node2 = Node(2)
    link_list._head=node1
    node1.next=node2
    # 访问链表
    print(link_list._head.item)  # 访问第一个结点数据
    print(link_list._head.next.item)  # 访问第二个结点数据
移除链表元素
from typing import Optional
class ListNode:
    def __init__(self, val=0, next=None):
        self.val = val
        self.next = next
class Solution:
    def removeElements(self, head: Optional[ListNode], val: int) -> Optional[ListNode]:
        '''方法一,无虚拟头节点'''
        #如果头节点值等于删除值
        # while head is not None and head.val == val:
        #     head = head.next
        # #如果非头节点值等于删除值
        # cul = head
        # while cul is not None and cul.next is not None:
        #     if cul.next.val == val:
        #         cul.next = cul.next.next
        #     else:
        #         cul = cul.next
        #return head
        '''方法二,有虚拟头节点'''
        dummy_head= ListNode(0,head)
        cul = dummy_head
        while cul is not None and cul.next is not None:
            if cul.next.val == val:
                cul.next = cul.next.next
            else:
                cul = cul.next
        return dummy_head.next
if __name__=="__main__":
    #head = ListNode(1, ListNode(2, ListNode(6, ListNode(3, ListNode(4, ListNode(5, ListNode(6)))))))
    head = ListNode(1, ListNode(2, ListNode(6, ListNode(3, ListNode(4, ListNode(5, ListNode(6)))))))
    val = 6
    s = Solution()
    # Call the removeElements method with the input linked list and value
    result = s.removeElements(head, val)
    current = result
    while current:
        print(current.val, end=" ")
        current = current.next
设计链表
使用虚拟头节点,避免特殊情况需要额外处理,比如头节点。
第n个节点前插入值时操作的也是第n个节点,而非前一个节点。
class ListNode:
    def __init__(self, val=0, next=None):
        self.val = val
        self.next = next

class MyLinkedList:

    def __init__(self):
        self.dummy_head=ListNode
        self.size =0

    def get(self, index: int) -> int:
        '''获取链表中下标为 index 的节点的值。如果下标无效,则返回 -1 '''
        #如果不合法,返回-1
        if index <0 or index >=self.size:
            return -1
        #使用虚拟头节点
        current=self.dummy_head.next
        for i in range(index):
            current=current.next
        return current.val

    def addAtHead(self, val: int) -> None:
        '''将一个值为 val 的节点插入到链表中第一个元素之前。'''
        #ListNode(val, self.dummy_head.next) 创建一个新的节点,值为 val,并将它的 next 指针指向给定 index 处的当前节点。
        self.dummy_head.next=ListNode(val,self.dummy_head.next)
        self.size+=1


    def addAtTail(self, val: int) -> None:
        '''将一个值为 val 的节点追加到链表中作为链表的最后一个元素'''

        current=self.dummy_head
        while current.next:
            current=current.next
        current.next=ListNode(val)
        self.size+=1

    def addAtIndex(self, index: int, val: int) -> None:
        '''将一个值为 val 的节点插入到链表中下标为 index 的节点之前。如果 index 等于链表的长度,那么该节点会被追加到链表的末尾。
        如果 index 比长度更大,该节点将 不会插入 到链表中。'''
        if index <0 or index>=self.size:
            return
        current=self.dummy_head
        for i in range(index):
            current=current.next
        current.next =ListNode(val,current.next)
        self.size+=1

    def deleteAtIndex(self, index: int) -> None:
        ''' 如果下标有效,则删除链表中下标为 index 的节点'''
        if index <0 or index> self.size:
            return
        current=self.dummy_head
        for i in range(index):
            current= current.next
        current.next=current.next.next
        self.size-=1
以上代码是照着随想录的代码自己敲了一遍,有时间再来独立敲一遍。
反转链表
双指针法,理解写在了注释里
class Solution:
    def reverseList(self, head: Optional[ListNode]) -> Optional[ListNode]:
        '''双指针法'''
        #初始化,最终结果是让cur指向pre,当cur指向None时终止,cur和pre指针同时向后移动
        cur = head
        pre = None
        #反转前先将下一个节点的值预先保存,不然经过反转,指针已经发生改变,无法找到下一个值
        while cur:
            #保存下一个节点
            temp=cur.next
            #令cur指向pre
            cur.next=pre
            #pre向后移动
            pre=cur
            #cur向后移动
            cur=temp
        return pre
递归法。初始调用时cur为头节点,pre为空,思想同双指针法。再次调用时cur指针和pre指针向后移动。
class Solution:
    def reverseList(self, head: Optional[ListNode]) -> Optional[ListNode]:
        return self.reverse(head,None)
    def reverse(self,cur:ListNode,pre:ListNode):
        if cur==None:
            return pre
        temp=cur.next
        cur.next=pre
        #cur指针和pre指针向后移动,cur指针为cur.next,pre指针为cur
        return self.reverse(temp,cur)
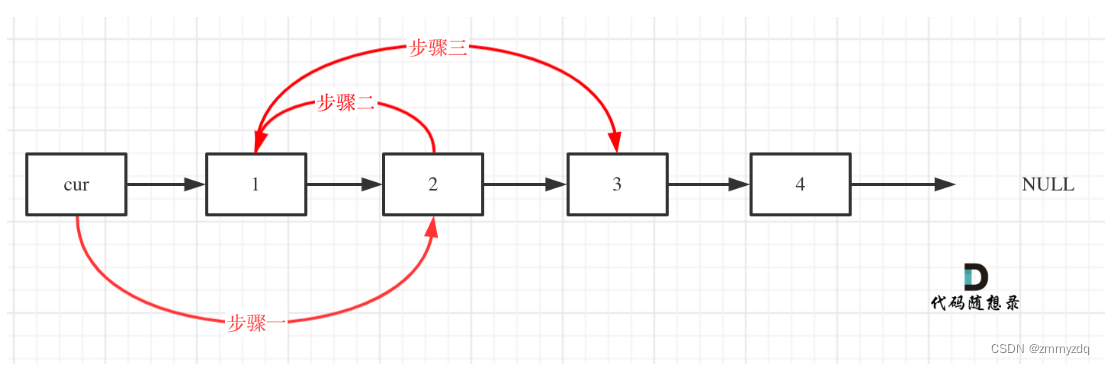
链表part02:两两交换链表中的节点
首先需要设置虚拟头节点保持操作一致。虚拟头节点为初始cur,终止条件为cur.next为空(节点数为偶数)或者cur.next.next为空(节点数为奇数)。
# Definition for singly-linked list.
# class ListNode:
#     def __init__(self, val=0, next=None):
#         self.val = val
#         self.next = next
class Solution:
    def swapPairs(self, head: Optional[ListNode]) -> Optional[ListNode]:
        # 定义虚拟头节点
        dummy_head = ListNode(next=head)
        cur = dummy_head
        while cur.next and cur.next.next:
            #假设为途中四个节点,虚拟头节点初始指向1
            #1.虚拟头节点指向2
            #2.2指向1
            #3.1指向3
            #虚拟头节点要改变指向的节点,所以预先要保存节点1
            temp=cur.next
            #同样节点2要改变指向的节点,因此要预先保存节点3
            temp1=cur.next.next.next
             #1.虚拟头节点指向2:开始指向1,现在指向1的下一个节点
            cur.next=cur.next.next
             #2.2指向1,原来指向2,现在指向1
            cur.next.next=temp
            #3.1指向3,操作完两个节点交换以后,cur指针移向下下个节点
            temp.next=temp1
            cur = cur.next.next
        return dummy_head.next
链表part02:删除链表的倒数第N个节点
# Definition for singly-linked list.
# class ListNode:
#     def __init__(self, val=0, next=None):
#         self.val = val
#         self.next = next
class Solution:
    def removeNthFromEnd(self, head: Optional[ListNode], n: int) -> Optional[ListNode]:
        #创建虚拟头节点
        dummy_head=ListNode(next=head)
        #创建两个指针,快指针和满指针,并将他们初始化为虚拟头节点
        slow=dummy_head
        fast=dummy_head
        # 快指针比慢指针慢n+1步
        for i in range(n+1):
            fast=fast.next
        #移动两个指针,知道快指针到达链表的末尾
        while fast:
            slow=slow.next
            fast=fast.next
        #通过更新第n-1个节点的next指针删除第n个节点
        slow.next= slow.next.next

        return dummy_head.next
一开始不理解倒数第n个节点式怎么找到的,看了代码以后理解了整个流程:
定义两个指针,同时移动,且快指针比慢指针快n+1步,那么当快指针到达链表末尾是,慢指针到达倒数第n+1个节点,恰好对第n个节点进行删除操作。
链表part02:链表相交
数值相同,不代表指针相同。
# Definition for singly-linked list.
# class ListNode:
#     def __init__(self, x):
#         self.val = x
#         self.next = None
'''
给你两个单链表的头节点 headA 和 headB ,请你找出并返回两个单链表相交的起始节点。
如果两个链表不存在相交节点,返回 null 。
'''
class Solution:
    def getIntersectionNode(self, headA: ListNode, headB: ListNode) -> Optional[ListNode]:
        lenA,lenB=0,0
        cur=headA
        #求链表A的长度
        while cur:
            cur=cur.next
            lenA+=1
        cur=headB
        #求headB的长度
        while cur:
            cur=cur.next
            lenB+=1
        curA=headA
        curB=headB
        #让curA为最长链表的头,lenB为其长度
        if lenA>lenB:
            curA,curB=curB,curA
            lenA,lenB=lenB,lenA
        for _ in range(lenB-lenA):
            curB=curB.next
        #遍历curA和curB,遇到相同则直接返回
        while curA:
            if curA==curB:
                return curA
            else:
                curA=curA.next
                curB=curB.next
        return None
照着随想录撸了下代码,不太理解。
链表part02:环形链表II
'''
给定一个链表的头节点  head ,返回链表开始入环的第一个节点。 如果链表无环,则返回 null。

如果链表中有某个节点,可以通过连续跟踪 next 指针再次到达,则链表中存在环。
为了表示给定链表中的环,评测系统内部使用整数 pos 来表示链表尾连接到链表中的位置(索引从 0 开始)。
如果 pos 是 -1,则在该链表中没有环。注意:pos 不作为参数进行传递,仅仅是为了标识链表的实际情况。
'''
a.判断是否有环
b.如何找到这个环的入口
判断是否有环
使用快慢指针法:分别定义 fast 和 slow 指针,从头结点出发,fast指针每次移动两个节点,slow指针每次移动一个节点,如果 fast 和 slow指针在途中相遇 ,说明这个链表有环。
为什么一定会相遇?
这是因为fast是走两步,slow是走一步,其实相对于slow来说,fast是一个节点一个节点的靠近slow的,所以fast一定可以和slow重合。(环内肯定会重合)
如何找到这个环的入口
这里不太明白,明日搞懂。
总结
因为有事拖了两天进度,今天也没能完成所有任务,改变下计划,每天先学习新知识,再把之前不够懂的搞懂,加油加油!
参考链接1:https://zhuanlan.zhihu.com/p/60057180
参考链接2:https://programmercarl.com/0203.%E7%A7%BB%E9%99%A4%E9%93%BE%E8%A1%A8%E5%85%83%E7%B4%A0.html#%E5%85%B6%E4%BB%96%E8%AF%AD%E8%A8%80%E7%89%88%E6%9C%AC


 被折叠的 条评论
为什么被折叠?
被折叠的 条评论
为什么被折叠?
 到【灌水乐园】发言


