


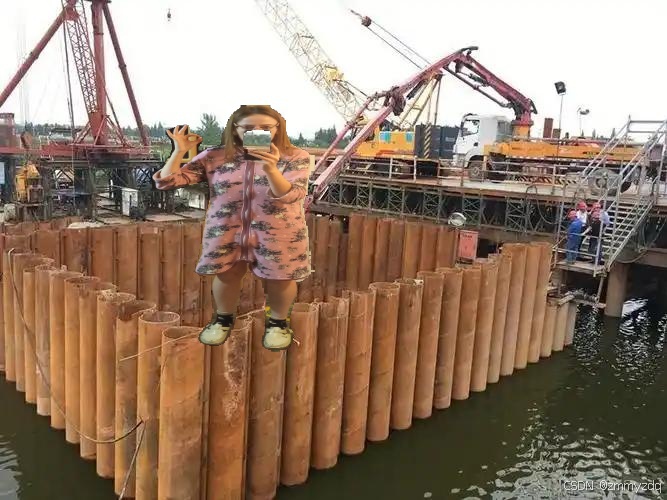
yolov8检测掩码目标,并与背景融合
剪切代码如下:
import os
from ultralytics import YOLO
import numpy as np
import cv2

# Load YOLO model
model = YOLO("/home/zm/PycharmProjects/yolo/ultralytics-main/yolov8m-seg.pt")

# Define input and output directories
input_dir = '/media/ZM/ZM/数据/ok/person_ok_clothes_helmet(train)/train_down/'
output_dir = '/media/ZM/ZM/数据/ok/seg_result/'

# Ensure the output directory exists
os.makedirs(output_dir, exist_ok=True)

# Loop through all image files in the directory
for img_name in os.listdir(input_dir):
    # Only process jpg images
    if img_name.endswith('.jpg'):
        # Construct the full file path
        img_path = os.path.join(input_dir, img_name)

        # Read the image
        orig_img = cv2.imread(img_path)

        # Resize the image to match the model input size (448x640)
        orig_img_resized = cv2.resize(orig_img, (640, 448))  # Note OpenCV uses (width, height)

        # Run inference on the image
        results = model(source=img_path, save=False, device='0', project=output_dir,classes=[0])

        # Get the mask data
        mask = results[0].masks.data[0].cpu().numpy().astype(np.bool_)

        # Resize the mask to the same dimensions as the resized image
        mask_resized = cv2.resize(mask.astype(np.uint8), (640, 448), interpolation=cv2.INTER_NEAREST).astype(np.bool_)

        # Apply the resized mask to the original image
        masked_image = np.zeros_like(orig_img_resized)
        masked_image[mask_resized] = orig_img_resized[mask_resized]

        # If you want a transparent background (RGBA)
        alpha_channel = np.ones(mask_resized.shape, dtype=orig_img.dtype) * 255  # Create the alpha channel
        masked_image_rgba = np.dstack((masked_image, alpha_channel))  # Add the alpha channel to RGB
        masked_image_rgba[~mask_resized] = (0, 0, 0, 0)  # Make the non-mask areas transparent

        # Save the image with a transparent background (RGBA)
        output_path_rgba = os.path.join(output_dir, f"masked_{img_name.replace('.jpg', '_rgba.png')}")
        cv2.imwrite(output_path_rgba, masked_image_rgba)

        # # Save the image with a black background
        # output_path_black_bg = os.path.join(output_dir, f"masked_{img_name}")
        # cv2.imwrite(output_path_black_bg, masked_image)

        print(f"Processed and saved: {img_name}")
融合代码代码如下:
import cv2
import numpy as np
import os
import random


def add_alpha_channel(img):
    """为jpg图像添加alpha通道"""
    b_channel, g_channel, r_channel = cv2.split(img)  # 剥离jpg图像通道
    alpha_channel = np.ones(b_channel.shape, dtype=b_channel.dtype) * 255  # 创建Alpha通道
    img_new = cv2.merge((b_channel, g_channel, r_channel, alpha_channel))  # 融合通道
    return img_new


def resize_image_aspect_ratio(img, target_width, target_height):
    """按比例调整PNG图像大小,使其宽度不超过500,高度不超过1080"""
    h, w = img.shape[:2]
    aspect_ratio = w / h

    # 设置最大宽度和高度限制
    max_width = 500
    max_height = 1080

    # 计算目标尺寸,保持宽高比
    if w > h:
        new_width = min(max_width, w)
        new_height = int(new_width / aspect_ratio)
    else:
        new_height = min(max_height, h)
        new_width = int(new_height * aspect_ratio)

    # 如果调整后的宽度或高度超过限制,进行适当缩放
    if new_width > max_width:
        new_width = max_width
        new_height = int(new_width / aspect_ratio)

    if new_height > max_height:
        new_height = max_height
        new_width = int(new_height * aspect_ratio)

    # 调整大小
    resized_img = cv2.resize(img, (new_width, new_height))
    return resized_img


def merge_img(jpg_img, png_img, y1, y2, x1, x2):
    """将png透明图像与jpg图像叠加"""
    # 判断jpg图像是否已经为4通道
    if jpg_img.shape[2] == 3:
        jpg_img = add_alpha_channel(jpg_img)

    # 叠加图像位置的限制,避免超出范围
    yy1 = 0
    yy2 = png_img.shape[0]
    xx1 = 0
    xx2 = png_img.shape[1]

    if x1 < 0:
        xx1 = -x1
        x1 = 0
    if y1 < 0:
        yy1 = -y1
        y1 = 0
    if x2 > jpg_img.shape[1]:
        xx2 = png_img.shape[1] - (x2 - jpg_img.shape[1])
        x2 = jpg_img.shape[1]
    if y2 > jpg_img.shape[0]:
        yy2 = png_img.shape[0] - (y2 - jpg_img.shape[0])
        y2 = jpg_img.shape[0]

    # 获取要覆盖图像的alpha值,将像素值除以255,使值保持在0-1之间
    alpha_png = png_img[yy1:yy2, xx1:xx2, 3] / 255.0
    alpha_jpg = 1 - alpha_png

    # 开始叠加
    for c in range(0, 3):
        jpg_img[y1:y2, x1:x2, c] = ((alpha_jpg * jpg_img[y1:y2, x1:x2, c]) + (alpha_png * png_img[yy1:yy2, xx1:xx2, c]))

    return jpg_img


def random_overlay(jpg_img, png_images_dir, max_overlays=3):
    """在JPEG图像上随机叠加1到max_overlays张PNG图像"""
    # 获取PNG图像路径列表
    png_files = [f for f in os.listdir(png_images_dir) if f.endswith('.png')]

    # 随机选择1到max_overlays个PNG图像
    num_overlays = random.randint(1, max_overlays)
    selected_png_files = random.sample(png_files, num_overlays)

    for png_file in selected_png_files:
        png_path = os.path.join(png_images_dir, png_file)
        png_img = cv2.imread(png_path, cv2.IMREAD_UNCHANGED)

        # 调整PNG图像的大小
        png_img_resized = resize_image_aspect_ratio(png_img, jpg_img.shape[1], jpg_img.shape[0])

        # 随机选择叠加位置
        x1 = random.randint(0, jpg_img.shape[1] - png_img_resized.shape[1])
        y1 = random.randint(0, jpg_img.shape[0] - png_img_resized.shape[0])
        x2 = x1 + png_img_resized.shape[1]
        y2 = y1 + png_img_resized.shape[0]

        # 开始叠加
        jpg_img = merge_img(jpg_img, png_img_resized, y1, y2, x1, x2)

    return jpg_img


if __name__ == '__main__':
    # 定义图像文件夹路径
    img_jpg_dir = '/media/ZM/ZM/数据/ok/20250304现场数据/no_obj/2025-03-03'  # JPG图像文件夹路径
    img_png_path = '/media/ZM/ZM/数据/ok/seg_result/wangluo'  # PNG图像文件夹路径

    # 获取JPEG图像路径列表
    jpg_files = [f for f in os.listdir(img_jpg_dir) if f.endswith('.jpg')]

    # 输出文件夹
    output_dir = '/media/ZM/ZM/数据/ok/result/wangluo1'
    os.makedirs(output_dir, exist_ok=True)

    # 对每一张JPEG图像执行随机叠加操作
    for jpg_file in jpg_files:
        img_jpg_path = os.path.join(img_jpg_dir, jpg_file)

        # 读取JPG图像
        img_jpg = cv2.imread(img_jpg_path, cv2.IMREAD_UNCHANGED)

        # 随机叠加PNG图像
        res_img = random_overlay(img_jpg, img_png_path)

        # 保存结果图像
        output_img_path = os.path.join(output_dir, f"result_5{jpg_file}")
        cv2.imwrite(output_img_path, res_img)

        print(f"Processed and saved: {jpg_file}")
结果:


 被折叠的 条评论
为什么被折叠?
被折叠的 条评论
为什么被折叠?
 到【灌水乐园】发言


