


 本文介绍了Elasticsearch的基本概念,包括其分布式、实时搜索和分析引擎特性,以及与Solr的区别。详细阐述了Elasticsearch的安装过程,包括Elasticsearch、Kibana和 IK 分词器的安装步骤。此外,还讲解了Elasticsearch的核心概念,如面向文档、倒排索引和RESTful操作,如CRUD。最后,展示了SpringBoot如何与Elasticsearch整合,以及如何实现京东商品信息的搜索和展示。
1. 什么是ElasticSearch
Elasticsearch是一个开源的分布式、RESTful 风格的搜索和数据分析引擎,它使用 Java 编写,内部采用 Lucene 做索引与搜索。它提供了一套简单一致的 RESTful API 来帮助我们实现存储和检索,从而隐藏掉了Lucene的复杂性。
Elasticsearch不仅仅只是全文搜索引擎。 它还具有以下功能:
- 分布式实时文件存储,并将每一个字段都编入索引,使其可以被搜索。
- 实时分析的分布式搜索引擎。
- 可以扩展到上百台服务器,处理PB级别的结构化或非结构化数据。
2. ElasticSearch和Solr的差别
ElasticSearch是一个实时分布式搜索和分析引擎。它用于全文搜索、结构化搜索、分析以及将这三者混合使用。ES是一个基于Lucene的开源搜索引擎。
Solr采用java开发,基于Lucene的全文搜索服务器。Solr提供了比Lucene更丰富的查询语言,同时实现了可配置、可扩展、并对索引、搜索性能进行了优化。 它可以独立运行,是一个独立的企业级搜索应用服务器,它对外提供类似于web-service的API接口。用户可以通过http请求,像搜索引擎服务器提交一定格式的文件,生成索引;也可以通过提出查找请求,并得到返回结果。
两者比较
- 当单纯的对已有数据进行搜索时,Solr更快
- 当实时建立索引时,Solr会产生io阻塞,查询性能较差,ElasticSearch具有明显的优势
- 随着数据量的增加,Solr的搜索效率会变得更低,而Elasticsearch却没有明显的变化
总结
- ES基本是开箱即用,非常简单。而solr会有点复杂。
- Solr利用Zookeeper进行分布式管理,而elasticsearch自身带有分布式协调管理功能
- Solr支持更多格式的数据,比如json、xml、csv。而es只支持json文件格式
- solr官方提供的功能更多,而elasticsearch更注重核心功能,高级功能由第三方插件提供
- solr查询快,但更新索引时慢,用于电商等查询多的应用
- es建立索引快,即实时性查询快,用于facebook新浪等搜索
- solr较成熟,有一个更大,更成熟的用户、开发和贡献者社区,而elasticsearch相对开发维护者较少,更新太快,学习使用成本较高
3. ElasticSearch、可视化和Kibana安装
注:安装ElasticSearch之前必须保证JDK1.8+安装完毕,并正确的配置好JDK环境变量,否则启动ElasticSearch失败。
-
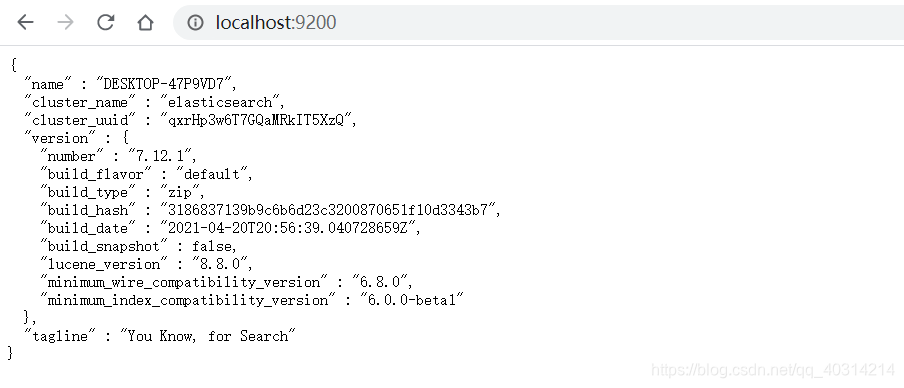
官网下载ES安装包,解压启动即可。 访问:http://localhost:9200/
-
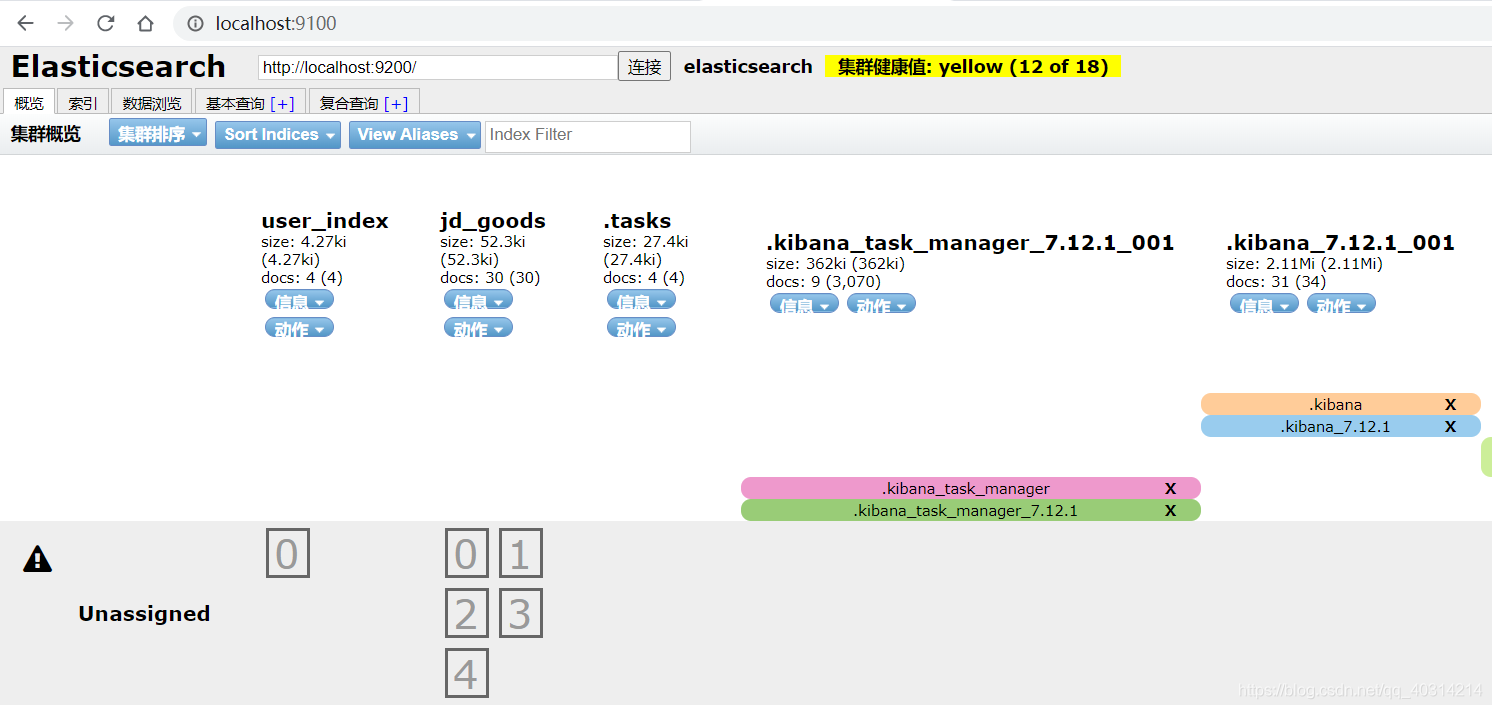
下载安装可视化插件elasticsearch-head,一个Vue项目
注意:需要有node环境#下载之后,依次执行下列命令 npm install npm run start访问 http://localhost:9100/
-
可视化插件连接ElasticSearch,需要配置跨域,并进行连接测试
# elasticsearch.yml文件 http.cors.enabled: true http.cors.allow-origin: "*" -
最后下载安装kibana,解压启动即可。 访问:http://localhost:5601/
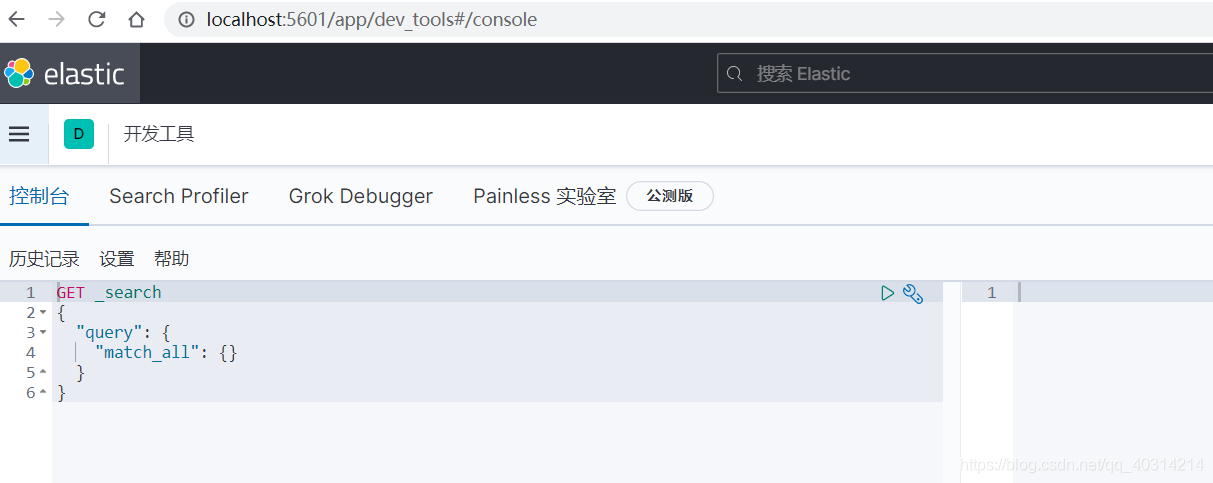
配置中文:config\kibana.ymli18n.locale: "zh-CN"
拓展:了解ELK
ELK是ElasticSearch 、 Logstash、Kibana三大开源框架首字母大写简称。市面上也称为Elastic Stack。Lostash是ELK的中央数据流,用于从不同目标(文件/数据存储/MQ)收集的不同格式数据,经过过滤后支持输出到不同目的地。Kibana可以将elastic的数据通过友好的页面展示出来,提供实时分析的功能。
4. IK分词器安装
- 什么是IK分词器
- 把一句话分词
- 如果使用中文:推荐IK分词器
- 两个分词算法:ik_smart(最少切分),ik_max_word(最细粒度划分)
-
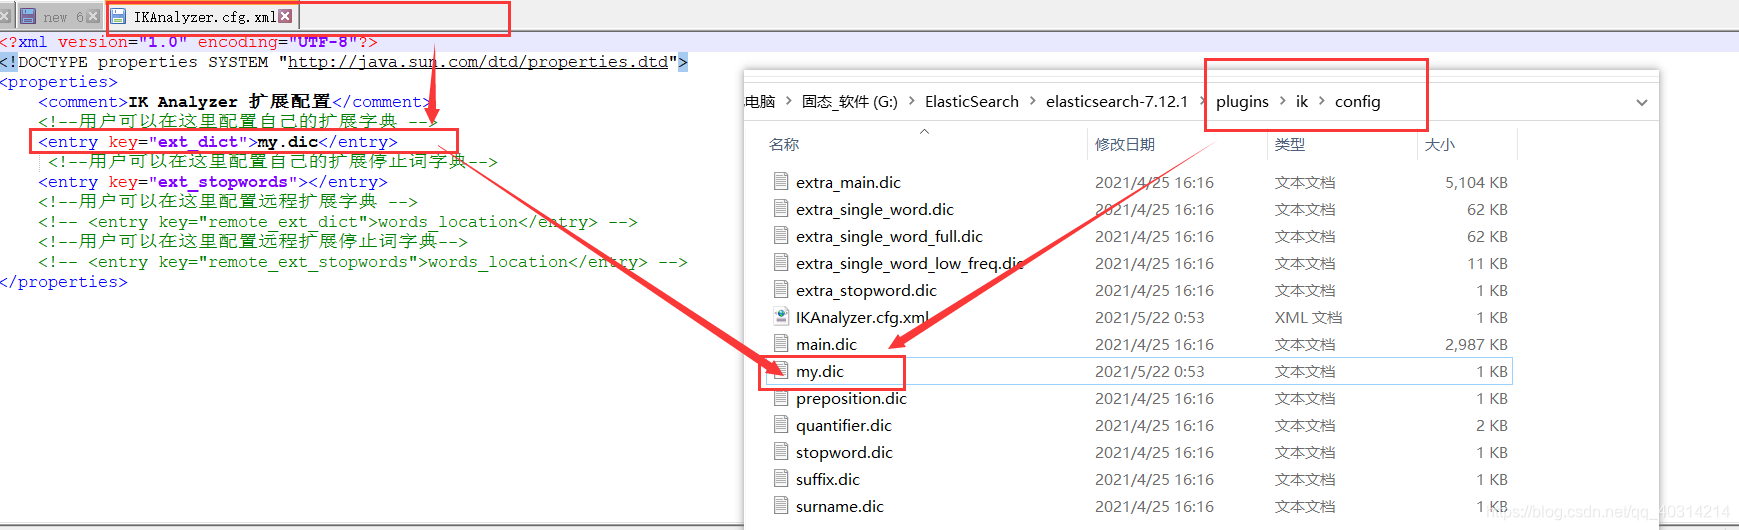
下载IK分词器压缩包,在ES的plugins目录中新建ik文件夹,解压并重启ES即可
-
使用Kibana测试
ik_smart测试:最粗粒度的拆分
// 输入
GET _analyze
{
  "analyzer": "ik_smart",
  "text": "我是社会主义接班人"
}
// 输出 { "tokens" : [ { "token" : "我", "start_offset" : 0, "end_offset" : 1, "type" : "CN_CHAR", "position" : 0 }, { "token" : "是", "start_offset" : 1, "end_offset" : 2, "type" : "CN_CHAR", "position" : 1 }, { "token" : "社会主义", "start_offset" : 2, "end_offset" : 6, "type" : "CN_WORD", "position" : 2 }, { "token" : "接班人", "start_offset" : 6, "end_offset" : 9, "type" : "CN_WORD", "position" : 3 } ] }ik_max_word测试:最细粒度的拆分
// 输入
GET _analyze
{
  "analyzer": "ik_max_word",
  "text": "我是社会主义接班人"
}
// 输出 { "tokens" : [ { "token" : "我", "start_offset" : 0, "end_offset" : 1, "type" : "CN_CHAR", "position" : 0 }, { "token" : "是", "start_offset" : 1, "end_offset" : 2, "type" : "CN_CHAR", "position" : 1 }, { "token" : "社会主义", "start_offset" : 2, "end_offset" : 6, "type" : "CN_WORD", "position" : 2 }, { "token" : "社会", "start_offset" : 2, "end_offset" : 4, "type" : "CN_WORD", "position" : 3 }, { "token" : "主义", "start_offset" : 4, "end_offset" : 6, "type" : "CN_WORD", "position" : 4 }, { "token" : "接班人", "start_offset" : 6, "end_offset" : 9, "type" : "CN_WORD", "position" : 5 }, { "token" : "接班", "start_offset" : 6, "end_offset" : 8, "type" : "CN_WORD", "position" : 6 }, { "token" : "人", "start_offset" : 8, "end_offset" : 9, "type" : "CN_CHAR", "position" : 7 } ] } -
自定义字典
5. ElasticSearch核心概念
-
es是面向文档的,一切都是JSON
-
与数据库对比
关系型数据库 Elasticsearch 数据库database 索引 indices(数据库) 表tables types (以后会被弃用) 行rows documents (文档) 字段columns fields -
物理设计
在后台把每个索引划分为多个分片,每片可以在集群中的不同服务器间迁移
-
逻辑设计
- 文档:索引和搜索数据的最小单位是文档;
- 自我包含:key:value
- 层次型:一个文档中包含文档(json对象)
- 类型:文档的逻辑容器
- 索引:数据库
- 文档:索引和搜索数据的最小单位是文档;
-
倒排索引
- es使用倒排索引的结构,采用Lucene倒排索引作为底层。用于快速全文检索。
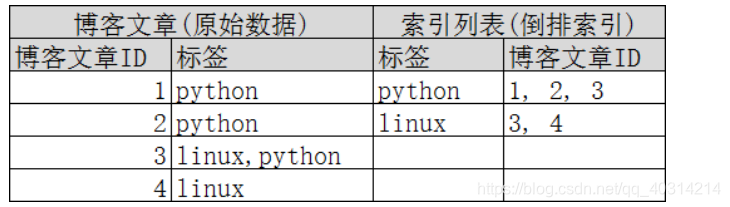
拓展:倒排索引
以下图为例,左侧是文章id和每篇文章对应的标签。当使用倒排索引的时候,会将标签分为两类,这样的话当我们想搜索和python相关的博客的时候,就无需搜索全部文章,而只需要从索引列表中检索即可。大大提高了检索效率。(倒排索引的核心在于分词)
6. REST风格操作CRUD
| method | url地址 | 描述 |
|---|---|---|
| PUT | localhost:9200/索引名称/类型名称/文档id | 创建文档(指定文档id) |
| POST | localhost:9200/索引名称/类型名称 | 创建文档(随机文档id) |
| POST | localhost:9200/索引名称/类型名称/文档id/_update | 修改文档 |
| DELETE | localhost:9200/索引名称/类型名称/文档id | 删除文档 |
| GET | localhost:9200/索引名称/类型名称/文档id | 通过文档id查询文档 |
| POST | localhost:9200/索引名称/类型名称/_search | 查询所有的数据 |
PUT 命令
-
使用ES默认数据类型
// 输入
PUT /index_test1/_doc/1
{
  "name": "小明",
  "age": 10
}
// 响应结果 { "_index" : "index_test1", "_type" : "_doc", "_id" : "1", "_version" : 1, "result" : "created", "_shards" : { "total" : 2, "successful" : 1, "failed" : 0 }, "_seq_no" : 0, "_primary_term" : 1 }![[外链图片转存失败,源站可能有防盗链机制,建议将图片保存下来直接上传(img-1sw3XJRe-1625377689765)(ElasticSearch学习笔记.assets/24009055-a5d0cecc806d6366.png)]](https://i-blog.csdnimg.cn/blog_migrate/fe4c1597c7574cb4395bdca1446d3bad.png)
我们可以看到,通过这种方式新建的索引数据,es会默认给上对应的字段类型。如果有需要指定类型的话,需要我们进行自定义 -
自定义索引表字段类型
-
字符串类型: text、keyword
-
数值类型: long、integer、short、byte、double、float、half、float、scaled、
-
日期类型:date
-
布尔值类型: boolean
-
二进制类型: binary
-
自定义索引字段类型
// 输入
PUT /index_test2
{
  "mappings": {
    "properties": {
      "name": {
        "type": "text"
      },
      "age": {
        "type": "integer"
      }
    }
  }
}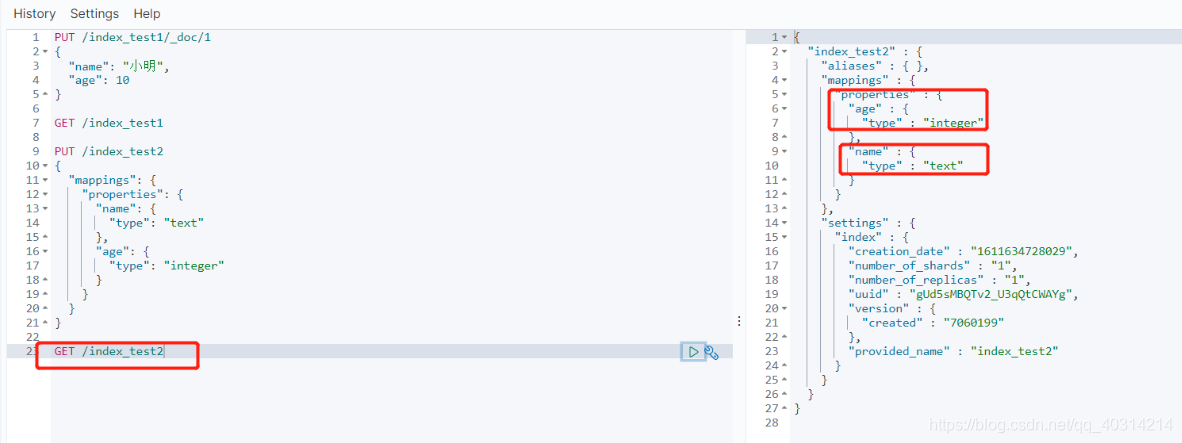
我们可以看到自定义字段后,再次查询得到的结果就是我们定义好的类型了。
-
扩展命令
GET _cat/	获取集群信息
GET _cat/health    获取es健康值
GET _cat/indices       获取es的所有索引
索引数据修改
-
使用
PUT命令// 输入 PUT /index_test1/_doc/1 { "name": "小蓝" }// 输出 { "_index" : "index_test1", // 索引名称 "_type" : "_doc", // 索引类型 "_id" : "1", // 数据id "_version" : 2, // 版本,每修改一次数据版本+1 "result" : "updated", // 状态:已更新 "_shards" : { "total" : 2, "successful" : 1, "failed" : 0 }, "_seq_no" : 1, "_primary_term" : 1 }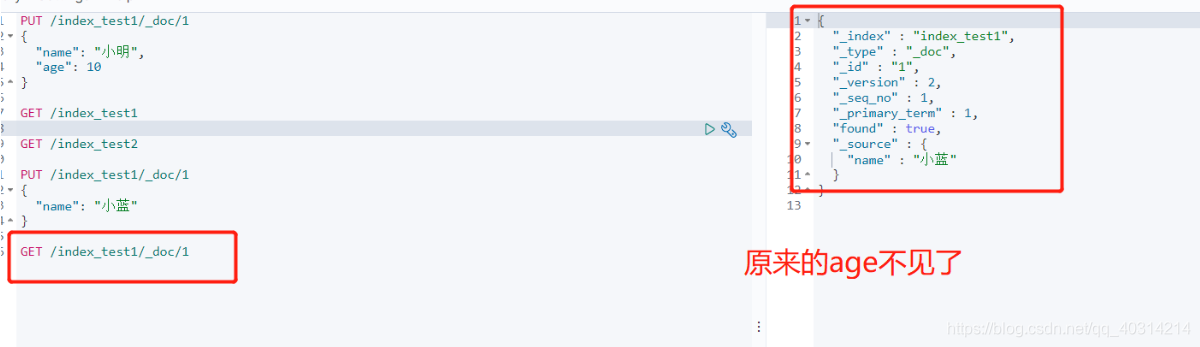
我们查看数据发现,源数据确认已经修改成功,但是age字段的值却变为了空。这是因为elasticSearch使用PUT命令进行更新的时候,对于没有赋值的字段会一律修改为空。所以一般来说,我们基本上是使用POST方法来进行更新的// 输入 POST /index_test1/_doc/1/_update { "doc": { "name": "小蓝" } }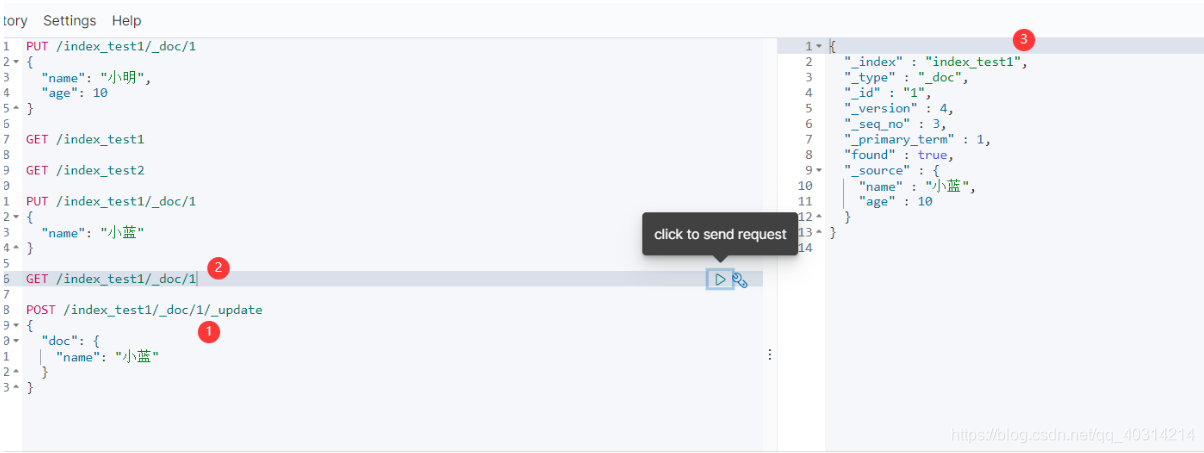
DELETE命令
DELETE一般用于索引的删除,使用方式也十分简单
DELETE /index_test1
GET命令
我们可以利用GET来查看索引和文档,查询的请求头格式如下:
GET /索引/类型/文档
对于查询体,也就是查询的具体条件,es支持两种查询方式。常规的REST URI方式和REST 请求体方式
- URI方式
- 复杂查询:下节详解
7. ES多条件查询
-
模糊查询(match)
// 输入
GET /index_test1/_doc/_search
{
  "query": {
    "match": {
      "name": "小明"
    }
  }
}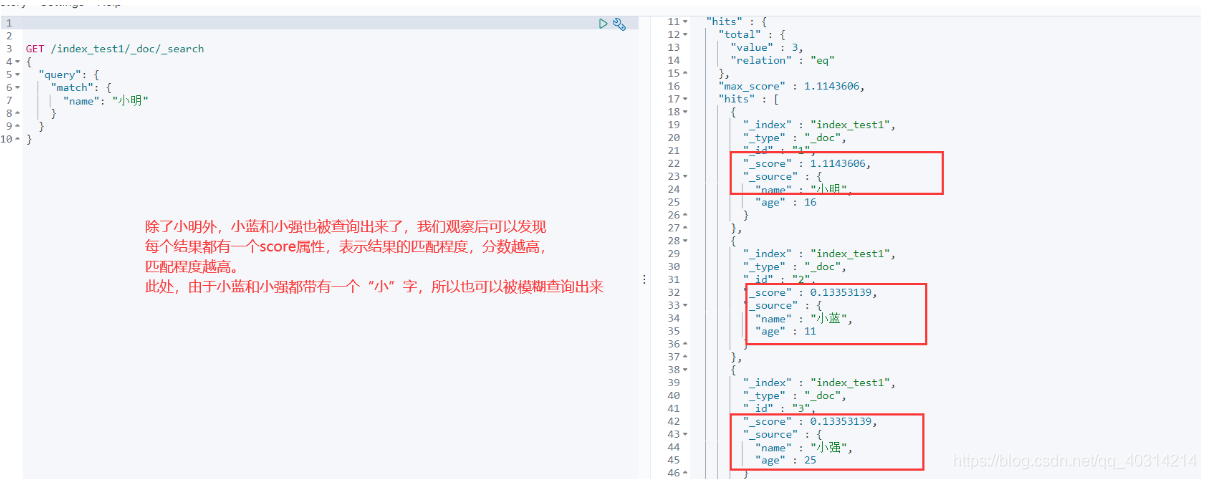
-
排序(sort)
// 输入
GET /index_test1/_doc/_search
{
  "query": {
    "match": {
      "name": "小明"
    }
  },
  "sort": [
    {
      "age": "desc"
    }
  ]
}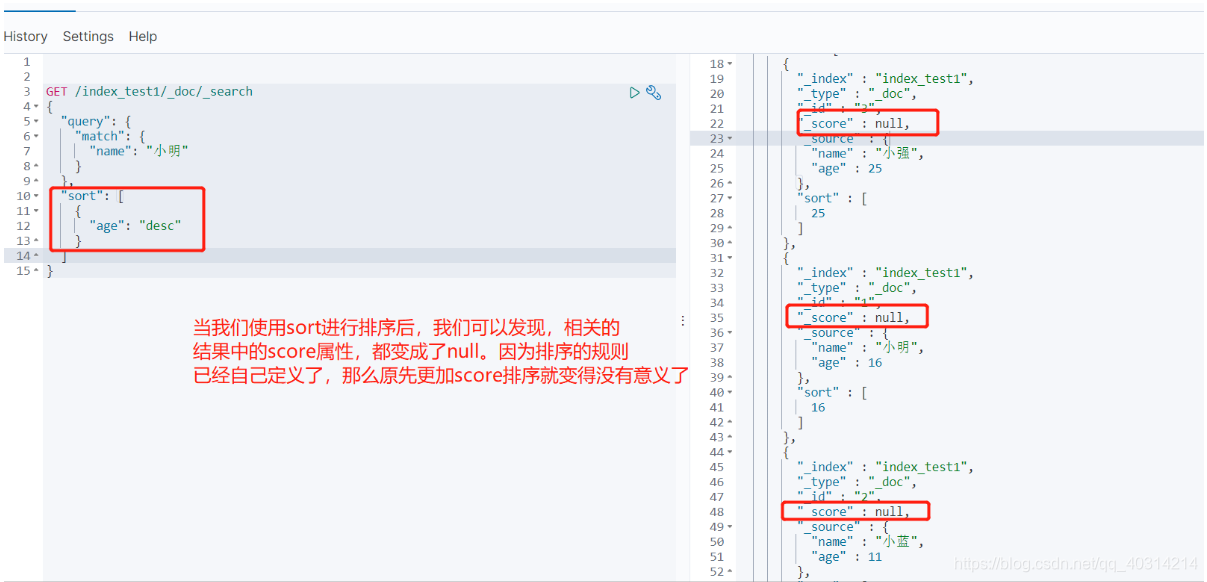
-
字段选择(source)
// 输入
GET /index_test1/_doc/_search
{
  "query": {
    "match": {
      "name": "小明"
    }
  },
  "_source": ["name"]
}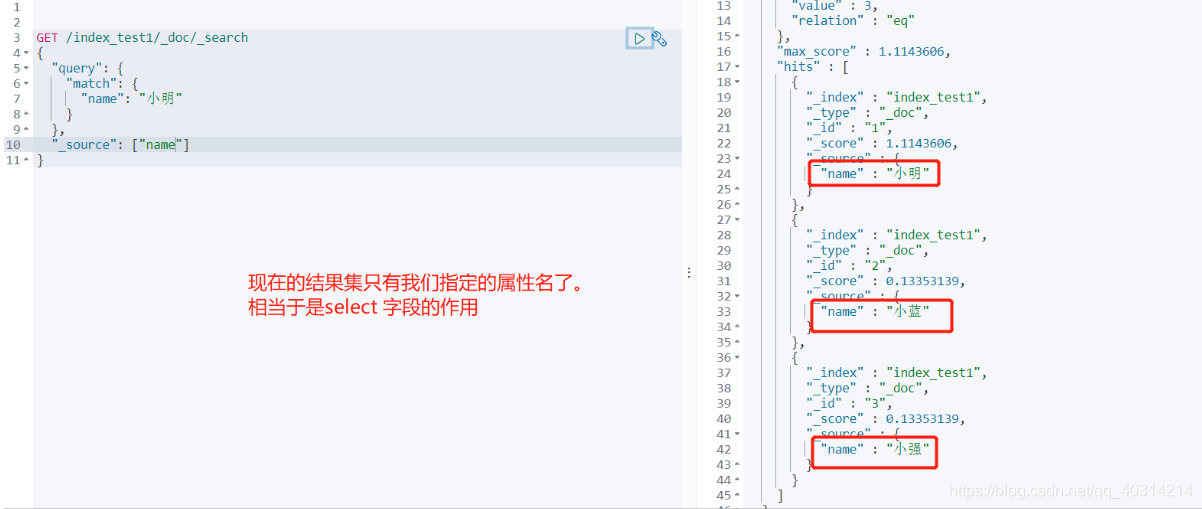
-
限制结果记录条数(from 、size)
// 输入
GET /index_test1/_doc/_search
{
  "query": {
    "match": {
      "name": "小明"
    }
  },
  "from": 1,
  "size": 1
}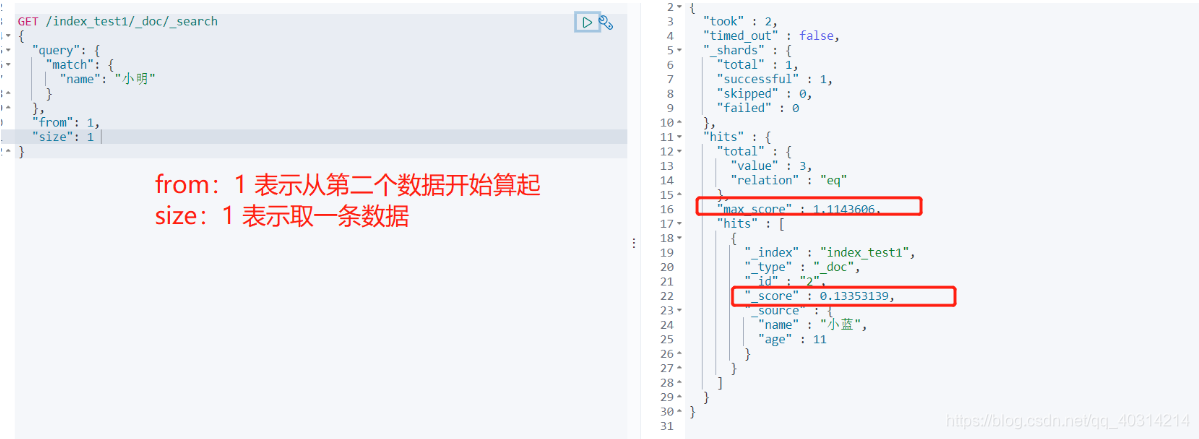
-
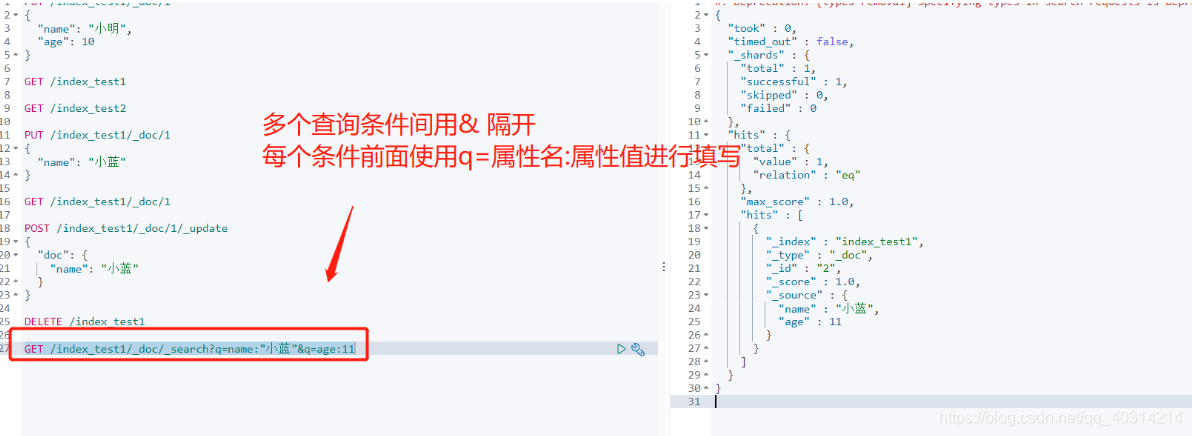
条件查询(可以写多个查询条件,并进行与或非逻辑判断)
// 输入
GET /index_test1/_search
{
  "query": {
    "bool": {
      "must": [
        {
          "match": {
            "name": "小明"
          }
        },
        {
          "match": {
            "age": 11
          }
        }
      ]
    }
  }
}


-
过滤器(filter)
gt  大于
gte 大于或等于
lt  小于
lte 小于或等于
// 输入 GET /index_test1/_search { "query": { "bool": { "must_not": [ { "match": { "name": "明" } } ], "filter": { "range": { "age": { "gte": 15, "lte": 26 } } } } } }
-
精准查询(term)
term 查询是直接通过倒排索引指定的词条进行精确查找的,因为倒排索引大大缩小了检索的范围,这也使得使用
term关键字的搜索效率很高。// 输入 GET /index_test1/_search { "query": { "term": { "name": "明" } } }
-
高亮查询
GET /index_test1/_search
{
  "query": {
    "match": {
      "name": "小明"
    }
  },
  "highlight": {
    "pre_tags": "<p class='a' >",
    "post_tags": "</p>",
    "fields": {
      "name": {}
    }
  }
}
8. SpringBoot整合ES
-
新建项目并导入项目依赖
创建一个springboot的项目 同时勾选上springboot-web的包以及Nosql的elasticsearch的包
<dependency>
     <groupId>org.springframework.boot</groupId>
    <artifactId>spring-boot-starter-data-elasticsearch</artifactId>
  </dependency>
  <dependency>
        <groupId>org.springframework.boot</groupId>
        <artifactId>spring-boot-starter-web</artifactId>
 </dependency>
注意,引入后要注意
ElasticSearch的客户端的版本是否和本地的es版本一致

如果不一致的话,就手动配置<properties> <!-- 这里的话,要和自己本地的es版本保持一致 --> <elasticsearch.version>7.12.1</elasticsearch.version> </properties>- 注入RestHighLevelClient 客户端
@Configuration public class ElasticSearchClientConfig { @Bean public RestHighLevelClient restHighLevelClient(){ RestHighLevelClient client = new RestHighLevelClient( RestClient.builder( new HttpHost("localhost", 9200, "http"))); return client; } } -
创建User实体类
@Data @NoArgsConstructor @AllArgsConstructor public class User { private String name; private int age; } -
使用客户端操作索引数据
-
创建索引
@Test void createIndex() throws IOException { // 创建索引请求 CreateIndexRequest request = new CreateIndexRequest("user_index"); // 通过客户端执行请求 CreateIndexResponse response = restHighLevelClient.indices().create(request, RequestOptions.DEFAULT); // 输出响应结果 System.out.println(response); } -
查询索引是否存在
@Test void existIndex() throws IOException { // 查询索引请求 GetIndexRequest request = new GetIndexRequest("user_index"); // 通过客户端执行请求 boolean response = restHighLevelClient.indices().exists(request, RequestOptions.DEFAULT); // 输出响应结果 System.out.println(response); } -
删除索引
@Test
void deleteIndex() throws IOException {
    // 删除索引请求
    DeleteIndexRequest request = new DeleteIndexRequest("user_index");
    // 通过客户端执行请求
    AcknowledgedResponse response = restHighLevelClient.indices().delete(request, RequestOptions.DEFAULT);
    // 输入响应结果
    System.out.println(response.isAcknowledged());
}
-
-
使用客户端操作文档数据
-
创建文档
@Test void createDocument() throws IOException { // 创建对象 User user = new User("小明",18); // 创建索引相关请求 IndexRequest request = new IndexRequest("user_index"); // 配置请求相关参数 request.id("1"); request.timeout("1s"); request.source(JSON.toJSONString(user), XContentType.JSON); // 通过客户端执行请求 IndexResponse response = restHighLevelClient.index(request, RequestOptions.DEFAULT); // 输出响应 System.out.println(response.status()); } -
判断文档是否存在
@Test void existDocument() throws IOException { // 创建索引相关请求 GetRequest request = new GetRequest("user_index", "1"); // 配置不显示索引上下文 request.fetchSourceContext(new FetchSourceContext(false)); request.storedFields("_none_"); // 获取文档信息 boolean exists = restHighLevelClient.exists(request, RequestOptions.DEFAULT); // 输出响应 System.out.println(exists); } -
获取文档信息
@Test void searchDocument() throws IOException { // 创建索引相关请求 GetRequest request = new GetRequest("user_index", "1"); // 获取文档信息 GetResponse response = restHighLevelClient.get(request, RequestOptions.DEFAULT); // 输出响应 System.out.println(response.getSourceAsString()); } -
更新文档
@Test void updateDocument() throws IOException { // 创建索引相关请求 UpdateRequest request = new UpdateRequest("user_index", "1"); // 插入更新的文档内容 User user = new User("大明",15); request.doc(JSON.toJSONString(user),XContentType.JSON); // 获取文档信息 UpdateResponse response = restHighLevelClient.update(request, RequestOptions.DEFAULT); // 输出响应 System.out.println(response.status()); // 输入全部信息 System.out.println(response); } -
删除文档
@Test void deleteDocument() throws IOException { // 创建索引相关请求 DeleteRequest request = new DeleteRequest("user_index", "1"); // 获取文档信息 DeleteResponse response = restHighLevelClient.delete(request, RequestOptions.DEFAULT); // 输出响应 System.out.println(response.status()); // 输入全部信息 System.out.println(response); } -
批量添加文档
@Test void bulkDocument() throws IOException { // 创建批量操作索引请求 BulkRequest request = new BulkRequest(); // 初始化数据 List<User> list = new ArrayList<>(); list.add(new User("小红",1)); list.add(new User("小白",2)); list.add(new User("小蓝",3)); list.add(new User("小黑",4)); // 创建具体的插入数据请求,并加入到批量请求中 for(int i = 0; i < list.size(); i++){ request.add(new IndexRequest("user_index") .id(""+i) .source(JSON.toJSONString(list.get(i)),XContentType.JSON)); } // 执行批量操作 BulkResponse response = restHighLevelClient.bulk(request, RequestOptions.DEFAULT); // 输出响应 System.out.println(response.status()); // 输出全部响应 System.out.println(response); } -
根据条件查询文档信息
@Test
void searchDocumentByCondition() throws IOException {
    // 创建请求对象
    SearchRequest searchRequest = new SearchRequest("user_index");
    // 创建查询条件
    SearchSourceBuilder searchSourceBuilder = new SearchSourceBuilder();
    searchSourceBuilder.query(QueryBuilders.matchQuery("name", "白"));
    searchRequest.source(searchSourceBuilder);
    // 执行查询
    SearchResponse response = restHighLevelClient.search(searchRequest, RequestOptions.DEFAULT);
    System.out.println(JSON.toJSONString(response.getHits()));
    for (SearchHit hit : response.getHits().getHits()) {
        System.out.println(hit.getSourceAsMap());
    }
}
-
完整代码
@SpringBootTest
class SpringbootEsApiApplicationTests {
    @Autowired
    private RestHighLevelClient restHighLevelClient;

    @Test
    void createIndex() throws IOException {
        // 创建索引请求
        CreateIndexRequest request = new CreateIndexRequest("user_index");
        // 通过客户端执行请求
        CreateIndexResponse response = restHighLevelClient.indices().create(request, RequestOptions.DEFAULT);
        // 输出响应结果
        System.out.println(response);

    }

    @Test
    void existIndex() throws IOException {
        // 查询索引请求
        GetIndexRequest request = new GetIndexRequest("user_index");
        // 通过客户端执行请求
        boolean response = restHighLevelClient.indices().exists(request, RequestOptions.DEFAULT);
        // 输出响应结果
        System.out.println(response);
    }

    @Test
    void deleteIndex() throws IOException {
        // 删除索引请求
        DeleteIndexRequest request = new DeleteIndexRequest("user_index");
        // 通过客户端执行请求
        AcknowledgedResponse response = restHighLevelClient.indices().delete(request, RequestOptions.DEFAULT);
        // 输入响应结果
        System.out.println(response.isAcknowledged());
    }


    @Test
    void createDocument() throws IOException {
        // 创建对象
        User user = new User("小明",18);
        // 创建索引相关请求
        IndexRequest request = new IndexRequest("user_index");
        // 配置请求相关参数
        request.id("1");
        request.timeout("1s");
        request.source(JSON.toJSONString(user), XContentType.JSON);
        // 通过客户端执行请求
        IndexResponse response = restHighLevelClient.index(request, RequestOptions.DEFAULT);
        // 输出响应
        System.out.println(response.status());
    }

    @Test
    void existDocument() throws IOException {
        // 创建索引相关请求
        GetRequest request = new GetRequest("user_index", "1");
        // 配置不显示索引上下文
        request.fetchSourceContext(new FetchSourceContext(false));
        request.storedFields("_none_");
        // 获取文档信息
        boolean exists = restHighLevelClient.exists(request, RequestOptions.DEFAULT);
        // 输出响应
        System.out.println(exists);
    }

    @Test
    void searchDocument() throws IOException {
        // 创建索引相关请求
        GetRequest request = new GetRequest("user_index", "1");
        // 获取文档信息
        GetResponse response = restHighLevelClient.get(request, RequestOptions.DEFAULT);
        // 输出响应
        System.out.println(response.getSourceAsString());
    }

    @Test
    void updateDocument() throws IOException {
        // 创建索引相关请求
        UpdateRequest request = new UpdateRequest("user_index", "1");
        // 插入更新的文档内容
        User user = new User("大明",15);
        request.doc(JSON.toJSONString(user),XContentType.JSON);
        // 获取文档信息
        UpdateResponse response = restHighLevelClient.update(request, RequestOptions.DEFAULT);
        // 输出响应
        System.out.println(response.status());
        // 输入全部信息
        System.out.println(response);
    }

    @Test
    void deleteDocument() throws IOException {
        // 创建索引相关请求
        DeleteRequest request = new DeleteRequest("user_index", "1");
        // 获取文档信息
        DeleteResponse response = restHighLevelClient.delete(request, RequestOptions.DEFAULT);
        // 输出响应
        System.out.println(response.status());
        // 输入全部信息
        System.out.println(response);
    }

    @Test
    void bulkDocument() throws IOException {
        // 创建批量操作索引请求
        BulkRequest request = new BulkRequest();
        // 初始化数据
        List<User> list = new ArrayList<>();
        list.add(new User("小红",1));
        list.add(new User("小白",2));
        list.add(new User("小蓝",3));
        list.add(new User("小黑",4));
        // 创建具体的插入数据请求,并加入到批量请求中
        for(int i = 0; i < list.size(); i++){
            request.add(new IndexRequest("user_index")
            .id(""+i)
            .source(JSON.toJSONString(list.get(i)),XContentType.JSON));
        }
        // 执行批量操作
        BulkResponse response = restHighLevelClient.bulk(request, RequestOptions.DEFAULT);
        // 输出响应
        System.out.println(response.status());
        // 输出全部响应
        System.out.println(response);
    }

    @Test
    void searchDocumentByCondition() throws IOException {
        // 创建请求对象
        SearchRequest searchRequest = new SearchRequest("user_index");
        // 创建查询条件
        SearchSourceBuilder searchSourceBuilder = new SearchSourceBuilder();
        searchSourceBuilder.query(QueryBuilders.matchQuery("name", "白"));
        searchRequest.source(searchSourceBuilder);
        // 执行查询
        SearchResponse response = restHighLevelClient.search(searchRequest, RequestOptions.DEFAULT);
        System.out.println(JSON.toJSONString(response.getHits()));
        for (SearchHit hit : response.getHits().getHits()) {
            System.out.println(hit.getSourceAsMap());
        }
    }

}
9. ES京东实战
-
搭建工程,并配置ES
<dependency>
    <groupId>org.springframework.boot</groupId>
    <artifactId>spring-boot-starter-data-elasticsearch</artifactId>
</dependency>
<dependency>
    <groupId>org.springframework.boot</groupId>
    <artifactId>spring-boot-starter-thymeleaf</artifactId>
</dependency>
<dependency>
    <groupId>org.springframework.boot</groupId>
    <artifactId>spring-boot-starter-web</artifactId>
</dependency>

<dependency>
    <groupId>org.springframework.boot</groupId>
    <artifactId>spring-boot-devtools</artifactId>
    <scope>runtime</scope>
    <optional>true</optional>
</dependency>
<dependency>
    <groupId>org.springframework.boot</groupId>
    <artifactId>spring-boot-configuration-processor</artifactId>
    <optional>true</optional>
</dependency>
<dependency>
    <groupId>org.projectlombok</groupId>
    <artifactId>lombok</artifactId>
    <optional>true</optional>
</dependency>
<dependency>
    <groupId>org.springframework.boot</groupId>
    <artifactId>spring-boot-starter-test</artifactId>
    <scope>test</scope>
</dependency>
<dependency>
    <groupId>org.jsoup</groupId>
    <artifactId>jsoup</artifactId>
    <version>1.10.2</version>
</dependency>
<dependency>
    <groupId>com.alibaba</groupId>
    <artifactId>fastjson</artifactId>
    <version>1.2.62</version>
</dependency>
server.port=8088 spring.thymeleaf.cache=false@Configuration public class ElasticSearchClientConfig { @Bean public RestHighLevelClient restHighLevelClient(){ RestHighLevelClient client = new RestHighLevelClient( RestClient.builder( new HttpHost("localhost", 9200, "http"))); return client; } } -
获取京东数据
public static List<Goods> parseHtml(String keyword) throws IOException { String url = "https://search.jd.com/Search?keyword=java"; Document document = Jsoup.parse(new URL(url),3000); Element element = document.getElementById("J_goodsList"); Elements elements = element.getElementsByTag("li"); List<Goods> goodsList = new ArrayList<>(); for(Element el : elements){ String img = el.getElementsByTag("img").eq(0).attr("data-lazy-img"); String price = el.select(".p-price em").text() + el.select(".p-price i").text(); String title = el.select(".p-name em").text().replace("<font class=\"skcolor_ljg\">","").replace("</font>",""); Goods goods = new Goods(); goods.setImg(img); goods.setPrice(price); goods.setTitle(title); goodsList.add(goods); } return goodsList; } -
将获取的数据放入ES
public Boolean dataToEs(String keywords) throws IOException { List<Goods> contents = HtmlParseUtil.parseHtml(keywords); //批量插入到es中 BulkRequest bulkRequest = new BulkRequest(); bulkRequest.timeout("2m"); for (int i = 0; i < contents.size(); i++) { System.out.println(JSON.toJSONString(contents.get(i))); bulkRequest.add( new IndexRequest("jd_goods").source(JSON.toJSONString(contents.get(i)), XContentType.JSON)); } BulkResponse bulk = restHighLevelClient.bulk(bulkRequest, RequestOptions.DEFAULT); return !bulk.hasFailures(); } -
将ES中的数据返回给前端
public List<Map<String,Object>> searchPage(String keyword, int pageNo, int pageSize) throws IOException { if (pageNo<1){ pageNo = 1; } //条件搜索 SearchRequest searchRequest = new SearchRequest("jd_goods"); //构建搜索条件 SearchSourceBuilder searchSourceBuilder = new SearchSourceBuilder(); //实现分页功能 searchSourceBuilder.from(pageNo); searchSourceBuilder.size(pageSize); //精确匹配 TermQueryBuilder termQueryBuilder = QueryBuilders.termQuery("title",keyword); searchSourceBuilder.query(termQueryBuilder); //60s加载时间 searchSourceBuilder.timeout(new TimeValue(60, TimeUnit.SECONDS)); //高亮 HighlightBuilder highlightBuilder = new HighlightBuilder(); highlightBuilder.field("title"); //这里可以配置多个字段,信息等等 //关闭多个高亮 highlightBuilder.requireFieldMatch(false); highlightBuilder.preTags("<span style='color:red'>"); highlightBuilder.postTags("</span>"); searchSourceBuilder.highlighter(highlightBuilder); //执行搜索 searchRequest.source(searchSourceBuilder); SearchResponse searchResponse = restHighLevelClient.search(searchRequest, RequestOptions.DEFAULT); //解析结果 ArrayList<Map<String,Object>> list = new ArrayList<>(); for (SearchHit documentFields : searchResponse.getHits().getHits()) { //解析我们的高亮字段 Map<String, HighlightField> highlightFields = documentFields.getHighlightFields(); HighlightField title = highlightFields.get("title"); //原来的结果 Map<String, Object> sourceAsMap = documentFields.getSourceAsMap(); if (documentFields != null) { Text[] fragments = title.fragments(); String newTitle = ""; //将高亮替换原来的字段 for (Text text : fragments) { newTitle += text; } sourceAsMap.put("title",newTitle); } list.add(sourceAsMap); } return list; } -
前端渲染
<!DOCTYPE html>
<html xmlns:th="http://www.thymeleaf.org">

<head>
	<meta charset="utf-8"/>
	<title>仿京东实战</title>
	<link rel="stylesheet" th:href="@{/css/style.css}"/>
</head>

<body class="pg">
<div class="page" id="app">
	<div id="mallPage" class=" mallist tmall- page-not-market ">

		<!-- 头部搜索 -->
		<div id="header" class=" header-list-app">
			<div class="headerLayout">
				<div class="headerCon ">
					<!-- Logo-->
					<h1 id="mallLogo">
						<img th:src="@{/images/jdlogo.png}" alt="">
					</h1>

					<div class="header-extra">

						<!--搜索-->
						<div id="mallSearch" class="mall-search">
							<form name="searchTop" class="mallSearch-form clearfix">
								<fieldset>
									<legend>天猫搜索</legend>
									<div class="mallSearch-input clearfix">
										<div class="s-combobox" id="s-combobox-685">
											<div class="s-combobox-input-wrap">
												<input v-model="searchValue" type="text" autocomplete="off" value="dd" id="mq"
															 class="s-combobox-input" aria-haspopup="true">
											</div>
										</div>
										<button type="submit" id="searchbtn" @click.prevent="search">搜索</button>
									</div>
								</fieldset>
							</form>
							<ul class="relKeyTop">
								<li><a>狂神说Java</a></li>
								<li><a>狂神说前端</a></li>
								<li><a>狂神说Linux</a></li>
								<li><a>狂神说大数据</a></li>
								<li><a>狂神聊理财</a></li>
							</ul>
						</div>
					</div>
				</div>
			</div>
		</div>

		<!-- 商品详情页面 -->
		<div id="content">
			<div class="main">
				<!-- 品牌分类 -->
				<form class="navAttrsForm">
					<div class="attrs j_NavAttrs" style="display:block">
						<div class="brandAttr j_nav_brand">
							<div class="j_Brand attr">
								<div class="attrKey">
									品牌
								</div>
								<div class="attrValues">
									<ul class="av-collapse row-2">
										<li><a href="#"> 狂神说 </a></li>
										<li><a href="#"> Java </a></li>
									</ul>
								</div>
							</div>
						</div>
					</div>
				</form>

				<!-- 排序规则 -->
				<div class="filter clearfix">
					<a class="fSort fSort-cur">综合<i class="f-ico-arrow-d"></i></a>
					<a class="fSort">人气<i class="f-ico-arrow-d"></i></a>
					<a class="fSort">新品<i class="f-ico-arrow-d"></i></a>
					<a class="fSort">销量<i class="f-ico-arrow-d"></i></a>
					<a class="fSort">价格<i class="f-ico-triangle-mt"></i><i class="f-ico-triangle-mb"></i></a>
				</div>

				<!-- 商品详情 -->
				<div class="view grid-nosku">

					<div class="product" v-for="(item,i) in results">
						<div class="product-iWrap">
							<!--商品封面-->
							<div class="productImg-wrap">
								<a class="productImg">
									<img src="https://img.alicdn.com/bao/uploaded/i1/3899981502/O1CN01q1uVx21MxxSZs8TVn_!!0-item_pic.jpg">
								</a>
							</div>
							<!--价格-->
							<p class="productPrice" v-html="item.price">
							</p>
							<!--标题-->
							<p class="productTitle">
								<a v-html="item.title"> </a>
							</p>
							<!-- 店铺名 -->
							<div class="productShop">
								<span>店铺: 狂神说Java </span>
							</div>
							<!-- 成交信息 -->
							<p class="productStatus">
								<span>月成交<em>999笔</em></span>
								<span>评价 <a>3</a></span>
							</p>
						</div>
					</div>
				</div>
			</div>
		</div>
	</div>
</div>

<script src="https://unpkg.com/vue/dist/vue.js"></script>
<script src="https://cdn.bootcdn.net/ajax/libs/axios/0.21.1/axios.min.js"></script>
<script>
	new Vue({
		el:'#app',
		data:{
			searchValue:"",
			results:[]
		},
		methods:{
			search(){
				axios.get("/queryGoods/"+this.searchValue+"/1/10").then(res =>{
					console.log(res)
					this.results = res.data;
				})
			}
		}
	});
</script>

</body>
</html>


 1352
1352

 被折叠的 条评论
为什么被折叠?
被折叠的 条评论
为什么被折叠?
 到【灌水乐园】发言


