


 这篇博客介绍了如何将RGB图像转换为二值mask,并进一步将这些mask转化为COCO格式的数据集。首先,通过`rgb2mask.py`脚本将RGB图像分割成二值mask,然后使用`mask2coco.py`将这些mask转换为COCO格式的JSON文件,同时处理图像文件,以供模型训练使用。整个过程涉及图像处理、文件重命名和数据集结构的构建,适用于实例分割任务。
文章目录
前言
前文说到,mask可以转labelme,然后再转coco。但对于实例级的mask事情变得有点不同,需先将RGB的mask拆解为二值mask然后进行直接操作,省略labelme这一步骤。
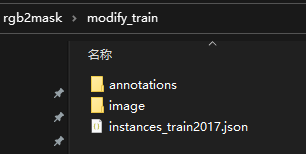
image文件夹下
annotations文件夹下
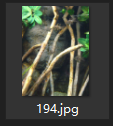
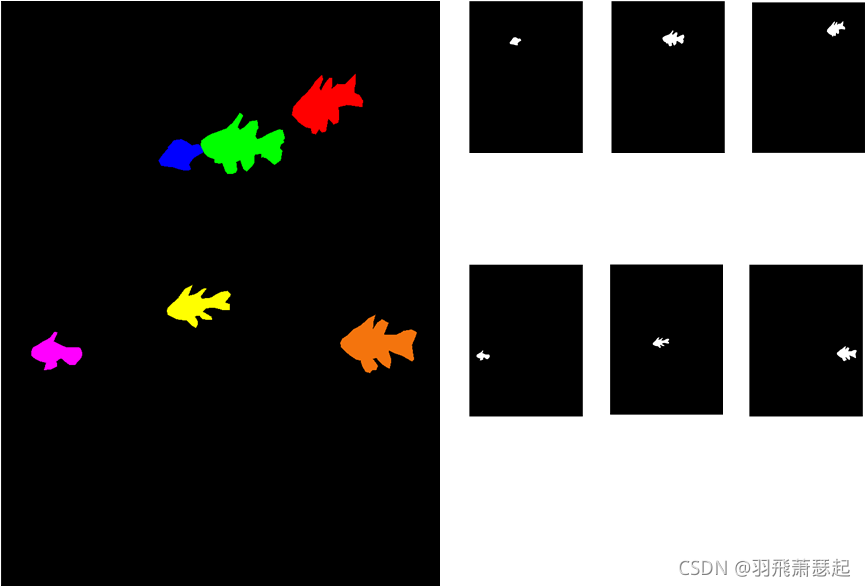
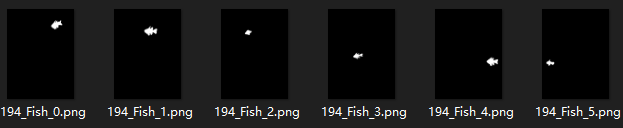 模型加载处理好的数据效果
RGB转二值mask
 rgb2mask.py
import cv2
import numpy as np
import os, glob

part = "test"

def rgb2masks(label_name):
# Camouflaged:
# COD10K-CAM-SuperNumber-SuperClass-SubNumber-SubClass-ImageNumber

# Non-Camouflaged:
# COD10K-NonCAM-SuperNumber-SuperClass-SubNumber-SubClass-ImageNumber

    name = os.path.split(label_name)[-1].split('.')[0]
    lbl_id = name.split('-')[-1]
    subClass = name.split('-')[-2]
    lbl = cv2.imread(label_name, 1)
    try:
        h, w = lbl.shape[:2]

        leaf_dict = {}
        idx = 0
        white_mask = np.ones((h, w, 3), dtype=np.uint8) * 255
        for i in range(h):
            for j in range(w):
                if tuple(lbl[i][j]) in leaf_dict or tuple(lbl[i][j]) == (0, 0, 0):
                    continue
                leaf_dict[tuple(lbl[i][j])] = idx
                mask = (lbl == lbl[i][j]).all(-1)
                # leaf = lbl * mask[..., None]      # colorful leaf with black background
                # np.repeat(mask[...,None],3,axis=2)    # 3D mask
                leaf = np.where(mask[..., None], white_mask, 0)
                mask_name = './'+part+'/annotations/' + lbl_id +'_'+subClass +'_'+ str(idx) + '.png'  # ImageNumber_SubClass_idx.png
                cv2.imwrite(mask_name, leaf)
                idx += 1
        print("正常:"+label_name)
    except:
        print("cannot read:"+label_name)
        with open(part+"_error.txt",'a+') as f:
            f.write(label_name)
            f.write('\n')

label_dir = './instance_'+part
label_list = glob.glob(os.path.join(label_dir, '*.png'))
for label_name in label_list:
    rgb2masks(label_name)
二值mask转coco格式
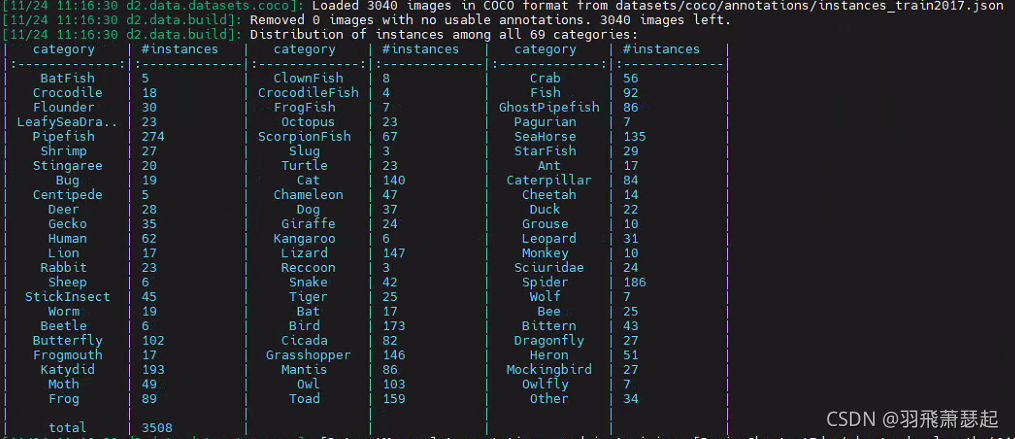
这块的代码作用有二,1.将原始图片移动并重命名 2.生成coco的json文件
mask2coco.py
import datetime
import json
import os
import re
import fnmatch
from PIL import Image
import numpy as np
from pycococreatortools import pycococreatortools
from glob import glob
import cv2
import shutil

part = 'test'
IMAGE_SRC = 'C:/Users/awei/Desktop/rgb2mask/Image_'+part+'/'
ROOT_DIR = 'C:/Users/awei/Desktop/rgb2mask/modify_'+part
IMAGE_DIR = os.path.join(ROOT_DIR, "image")
ANNOTATION_DIR = os.path.join(ROOT_DIR, "annotations")

INFO = {
    "description": "Leaf Dataset",
    "url": "https://github.com/waspinator/pycococreator",
    "version": "0.1.0",
    "year": 2017,
    "contributor": "Francis_Liu",
    "date_created": datetime.datetime.utcnow().isoformat(' ')
}

LICENSES = [
    {
        "id": 1,
        "name": "Attribution-NonCommercial-ShareAlike License",
        "url": "http://creativecommons.org/licenses/by-nc-sa/2.0/"
    }
]

# 根据自己的需要添加种类
CATEGORIES = [
    # {
    #     'id': 1,  # 是数字1,不是字符串
    #     'name': 'leaf',
    #     'supercategory': 'leaf',
    # }
]

# Camouflaged:
# COD10K-CAM-SuperNumber-SuperClass-SubNumber-SubClass-ImageNumber

# Non-Camouflaged:
# COD10K-NonCAM-SuperNumber-SuperClass-SubNumber-SubClass-ImageNumber
# Super_Class_Dictionary = {'1':'Aquatic', '2':'Terrestrial', '3':'Flying', '4':'Amphibian', '5':'Other'}
# Sub_Class_Dictionary = {'1':'batFish','2':'clownFish','3':'crab','4':'crocodile','5':'crocodileFish','6':'fish','7':'flounder',
#              '8':'frogFish','9':'ghostPipefish','10':'leafySeaDragon','11':'octopus','12':'pagurian','13':'pipefish',
#               '14':'scorpionFish','15':'seaHorse','16':'shrimp','17':'slug','18':'starFish','19':'stingaree',
#               '20':'turtle','21':'ant','22':'bug','23':'cat','24':'caterpillar','25':'centipede','26':'chameleon',
#               '27':'cheetah','28':'deer','29':'dog','30':'duck','31':'gecko','32':'giraffe','33':'grouse','34':'human',
#               '35':'kangaroo','36':'leopard','37':'lion','38':'lizard','39':'monkey','40':'rabbit','41':'reccoon',
#               '42':'sciuridae','43':'sheep','44':'snake','45':'spider','46':'stickInsect','47':'tiger','48':'wolf',
#               '49':'worm','50':'bat','51':'bee','52':'beetle','53':'bird','54':'bittern','55':'butterfly','56':'cicada',
#               '57':'dragonfly','58':'frogmouth','59':'grasshopper','60':'heron','61':'katydid','62':'mantis',
#               '63':'mockingbird','64':'moth','65':'owl','66':'owlfly','67':'frog','68':'toad','69':'other'}

def getCategories():
    image_files = glob(IMAGE_SRC + "*.jpg")
    subClassList = []
    temp = []
    for image in image_files:

        image_name = os.path.basename(image).split('.')[0]
        try:
            _,type,superNumer,superClass,subNumber,subClass,imageNumber = image_name.split('-')
        except:
            print("NonCAM")
            continue


        if not type=="CAM":
            continue


        if not os.path.exists(IMAGE_DIR+"/"+str(imageNumber)+".jpg"):
            shutil.copy(image, IMAGE_DIR+"/"+str(imageNumber)+".jpg")
        if subClass not in subClassList:
            subClassList.append(subClass)
            item = {'id':int(subNumber),  # 强转int类型,很重要!!
                    'name':subClass,
                    'supercategory':superClass
            }
            temp.append(item)
    global CATEGORIES
    CATEGORIES = sorted(temp,key=lambda x: x["id"])


def filter_for_jpeg(root, files):
    file_types = ['*.jpeg', '*.jpg', '*.png']
    file_types = r'|'.join([fnmatch.translate(x) for x in file_types])
    files = [os.path.join(root, f) for f in files]
    files = [f for f in files if re.match(file_types, f)]
    return files


def filter_for_annotations(root, files, image_filename):
    file_types = ['*.png']
    file_types = r'|'.join([fnmatch.translate(x) for x in file_types])
    basename_no_extension = os.path.splitext(os.path.basename(image_filename))[0]
    file_name_prefix = basename_no_extension + '_.*'   # 用于匹配对应的二值mask
    files = [os.path.join(root, f) for f in files]
    files = [f for f in files if re.match(file_types, f)]
    files = [f for f in files if re.match(file_name_prefix, os.path.splitext(os.path.basename(f))[0])]
    return files


def main():
    getCategories()
    coco_output = {
        "info": INFO,
        "licenses": LICENSES,
        "categories": CATEGORIES,
        "images": [],
        "annotations": []
    }


    image_id = 1
    segmentation_id = 1

    # filter for jpeg images
    for root, _, files in os.walk(IMAGE_DIR):
        image_files = filter_for_jpeg(root, files)

        # go through each image
        for image_filename in image_files:
            image = Image.open(image_filename)
            image_info = pycococreatortools.create_image_info(
                    image_id, os.path.basename(image_filename), image.size)
            coco_output["images"].append(image_info)

            # filter for associated png annotations
            for root, _, files in os.walk(ANNOTATION_DIR):
                annotation_files = filter_for_annotations(root, files, image_filename)

                # go through each associated annotation
                for annotation_filename in annotation_files:


                    # class_id = [x['id'] for x in CATEGORIES if x['name'] in annotation_filename][0]
                    class_id = [x['id'] for x in CATEGORIES if x['name'].upper() == annotation_filename.split('_')[-2].upper()][0]  # 精确匹配类型名

                    print(annotation_filename+" "+str(class_id))

                    category_info = {'id': class_id, 'is_crowd': 'crowd' in image_filename}
                    binary_mask = np.asarray(Image.open(annotation_filename)
                                             .convert('1')).astype(np.uint8)

                    annotation_info = pycococreatortools.create_annotation_info(
                            segmentation_id, image_id, category_info, binary_mask,
                            image.size, tolerance=2)

                    if annotation_info is not None:
                        coco_output["annotations"].append(annotation_info)

                    segmentation_id = segmentation_id + 1

            image_id = image_id + 1

    with open(ROOT_DIR+'/instances_'+part+'2017.json', 'w') as output_json_file:
        json.dump(coco_output, output_json_file)


if __name__ == "__main__":
    main()


 8612
8612

 被折叠的 条评论
为什么被折叠?
被折叠的 条评论
为什么被折叠?
 到【灌水乐园】发言


