一、服务引入
服务消费方需要用@DubboReference注解来引入Dubbo服务,应用在启动过程中,进行完服务导出之后,就会进行服务引入,属性的类型就是一个Dubbo服务接口,而服务引入最终要做到的就是给这个属性赋值一个接口代理对象。
@DubboReference
private DemoService demoService;
我们知道dubbo服务启动的时候会将带有@DubboReference的属性解析为ReferenceBean对象,由于改bean实现了FactoryBean接口,最终spring会执行到类的getObject方法,通过方法名createLazyProxy就能猜出来这里其实是懒加载的处理逻辑,也就是并没有直接将服务进行引入,这里只是创建一个假代理对象。
public T getObject() {
	if (lazyProxy == null) {
		createLazyProxy();
	}
	return (T) lazyProxy;
}
下面的方法利用到了jdk的动态代理创建了lazyProxy对象
private void createLazyProxy() {

	ProxyFactory proxyFactory = new ProxyFactory();
	proxyFactory.setTargetSource(new DubboReferenceLazyInitTargetSource());
	proxyFactory.addInterface(interfaceClass);
	Class<?>[] internalInterfaces = AbstractProxyFactory.getInternalInterfaces();
	for (Class<?> anInterface : internalInterfaces) {
		proxyFactory.addInterface(anInterface);
	}
	if (!StringUtils.isEquals(interfaceClass.getName(), interfaceName)) {
		try {
			Class<?> serviceInterface = ClassUtils.forName(interfaceName, beanClassLoader);
			proxyFactory.addInterface(serviceInterface);
		} catch (ClassNotFoundException e) {
		}
	}

	this.lazyProxy = proxyFactory.getProxy(this.beanClassLoader);
}
调用 LazyProxy 的方法会触发 JdkDynamicAopProxy#invoke(),它会在第一次调用非 Object 方法时创建实际的代理对象。创建实际的对象由 DubboReferenceLazyInitTargetSource 完成
private class DubboReferenceLazyInitTargetSource extends AbstractLazyCreationTargetSource {

	@Override
	protected Object createObject() throws Exception {
		return getCallProxy();
	}

	@Override
	public synchronized Class<?> getTargetClass() {
		return getInterfaceClass();
	}
}
而getCallProxy方法就会调用到到init()方法,init()方法去初始化ref(真正的代理对象)
public T get() {
	if (ref == null) {
		// ensure start module, compatible with old api usage
		getScopeModel().getDeployer().start();

		synchronized (this) {
			if (ref == null) {
				init();
			}
		}
	}
	return ref;
}
ref = createProxy(referenceParameters);
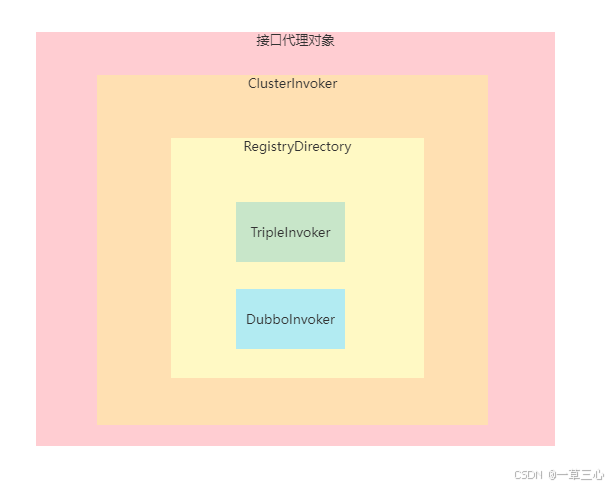
createProxy的过程就是调用方法createInvokerForRemote创建invoker的过程,生成好Invoker对象之后,就会把Invoker对象进行封装并生成一个服务接口的代理对象,代理对象调用某个方法时,会把所调用的方法信息生成一个Invocation对象,并最终通过某一个Invoker的invoke()方法把Invocation对象发送出去,所以代理对象中的Invoker对象是关键,服务引入最核心的就是要生成这些Invoker对象。
private void createInvokerForRemote() {
	if (urls.size() == 1) {
		URL curUrl = urls.get(0);
		invoker = protocolSPI.refer(interfaceClass, curUrl);
		if (!UrlUtils.isRegistry(curUrl)){
			List<Invoker<?>> invokers = new ArrayList<>();
			invokers.add(invoker);
			invoker = Cluster.getCluster(scopeModel, Cluster.DEFAULT).join(new StaticDirectory(curUrl, invokers), true);
		}
	} else {
		List<Invoker<?>> invokers = new ArrayList<>();
		URL registryUrl = null;
		for (URL url : urls) {
			invokers.add(protocolSPI.refer(interfaceClass, url));
			if (UrlUtils.isRegistry(url)) {
				registryUrl = url;
			}
		}
		if (registryUrl != null) {
			String cluster = registryUrl.getParameter(CLUSTER_KEY, ZoneAwareCluster.NAME);
			invoker = Cluster.getCluster(registryUrl.getScopeModel(), cluster, false).join(new StaticDirectory(registryUrl, invokers), false);
		} else {
			if (CollectionUtils.isEmpty(invokers)) {
				throw new IllegalArgumentException("invokers == null");
			}
			URL curUrl = invokers.get(0).getUrl();
			String cluster = curUrl.getParameter(CLUSTER_KEY, Cluster.DEFAULT);
			invoker = Cluster.getCluster(scopeModel, cluster).join(new StaticDirectory(curUrl, invokers), true);
		}
	}
}
Invoker是非常核心的一个概念,也有非常多种类,比如:
1. TripleInvoker:表示利用tri协议把Invocation对象发送出去
2. DubboInvoker:表示利用dubbo协议把Invocation对象发送出去
3. ClusterInvoker:有负载均衡功能
像TripleInvoker和DubboInvoker对应的就是具体服务提供者,包含了服务提供者的ip地址和端口,并且会负责跟对应的ip和port建立Socket连接,后续就可以基于这个Socket连接并按协议格式发送
Invocation对象。
比如现在引入了DemoService这个服务,那如果该服务支持:
1. 一个tri协议,绑定的端口为20882
2. 一个dubbo协议,绑定的端口为20883
那么在服务消费端这边,就会生成一个TripleInvoker和一个DubboInvoker,代理对象执行方法时就
会进行负载均衡选择其中一个Invoker进行调用。
一、接口级服务引入
一、引入流程
在Dubbo2.7中,只有接口级服务注册,服务消费者会利用接口名从注册中心找到该服务接口所有的服务URL,服务消费者会根据每个服务URL的protocol、ip、port生成对应的Invoker对象,比如生成TripleInvoker、DubboInvoker等,调用这些Invoker的invoke()方法就会发送数据到对应的ip、
port。
服务导出时,Dubbo3.0默认情况下即会进行接口级注册,也会进行应用级注册,目的就是为了兼
容服务消费者应用用的还是Dubbo2.7,用Dubbo2.7就只能老老实实的进行接口级服务引入。
接口级服务引入核心就是要找到当前所引入的服务有哪些服务URL,然后根据每个服务URL生成对应的Invoker,流程为:
1.首先,根据当前引入的服务接口生成一个RegistryDirectory对象,表示动态服务目录,用来查询并缓存服务提供者信息。
2.RegistryDirectory对象会根据服务接口名去注册中心,比如Zookeeper中的/dubbo/服务接口名称/providers/节点下查找所有的服务URL。
3. 根据每个服务URL生成对应的Invoker对象,并把Invoker对象存在RegistryDirectory对象的invokers属性中RegistryDirectory对象也会监听/dubbo/服务接口名/providers/节点的数据变化,一旦发生了变化就要进行相应的改变。
4.最后将RegistryDirectory对象生成一个ClusterInvoker对象,到时候调用ClusterInvoker对象的invoke()方法就会进行负载均衡选出某一个Invoker进行调用。

二、源码流程解析
createInvokerForRemote方法中利用url上的属性调用protocolSPI.refer方法,根据url当前前缀为registry可知,会执行到RegistryProtocol.refer方法。

接口级服务引入调用的核心方法为refreshInterfaceInvoker
protected void refreshInterfaceInvoker(CountDownLatch latch) {
	clearListener(invoker);
	if (needRefresh(invoker)) {
		if (logger.isDebugEnabled()) {
			logger.debug("Re-subscribing interface addresses for interface " + type.getName());
		}

		if (invoker != null) {
			invoker.destroy();
		}
		invoker = registryProtocol.getInvoker(cluster, registry, type, url);
	}
}
registryProtocol#getInvoker方法中创建了RegistryDirectory,它会调用registryProtocol#subscribe方法会监听/dubbo/服务接口名/providers/节点的数据,一旦发生了变化那么相应的invoker也要变化,就会调用registryProtocol#refreshInvoker方法刷新覆盖原来的invoker,否则就可能导致invoker调用方法失败。
public <T> ClusterInvoker<T> getInvoker(Cluster cluster, Registry registry, Class<T> type, URL url) {
	DynamicDirectory<T> directory = new RegistryDirectory<>(type, url);
	return doCreateInvoker(directory, cluster, registry, type);
}
生成的invoker都存放在RegistryDirectory的urlInvokerMap和invokers中
/**
 * Map<url, Invoker> cache service url to invoker mapping.
 * The initial value is null and the midway may be assigned to null, please use the local variable reference
 */
protected volatile Map<URL, Invoker<T>> urlInvokerMap;

/**
 * All invokers from registry
 */
private volatile BitList<Invoker<T>> invokers = BitList.emptyList();
registryProtocol#subscribe方法,可以看到下图中订阅的路径为dubbo/org.apache.dubbo.demo.Demoservice
public void subscribe(URL url) {
	setSubscribeUrl(url);
	consumerConfigurationListener.addNotifyListener(this);
	referenceConfigurationListener = new ReferenceConfigurationListener(url.getOrDefaultModuleModel(), this, url);
	registry.subscribe(url, this);
}

zookeeper中数据如下,当有新的应用实例启动的时候,又会向org.apache.dubbo.DemoService下的provoders目录注册一个新的数据,此时registryDirectory会监听到这个目录的变化,就会调用refreshInvoker重新生成invoker,存入到urlInvokerMap和集合invokers中。

refreshInvoker主要做的事情就是根据url上的dubbo协议生成DubboInvoker,这里同样利用SPI机制作用会调用到DubboProtocol#protocolBindingRefer方法中。

DubboInvoker已经是最底层的Invoker了,具有远程通信的功能
public <T> Invoker<T> protocolBindingRefer(Class<T> serviceType, URL url) throws RpcException {
	checkDestroyed();
	optimizeSerialization(url);

	// create rpc invoker.
	DubboInvoker<T> invoker = new DubboInvoker<T>(serviceType, url, getClients(url), invokers);
	invokers.add(invoker);

	return invoker;
}
看下它的构造方法,serviceType就是接口类型,ExchangeClient就是与远程netty服务端建立起来的连接,向netty服务端发送请求并接受请求。
public DubboInvoker(Class<T> serviceType, URL url, ExchangeClient[] clients, Set<Invoker<?>> invokers) {
	super(serviceType, url, new String[]{INTERFACE_KEY, GROUP_KEY, TOKEN_KEY});
	this.clients = clients;
	// get version.
	this.version = url.getVersion(DEFAULT_VERSION);
	this.invokers = invokers;
	this.serverShutdownTimeout = ConfigurationUtils.getServerShutdownTimeout(getUrl().getScopeModel());
}
初始化ExchangeClient会调用到initClient方法,其最底层也就是创建nettyClient,连接远程服务,具体就是netty相关的内容了,后面会单独讲解netty
private ExchangeClient initClient(URL url) {

	String str = url.getParameter(CLIENT_KEY, url.getParameter(SERVER_KEY, DEFAULT_REMOTING_CLIENT));
	url = url.addParameter(CODEC_KEY, DubboCodec.NAME);
	// enable heartbeat by default
	url = url.addParameterIfAbsent(HEARTBEAT_KEY, String.valueOf(DEFAULT_HEARTBEAT));

	ExchangeClient client;
	try {
		// Replace InstanceAddressURL with ServiceConfigURL.
		url = new ServiceConfigURL(DubboCodec.NAME, url.getUsername(), url.getPassword(), url.getHost(), url.getPort(), url.getPath(),  url.getParameters());
		// connection should be lazy
		if (url.getParameter(LAZY_CONNECT_KEY, false)) {
			client = new LazyConnectExchangeClient(url, requestHandler);
		} else {
			client = Exchangers.connect(url, requestHandler);
		}

	} catch (RemotingException e) {
		throw new RpcException("Fail to create remoting client for service(" + url + "): " + e.getMessage(), e);
	}

	return client;
}
最终完成了DubboInvoker的创建,然后将其都存入到了registryDirectory中,那么最终回到了registryProtocol#doCreateInvoker方法中。上面的步骤只是执行完成了倒数第二行directory.subscribe(toSubscribeUrl(urlToRegistry)),最后一行cluster.join(directory, true)便是将dubbo拥有负载均衡的功能。
protected <T> ClusterInvoker<T> doCreateInvoker(DynamicDirectory<T> directory, Cluster cluster, Registry registry, Class<T> type) {
	directory.setRegistry(registry);
	directory.setProtocol(protocol);
	// all attributes of REFER_KEY
	Map<String, String> parameters = new HashMap<>(directory.getConsumerUrl().getParameters());
	URL urlToRegistry = new ServiceConfigURL(
		parameters.get(PROTOCOL_KEY) == null ? DUBBO : parameters.get(PROTOCOL_KEY),
		parameters.remove(REGISTER_IP_KEY), 0, getPath(parameters, type), parameters);
	urlToRegistry = urlToRegistry.setScopeModel(directory.getConsumerUrl().getScopeModel());
	urlToRegistry = urlToRegistry.setServiceModel(directory.getConsumerUrl().getServiceModel());
	if (directory.isShouldRegister()) {
		directory.setRegisteredConsumerUrl(urlToRegistry);
		registry.register(directory.getRegisteredConsumerUrl());
	}
	directory.buildRouterChain(urlToRegistry);
	directory.subscribe(toSubscribeUrl(urlToRegistry));

	return (ClusterInvoker<T>) cluster.join(directory, true);
}
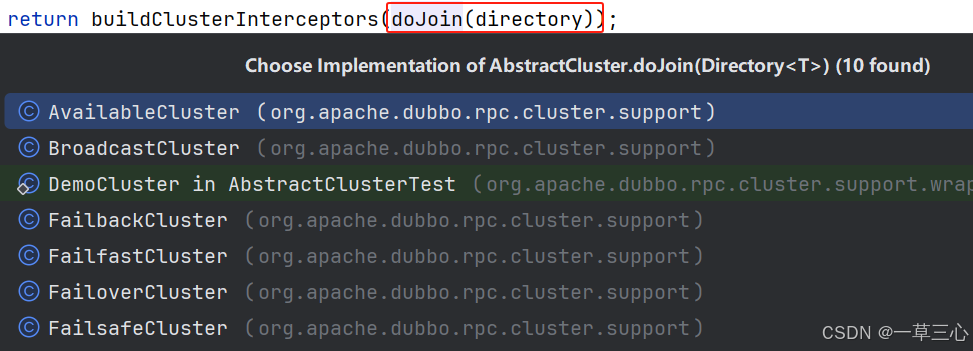
可以看到Cluster#doJoin方法中有多种Cluster方法的实现,每个实现也代表不同的负载均衡策略,常用的有AvailableCluster,FailoverCluster,FailfastCluster;默认负载均衡策略为Failover(当服务消费者调用服务时,如果第一个服务提供者不可用或调用失败,Dubbo会自动切换到其他可用的服务提供者进行重试)
public <T> Invoker<T> join(Directory<T> directory, boolean buildFilterChain) throws RpcException {
	if (buildFilterChain) {
		return buildClusterInterceptors(doJoin(directory));
	} else {
		return doJoin(directory);
	}
}
 最终doJoin方法会将RegistryDirectory最为参数,包装为FailoverClusterInvoker返回。
public <T> AbstractClusterInvoker<T> doJoin(Directory<T> directory) throws RpcException {
	return new FailoverClusterInvoker<>(directory);
}
当发起远程调用的时候,那么最先执行到FailoverClusterInvoker#doInvoke方法,那么会利用类中
LoadBalance#select方法选择出一个invoker进行服务调用,具体方法调用流程与负载均衡策略会单独一个章节讲解,这里先了解服务引入流程。
public Result doInvoke(Invocation invocation, final List<Invoker<T>> invokers, LoadBalance loadbalance) throws RpcException {
	List<Invoker<T>> copyInvokers = invokers;
	checkInvokers(copyInvokers, invocation);
	String methodName = RpcUtils.getMethodName(invocation);
	int len = calculateInvokeTimes(methodName);
	// retry loop.
	RpcException le = null; // last exception.
	List<Invoker<T>> invoked = new ArrayList<Invoker<T>>(copyInvokers.size()); // invoked invokers.
	Set<String> providers = new HashSet<String>(len);
	for (int i = 0; i < len; i++) {
		//Reselect before retry to avoid a change of candidate `invokers`.
		//NOTE: if `invokers` changed, then `invoked` also lose accuracy.
		if (i > 0) {
			checkWhetherDestroyed();
			copyInvokers = list(invocation);
			// check again
			checkInvokers(copyInvokers, invocation);
		}
		Invoker<T> invoker = select(loadbalance, invocation, copyInvokers, invoked);
		invoked.add(invoker);
		RpcContext.getServiceContext().setInvokers((List) invoked);
		boolean success = false;
		try {
			Result result = invokeWithContext(invoker, invocation);
			if (le != null && logger.isWarnEnabled()) {
				logger.warn("Although retry the method " + methodName
						+ " in the service " + getInterface().getName()
						+ " was successful by the provider " + invoker.getUrl().getAddress()
						+ ", but there have been failed providers " + providers
						+ " (" + providers.size() + "/" + copyInvokers.size()
						+ ") from the registry " + directory.getUrl().getAddress()
						+ " on the consumer " + NetUtils.getLocalHost()
						+ " using the dubbo version " + Version.getVersion() + ". Last error is: "
						+ le.getMessage(), le);
			}
			success = true;
			return result;
		} catch (RpcException e) {
			if (e.isBiz()) { // biz exception.
				throw e;
			}
			le = e;
		} catch (Throwable e) {
			le = new RpcException(e.getMessage(), e);
		} finally {
			if (!success) {
				providers.add(invoker.getUrl().getAddress());
			}
		}
	}
	throw new RpcException(le.getCode(), "Failed to invoke the method "
			+ methodName + " in the service " + getInterface().getName()
			+ ". Tried " + len + " times of the providers " + providers
			+ " (" + providers.size() + "/" + copyInvokers.size()
			+ ") from the registry " + directory.getUrl().getAddress()
			+ " on the consumer " + NetUtils.getLocalHost() + " using the dubbo version "
			+ Version.getVersion() + ". Last error is: "
			+ le.getMessage(), le.getCause() != null ? le.getCause() : le);
}
二、应用级务引入
一、引入流程
在Dubbo中,应用级服务引入,并不是指引入某个应用,这里和SpringCloud是有区别的,在
SpringCloud中,服务消费者只要从注册中心找到要调用的应用的所有实例地址就可以了,但是在
Dubbo中找到应用的实例地址还远远不够,因为在Dubbo中,我们是直接使用的接口,所以在Dubbo中就算是应用级服务引入,最终还是得找到服务接口有哪些服务提供者。
所以,对于服务消费者而言,不管是使用接口级服务引入,还是应用级服务引入,最终的结果应该得是一样的,也就是某个服务接口的提供者Invoker是一样的,不可能使用应用级服务引入得到的
Invoker多一个或少一个,但是,目前会有情况不一致,就是一个协议有多个端口时,比如在服
务提供者应用这边支持:
dubbo.application.name=dubbo-springboot-demo-provider

dubbo.application.protocols.p1.name=dubbo
dubbo.application.protocols.p1.port=20881

dubbo.application.protocols.p2=tri
dubbo.application.protocols.p2.port=20882

dubbo.application.protocols.p3.name=tri
dubbo.application.protocols.p3.port=50051
那么在消费端进行服务引入时,比如引入DemoService时,接口级服务引入会生成3个Invoker(2个TripleInvoker,1个DubboInvoker),而应用级服务引入只会生成2个Invoker(1个TripleInvoker,1个DubboInvoker),原因就是在进行应用级注册时是按照一个协议对应一个port存的。
那既然接口级服务引入和应用级服务引入最终的结果差不多,有同学可能就不理解了,那应用级服务入有什么好处呢?要知道应用级服务引入和应用级服务注册是对应,服务提供者应用如果只做应用级注册,那么对应的服务消费者就只能进行应用级服务引入,好处就是前面所说的,减轻了注册中心的压力等,那么带来的影响就是服务消费者端寻找服务URL的逻辑更复杂了。
只要找到了当前引入服务对应的服务URL,然后生成对应的Invoker,并最终生成一个
ClusterInvoker。
在进行应用级服务引入时:
1.首先,根据当前引入的服务接口生成一个ServiceDiscoveryRegistryDirectory对象,表示动态服务目录,用来查询并缓存服务提供者信息。
2.根据接口名去获取/dubbo/mapping/服务接口名节点的内容,拿到的就是该接口所对应的应用名。
3.有了应用名之后,再去获取/services/应用名节点下的实例信息。
4.知道了实例上所有的服务URL,就根据当前引入服务的信息进行过滤,会根据引入服务的接口名+协议名,消费者可以在@DubboReference中指定协议,表示只使用这个协议调用当前服务,如果没有指定协议,那么就会去获取tri、dubbo、rest这三个协议对应的服务URL(Dubbo3.0默认只支持这三个协议)。
5.这样,经过过滤之后,就得到了当前所引入的服务对应的服务URL了,然后会根据每个服务URL生成对应的Invoker对象,并把Invoker对象存在ServiceDiscoveryRegistryDirectory对象的invokers属性中。
6.最后将ServiceDiscoveryRegistryDirectory对象生成一个ClusterInvoker对象,到时候调用ClusterInvoker对象的invoke()方法就会进行负载均衡选出某一个Invoker进行调用
二、源码流程解析
服务级引入与接口级别引入大同小异,当为接口级引入时,此时的step为FORCE_INTERFACE,会执行到migrationInvoker#migrateToForceInterfaceInvoker方法,最终refreshInterfaceInvoker方法完成引入。当为服务级别引入时,此时step为FORCE_APPLICATION,最终会调用refreshServiceDiscoveryInvoker方法完成服务引入。
switch (step) {
	case APPLICATION_FIRST:
		migrationInvoker.migrateToApplicationFirstInvoker(newRule);
		break;
	case FORCE_APPLICATION:
		success = migrationInvoker.migrateToForceApplicationInvoker(newRule);
		break;
	case FORCE_INTERFACE:
	default:
		success = migrationInvoker.migrateToForceInterfaceInvoker(newRule);
}
服务级别引入refreshServiceDiscoveryInvoker中调用registryProtocol#getServiceDiscoveryInvoker方法,该方法创建的是ServiceDiscoveryRegistryDirectory,接口级引入创建的是RegistryDirectory
protected void refreshServiceDiscoveryInvoker(CountDownLatch latch) {
	clearListener(serviceDiscoveryInvoker);
	if (needRefresh(serviceDiscoveryInvoker)) {
		if (logger.isDebugEnabled()) {
			logger.debug("Re-subscribing instance addresses, current interface " + type.getName());
		}

		if (serviceDiscoveryInvoker != null) {
			serviceDiscoveryInvoker.destroy();
		}
		serviceDiscoveryInvoker = registryProtocol.getServiceDiscoveryInvoker(cluster, registry, type, url);
	}
}
public <T> ClusterInvoker<T> getServiceDiscoveryInvoker(Cluster cluster, Registry registry, Class<T> type, URL url) {
	DynamicDirectory<T> directory = new ServiceDiscoveryRegistryDirectory<>(type, url);
	return doCreateInvoker(directory, cluster, registry, type);
}
创建invoker的过程中最终来到ServiceDiscoveryRegistry#doSubscribe方法,而上面讲解的接口级别引入区别则是调用到了ZookeeperRegistrydoSubscribe方法。
public void doSubscribe(URL url, NotifyListener listener) {
	url = addRegistryClusterKey(url);

	serviceDiscovery.subscribe(url, listener);

	boolean check = url.getParameter(CHECK_KEY, false);

	Set<String> subscribedServices = Collections.emptySet();
	try {
		ServiceNameMapping serviceNameMapping = ServiceNameMapping.getDefaultExtension(this.getUrl().getScopeModel());
		subscribedServices = serviceNameMapping.getAndListen(this.getUrl(), url, new DefaultMappingListener(url, subscribedServices, listener));
	} catch (Exception e) {
		logger.warn("Cannot find app mapping for service " + url.getServiceInterface() + ", will not migrate.", e);
	}

	if (CollectionUtils.isEmpty(subscribedServices)) {
		if (check) {
			throw new IllegalStateException("Should has at least one way to know which services this interface belongs to, subscription url: " + url);
		}
		return;
	}

	subscribeURLs(url, listener, subscribedServices);
}
其中下面这行代码则是根据url中的接口名去/dubbo/mapping目录下获取应用名,获取到应用名
dubbo-demo-annotation-provider之后,执行subscribeURLs方法
subscribedServices = serviceNameMapping.getAndListen(this.getUrl(), url, new DefaultMappingListener(url, subscribedServices, listener));

subscribeURLs方法中调用方法serviceDiscovery.getInstances根据应用名到目录/services/应用名/实例ip+实例port,获取到所有的实例信息,节点内容封装为实例对象
List<ServiceInstance> serviceInstances = serviceDiscovery.getInstances(serviceName);

节点实例内容如下:
{
	"name": "dubbo-demo-annotation-provider",
	"id": "192.168.0.129:20880",
	"address": "192.168.0.129",
	"port": 20880,
	"sslPort": null,
	"payload": {
		"@class": "org.apache.dubbo.registry.zookeeper.ZookeeperInstance",
		"id": "192.168.0.129:20880",
		"name": "dubbo-demo-annotation-provider",
		"metadata": {
			"dubbo.endpoints": "[{\"port\":20880,\"protocol\":\"dubbo\"}]",
			"dubbo.metadata-service.url-params": "{\"connections\":\"1\",\"version\":\"1.0.0\",\"dubbo\":\"2.0.2\",\"port\":\"20880\",\"protocol\":\"dubbo\"}",
			"dubbo.metadata.revision": "36db03c4847aace10831e5cfdb06c10b",
			"dubbo.metadata.storage-type": "local"
		}
	},
	"registrationTimeUTC": 1732193357653,
	"serviceType": "DYNAMIC",
	"uriSpec": null
}
根据上面实例内容上获取到的MetadataInfo以及endpoint信息,就能知道所有实例上所有的服务URL(注意:一个接口+一个协议+一个实例 : 对应一个服务URL),拿到了服务URL之后,就根据当前引入服务的信息进行过滤,经过过滤之后得到当前所引入的服务对应的服务URL。
接下来就跟接口级引入一样执行到ServiceDiscoveryRegistryDirectory#toInvokers方法,这里会循环获取到的InstanceAddressURL生成invoker,最终存在ServiceDiscoveryRegistryDirectory对象的invokers属性中,最后将ServiceDiscoveryRegistryDirectory对象生成一个ClusterInvoker对象,到时候调用ClusterInvoker对象的invoke()方法就会进行负载均衡选出某一个Invoker进行调用。
private Map<String, Invoker<T>> toInvokers(Map<String, Invoker<T>> oldUrlInvokerMap, List<URL> urls) {
	Map<String, Invoker<T>> newUrlInvokerMap = new ConcurrentHashMap<>(urls == null ? 1 : (int) (urls.size() / 0.75f + 1));
	if (urls == null || urls.isEmpty()) {
		return newUrlInvokerMap;
	}
	for (URL url : urls) {
		InstanceAddressURL instanceAddressURL = (InstanceAddressURL) url;
		if (EMPTY_PROTOCOL.equals(instanceAddressURL.getProtocol())) {
			continue;
		}
		if (!getUrl().getOrDefaultFrameworkModel().getExtensionLoader(Protocol.class).hasExtension(instanceAddressURL.getProtocol())) {
			logger.error(new IllegalStateException("Unsupported protocol " + instanceAddressURL.getProtocol() +
				" in notified url: " + instanceAddressURL + " from registry " + getUrl().getAddress() +
				" to consumer " + NetUtils.getLocalHost() + ", supported protocol: " +
				getUrl().getOrDefaultFrameworkModel().getExtensionLoader(Protocol.class).getSupportedExtensions()));
			continue;
		}

		instanceAddressURL.setProviderFirstParams(providerFirstParams);

		// Override provider urls if needed
		if (enableConfigurationListen) {
			instanceAddressURL = overrideWithConfigurator(instanceAddressURL);
		}

		Invoker<T> invoker = oldUrlInvokerMap == null ? null : oldUrlInvokerMap.get(instanceAddressURL.getAddress());
		if (invoker == null || urlChanged(invoker, instanceAddressURL)) { // Not in the cache, refer again
			try {
				boolean enabled = true;
				if (instanceAddressURL.hasParameter(DISABLED_KEY)) {
					enabled = !instanceAddressURL.getParameter(DISABLED_KEY, false);
				} else {
					enabled = instanceAddressURL.getParameter(ENABLED_KEY, true);
				}
				if (enabled) {
					invoker = protocol.refer(serviceType, instanceAddressURL);
				}
			} catch (Throwable t) {
				logger.error("Failed to refer invoker for interface:" + serviceType + ",url:(" + instanceAddressURL + ")" + t.getMessage(), t);
			}
			if (invoker != null) { // Put new invoker in cache
				newUrlInvokerMap.put(instanceAddressURL.getAddress(), invoker);
			}
		} else {
			newUrlInvokerMap.put(instanceAddressURL.getAddress(), invoker);
			oldUrlInvokerMap.remove(instanceAddressURL.getAddress(), invoker);
		}
	}
	return newUrlInvokerMap;
}
三、MigrationInvoker的生成
上面分析了接口级服务引入和应用级服务引入,最终都是得到某服务对应的服务提供者Invoker,那最终进行服务调用时,到底该怎么选择呢?
所以在Dubbo3.0中,可以配置:
dubbo.application.service-discovery.migration=APPLICATION_FIRST

FORCE_INTERFACE,强制使用接口级服务引入
FORCE_APPLICATION,强制使用应用级服务引入

APPLICATION_FIRST,智能选择是接口级还是应用级,默认就是这个
对于前两种强制的方式,没什么特殊,就是上面走上面分析的两个过程,没有额外的逻辑,那对于
APPLICATION_FIRST就需要有额外的逻辑了,也就是Dubbo要判断,当前所引入的这个服务,应该走接口级还是应用级,这该如何判断呢?
当为APPLICATION_FIRST时,可以看到同时执行了refreshInterfaceInvoker方法跟refreshServiceDiscoveryInvoker方法,即执行了接口级引入,也执行了应用级引入。
public void migrateToApplicationFirstInvoker(MigrationRule newRule) {
	CountDownLatch latch = new CountDownLatch(0);
	refreshInterfaceInvoker(latch);
	refreshServiceDiscoveryInvoker(latch);

	// directly calculate preferred invoker, will not wait until address notify
	// calculation will re-occurred when address notify later
	calcPreferredInvoker(newRule);
}
事实上,在进行某个服务的服务引入时,会统一利用InterfaceCompatibleRegistryProtocol的refer
来生成一个MigrationInvoker对象,在MigrationInvoker中有三个属性:
private volatile ClusterInvoker<T> invoker; // 用来记录接口级ClusterInvoker

private volatile ClusterInvoker<T> serviceDiscoveryInvoker; // 用来记录应用级的ClusterInvoker

private volatile ClusterInvoker<T> currentAvailableInvoker; // 用来记录当前使用的ClusterInvoker,要么是接口级,要么应用级
一开始构造出来的MigrationInvoker对象中三个属性都为空,接下来会利用MigrationRuleListener来
处理MigrationInvoker对象,也就是给这三个属性赋值。在MigrationRuleListener的构造方法中,会从配置中心读取DUBBO_SERVICEDISCOVERY_MIGRATION组下面的"当前应用名+.migration"的配置项,配置项为yml格式,对应的对象为MigrationRule,也就是可以配置具体的迁移规则,比如某个接口或某个应用的MigrationStep(FORCE_INTERFACE、APPLICATION_FIRST、FORCE_APPLICATION),还可以配置threshold,表示一个阈值,比如配置为2,表示应用级Invoker数量是接口级Invoker数量的两倍时才使用应用级Invoker,不然就使用接口级数量,如果没有配置迁移规则,则会看当前应用中是否配置了migration.step,如果没有,那就从全局配置中心读取dubbo.application.service-discovery.migration来获取MigrationStep,如果也没有配置,那MigrationStep默认为APPLICATION_FIRST如果没有配置迁移规则,则会看当前应用中是否配置了migration.threshold,如果没有配,则threshold默认为-1。
具体接口级服务引入和应用级服务引入是如何生成ClusterInvoker,前面已经分析过了,我们这里只需要分析当step为APPLICATION_FIRST时,是如何确定最终要使用的ClusterInvoker的。
得到了接口级ClusterInvoker和应用级ClusterInvoker之后,就会利用
DefaultMigrationAddressComparator来进行判断:
1. 如果应用级ClusterInvoker中没有具体的Invoker,那就表示只能用接口级Invoker
2. 如果接口级ClusterInvoker中没有具体的Invoker,那就表示只能用应用级Invoker
3. 如果应用级ClusterInvoker和接口级ClusterInvoker中都有具体的Invoker,则获取对应的Invoker个数
4. 如果在迁移规则和应用参数中都没有配置threshold,那就读取全局配置中心的
dubbo.application.migration.threshold参数,如果也没有配置,则threshold默认为0(不是-1了)
5. 用应用级Invoker数量 / 接口级Invoker数量,得到的结果如果大于等于threshold,那就用应用级
ClusterInvoker,否则用接口级ClusterInvoker。
threshold默认为0,那就表示在既有应用级Invoker又有接口级Invoker的情况下,就一定会用应用级Invoker,两个正数相除,结果肯定为正数,当然你自己可以控制threshold,如果既有既有应用级Invoker又有接口级Invoker的情况下,你想在应用级Invoker的个数大于接口级Invoker的个数时采用应用级Invoker,那就可以把threshold设置为1,表示个数相等,或者个数相除之后的结果大于1时用应用级Invoker,否者用接口级Invoker。
这样MigrationInvoker对象中的三个数据就能确定好值了,和在最终的接口代理对象执行某个方法时,就会调用MigrationInvoker对象的invoke,在这个invoke方法中会直接执行currentAvailableInvoker对应的invoker的invoker方法,从而进入到了接口级ClusterInvoker或应用级ClusterInvoker中,从而进行负载均衡,选择出具体的DubboInvoer或TripleInvoker,完成真正的服务调用。


 1850
1850

 被折叠的 条评论
为什么被折叠?


