


AST 简单介绍
当我们了解了 JS 的混淆的基本知识后,我们会去想要怎么对其进行反编译,AST 就可以做到
AST全称:Abstract Syntax Tree 中文名叫做: 抽象语法树
如果对编译器有所了解的话,应该知道,一段代码在执行前,通常要经历三个步骤
词法分析: 一段代码首先会被分成一段段有意义的词法单元, 比如说 const name = 'Germey' 这段代码, 它就可以被拆分成四个部分: const , name, = , 'Germey' ,每一个部分都具有一定的含义
语法分析: 接着编译器会对一个个词法单元进行语法分析,将其转换成能代表程序语法结构的数据结构。 比如: const 就被分析为 VariableDeclaration 类型, 代表变量声明的具体定义。name 就被分析为 Identifier 类型, 代表一个标识符。 代码内容多了, 这一个个词法就会有依赖,嵌套等关系,因此表示语法结构的数据结构就成构成了一个树状的结构,也就是语法树,即 AST
指令生成: 最后将 AST 转换成为实际真正可执行的指令并执行即可
AST 是源代码的抽象语法结构的树状表示,树上的每个节点都表示源代码中的一种结构,这种数据结构其实可以类别成一个大的 JSON 对象, 我们应该了解过 JSON 对象, 它可以包含列表,字典并且层层嵌套, 因此它看起来就像一颗树,有树根,树干和树叶,无论多大,都是一棵完整的树
在前端开发中, AST 技术应用的非常广泛,比如 webpack 打包工具的很多压缩和优化插件, Babel插件, Vue 和 React 的脚手架工具的底层都运用了 AST 技术。 有了 AST ,我们就可以方便的对 JS 代码进行转换和改写, 因此还原混淆后的 JS 也不在话下
实例引入
首先推荐一个AST 在线解析网站: AST explorer
我们在左边输入一行简单的代码:
const name = 'Germey'
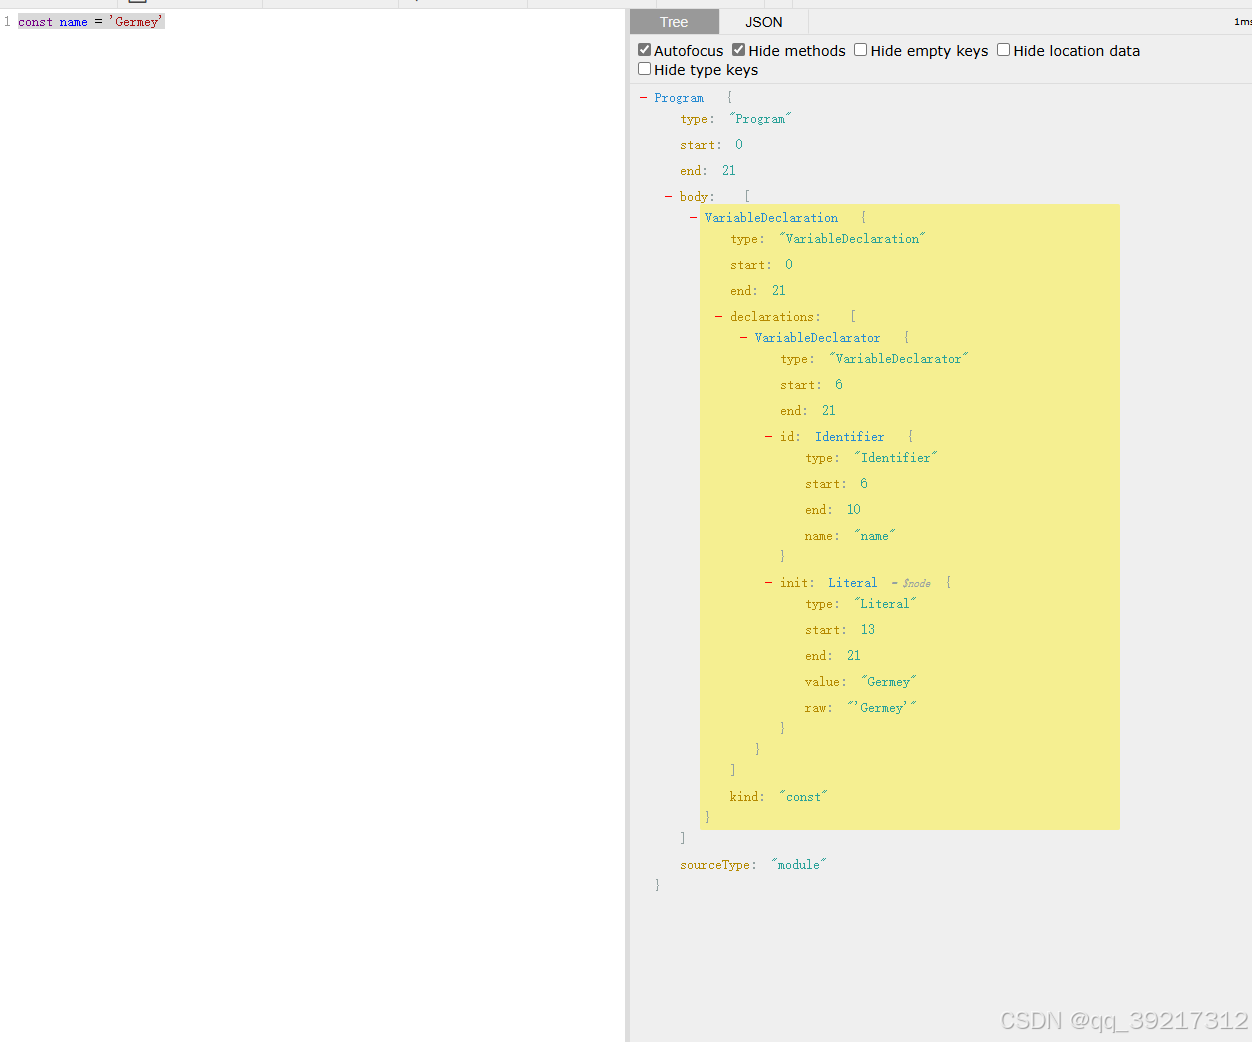
这时候就可以看到,右侧出现了一个树状结构,这就是 AST
这就是一个一层层嵌套的数据结构,可以看到它把代码的每一个部分都进行了拆分并分析出对应的类型,位置,和值,比如说 name 被解析成一个 type 为 Identifier 的数据结构, start 和 end 分别代表代码的其实位置和终止位置, name 代表该 Identifier 的名称。 另外, Germey 这个字符串被解析成了 StringLiteral 类型的数据结构, 它同样有 start, end 等属性, 同时还有 extra 属性,extra 属性还带有子属性 rawValue , 该子属性的值就是 Germey 这个字符串。 我们所看到的这些数据结构就构成一个层层嵌套的 AST
另外右上角,我们还看到了一个 Parser 标识,其内容是 @babel/parser ,这时一个目前最流行的 JS 语法编译器 Babel 的 Node.js 包, 同时他也是主流前端开发技术中必不可少的一个包。它内置了很多分析 JS 代码的语法, 可以实现 JS 代码到 AST 的转换。更多可以参考 Babel 官网
注意: 这里的很多东西和现在的已经有所区别,不过只要大纲不错,作为了解先
准备工作
安装好 Node.js , 并且要能正常使用 npm 命令
安装 Babel : npm install -g @babel/node
接下来初始化一个 Node.js 项目 learn-ast, 然后在 learn-ast 目录下运行初始化命令
npm init
package name: 你的项目名字叫啥
version: 版本号 (默认 1.0.0)(可选)
description: 对项目的描述(可选)
entry point: 项目的入口文件(默认 index.js)(可选)
test command: 项目启动的时候要用什么命令来执行脚本文件(默认为node app.js)(可选)
git repository: 如果你要将项目上传到git中的话,那么就需要填写git的仓库地址(可选)
keywirds: 项目关键字(我也不知道有啥用,所以我就不写了)
author: 作者的名字(可选)
license: 发行项目需要的证书(可选)最后输入 yes
npm install -D @babel/core @babel/cli @babel/preset-env
有可能报错,可能是网络不好,多执行几次
运行完毕后, 就会生成一个 package.json 文件并在 devDependencies 中列出了刚刚安装的几个 Node.js 包
接着我们要在 learn-ast 目录下创建一个 .babelrc 文件,其内容如下
{
  "presets":[
    "@babel/preset-env"
  ]
}
节点类型
在刚才的示例中, 我们看到不同的代码词法单元被解析成了不同的类型,这里简单列举 Babel 中所支持的一些类型
Literal: 中文可以理解为字面量,即简单的文字表示, 比如 : 3, 'abc', null , true 等这些都是基本字面表示。它有可以进一步分为 RegExpLiteral, NullLiteral, StringLiteral, BooleanLiteral, NumericLiteral, BigIntLiteral 等类型, 更确切的代表某一种字面量
Declarations: 声明, 比如 FunctionDeclaraion 和 VariableDeclarration 分别用于声明一个方法和变量
Expressions: 表达式, 它本身会返回一个计算结果, 通常有两个作用: 一个是放在赋值语句的右边进行赋值,另外还可以作为方法的参数,比如 LogicalExpression, ConditionalExpression, ArrayExpression 等分别代表逻辑运算表达式,三元运算表达式,数组表达式。另外还有一些特殊的表达式, 如 YieldExpression, AwaitExpression ,ThisExpression
Statements: 语句, 比如 IfStatement , SwitchStatement, BreakStatement 这些控制语句,还有一些特殊语句,比如:DebuggerStatement, BlockStatement 等
Identifier: 标识符, 指代一些变量名称,比如上述例子中的 name 就是一个 Identifier
Classes: 类, 代表一个类的定义, 包括 Class, ClassBody, ClassMethod , ClassProperty 等具体类型
Functions: 方法声明, 它一般代表 FunctionDeclaration 或 FunctionExpression 等具体类型
Modules: 模块, 可以理解为一个 Node.js 模块, 包括 ModuleDeclaration, ModuleSpecifier 等具体类型
Program : 程序, 整个代码可以称为 Program
具体的可以参考: https://babeljs.io/docs/en/babel-types
@babel/parser 的使用
@babel/parser 是 Babel 中的 JS 解析器,也是一个 Node.js 包, 它提供了一个重要的方法,就是parse 和 parseExpression 方法,前者支持解析一段 JS 代码,后者则尝试解析单个 JS 表达式并考虑性能问题。 一般来说我们直接使用 parse 就够了
对于 parse 方法来说,输入和输出如下
输入: 一段 JS 代码
输出: 该段 JS 代码对应的抽象语法树,即 AST ,它基于 ESTree 规范
由于 JS 代码中包含多种类型的表达,例如 变量名,变量值,方法声明,控制语句,类声明等。这里简单坐下归类,具体参考:
https://github.com/babel/babel/blob/master/packages/babel-parser/ast/spec.md
现在来测试一下,新建一个 JS 文件,保存为 codes/code1.js 内容如下
const a = 3;
let string = 'hello';
for (let i = 0; i < a; i++) {
    string += 'world';
}
console.log("string", string)
下面我们需要使用 parse 方法将其转化为一个抽象语法树, 即 AST
新建一个 basic1.js 文件
import {parse} from "@babel/parser";
import fs from "fs";

const code = fs.readFileSync("code/code1.js", "utf-8")
let ast = parse(code);
console.log(ast)
接着运行
babel-node basic1.js
Node {
type: 'File',
start: 0,
end: 124,
loc: SourceLocation {
start: Position { line: 1, column: 0, index: 0 },
end: Position { line: 6, column: 29, index: 124 },
filename: undefined,
identifierName: undefined
},
errors: [],
program: Node {
type: 'Program',
start: 0,
end: 124,
loc: SourceLocation {
start: [Position],
end: [Position],
filename: undefined,
identifierName: undefined
},
sourceType: 'script',
interpreter: null,
body: [ [Node], [Node], [Node], [Node] ],
directives: []
},
comments: []
}
可以看到,整个 AST 的根节点就是一个 Node , 其 type 是 File , 代表一个 File 类型的节点,其中包括 type , start, end , loc, program 等属性。 其中 program 也是一个 Node , 但它的 type 是 Program, 代表一个程序。 同样, program 也包括了一些属性, 比如:start, end , loc , interpreter, body 等。其中, body 是最为重要的属性,是一个列表类型,不过控制台并没有把它的节点内容输出出来。我们可以增加一行代码专门输出 body
console.log(ast.program.body)
[
Node {
type: 'VariableDeclaration',
start: 0,
end: 12,
loc: SourceLocation {
start: [Position],
end: [Position],
filename: undefined,
identifierName: undefined
},
declarations: [ [Node] ],
kind: 'const'
},
Node {
type: 'VariableDeclaration',
start: 14,
end: 35,
loc: SourceLocation {
start: [Position],
end: [Position],
filename: undefined,
identifierName: undefined
},
declarations: [ [Node] ],
kind: 'let'
},
Node {
type: 'ForStatement',
start: 37,
end: 93,
loc: SourceLocation {
start: [Position],
end: [Position],
filename: undefined,
identifierName: undefined
},
init: Node {
type: 'VariableDeclaration',
start: 42,
end: 51,
loc: [SourceLocation],
declarations: [Array],
kind: 'let'
},
test: Node {
type: 'BinaryExpression',
start: 53,
end: 58,
loc: [SourceLocation],
left: [Node],
operator: '<',
right: [Node]
},
update: Node {
type: 'UpdateExpression',
start: 60,
end: 63,
loc: [SourceLocation],
operator: '++',
prefix: false,
argument: [Node]
},
body: Node {
type: 'BlockStatement',
start: 65,
end: 93,
loc: [SourceLocation],
body: [Array],
directives: []
}
},
Node {
type: 'ExpressionStatement',
start: 95,
end: 124,
loc: SourceLocation {
start: [Position],
end: [Position],
filename: undefined,
identifierName: undefined
},
expression: Node {
type: 'CallExpression',
start: 95,
end: 124,
loc: [SourceLocation],
callee: [Node],
arguments: [Array]
}
}
]
可以看到有很多内容,我们直接通过 ast.program.body 即可将 body 获取到。刚才的四个 Node 的具体结构也出来了。前两个 Node 都是 VariableDeclaration 类型,这正好对应了前两行代码
const a = 3
let string = "hello"
这里我们分别声明了一个数字类型和字符串类型的变量, 所以每句都被解析为 VariableDeclaration 类型。 每个 VariableDeclaration 都包含了一个 declarations 属性,其内部又是一个 Node 列表,其中包含了具体的详细信息
接着我们在观察下一个 Node , 它是 ForStatement 类型, 代表一个 for 循环语句,对应代码:
for (let i = 0; i < a; i++) {
    string += 'world';
}
for 循环通常包括四个部分 for 初始逻辑, 判断逻辑 更新逻辑以及 for 循环区块的主循环执行逻辑, 所以对于一个 ForStatement, 它自然有几个对应的属性内容表示, 分别为:init , test, update 和 body
对于 init 即循环的初始逻辑,其代码如下
let i = 0
它相当于一个变量声明, 所以它又被解析为 VariableDeclaration 类型, 这和上文是一样的
对于 test , 即判断逻辑, 其代码如下
i < a
它是一个逻辑表达式, 被解析为 BinaryExpression , 代表运算逻辑
对于 update 即更新逻辑, 其代码如下
i++
它就是对 i 加 1 ,也就是一个表达式,被解析为 UpdateExpression 类型
对于 body , 它被一个大括号包围,其内容为
{
string += "world";
}
整个内容算作一个代码块,所以内解析为 BlockStatement 类型, 其 body 属性又是一个列表
对于最后一行,代码如下
console.log('string', string);
它被解析为 ExpressionStatement 类型, expression 的属性是 CallExpression 。 CallExpression 又包含了 callee 和 arguments 属性, 对应的就是 console 对象的 log 方法的调用逻辑
到现在为止我们应该能弄明白整个过程了
parser 会将代码根据逻辑区块进行划分,每个逻辑区块根据其作用都会归类成不同的类型,不同的类型拥有不同的属性表示。同时代码和代码之间有嵌套关系,所以最终整个代码都会被解析成一个层层嵌套的表示结果
另外,推荐到上文提到的网站来进行 AST 的解析和查看,它比代码更直观
转化为 AST 后, 怎么在把 AST 转回代码呢? 要还原,我们可以借助 generate 方法
@babel/generate 的使用
@babel/generate 也是一个 Node.js 包, 提供了generate 方法将 AST 还原成 JS 代码,调用如下
import {parse} from "@babel/parser";
import generate from "@babel/generator";
import fs from "fs";

const code = fs.readFileSync("code/code1.js", "utf-8")
let ast = parse(code);
// 将 AST 转化为 JS 代码
const {code: output} = generate(ast)
console.log(output)
const a = 3;
let string = 'hello';
for (let i = 0; i < a; i++) {
    string += 'world';
}
console.log("string", string);
这时候可以看到,利用 generate 方法,我们成功将 AST 对象转化为 JS 代码
到这里我们就清楚,如果要把 JS 代码解析成 AST 对象, 就用 parser 方法, 如果要把 AST 对象还原成代码就用 generate 方法
另外, generate 方法还以在第二个参数接收一些配置选项,第三个参数可以接收源代码作为输出的参考,用法如下
const output = generate(ast, { /* options */}, code);
其中 options 可以是一些其他配置参数。这里列举几个
| 参数 | 类型 | 默认值 | 描述 |
|---|---|---|---|
| auxiliaryCommentBerfore | string | 在输出文件的开头添加块注释可选字符串 | |
| auxiliaryCommentAfter | string | 在输出文件的末尾添加块注释可选字符串 | |
| retainLines | boolean | false | 尝试在输出代码中使用与源代码中相同的行号 |
| retainFunctionParens | boolean | false | 保留表达式周围的括号 |
| comments | boolean | true | 输出中是否应包含注释 |
| compact | boolean或 auto | opts.minifies | 设置为true 以避免添加空格进行格式化 |
| minified | boolean | false | 是否应该压缩后输出 |
比如我们想要和原代码维持相同的代码行,可以使用如下配置
import {parse} from "@babel/parser"; import generate from "@babel/generator"; import fs from "fs"; const code = fs.readFileSync("code/code1.js", "utf-8") let ast = parse(code); // 将 AST 转化为 JS 代码 const {code: output} = generate(ast, { retainLines:true, }) console.log(output)const a = 3; let string = 'hello'; for (let i = 0; i < a; i++) { string += 'world'; } console.log("string", string);
这时可以看到生成的代码没有空行了
@babel/traverse
前面我们了解了 AST 的解析, 输入任意一段 JS 代码,我们便可以分析出其 AST 。但只是了解 AST , 我们并不能实现 JS 代码的反混淆。下面我们来了解 AST 的遍历和修改
遍历我们使用的是 @babel/traverse , 它可以接收一个 AST , 利用 traverse 方法可以遍历其中的所有节点。在遍历方法中,我们可以对每个节点进行对应的操作
新建一个 JS 文件 命名为 basic2.js 内容如下
import {parse} from "@babel/parser";
import traverse from "@babel/traverse";
import fs from "fs"
const code = fs.readFileSync("code/code1.js", "utf-8");
let ast = parse(code);
traverse(ast, {
enter(path) {
console.log(path)
},
});
babel-node basic2.js
_traverseFlags: 0,
skipKeys: null,
parentPath: null,
container: [Node],
listKey: undefined,
key: 'program',
node: [Node],
type: 'Program',
parent: [Node],
hub: undefined,
data: null,
context: [TraversalContext],
scope: [Circular *2]
},
block: Node {
type: 'Program',
start: 0,
end: 124,
loc: [SourceLocation],
sourceType: 'script',
interpreter: null,
body: [Array],
directives: []
},
labels: Map(0) {},
inited: true,
bindings: [Object: null prototype] { a: [Binding], string: [Binding] },
references: [Object: null prototype] { a: true, string: true, i: true },
globals: [Object: null prototype] { console: [Node] },
uids: [Object: null prototype] {},
data: [Object: null prototype] {},
crawling: false
}
}
这里输出了很多内容,省略了部分
首先我们看到它的类型是 NodePaht, 拥有 parent, container, node, scope, type 等多个属性。比如 node 属性是一个 Node 类型的对象,和上文说的 Node 是同一类型,它代表当前正在遍历的节点。 比如,利用 parent 也能获得一个 Node 类型对象,它代表该节点的父节点
所以,我们可以利用 path.node 拿到当前对应的 Node 对象,利用 path.parent 拿到当前 Node 对象的父节点
既然如此,我们便可以使用它来对 Node 进行一些处理,比如我们可以把值变化一下原来的代码如下
const a = 3;
let string = 'hello';
for (let i = 0; i < a; i++) {
string += 'world';
}
console.log("string", string)
我们想要利用修改 AST 的方式对如上代码进行修改,比如修改一下 a 变量和 string 变量的值,变成如下代码
const a = 5;
let string = 'hi';
for (let i = 0; i < a; i++) {
    string += 'world';
}
console.log("string", string)
我们可以实现这样的逻辑
import {parse} from "@babel/parser";
import traverse from "@babel/traverse";
import generate from "@babel/generator"
import fs from "fs"
const code = fs.readFileSync("code/code1.js", "utf-8");
let ast = parse(code);
traverse(ast, {
enter(path) {
let node = path.node;
if(node.type === "NumericLiteral" && node.value === 3){
node.value = 5
}
if(node.type === "StringLiteral" && node.value=== 'hello'){
node.value = 'hi'
}
},
});
const {code: output} = generate(ast, {
retailLines: true,
})
console.log(output)
运行: babel-node basic2.js
const a = 5;
let string = "hi";
for (let i = 0; i < a; i++) {
string += 'world';
}
console.log("string", string);
可以看到原始的 JS 代码就被成功更改了
另外,除了定义 enter 方法外,我们还可以直接定义对应特定类型的解析方法,这样遇到此类型节点时,该方法就会被自动调用,用法类似如下
import {parse} from "@babel/parser";
import traverse from "@babel/traverse";
import generate from "@babel/generator"
import fs from "fs"
const code = fs.readFileSync("code/code1.js", "utf-8");
let ast = parse(code);
traverse(ast, {
NumericLiteral(path) {
if (path.node.value === 3) {
path.node.value = 5
}
},
StringLiteral(path){
if(path.node.value==='hello'){
path.node.value='hi'
}
},
});
const {code: output} = generate(ast, {
retailLines: true,
})
console.log(output)
运行结果完全相同
另外,我们可以再看下其他的操作方法。比如删除某个 node ,这里可以试着删除最后一行代码对应的节点,此时直接使用 remove 方法即可
import {parse} from "@babel/parser";
import traverse from "@babel/traverse";
import generate from "@babel/generator"
import fs from "fs"
const code = fs.readFileSync("code/code1.js", "utf-8");
let ast = parse(code);
traverse(ast, {
CallExpression(path){
let node = path.node
if(
node.callee.object.name === 'console' &&
node.callee.property.name === 'log'
){
path.remove();
}
}
});
const {code: output} = generate(ast, {
retailLines: true,
})
console.log(output)
运行: babel-node basic2.js
const a = 3;
let string = 'hello';
for (let i = 0; i < a; i++) {
string += 'world';
}
这样我们就删除了最后一行代码
@babel/types 的使用
@babel/types 也是一个 node.js 包, 它里面定义了各种各样的对象,我们可以方便的使用 type 声明一个新节点
比如说,这里有这样一个代码
const a= 1;
我们想增加一行代码
const a= 1;
const b = a+1;
借助 types 实现
import traverse from "@babel/traverse"
import {parse} from "@babel/parser"
import generate from "@babel/generator"
import * as types from "@babel/types"

const code = "const a = 1;";
let ast = parse(code)
traverse(ast, {
    VariableDeclaration(path) {
        let init = types.binaryExpression(
            "+",
            types.identifier("a"),
            types.numericLiteral(1)
        );
        let declarator = types.variableDeclarator(types.identifier("b"), init);
        let declaration = types.variableDeclaration("const", [declarator]);
        path.insertAfter(declaration);
        path.stop();
    }
})
const output = generate(ast, {
    retainLines: true,
}).code
console.log(output)
const a = 1;const b = a + 1;
实现步骤:
首先我们用前面提到 AST 解析网站对 const a = 1;const b = a + 1; 进行解析
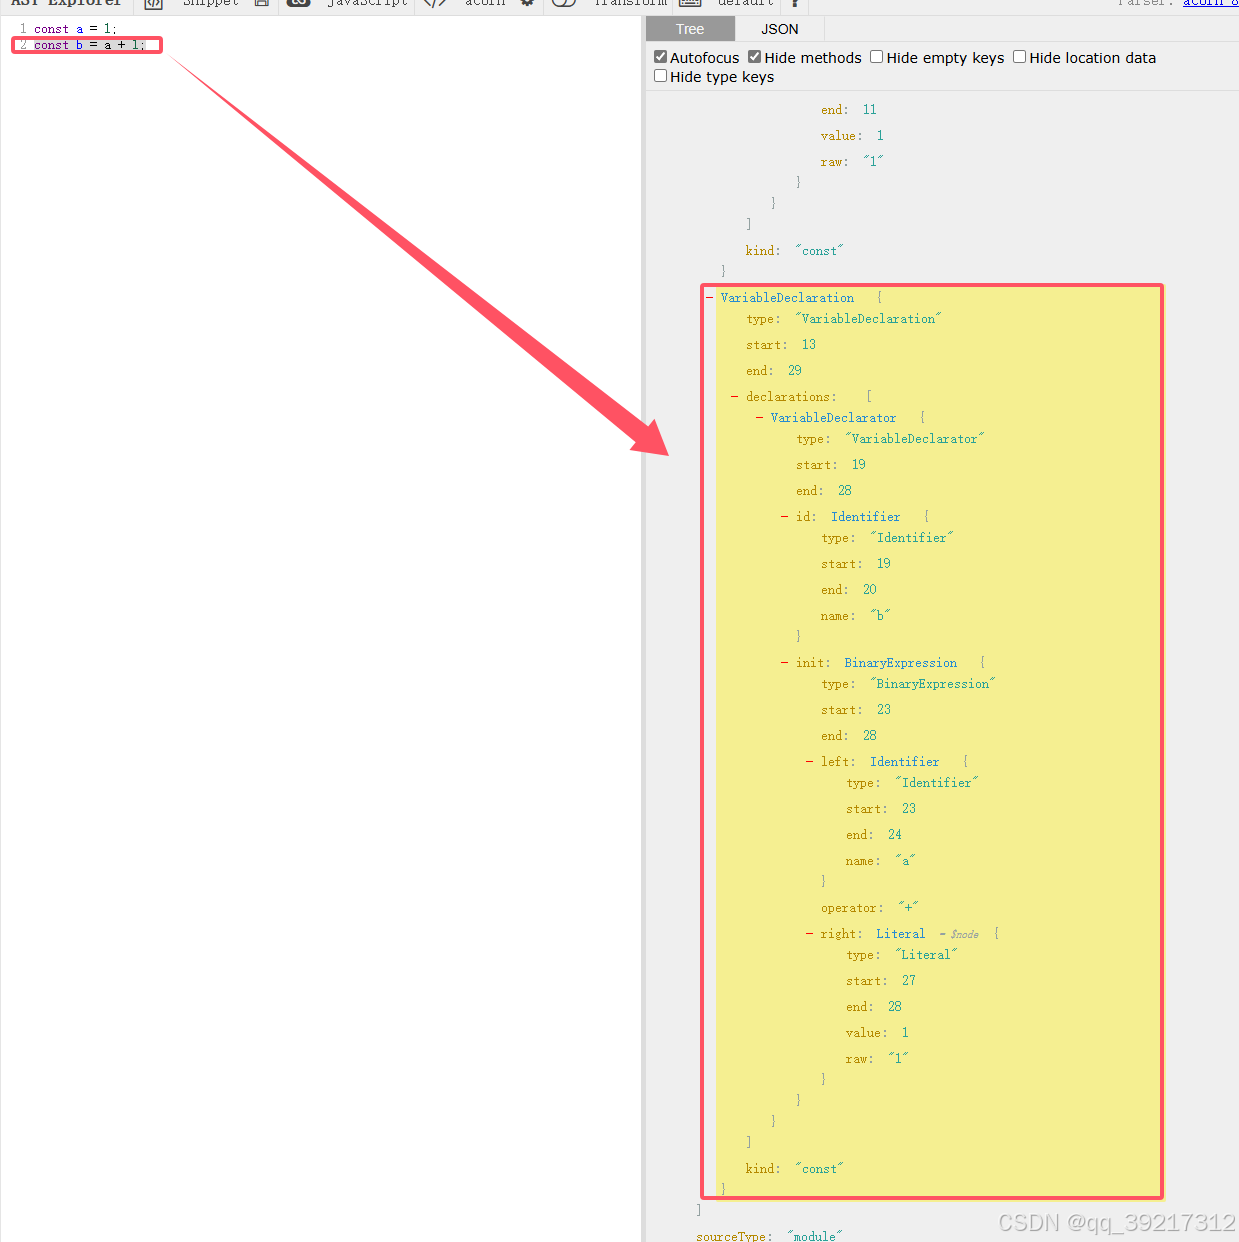
我们着重看第二行代码 const = a + 1; , 对应右边黄色区域。
首先整行代码对应的节点是 VariableDeclaration 。 要生成 VariableDeclaration ,我们可以借助 types 的 variableDeclaration 方法,二者差别仅仅是后者开头字母是小写的
API 的使用
t.variableDeclaration(kind, declarations)
可以看到它需要两个参数
kind: 必需, 可以是 var | let | condt
declaratins : 必需,是 Array<VariableDeclarator>, 即 VariableDeclarator 组成的列表
这里的kind 我们已经确定了, 那么 declarations 怎么构造呢?
要构造 declarations ,我们需要进一步构造 VariableDeclarator , 它也可以借助 types 的 variableDeclarator 方法, 用法如下
t.variableDeclarator(id, init)
它需要 id 和 init 两个参数
id: 必需, 即 Identifier 对选哪个
init: Expression 对象, 默认为空
因此,我们还需要构造 id 和 init 。 这里 id 其实就是 b 了, 我们可以借助 types 的 identifier 方法来构造。 而对于 Init , 它是 expression , 在 AST 中我们可以观察到它是 BinaryExpression 类型,所以我们可以借助 types 的 binaryExpression 来构造。 binaryExpression 用法如下
t.binaryExpression(operator, left, right)
它有三个参数,具体如下:
operator: 必需, 算术运算符 : 例如 :+ , - , * , / , 等等
left: 必需, Expression, 即 operator 左侧的表达式
right: 必需, Expression , 即 operator 右侧的表达式
这里又需要三个参数,operator 就是运算符, left 就是运算符左侧内容, right 就是运算符右侧的内容。 后面两个参数都需要是 Expression , 根据 AST , 这里的 Expression 可以直接声明为 Identifier 和 NumericLiteral , 所以又可以分别用 types 的 identifier 和 numericLiteral 创建。
这样就梳理清楚了思路,我们从里到外,一层层构造,最后就声明了一个 VariableDeclaration 类型的节点
最后调用 path 的 insertAfter 方法便可以成功将节点插入到 path 对应的节点
这里关于 types 更多用法,可以参考: https://babeljs.io/docs/en/babel-types#binaryexpression


 1144
1144

 被折叠的 条评论
为什么被折叠?
被折叠的 条评论
为什么被折叠?
 到【灌水乐园】发言


