


 本文详细介绍了如何在Android上进行USB通信,特别是针对热敏打印机的使用。首先,文章阐述了USB通信的基本概念和工作原理,然后逐步讲解了从设备过滤、端点查找、设备连接到初始化、发送和接收数据的操作步骤。接着,通过一个热敏打印机的实例,展示了初始化、打印和切纸的具体代码实现。最后,强调了USB通信的通用性和不同设备间数据发送的差异性,并指出根据厂家文档调整参数的重要性。
文章目录
前言
距离写上一篇《Android 串口通信开发总结和解析案例》已经过去有段时间了,终于最近有时间,来记录和温习一下。
这一篇文章将会结合热敏打印机的实例来学习关于USB通讯的知识。
一、USB通信是什么?
老规矩先上概念
USB通讯原理:USB是轮询总线,USB主机与设备之间的数据交换都是由主机发起的,设备端只能被动的响应。USB数据传入或传出 USB 设备中的端点。
USB是一个外部总线标准,用于规范电脑与外部设备的连接和通讯。USB接口支持设备的即插即用和热插拔功能
简单说。 USB通讯跟串口一样,也是靠一种通讯协议来通信的。区别是支持即插即用,通讯时设备只能被动响应。通信的数据不是串口那样一位一位的传输。当然这种类型的开发最关键的还是知道怎么用。我们使用时是通过Android 提供的API来发送、接收数据。
进入正题
二、USB通信开发
具体步骤:
1.通过vendorId、productId过滤找到自己的USB设备
首先AndroidManifest中声明权限
<uses-feature android:name="android.hardware.usb.host" />
声明变量
private UsbDeviceConnection connection;
        UsbManager usbManager = getUsbManager();
        //创建和初始化用于存储厂家、和产品号的两个List
        List<Integer> vendorIds = new ArrayList<>();
        List<Integer> productIds = new ArrayList<>();
        //下面的五组是我的使用场景中的五中可能出现的设备对应的厂家号和产品号。
        //由厂家提供给公司,按需要更改,要尽可能把设备会用到的USB设备信息都列进去
        //案例中只有一种
        Collections.addAll(vendorIds, 1155, 1157, 1659, 3544, 6790);
        Collections.addAll(productIds, 30016, 30017, 8965, 5120, 30084);
        //过滤USB设备,找到匹配的,那一个usb设备
        UsbDevice usbDevice = null;
        for (UsbDevice one : usbManager.getDeviceList().values()) {
            int vendorIdx = vendorIds.indexOf(one.getVendorId());
            int productIdx = productIds.indexOf(one.getProductId());
            if (vendorIdx == productIdx && vendorIdx != -1) {
                usbDevice = one;
                break;
            }
        }
2.找到此设备发送信息,接收信息的UsbEndpoint
 // 检查interface
        if (usbDevice == null || usbDevice.getInterfaceCount() != 1) {
            return;
        }
        // 检查此设备断点endpoint
        UsbInterface usbInterface = usbDevice.getInterface(0);
        if (usbInterface.getEndpointCount() < 1) {
            return;
        }
        // 过滤此USB的端点。用来发送和接收数据
        UsbEndpoint usbEndpointOut = null;
        UsbEndpoint usbEndpointIn = null;
        for (int i = 0; i < usbInterface.getEndpointCount(); i++) {
            UsbEndpoint usbEndpoint = usbInterface.getEndpoint(i);
            int direction = usbEndpoint.getDirection();
            int type = usbEndpoint.getType();
            if (type != UsbConstants.USB_ENDPOINT_XFER_BULK) {
                //过滤不支持的USB协议类型
                continue;
            }
            if (direction == UsbConstants.USB_DIR_OUT) {
                usbEndpointOut = usbEndpoint;
            } else if (direction == UsbConstants.USB_DIR_IN) {
                usbEndpointIn = usbEndpoint;
            }

            if (usbEndpointIn != null && usbEndpointOut != null) {
                break;
            }
        }
3.打开Usb设备通讯
 		//连接USB设备
        connection = usbManager.openDevice(usbDevice);
4.进行初始化、发送、接收消息等操作
发送byte[]内容视厂家提供文档而定
比如这个 初始化的文档中对初始化的描述是这样
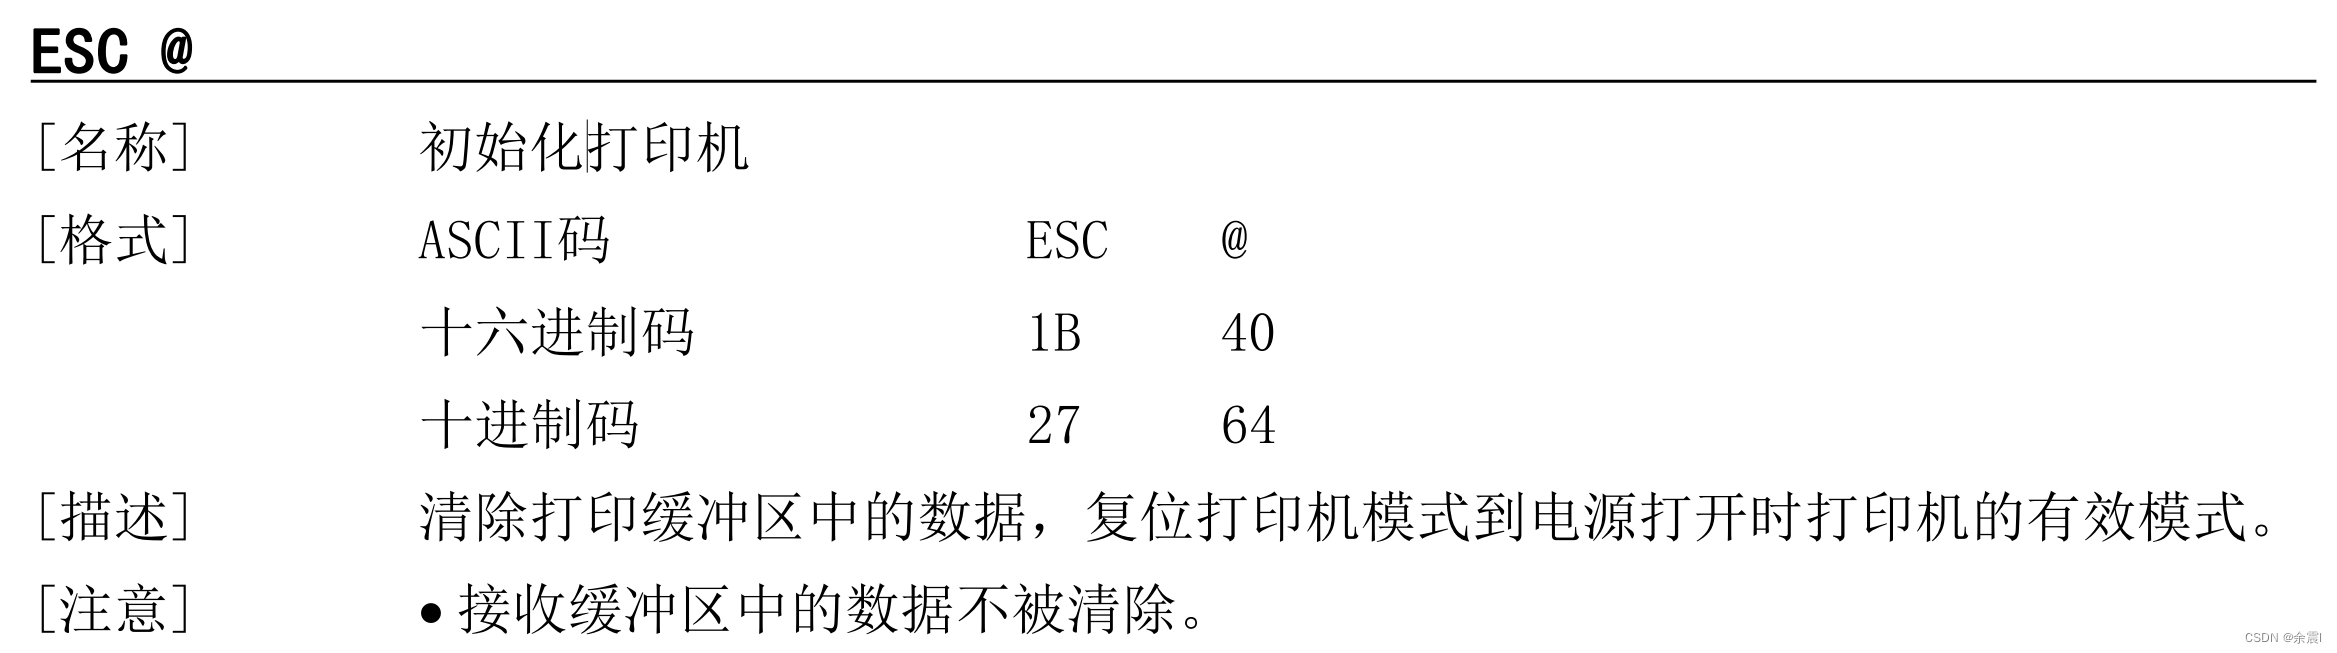
        if (connection != null) {
            connection.claimInterface(usbInterface, true);
            byte[] bytes;
            //初始化打印机
            bytes = new byte[]{0x1B, 0x40};
            if (connection.bulkTransfer(usbEndpointOut, bytes, bytes.length, 1500) < 0) {
                Logger.e("初始化打印机异常");
            }
        } else {
            Logger.e("未连接到打印机");
        }
接收的代码:
status = connection.bulkTransfer(usbEndpointIn, receiveBytes, receiveBytes.length, 1500);
发现发送和接收信息都是调用了connection的同一个方法,区别在于传递的参数不一样。来看一下这个方法的参数说明。
    /**
     * Performs a bulk transaction on the given endpoint.
     * The direction of the transfer is determined by the direction of the endpoint.
     * <p>
     * This method transfers data starting from index 0 in the buffer.
     * To specify a different offset, use
     * {@link #bulkTransfer(UsbEndpoint, byte[], int, int, int)}.
     * </p>
     *
     * @param endpoint the endpoint for this transaction
     * @param buffer buffer for data to send or receive; can be {@code null} to wait for next
     *               transaction without reading data
     * @param length the length of the data to send or receive. Before
     *               {@value Build.VERSION_CODES#P}, a value larger than 16384 bytes
     *               would be truncated down to 16384. In API {@value Build.VERSION_CODES#P}
     *               and after, any value of length is valid.
     * @param timeout in milliseconds, 0 is infinite
     * @return length of data transferred (or zero) for success,
     * or negative value for failure
     */
    public int bulkTransfer(UsbEndpoint endpoint,
            byte[] buffer, int length, int timeout) {
        return bulkTransfer(endpoint, buffer, 0, length, timeout);
    }
翻译在这里
在给定端点上执行批量事务。
传输的方向由端点的方向决定。
<p>
 此方法从缓冲区中的索引 0 开始传输数据。要指定不同的偏移量,请使用 {@link bulkTransfer(UsbEndpoint, byte[], int, int, int)}。
<p>
@param endpoint 此事务的端点
@param buffer 用于发送或接收数据的缓冲区;可以 {@code null} 等待下一个事务而不读取数据
@param length 发送或接收数据的长度。在 {@value Build.VERSION_CODESP} 之前,大于 16384 字节的值将被截断为 16384。在 API {@value Build.VERSION_CODESP} 及之后,任何长度值都是有效的。
@param 超时,以毫秒为单位,0 是无限的 @return 成功传输的数据长度(或零),或负值表示失败
很容易理解把,唯一需要说明一下的是,endpoint ,收和发不可以是同一个,而是设备本身就定义好的,就是在上一步中我们在设备里面过滤找到的那两个。
5.释放资源
        if (connection != null) {
            connection.close();
        }
三.热敏打印机案例
看过很多热敏打印机的文档,发现不同的厂商,大部分热敏打印机的开发文档这一块,发送的数据很多都是相同的,
比如初始化、切纸之类的,我估计他们底层也是根据一个规范来的,只不过对一部分进行了自己的定制。
不过具体还是要根据文档来的,省的发现问题再去看浪费时间。
1.初始化
这里贴一下完整的初始化的代码。
 /**
     * 初始化热敏打印机
     */
    private void initPrinter() {
        UsbManager usbManager = getUsbManager();

        List<Integer> vendorIds = new ArrayList<>();
        List<Integer> productIds = new ArrayList<>();
        Collections.addAll(vendorIds, 1155, 1157, 1659, 3544, 6790);
        Collections.addAll(productIds, 30016, 30017, 8965, 5120, 30084);
        // 过滤USB设备
        UsbDevice usbDevice = null;
        for (UsbDevice one : usbManager.getDeviceList().values()) {
            int vendorIdx = vendorIds.indexOf(one.getVendorId());
            int productIdx = productIds.indexOf(one.getProductId());
            if (vendorIdx == productIdx && vendorIdx != -1) {
                usbDevice = one;
                break;
            }
        }
        // 检查interface
        if (usbDevice == null || usbDevice.getInterfaceCount() != 1) {
            return;
        }
        // 检查此设备断点endpoint
        UsbInterface usbInterface = usbDevice.getInterface(0);
        if (usbInterface.getEndpointCount() < 1) {
            return;
        }
        // 过滤此USB的端点。用来发送和接收数据
        UsbEndpoint usbEndpointOut = null;
        UsbEndpoint usbEndpointIn = null;
        for (int i = 0; i < usbInterface.getEndpointCount(); i++) {
            UsbEndpoint usbEndpoint = usbInterface.getEndpoint(i);
            int direction = usbEndpoint.getDirection();
            int type = usbEndpoint.getType();
            if (type != UsbConstants.USB_ENDPOINT_XFER_BULK) {
                //过滤不支持的USB协议类型
                continue;
            }
            if (direction == UsbConstants.USB_DIR_OUT) {
                usbEndpointOut = usbEndpoint;
            } else if (direction == UsbConstants.USB_DIR_IN) {
                usbEndpointIn = usbEndpoint;
            }

            if (usbEndpointIn != null && usbEndpointOut != null) {
                break;
            }
        }

        //连接USB设备
        connection = usbManager.openDevice(usbDevice);
        if (connection != null) {
            connection.claimInterface(usbInterface, true);
            byte[] bytes;
            //初始化打印机
            bytes = new byte[]{0x1B, 0x40};
            if (connection.bulkTransfer(usbEndpointOut, bytes, bytes.length, 1500) < 0) {
                Logger.e("初始化打印机异常");
                printerInitStatus = false;
            }
        } else {
            Logger.e("未连接到打印机");
            printerInitStatus = false;
        }
        PrintHelper.getInstance().init(usbEndpointIn, usbEndpointOut, connection);
    }
相比上面 多了一句这,我封装的类,下面会把带注释的贴在下面
PrintHelper.getInstance().init(usbEndpointIn, usbEndpointOut, connection);
2.打印
    /**
     *
     * @param text         打印内容
     * @param needCut      是否切纸
     * @param bottomMargin 底边距 bottomMargin>1,底边距=bottomMargin*0.5mm 默认4
     * @param fullCut      是否全切 默认半切
     * @return             执行状态    -1异常
     */
    @Override
    public int print(String text, boolean needCut, int bottomMargin, boolean fullCut) {
        if (!printerInitStatus || connection == null) {
            Logger.e("打印机未完成初始化");
            return Const.Error.PRINT_ERROR;
        }
        if (!TextUtils.isEmpty(text)) {
            Logger.i("打印数据:%s", text);
        }
        try {
            int paperBoxStatus;
            int ret;
            ret = PrintHelper.getInstance().checkPaperStatus();
            if (ret == Const.Error.PRINT_ERROR) {
                return ret;
            } else {
                paperBoxStatus = ret;
                if (TextUtils.isEmpty(text)) {
                    return paperBoxStatus;
                }
            }
            ret = PrintHelper.getInstance().print(text);
            if (ret == Const.Error.PRINT_ERROR) {
                return ret;
            } else {
                //打印正常
                return PrintHelper.getInstance().cutPaper(bottomMargin, needCut, fullCut, paperBoxStatus);
            }
        } catch (Exception e) {
            Logger.e(e, "捕获到异常");
            return Const.Error.PRINT_ERROR;
        }
    }
3.切纸
这里补充一个概念,全切和半切
全切:一刀切到底,纸会掉下来
半切:切的不彻底,打印纸需要稍微用力才会掉下来
这个方法的参数注释看上一个方法就是了,本来也是在上面的方法里面调用的
 public int cutPaper(int bottomMargin, boolean needCut, boolean fullCut, int paperBoxStatus) {
        byte[] bytes;//发送
        //获取下边距 默认最小4
        if (bottomMargin < 4 || bottomMargin == 0) {
            bytes = new byte[]{0x1B, 0x64, 0x04};
        } else {
            bytes = new byte[]{0x1B, 0x64, (byte) (Integer.parseInt(String.valueOf(bottomMargin), 16))};
        }
        //进纸空行 为了边距
        if (connection.bulkTransfer(this.usbEndpointOut, bytes, bytes.length, 1500) < 0) {
            Logger.e("打印进纸空行异常");//打印输出打印缓冲区中的数据,并进纸 n 行
            return Const.Error.PRINT_ERROR;
        }
        // 切纸
        if (needCut) {
            if (fullCut) {
                //全切
                bytes = new byte[]{0x1B, 0x69};
            } else {
                //半切
                bytes = new byte[]{0x1B, 0x6d};
            }
            if (connection.bulkTransfer(this.usbEndpointOut, bytes, bytes.length, 1500) < 0) {
                return Const.Error.PRINT_ERROR;
            }
        }
        return paperBoxStatus;
    }
4,完整代码
这里贴出PrintHelper。
这里再次重申一下,不同的设备,发送的数据和接收的数据有些是不同的,但是步骤都是一样的,你只需要根据文档改改参数而已。
package com.qinze.multimedia.client.util;

import android.hardware.usb.UsbDeviceConnection;
import android.hardware.usb.UsbEndpoint;
import android.text.TextUtils;

import com.google.gson.reflect.TypeToken;
import com.orhanobut.logger.Logger;
import com.qinze.multimedia.client.MyApp;
import com.qinze.multimedia.client.config.Const;
import com.qinze.multimedia.client.entity.PrintBody;

import java.io.UnsupportedEncodingException;
import java.util.List;

public class PrintHelper {
    public static PrintHelper instance;
    private UsbEndpoint usbEndpointOut;
    private UsbEndpoint usbEndpointIn;
    private UsbDeviceConnection connection;

    public void init(UsbEndpoint usbEndpointIn, UsbEndpoint usbEndpointOut, UsbDeviceConnection connection) {
        this.usbEndpointIn = usbEndpointIn;
        this.usbEndpointOut = usbEndpointOut;
        this.connection = connection;
    }


    public static PrintHelper getInstance() {
        if (instance == null) {
            instance = new PrintHelper();
        }
        return instance;
    }

    public int checkPaperStatus() {
        if (connection == null) {
            Logger.e("连接USB设备异常");
            return Const.Error.PRINT_ERROR;
        }
        byte[] bytes;//发送
        byte[] receiveBytes = new byte[10];//接收
        //检查连续用纸传感器状态
        bytes = new byte[]{0x10, 0x04, 0x04};
        int status;
        status = connection.bulkTransfer(usbEndpointOut, bytes, bytes.length, 1500);
        if (status < 0) {
            Logger.e("发送连续用纸传感器状态异常");
            return Const.Error.PRINT_ERROR;
        }
        //打印机接收到的信息字节
        status = connection.bulkTransfer(usbEndpointIn, receiveBytes, receiveBytes.length, 1500);
        if (status < 0) {
            Logger.i("接收连续用纸传感器状态检查错误", status);
            return Const.Error.PRINT_ERROR;
        } else {
            //返回纸盒状态
            return Integer.parseInt(String.valueOf(receiveBytes[0]));
        }
    }

    public int print(String text) throws UnsupportedEncodingException {
        byte[] bytes;//发送
        List<PrintBody> printBodyList = GsonUtils.fromJson(text, new TypeToken<List<PrintBody>>() {
        }.getType());
        for (int i = 0; i < printBodyList.size(); i++) {
            PrintBody printBody = printBodyList.get(i);
            String content = printBody.getContent();
            int fontSize = printBody.getTextSize();
            int contentType = printBody.getContentType();
            //设置字号
            String cmdStr = cmdFontSize(fontSize);
            if (TextUtils.isEmpty(cmdStr)) {
                Logger.e("数据非法:字号为空");
                return Const.Error.PRINT_ERROR;
            }
            // 设置字号
            if (connection.bulkTransfer(this.usbEndpointOut, cmdStr.getBytes(), cmdStr.getBytes().length, 1500) < 0) {
                Logger.e("设置字号异常");
                return Const.Error.PRINT_ERROR;
            }
            if (contentType == 1) {//文本
                bytes = new byte[]{0x1b, 0x61, 0x00};//左对齐
                if (connection.bulkTransfer(this.usbEndpointOut, bytes, bytes.length, 5000) < 0) {
                    return Const.Error.PRINT_ERROR;
                }

                bytes = content.getBytes("GB2312"); // 需转换为GB2312字符集 否则汉字会乱码
                if (connection.bulkTransfer(this.usbEndpointOut, bytes, bytes.length, 5000) < 0) {
                    Logger.e("获取字符异常");
                    return Const.Error.PRINT_ERROR;
                }
                String lineSpacingExtra = printBody.getLineSpacingExtra();

                if (!TextUtils.isEmpty(lineSpacingExtra)) {
                    bytes = new byte[]{0x1B, 0x64, (byte) Integer.parseInt(lineSpacingExtra, 16)};

                } else {
                    bytes = new byte[]{0x1B, 0x64, 0x02};
                }
                //行边距
                if (connection.bulkTransfer(this.usbEndpointOut, bytes, bytes.length, 1500) < 0) {
                    Logger.e("行边距设置异常");//打印输出打印缓冲区中的数据,并进纸 n 行
                    return Const.Error.PRINT_ERROR;
                }
            } else if (contentType == 2) {//二维码
                bytes = new byte[]{0x1b, 0x61, 0x01, 0x49};//居中
                if (connection.bulkTransfer(this.usbEndpointOut, bytes, bytes.length, 5000) < 0) {
                    return Const.Error.PRINT_ERROR;
                }
                bytes = new byte[]{0x1d, 0x28, 0x6b, 0x04, 0x00, 0x31, 0x41, 0x31, 0x00};
                if (connection.bulkTransfer(this.usbEndpointOut, bytes, bytes.length, 5000) < 0) {
                    Logger.e("选择QR码类型异常");
                    return Const.Error.PRINT_ERROR;
                }
                bytes = new byte[]{0x1d, 0x28, 0x6b, 0x03, 0x00, 0x31, 0x43, 0x10};
                if (connection.bulkTransfer(this.usbEndpointOut, bytes, bytes.length, 5000) < 0) {
                    Logger.e("设置QR条码的模块大小异常");
                    return Const.Error.PRINT_ERROR;
                }
                bytes = new byte[]{0x1d, 0x28, 0x6b, 0x03, 0x00, 0x31, 0x45, 0x30};
                if (connection.bulkTransfer(this.usbEndpointOut, bytes, bytes.length, 5000) < 0) {
                    Logger.e("选择QR条码的纠错等级异常");
                    return Const.Error.PRINT_ERROR;
                }
                byte[] qrCodeBytes = content.getBytes("GB2312");
                byte[] printQrBytes = new byte[8 + qrCodeBytes.length];
                printQrBytes[0] = 0x1d;
                printQrBytes[1] = 0x28;
                printQrBytes[2] = 0x6b;
                int len = qrCodeBytes.length + 3;
                printQrBytes[3] = ((byte) (len % 256));
                printQrBytes[4] = ((byte) (len / 256));
                printQrBytes[5] = 0x31;
                printQrBytes[6] = 0x50;
                printQrBytes[7] = 0x30;
                for (int pos = 0; pos < qrCodeBytes.length; pos++) {
                    printQrBytes[8 + pos] = qrCodeBytes[pos];
                }
                if (connection.bulkTransfer(this.usbEndpointOut, printQrBytes, printQrBytes.length, 5000) < 0) {
                    Logger.e("下载QR码数据到符号存储区");
                    return Const.Error.PRINT_ERROR;
                }
                bytes = new byte[]{0x1d, 0x28, 0x6b, 0x03, 0x00, 0x31, 0x51, 0x30};
                if (connection.bulkTransfer(this.usbEndpointOut, bytes, bytes.length, 5000) < 0) {
                    Logger.e("打印存储区二维码异常"); //打印QR条码存储区中的符号数据
                    return Const.Error.PRINT_ERROR;
                }
            }
        }
        return 0;
    }

    public int cutPaper(int bottomMargin, boolean needCut, boolean fullCut, int paperBoxStatus) {
        byte[] bytes;//发送
        //获取下边距 默认最小4
        if (bottomMargin < 4 || bottomMargin == 0) {
            bytes = new byte[]{0x1B, 0x64, 0x04};
        } else {
            bytes = new byte[]{0x1B, 0x64, (byte) (Integer.parseInt(String.valueOf(bottomMargin), 16))};
        }
        //进纸空行 为了边距
        if (connection.bulkTransfer(this.usbEndpointOut, bytes, bytes.length, 1500) < 0) {
            Logger.e("打印进纸空行异常");//打印输出打印缓冲区中的数据,并进纸 n 行
            return Const.Error.PRINT_ERROR;
        }
        // 切纸
        if (needCut) {
            if (fullCut) {
                //全切
                bytes = new byte[]{0x1B, 0x69};
            } else {
                //半切
                bytes = new byte[]{0x1B, 0x6d};
            }
            if (connection.bulkTransfer(this.usbEndpointOut, bytes, bytes.length, 1500) < 0) {
                return Const.Error.PRINT_ERROR;
            }
        }
        return paperBoxStatus;
    }

    // 字体的大小
    // 0:正常大小 1:两倍高 2:两倍宽 3:两倍大小 4:三倍高 5:三倍宽 6:三倍大小
    // 7:四倍高 8:四倍宽 9:四倍大小 10:五倍高 11:五倍宽 12:五倍大小
    public String cmdFontSize(int fantasize) {
        String cmdStr = "";
        // 设置字体大小
        switch (fantasize) {
            case 0:
                cmdStr = new StringBuffer().append((char) 29).append((char) 33)
                        .append((char) 0).toString();// 29 33
                break;

            case 1:
                cmdStr = new StringBuffer().append((char) 29).append((char) 33)
                        .append((char) 1).toString();
                break;

            case 2:
                cmdStr = new StringBuffer().append((char) 29).append((char) 33)
                        .append((char) 16).toString();
                break;

            case 3:
                cmdStr = new StringBuffer().append((char) 29).append((char) 33)
                        .append((char) 17).toString();
                break;
            case 4:
                cmdStr = new StringBuffer().append((char) 29).append((char) 33)
                        .append((char) 2).toString();
                break;
            case 5:
                cmdStr = new StringBuffer().append((char) 29).append((char) 33)
                        .append((char) 32).toString();
                break;

            case 6:
                cmdStr = new StringBuffer().append((char) 29).append((char) 33)
                        .append((char) 34).toString();
                break;

            case 7:
                cmdStr = new StringBuffer().append((char) 29).append((char) 33)
                        .append((char) 3).toString();
                break;

            case 8:
                cmdStr = new StringBuffer().append((char) 29).append((char) 33)
                        .append((char) 48).toString();
                break;

            case 9:
                cmdStr = new StringBuffer().append((char) 29).append((char) 33)
                        .append((char) 51).toString();
                break;

            case 10:
                cmdStr = new StringBuffer().append((char) 29).append((char) 33)
                        .append((char) 4).toString();
                break;

            case 11:
                cmdStr = new StringBuffer().append((char) 29).append((char) 33)
                        .append((char) 64).toString();
                break;

            case 12:
                cmdStr = new StringBuffer().append((char) 29).append((char) 33)
                        .append((char) 68).toString();
                break;

        }
        return cmdStr;
    }
}
总结
关于USB通讯,跟串口一样,还是一通百通的,步骤都是一样的,就像上面分的那几个步骤,开始不要忘记加权限,最后不要忘记关闭。 一般USB比串口的解析简单一点。
于热敏打印机,步骤也都是一样的,初始化,设置打印的参数(字符集,内容,对齐方式,间距,加粗等),切纸。
是不是很简单。
对了,最后说一下为什么我没做关于USB设备插入,拔出的监听?因为我觉得没必要。这种打印机的使用场景,谁没事会不断电谢拆主机拔掉打印机呢。需要的话网上有很多。
最后再说一次,通信的数据需要根据厂家文档做出修改,没有就想办法去找,别不改硬试!!!!!


 1512
1512

 被折叠的 条评论
为什么被折叠?
被折叠的 条评论
为什么被折叠?
 到【灌水乐园】发言


