


1、概述
前面我们学习了网络编程和序列化相关的内容,主要涉及的知识点是Java原生的NIO,代码已经调试了好久了,越写越乱,想了一下还是放弃吧,直接选用Netty得了。关于Netty相关的东西其实比较复杂,并且相关的概念也比较抽象,我们暂时先站在使用的角度去学习,找到感觉后再去看Netty里面的一些组件和IO模型以及线程模型相关的东西可能就会很快的上手了。今天我们就从一个Echo案例 和一个HTTP 服务器案例 开始,逐步的玩转 Netty
2、从一个小案例开始
2.1、最简单的Echo服务
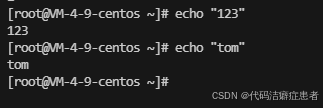
在 Linux 中有个 echo 命令,作用之一 是打印出 文本内容,比如 输入 echo "123" 回车后就会输出123
假设我们使用Java 实现这个功能 我们需要怎么做呢,你肯定能想到 echo 肯定有个服务端,我们输入命令的时候就相当于是往它的服务端发送了一个请求,然后它的服务端 将我们发过去的数据原样返回并 输出在控制台,这个过程比较简单,我们可以使用Java的标准IO或者NIO实现,也可以使用Netty。
2.2、NIO 版本的Echo服务
首先我们先来看 NIO实现的版本,我们可以先回忆一下 NIO编码的步骤,如下图所示
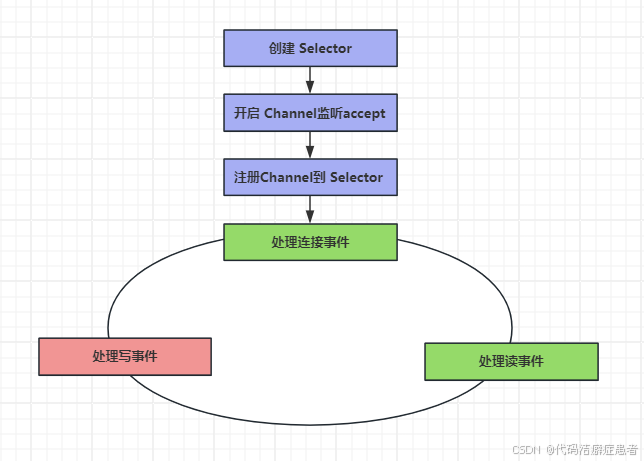
我们如果要实现 Echo 案例,就可以使用 Selector 来管理多个通道 实现IO多路复用,然后使用ServerSocketChannel 用来监听客户端的连接,连接建立完成后 使用 SocketChannel 用来和客户端进行数据传输,当然还需要处理一些细节,比如 需要对 在通道中传输数据的 ByteBuffer 进行操作,还需要判断 用于标识通道事件状态的SelectionKey的值。
服务端的相关代码如下所示:
package org.wcan.netty._01_demo;

import java.io.IOException;
import java.nio.ByteBuffer;
import java.nio.channels.ServerSocketChannel;
import java.nio.channels.SocketChannel;
import java.nio.channels.SelectionKey;
import java.nio.channels.Selector;
import java.nio.charset.Charset;
import java.nio.charset.StandardCharsets;
import java.util.Iterator;
import java.util.Set;

public class NIOServer {
    public static void main(String[] args) throws IOException {
        // 创建一个 Selector,用于监听多个通道
        Selector selector = Selector.open();

        // 创建 ServerSocketChannel,用于监听客户端连接
        ServerSocketChannel serverChannel = ServerSocketChannel.open();
        serverChannel.configureBlocking(false); // 非阻塞模式
        serverChannel.socket().bind(new java.net.InetSocketAddress(9000)); // 绑定端口

        // 注册通道到 Selector,监听 ACCEPT 事件
        serverChannel.register(selector, SelectionKey.OP_ACCEPT);

        System.out.println("服务器启动,等待连接...");

        while (true) {
            // 阻塞,直到有事件发生
            selector.select();

            // 获取发生的事件
            Set<SelectionKey> selectedKeys = selector.selectedKeys();
            Iterator<SelectionKey> iterator = selectedKeys.iterator();

            while (iterator.hasNext()) {
                SelectionKey key = iterator.next();

                // 处理事件后移除
                iterator.remove();

                // 处理新客户端连接请求
                if (key.isAcceptable()) {
                    ServerSocketChannel server = (ServerSocketChannel) key.channel();
                    SocketChannel clientChannel = server.accept();
                    clientChannel.configureBlocking(false); // 设置为非阻塞模式
                    clientChannel.register(selector, SelectionKey.OP_READ); // 注册读取事件
//                    System.out.println("新客户端连接: " + clientChannel.getRemoteAddress());
                }
                // 处理客户端发送的消息
                else if (key.isReadable()) {
                    SocketChannel clientChannel = (SocketChannel) key.channel();
                    ByteBuffer buffer = ByteBuffer.allocate(1024);
                    int bytesRead = -1;
                    try {
                        bytesRead = clientChannel.read(buffer);
                    } catch (IOException e) {
                        key.cancel();
                        clientChannel.close();
                    }
                    if (bytesRead == -1) {
                        key.cancel();
                        clientChannel.close();
                    } else {
                        // 切换到读取模式
                        buffer.flip();
                        String message = Charset.forName("UTF-8").decode(buffer).toString();
                        System.out.println("收到消息: " + message);
                        // 回写数据
                        buffer.clear();
                        buffer.put((message).getBytes(StandardCharsets.UTF_8));
                        buffer.flip();
                        clientChannel.write(buffer);
                    }
                }
            }
        }
    }
}
客户端的代码和服务端的代码的步骤类似,如下所示
package org.wcan.netty._01_demo;

import java.io.IOException;
import java.net.InetSocketAddress;
import java.nio.ByteBuffer;
import java.nio.channels.SocketChannel;
import java.nio.channels.SelectionKey;
import java.nio.channels.Selector;
import java.nio.charset.Charset;
import java.nio.charset.StandardCharsets;
import java.util.Iterator;
import java.util.Scanner;

public class NIOClient {
    public static void main(String[] args) throws IOException {
        // 打开一个 Selector
        Selector selector = Selector.open();
        // 打开一个 SocketChannel
        SocketChannel socketChannel = SocketChannel.open();
        socketChannel.configureBlocking(false); // 设置非阻塞模式
        // 连接到服务器
        socketChannel.connect(new InetSocketAddress("localhost", 9000));
        // 将 SocketChannel 注册到 Selector 上,监听连接完成事件
        socketChannel.register(selector, SelectionKey.OP_CONNECT);
        while (true) {
            // 阻塞直到有事件发生
            selector.select();
            // 获取所有已选择的事件
            Iterator<SelectionKey> iterator = selector.selectedKeys().iterator();
            while (iterator.hasNext()) {
                SelectionKey key = iterator.next();
                iterator.remove();
                // 处理连接完成事件
                if (key.isConnectable()) {
                    SocketChannel clientChannel = (SocketChannel) key.channel();
                    // 完成连接
                    if (clientChannel.isConnectionPending()) {
                        clientChannel.finishConnect();
                    }
                    // 注册为可写事件,以便发送数据
                    clientChannel.register(selector, SelectionKey.OP_WRITE);
                }
                // 处理可写事件
                else if (key.isWritable()) {
                    SocketChannel clientChannel = (SocketChannel) key.channel();
                    // 构造发送的消息
                    String message = "Hello Netty!";
                    ByteBuffer buffer = ByteBuffer.wrap(message.getBytes(StandardCharsets.UTF_8));

                    // 写数据到服务器
                    while (buffer.hasRemaining()) {
                        clientChannel.write(buffer);
                    }
                    // 注册为可读事件,准备接收响应
                    clientChannel.register(selector, SelectionKey.OP_READ);
                }
                // 处理可读事件
                else if (key.isReadable()) {
                    SocketChannel clientChannel = (SocketChannel) key.channel();
                    ByteBuffer buffer = ByteBuffer.allocate(1024);
                    // 读取服务器响应
                    int bytesRead = clientChannel.read(buffer);
                    if (bytesRead == -1) {
                        clientChannel.close();
                        System.out.println("连接关闭!");
                    } else {
                        buffer.flip();
                        String response = Charset.forName("UTF-8").decode(buffer).toString();
                        System.out.println("Echo: " + response);
                        // 关闭连接
                        clientChannel.close();
                    }
                }
            }
        }
    }
}
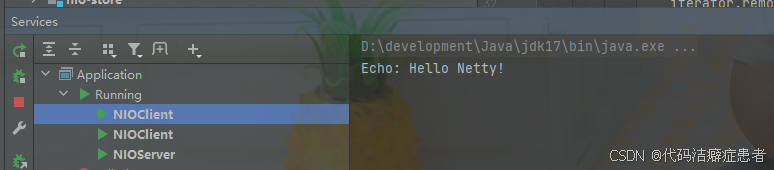
假如我们发送一个 Hello Netty 的字符串到服务端,我们先启动 NIOServer 类 接着 启动NIOClient类(可以启动多个),就可以在控制台看到效果了。
2.3、Netty 版本的实现
我们暂时先不要关注Netty是什么,我们就把他先当成一组API。我们先来给出代码,先体验一下,后面在解释。
服务端代码
package org.wcan.netty._01_demo;

import io.netty.bootstrap.ServerBootstrap;
import io.netty.buffer.ByteBuf;
import io.netty.channel.*;
import io.netty.channel.nio.NioEventLoopGroup;
import io.netty.channel.socket.SocketChannel;
import io.netty.channel.socket.nio.NioServerSocketChannel;
import io.netty.util.CharsetUtil;

public class NettyEchoServer {

    public static void main(String[] args) throws Exception {
        EventLoopGroup workerGroup = new NioEventLoopGroup();
        try {
            ServerBootstrap b = new ServerBootstrap();
            b.group(workerGroup)
                    .channel(NioServerSocketChannel.class)
                    .childHandler(new ChannelInitializer<SocketChannel>() {
                        @Override
                        protected void initChannel(SocketChannel ch) {
                            ch.pipeline().addLast(new ChannelInboundHandlerAdapter() {
                                @Override
                                public void channelRead(ChannelHandlerContext ctx, Object msg) {
                                    ByteBuf in = (ByteBuf) msg;
                                    System.out.println("收到消息: " + in.toString(CharsetUtil.UTF_8));
                                    ctx.writeAndFlush(msg); // 回写数据
                                }
                                @Override
                                public void exceptionCaught(ChannelHandlerContext ctx, Throwable cause) {
                                    cause.printStackTrace();
                                    ctx.close();
                                }
                            });
                        }
                    });
            ChannelFuture f = b.bind(9000).sync();
            f.channel().closeFuture().sync();
        } finally {
            workerGroup.shutdownGracefully();
        }
    }
}
客户端代码
package org.wcan.netty._01_demo;

import io.netty.bootstrap.Bootstrap;
import io.netty.buffer.ByteBuf;
import io.netty.buffer.Unpooled;
import io.netty.channel.*;
import io.netty.channel.nio.NioEventLoopGroup;
import io.netty.channel.socket.SocketChannel;
import io.netty.channel.socket.nio.NioSocketChannel;
import io.netty.util.CharsetUtil;

public class NettyEchoClient {

    public static void main(String[] args) throws Exception {
        EventLoopGroup group = new NioEventLoopGroup();
        try {
            Bootstrap b = new Bootstrap();
            b.group(group)
                    .channel(NioSocketChannel.class)
                    .handler(new ChannelInitializer<SocketChannel>() {
                        @Override
                        protected void initChannel(SocketChannel ch) {
                            ch.pipeline().addLast(new ChannelInboundHandlerAdapter() {
                                @Override
                                public void channelActive(ChannelHandlerContext ctx) {
                                    ctx.writeAndFlush(Unpooled.copiedBuffer("Hello Netty!", CharsetUtil.UTF_8));
                                }
                                @Override
                                public void channelRead(ChannelHandlerContext ctx, Object msg) {
                                    ByteBuf in = (ByteBuf) msg;
                                    System.out.println("Echo: " + in.toString(CharsetUtil.UTF_8));
                                }
                            });
                        }
                    });
            ChannelFuture f = b.connect("localhost", 9000).sync();
            f.channel().closeFuture().sync();
        } finally {
            group.shutdownGracefully();
        }
    }
}
我们分别运行服务端和客户端,效果如下
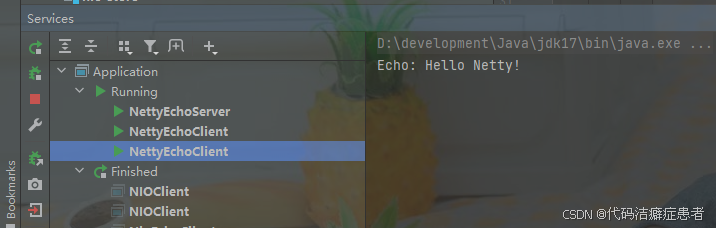
相信你很容易就发现了 Netty版本的代码看着有点不习惯 但是相比较 NIO 他的实现更加的简洁。Netty中的线程模型和IO模型 都比较抽象,后面会详细介绍。
3、 如何使用Netty
我们先来看Netty编码的步骤 先混个脸熟,后面我们在深入的学习相关的概念,
3.1、Netty 使用的步骤
前面我们编写了一个Echo服务的案例,我们先来总结下编写的步骤,首先来看服务端的
1、创建工作线程组 EventLoopGroup(里面存放的是所有的工作线程)
2、创建服务器引导组件 ServerBootstrap(相当于服务端的运行环境,包括元数据的配置)
3、将工作线程组添加到引导组件中,并且指定 通道 为 NioServerSocketChannel
4、添加业务处理器(ChannelHandler),比如用于处理连接事件、读事件和写事件等等
整个服务端的代码的流程可以说是比较简洁的了,整个过程 可以参考下面这张图
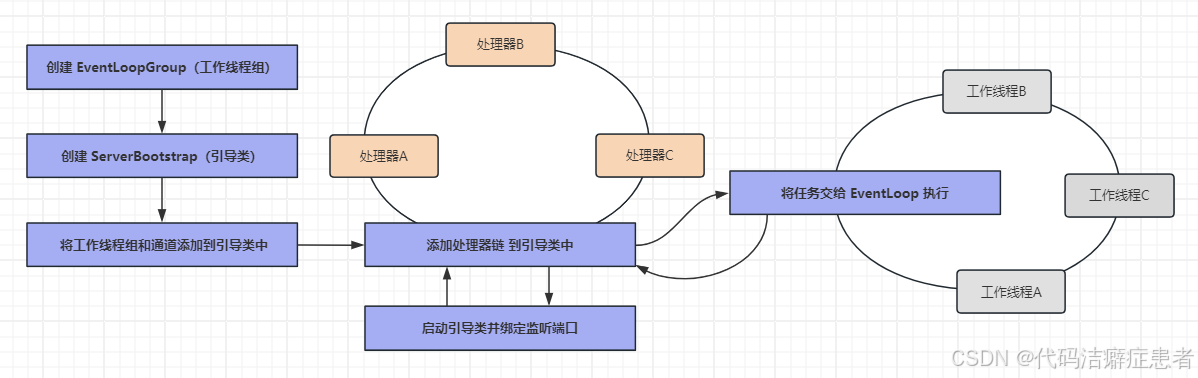
需要注意的是 EventLoopGroup 里面包含了多个线程,业务处理器(ChannelHandler)也可以添加多个。
接着我们再看客户端的实现步骤
1、创建工作线程组 EventLoopGroup
2、创建一个Bootstrap客户端引导组件,用于配置客户端参数(相当于服务端的运行环境)
3、将工作线程组添加到引导组件中,并且指定 通道 为 NioSocketChannel
4、添加业务处理器(ChannelHandler)
整个步骤和服务端基本相同。我们记下这个步骤,这就是Netty编码的基本套路了。
3.2、完善 Echo 案例
我们知道了使用 Netty 的编码步骤,那么我们接下来继续回到案例上,我们上面的案例在客户端的代码里写了一个固定的字符串,我们接下来做个改造,让用户在控制台输入一个字符串,发送给服务端,并且可以持续的输入。要实现这个功能 我们面临的问题至少有以下3个点
1. 如何让客户端在启动后持续监听控制台输入?
2. 如何将输入的字符串发送到服务端?
3. 如何处理输入流,比如如何读取用户输入并发送,同时不阻塞服务端(允许多个客户端连接)
假设你要是用NIO实现 是不是感觉人要麻了,所有我们选择使用 Netty来实现。老样子还是先给出代码,我们分析代码步骤 通过案例逐步的学习如何使用Netty
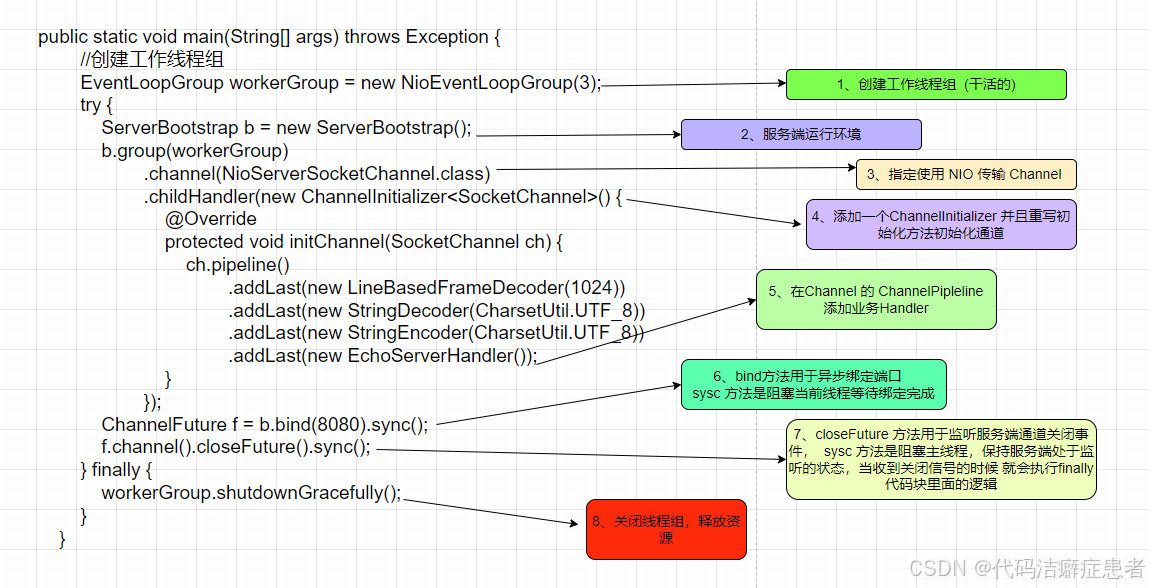
服务端代码 (工作线程组官方推荐创建2个,这里我们先创建一个)
package org.wcan.netty._02_demo;

import io.netty.bootstrap.ServerBootstrap;
import io.netty.channel.*;
import io.netty.channel.nio.NioEventLoopGroup;
import io.netty.channel.socket.SocketChannel;
import io.netty.channel.socket.nio.NioServerSocketChannel;
import io.netty.handler.codec.LineBasedFrameDecoder;
import io.netty.handler.codec.string.StringDecoder;
import io.netty.handler.codec.string.StringEncoder;
import io.netty.util.CharsetUtil;

public class EchoServer {
    public static void main(String[] args) throws Exception {
        //创建工作线程组
        EventLoopGroup workerGroup = new NioEventLoopGroup();
        try {
            ServerBootstrap b = new ServerBootstrap();
            b.group(workerGroup)
                    .channel(NioServerSocketChannel.class)
                    .childHandler(new ChannelInitializer<SocketChannel>() {
                        @Override
                        protected void initChannel(SocketChannel ch) {
                            ch.pipeline()
                                    .addLast(new LineBasedFrameDecoder(1024))
                                    .addLast(new StringDecoder(CharsetUtil.UTF_8))
                                    .addLast(new StringEncoder(CharsetUtil.UTF_8))
                                    .addLast(new EchoServerHandler());
                        }
                    });
            ChannelFuture f = b.bind(8080).sync();
            f.channel().closeFuture().sync();
        } finally {
            workerGroup.shutdownGracefully();
        }
    }
}
package org.wcan.netty._02_demo;

import io.netty.channel.ChannelHandlerContext;
import io.netty.channel.ChannelInboundHandlerAdapter;

public class EchoServerHandler extends ChannelInboundHandlerAdapter {
    @Override
    public void channelRead(ChannelHandlerContext ctx, Object msg) {
        String request = (String) msg;
        System.out.println("收到消息: " + request);
        ctx.writeAndFlush("[Echo] " + request + "\n");
    }
    @Override
    public void exceptionCaught(ChannelHandlerContext ctx, Throwable cause) {
        cause.printStackTrace();
        ctx.close();
    }
}
客户端实现
package org.wcan.netty._02_demo;

import io.netty.bootstrap.Bootstrap;
import io.netty.channel.*;
import io.netty.channel.nio.NioEventLoopGroup;
import io.netty.channel.socket.SocketChannel;
import io.netty.channel.socket.nio.NioSocketChannel;
import io.netty.handler.codec.LineBasedFrameDecoder;
import io.netty.handler.codec.string.StringDecoder;
import io.netty.handler.codec.string.StringEncoder;
import io.netty.util.CharsetUtil;

import java.util.Scanner;

public class EchoClient {
    public static void main(String[] args) throws Exception {
        EventLoopGroup group = new NioEventLoopGroup();
        try {
            Bootstrap b = new Bootstrap();
            b.group(group)
                    .channel(NioSocketChannel.class)
                    .handler(new ChannelInitializer<SocketChannel>() {
                        @Override
                        protected void initChannel(SocketChannel ch) {
                            ch.pipeline()
                                    .addLast(new LineBasedFrameDecoder(1024))
                                    .addLast(new StringDecoder(CharsetUtil.UTF_8))
                                    .addLast(new StringEncoder(CharsetUtil.UTF_8))
                                    .addLast(new EchoClientHandler());
                        }
                    });
            ChannelFuture f = b.connect("localhost", 8080).sync();
            Channel channel = f.channel();
            new Thread(() -> {
                Scanner scanner = new Scanner(System.in);
                while (true) {
                    System.out.print("请输入消息(输入exit退出): ");
                    String input = scanner.nextLine();
                    if ("exit".equalsIgnoreCase(input)) {
                        channel.close();
                        break;
                    }
                    channel.writeAndFlush(input + "\n");
                }
            }).start();
            channel.closeFuture().sync();
        } finally {
            group.shutdownGracefully();
        }
    }
}
package org.wcan.netty._02_demo;
import io.netty.channel.ChannelHandlerContext;
import io.netty.channel.ChannelInboundHandlerAdapter;
/**
* @ClassName EchoClientHandler
* @Description 客户端处理器
* @Author wcan
* @Date 2025/2/13 下午 14:44
* @Version 1.0
*/
public class EchoClientHandler extends ChannelInboundHandlerAdapter {
@Override
public void channelRead(ChannelHandlerContext ctx, Object msg) {
// 直接接收String类型响应
String response = (String) msg;
System.out.println(response.trim());
}
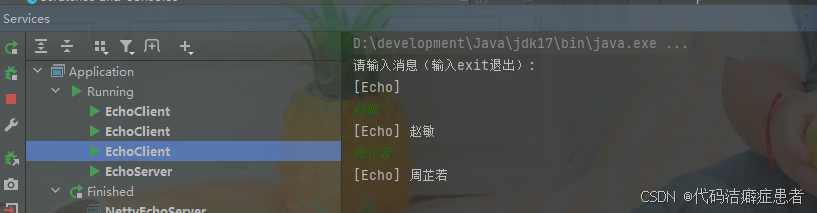
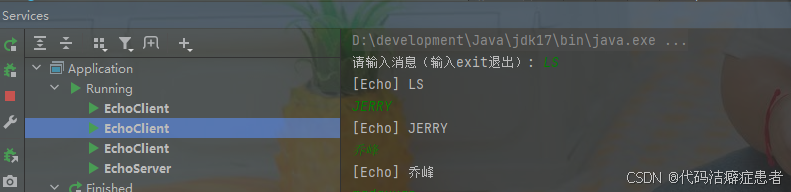
}我们先运行服务端再启动多个客户端,就能体验到结果了。
3.3、Netty 的执行流程
在第二个案例中 我们换了一个写法,netty官方也更推荐第二种写法,关于代码执行流程如下图所示
我们可以先看下上图中的流程,理清楚了整体流程 我们接下来就分析 其中涉及到的组件。客户端的流程也是和服务端类似,这里不在赘述。从上图中我们可以梳理出一些组件,比如干活的组件是EventLoop,由EventLoopGroup 提供,NioServerSocketChannel 是数据传输的通道,ChannelInitializer用来初始化通道,ChannelPipeline 是处理器链,处理器就是定义一组需要实现的业务。比如我们自定义了一个 EchoServerHandler ,相关代码如下:
public class EchoServerHandler extends ChannelInboundHandlerAdapter {
    @Override
    public void channelRead(ChannelHandlerContext ctx, Object msg) {
        String request = (String) msg;
        System.out.println("收到消息: " + request);
        ctx.writeAndFlush("[Echo] " + request + "\n");
    }
    @Override
    public void exceptionCaught(ChannelHandlerContext ctx, Throwable cause) {
        cause.printStackTrace();
        ctx.close();
    }
}
EchoServerHandler 主要的作用即使将收到的请求 在返回给客户端。当然这里又涉及到了一个 ChannelHandlerContext 组件,我们后面深入的分析。
4、Netty 中的组件
前面我们知道了 Netty 服务端程序的启动流程了,并且也简单的知道一些组件。 这个章节我们来仔细的分析 Netty 中的组件。
4.1、EventLoopGroup
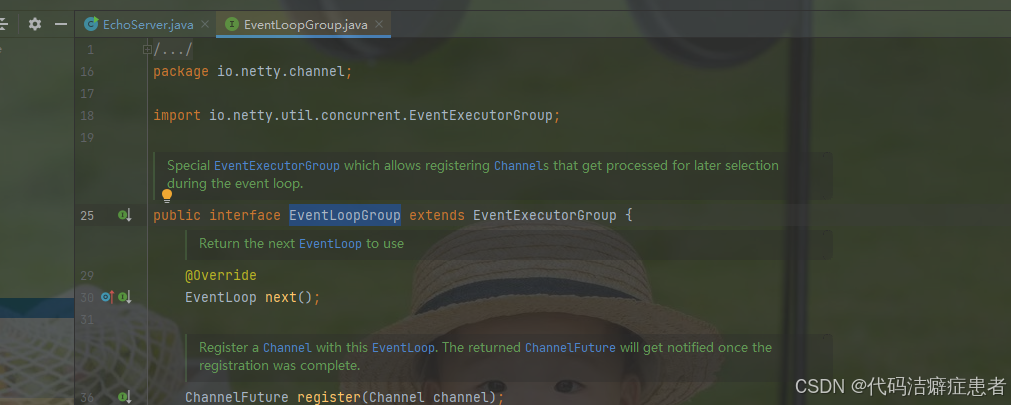
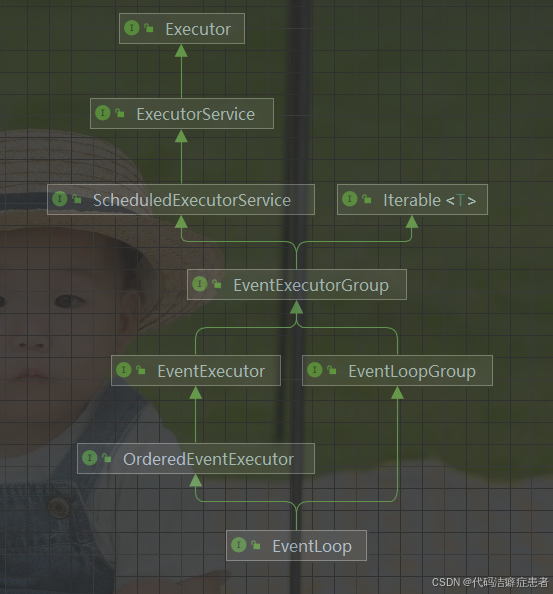
我们前面介绍过 干活的线程在 Netty 中叫做 EventLoop ,而 EventLoopGroup 里面会有多个EventLoop。我们点开 EventLoopGroup 类查看源码,就会发现 他是一个接口,并且还继承了EventExecutorGroup 这个接口
我们继续点进去看 EventExecutorGroup 这个接口的源码
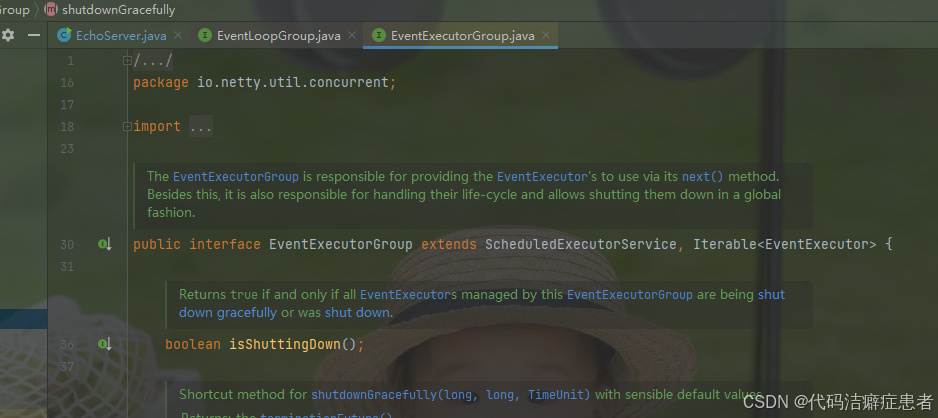
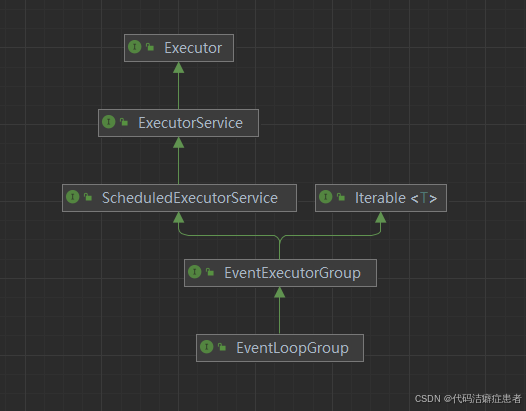
我们可以发现 EventExecutorGroup 继承了 ScheduledExecutorService 。到这里我们就能得出结论,EventLoopGroup 本质上就是一个线程池,他的继承关系如下图所示
4.2、EventLoop
我们查看 EventLoopGroup 源码的时候 就会发现 这个接口其实还有很多子接口或者实现类,
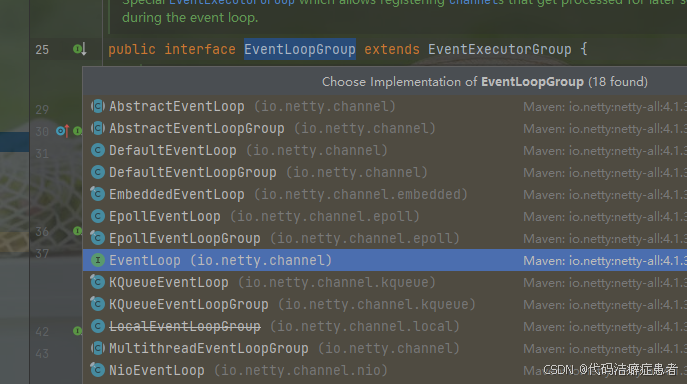
EventLoop 就是其中的一个,我们点进去看看 EventLoop源码
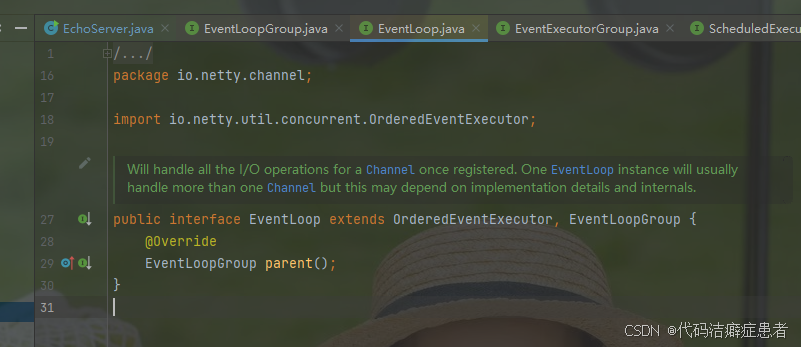
我们发现 不仅继承了 EventLoopGroup 还继承了一个 OrderedEventExecutor。OrderedEventExecutor是Netty 里面的一个接口,这里的层级有点多 我们直接查看类图
4.3、Channel
Channel 组件是连接到网络套接字或能够进行 读、写、连接和绑定等I/O操作 的组件。也就是Netty 帮我们屏蔽了 原生的Socket 。 我们在使用 Netty 进行网络编程时候只需要 使用Channel即可。Channel有多种不同的实现,甚至 你还可以自定义实现。
我们上面的案例中 使用的 Channel 是 NioServerSocketChannel,我们点进去先看下源码

他的类图如下所示
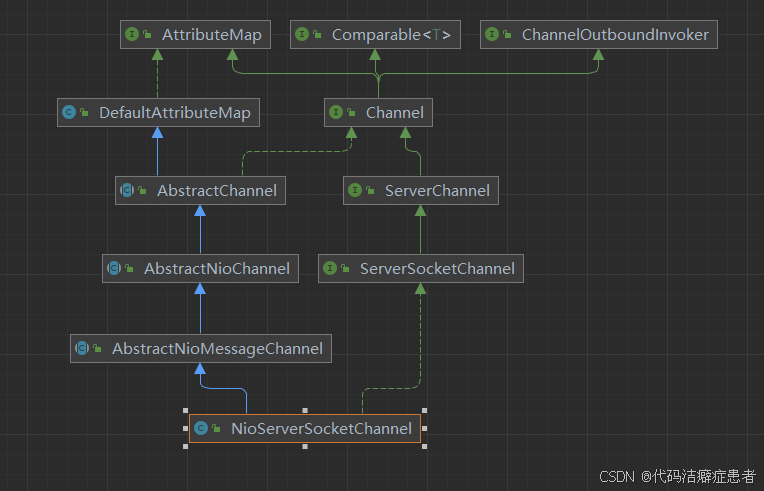
我们直接看 Channel 接口源码 ,其实有一个很重要的方法
    /**
     * Return the assigned {@link ChannelPipeline}.
     */
    ChannelPipeline pipeline();
这个方法 会返回一个 ChannelPipeline 对象。ChannelPipeline对象 就和我们要编写的业务处理密切相关了。
4.4、ChannelPipeline
ChannelPipeline 可以理解成是一个容器,内部封装了很多 增删改的方法,主要是用来维护运行环境中的业务处理器,前面的案例中就是用了 addLast 方法添加了3个处理器。在源码的注释信息上有一张结构图,描述了关于ChannelPipeline 的逻辑结构。

4.5、ChannelHandler
ChannelHandler 就是一个业务处理器,用户可自行实现自己的逻辑,当有多个ChannelHandler连在一起形成一条处理器链,这个处理器链 就是Pipeline (个人理解)
到这里我们应该能把上述几个组件串起来了。他们的关系如下图所示
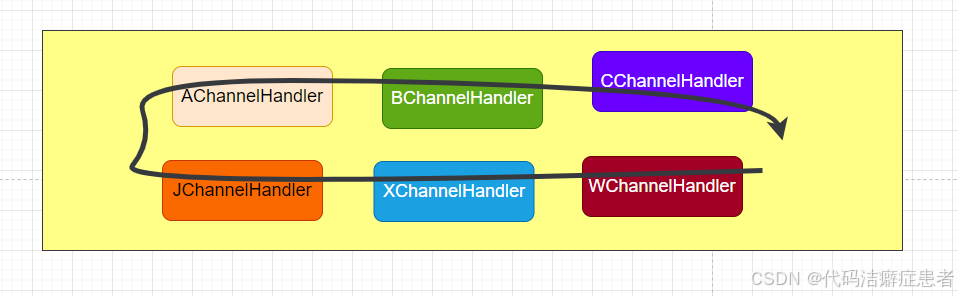
黄色的矩形框就是Channel,黑色的线条就是 Pipeline,里面彩色的小矩形框就是不同的业务处理器。
4.6、ChannelFuture
Channel 的 bind 方法会返回一个 ChannelFuture 对象, 这个对象提供获取异步处理结果的方法。以前面的Echo服务器为例 ,绑定端口的操作是异步的,bind方法立刻返回一个ChannelFuture对象,在后续某个时间点连接创建成功后 会通知ChannelFuture对象,我们使用get 方法就能获取到结果了。
我们可以点进去看下源码
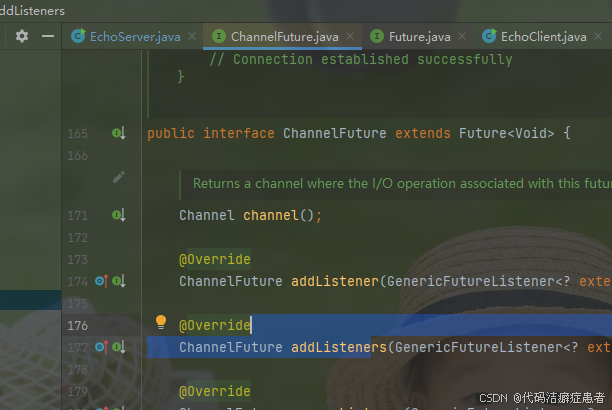
这个接口继承了 Future 接口,需要注意的是 这是 Netty 里面的接口,这个接口扩展了JDK 自带的Future接口。
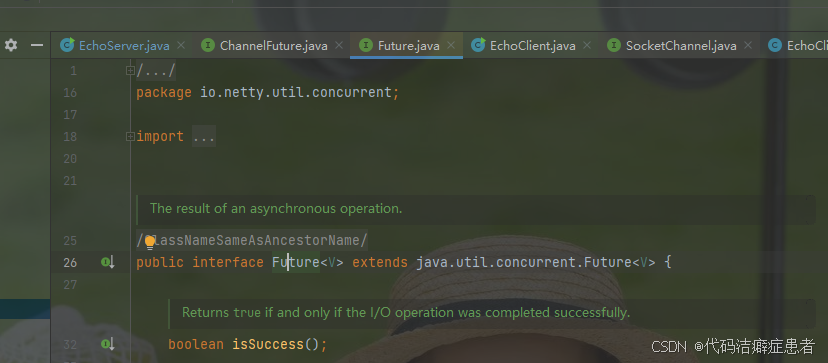
你可能会有疑问 为啥 Netty 不直接使用 JDK 中的 Future 而是要自己去弄一个,很显然 JDK 中的Future 只能同步等待任务结束才能拿到结果,很显然 Netty 需要的是 可以同步等待任务结束得到结果,也能够以异步的方式得到结果,当然都是要等任务结束。
更重要的是 Netty的Future与Channel紧密相关,能够提供与I/O操作相关的额外方法,比如获取关联的Channel,这在处理网络事件时非常有用。而JDK的Future是通用的,无法直接与Netty的组件集成。
5、实现一个HTTP服务器
5.1、需求分析
我们知道了 Netty 中常用的组件的功能 还清楚了使用 Netty 开发的基本步骤,下面我们来做一个进阶的案例 实现一个 HTTP 服务器,需求是 要能够处理 get 请求和 Post 请求,并且将传过去的参数返回。
5.2、编码设计
在 Netty 中提供了一组用户处理 HTTP 请求和响应的编解码器 HttpServerCodec ,服务端的代码整体结构 和之前 Echo 服务 的一样,甚至你可以直接拷贝过来。不同的是 初始化 Channel 的逻辑 我们需要 根据自己的需求添加,本次我们需要使用的 HttpServerCodec 以及需要自己实现的HttpServerHandler,主要就是用来处理 HTTP 请求的功能
5.3、引导类实现
先给出引导类的代码
package org.wcan.netty._03_demo;

import io.netty.bootstrap.ServerBootstrap;
import io.netty.channel.ChannelFuture;
import io.netty.channel.ChannelInitializer;
import io.netty.channel.ChannelPipeline;
import io.netty.channel.EventLoopGroup;
import io.netty.channel.nio.NioEventLoopGroup;
import io.netty.channel.socket.SocketChannel;
import io.netty.channel.socket.nio.NioServerSocketChannel;
import io.netty.handler.codec.http.HttpObjectAggregator;
import io.netty.handler.codec.http.HttpServerCodec;

public class HttpServer {
    public static void main(String[] args) throws Exception {
        //负责处理连接事件
        EventLoopGroup bossGroup = new NioEventLoopGroup(1);
        //负责处理 I/O 事件
        EventLoopGroup workerGroup = new NioEventLoopGroup();
        try {
            ServerBootstrap b = new ServerBootstrap();
            b.group(bossGroup, workerGroup)
                    .channel(NioServerSocketChannel.class)
                    .childHandler(new ChannelInitializer<SocketChannel>() {
                        @Override
                        protected void initChannel(SocketChannel ch) {
                            ChannelPipeline p = ch.pipeline();
                            p.addLast(new HttpServerCodec()); // HTTP 编解码
                            p.addLast(new HttpObjectAggregator(65536)); // 聚合 HTTP 消息
                            p.addLast(new HttpServerHandler()); // 自定义处理器
                        }
                    });
            ChannelFuture f = b.bind(8080).sync();
            f.channel().closeFuture().sync();
        } finally {
            bossGroup.shutdownGracefully();
            workerGroup.shutdownGracefully();
        }
    }
}
这里我们使用了两个线程组 其中 boss 负责处理连接,worker 负责处理请求。下面我们来实现解析 HTTP 请求的功能,实现的步骤也和之前类似。
5.4、HttpServerHandler实现
我们之前的业务 Handler 是采用继承 ChannelInboundHandlerAdapter 的方式,其实 ChannelInboundHandlerAdapter 还有一个很好用的子类 SimpleChannelInboundHandler
这次我们就来继承 SimpleChannelInboundHandler 来实现,同样的我们需要重写 channelRead0 方法,用来实现读取请求内容并解析。
相关代码如下
package org.wcan.netty._03_demo;

import io.netty.buffer.ByteBuf;
import io.netty.buffer.Unpooled;
import io.netty.channel.ChannelFutureListener;
import io.netty.channel.ChannelHandlerContext;
import io.netty.channel.SimpleChannelInboundHandler;
import io.netty.handler.codec.http.*;
import io.netty.util.CharsetUtil;

import java.util.List;
import java.util.Map;

public class HttpServerHandler extends SimpleChannelInboundHandler<FullHttpRequest> {
    @Override
    protected void channelRead0(ChannelHandlerContext ctx, FullHttpRequest request) {
        // 处理 GET 请求
        if (request.method() == HttpMethod.GET) {
            handleGetRequest(ctx, request);
        }
        // 处理 POST 请求
        else if (request.method() == HttpMethod.POST) {
            handlePostRequest(ctx, request);
        }
        // 其他方法返回 405
        else {
            sendError(ctx, HttpResponseStatus.METHOD_NOT_ALLOWED);
        }
    }

    private void handleGetRequest(ChannelHandlerContext ctx, FullHttpRequest request) {
        // 解析查询参数
        QueryStringDecoder queryDecoder = new QueryStringDecoder(request.uri());
        Map<String, List<String>> params = queryDecoder.parameters();

        // 构建响应内容
        String responseContent = "GET Request Received\nParams: " + params;
        sendResponse(ctx, request, HttpResponseStatus.OK, responseContent);
    }

    private void handlePostRequest(ChannelHandlerContext ctx, FullHttpRequest request) {
        // 获取 POST 内容
        ByteBuf content = request.content();
        String requestBody = content.toString(CharsetUtil.UTF_8);

        // 构建响应内容
        String responseContent = "POST Request Received\nBody: " + requestBody;
        sendResponse(ctx, request, HttpResponseStatus.OK, responseContent);
    }

    private void sendResponse(ChannelHandlerContext ctx, FullHttpRequest request,
                             HttpResponseStatus status, String content) {
        FullHttpResponse response = new DefaultFullHttpResponse(
                HttpVersion.HTTP_1_1, status,
                Unpooled.copiedBuffer(content, CharsetUtil.UTF_8));

        response.headers().set(HttpHeaderNames.CONTENT_TYPE, "text/plain; charset=UTF-8");
        response.headers().set(HttpHeaderNames.CONTENT_LENGTH, response.content().readableBytes());

        if (!HttpUtil.isKeepAlive(request)) {
            ctx.writeAndFlush(response).addListener(ChannelFutureListener.CLOSE);
        } else {
            response.headers().set(HttpHeaderNames.CONNECTION, HttpHeaderValues.KEEP_ALIVE);
            ctx.writeAndFlush(response);
        }
    }

    private void sendError(ChannelHandlerContext ctx, HttpResponseStatus status) {
        FullHttpResponse response = new DefaultFullHttpResponse(
                HttpVersion.HTTP_1_1, status,
                Unpooled.copiedBuffer("Failure: " + status + "\r\n", CharsetUtil.UTF_8));
        response.headers().set(HttpHeaderNames.CONTENT_TYPE, "text/plain; charset=UTF-8");
        ctx.writeAndFlush(response).addListener(ChannelFutureListener.CLOSE);
    }

    @Override
    public void exceptionCaught(ChannelHandlerContext ctx, Throwable cause) {
        cause.printStackTrace();
        ctx.close();
    }
}
好了,我们启动引导类 就可以监听8080端口了。
5.5、功能验证
5.5.1、get请求测试
我们使用浏览器发送一个带参数的 get 请求试试
比如请求url
http://127.0.0.1:8080/userInfo/getUserInfo?userId=1&userName=tom
我们可以看到服务端成功的给浏览器返回了解析后的参数
5.5.2、post 请求测试
接着我们使用apiPost 工具来测试下 post 请求的处理,我们发送以下请求
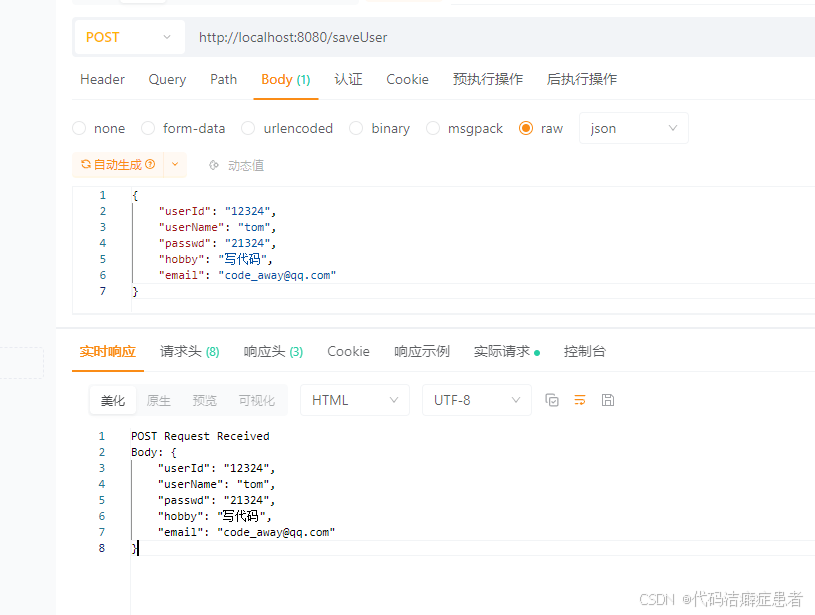
5.5.3、压测
我们可以利用 apiPost 工具的压测功能试试 咱们的这个服务吞吐量如何
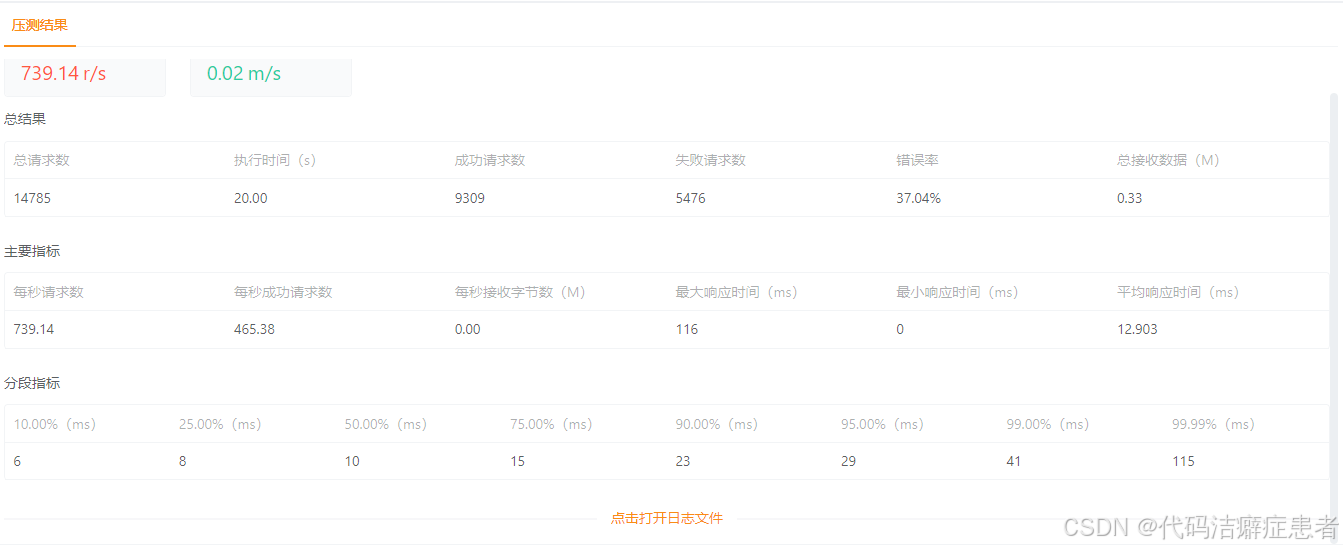
每个请求基本上毫秒级的响应 ,每秒请求数 739 成功处理了465 吞吐量看着还可以,就是错误率有 37% 这个有点尴尬,后面我们会学习如何调优,到时候我们再构建一款高性能的 HTTP f服务器。
6、总结
本篇文章结合案例给大家介绍了 Netty 的基本用法以及编码的步骤,并且详细的剖析了 Netty 中常用的一些组件,没有讲解复杂的概念,最后使用 Netty 实现看一个 HTTP 服务器。结合两个案例相信大家已经知道如何使用 Netty 开发一个网络应用程序了。至于Netty 的高级特性 线程模型 我会再后面的文章给大家介绍。


 4197
4197

 被折叠的 条评论
为什么被折叠?
被折叠的 条评论
为什么被折叠?
 到【灌水乐园】发言


