


文章目录
分布式事务模型
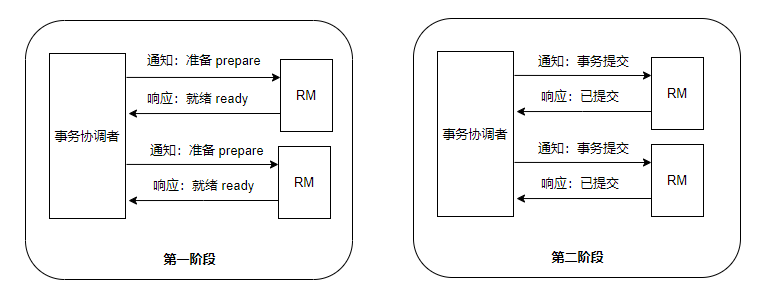
解决分布式事务,各个子系统之间必须能感知到彼此的事务状态,才能保证状态一致,因此需要一个事务协调者来协调每一个事务的参与者(子系统事务)。这里的子系统事务,称为分支事务;有关联的各个分支事务在一起称为全局事务。
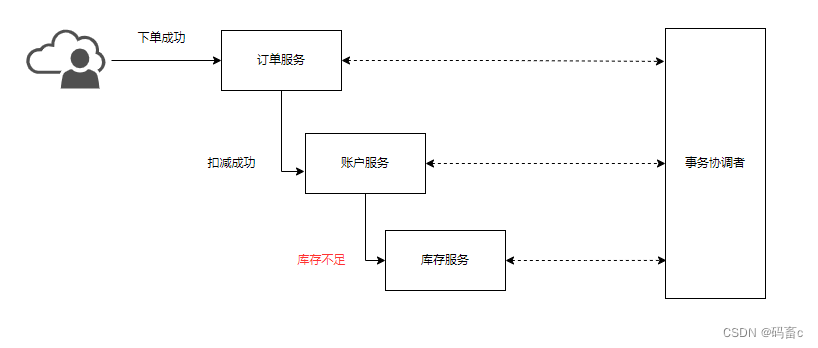
分布式事务最大的问题是各个子事务的一致性问题,如上图所示:若库存服务扣减失败后,应该将账户服务与订单服务中的数据库操作进行回滚,这样才能达成数据的一致性。因此可以借鉴结合CAP定理与BASE理论:
- 最终一致性思想 - AP模式:各子事务分别执行和提交,允许出现结果不一致,然后采用弥补措施恢复数据即可,实现最终一致。
- 强一致性思想 - CP模式:各个子事务执行后互相等待,同时提交,同时回滚,达成强一致。但事务等待过程中,处于弱可用状态。
Seata 架构
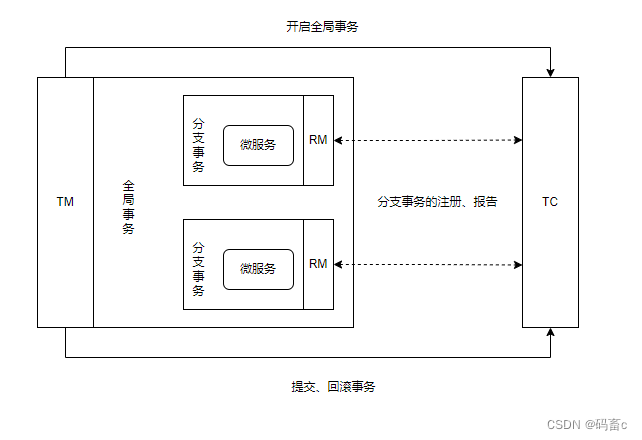
Seata事务管理中有三个重要的角色:
- TC(Transaction Coordinator) - 事务协调者:维护全局和分支事务的状态,协调全局事务提交或回滚。
- TM(Transaction Manager) - 事务管理器:定义全局事务的范围、开始全局事务、提交或回滚全局事务。
- RM(Resource Manager) - 资源管理器:管理分支事务处理的资源,与TC交谈以注册分支事务和报告分支事务的状态,并驱动分支事务提交或回滚。
Seata提供了四种不同的分布式事务解决方案:
- XA 模式:强一致性分阶段事务模式,牺牲了一定的可用性,无业务侵入
- AT 模式:最终一致的分阶段事务模式,牺牲了一定的一致性,无业务侵入。弥补了 XA 模式中锁定资源数据周期长的问题,但也引入了一些数据正确性的问题。也是 Seata 的默认模式
- TCC 模式:最终一致的分阶段事务模式,有业务侵入
- SAGA 模式:长事务模式,有业务侵入
部署 TC 服务
TC 协调者服务就是我们要下载 Seata 服务,版本为 1.6.1,下载地址。
安装后的目录如下:
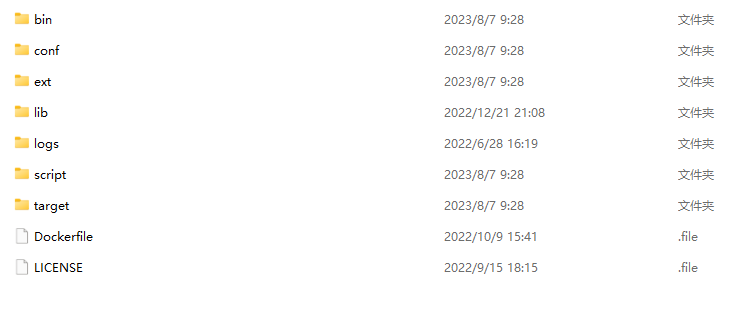
启动脚本在 bin 目录下,根据不同的操作系统选择不同启动脚本。
conf 目录下是服务的配置:

example.yaml 是配置的样例文件,里面包含了所有配置的样例:
server:
  port: 7091

spring:
  application:
    name: seata-server

logging:
  config: classpath:logback-spring.xml
  file:
    path: ${user.home}/logs/seata
  extend:
    logstash-appender:
      destination: 127.0.0.1:4560
    kafka-appender:
      bootstrap-servers: 127.0.0.1:9092
      topic: logback_to_logstash

seata:
  config:
    # support: nacos 、 consul 、 apollo 、 zk  、 etcd3
    type: file
    nacos:
      server-addr: 127.0.0.1:8848
      namespace:
      group: SEATA_GROUP
      ...
    consul:
      server-addr: 127.0.0.1:8500
      acl-token:
      ...
    apollo:
      appId: seata-server
      apollo-meta: http://192.168.1.204:8801
      ...
    zk:
      server-addr: 127.0.0.1:2181
      ...
    etcd3:
      server-addr: http://localhost:2379
      key: seata.properties
  registry:
    # support: nacos 、 eureka 、 redis 、 zk  、 consul 、 etcd3 、 sofa
    type: file
    preferred-networks: 30.240.*
    nacos:
      application: seata-server
      server-addr: 127.0.0.1:8848
      group: SEATA_GROUP
      namespace:
      cluster: default
      ...
    eureka:
      service-url: http://localhost:8761/eureka
      application: default
      ...
    redis:
      server-addr: localhost:6379
      db: 0
      ...
    zk:
      cluster: default
      server-addr: 127.0.0.1:2181
      ...
    consul:
      cluster: default
      server-addr: 127.0.0.1:8500
      ...
    etcd3:
      cluster: default
      server-addr: http://localhost:2379
    sofa:
      server-addr: 127.0.0.1:9603
      application: default
      ...

  server:
    service-port: 8091 #If not configured, the default is '${server.port} + 1000'
    ...
    recovery:
      ...
    undo:
      ...
    session:
      ...
  store:
    # support: file 、 db 、 redis
    mode: file
    session:
      mode: file
    lock:
      mode: file
    file:
      dir: sessionStore
      max-branch-session-size: 16384
      max-global-session-size: 512
      ...
    db:
      datasource: druid
      db-type: mysql
      driver-class-name: com.mysql.jdbc.Driver
      url: jdbc:mysql://127.0.0.1:3306/seata?rewriteBatchedStatements=true
      ...
    redis:
      mode: single
      database: 0
      ...
  metrics:
    enabled: false
    registry-type: compact
    exporter-list: prometheus
    exporter-prometheus-port: 9898
  transport:
    ...
着重关注部分配置:
-
config 与 registry 分别对应配置中心、注册中心。可选择的方式有很多,我们使用 nacos,也就是将 seata server 的节点服务管理、配置管理都放到 nacos 中进行管理
-
server 节点与配置文件首部的 spring server 节点。spring server 是管控台 Web 服务的配置,而 server 节点是 TM、各个 RM 与 TC 进交互时的配置,也就是说会监听另一个端口(默认 spring 的 server.port + 1000),另起一套 netty 服务。transport 节点则正是各个角色进行交互时使用的 netty 服务配置。
-
console:管控台的用户密码配置
-
store 节点指的是 TC 在工作期间存储协调数据的配置,支持的方式也有很多,我们使用 mysql 数据库的方式进行存储。那么就需要在
seata-1.6.1-server\script\server\db目录下找到 DDL 文件在数据中执行: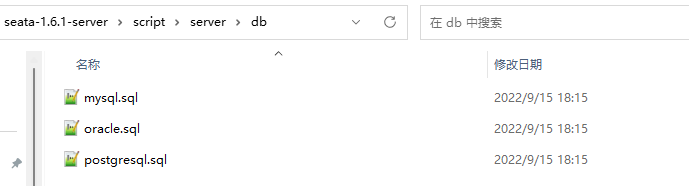
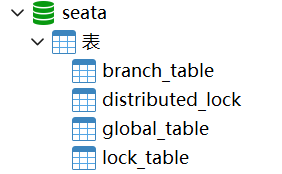
并在 nacos 中创建属于对应的配置文件,将 db 信息存入 nacos 中: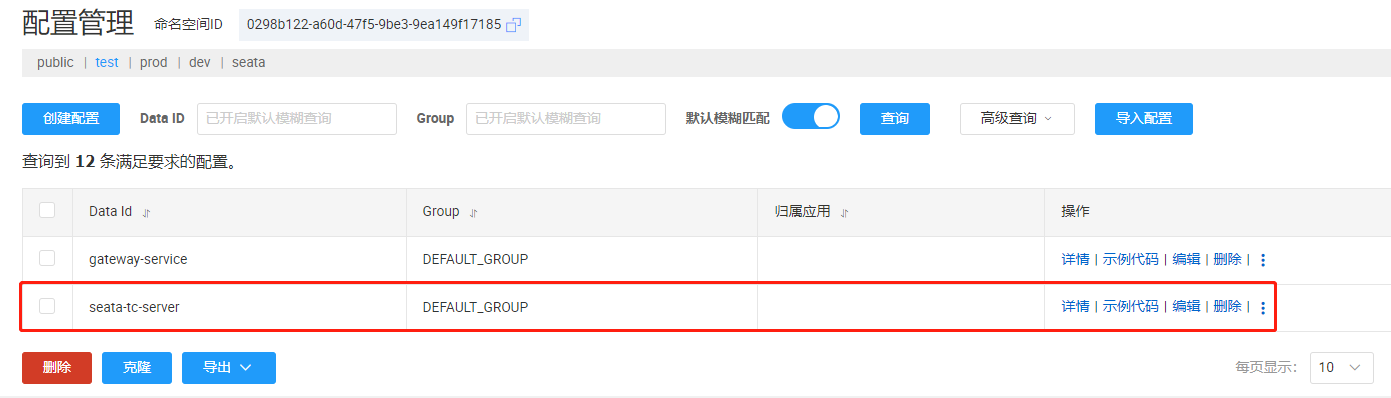
seata:
  store:
    mode: db
    file:
      dir: sessionStore
      max-branch-session-size: 16384
      max-global-session-size: 512
      file-write-buffer-cache-size: 16384
      session-reload-read-size: 100
      flush-disk-mode: async
    db:
      datasource: druid
      db-type: mysql
      driver-class-name: com.mysql.cj.jdbc.Driver
      url: jdbc:mysql://127.0.0.1:3306/seata?rewriteBatchedStatements=true&useSSL=true&useUnicode=true&characterEncoding=utf-8&serverTimezone=Asia/Shanghai
      user: root
      password: root
      min-conn: 10
      max-conn: 100
      global-table: global_table
      branch-table: branch_table
      lock-table: lock_table
      distributed-lock-table: distributed_lock
      query-limit: 1000
      max-wait: 5000
application.yaml 则是 seata server 启动时实际使用的配置文件,我们将 example.yaml 中的配置根据需求精简一下后如下:
server:
  port: 8600

spring:
  application:
    name: seata-tc-server

logging:
  config: classpath:logback-spring.xml
  file:
    path: ${user.home}/logs/seata
  extend:
    logstash-appender:
      destination: 127.0.0.1:4560
    kafka-appender:
      bootstrap-servers: 127.0.0.1:9092
      topic: logback_to_logstash

console:
  user:
    username: seata
    password: seata

seata:
  config:
    # support: nacos, consul, apollo, zk, etcd3
    type: nacos
    nacos:
      server-addr: 127.0.0.1:8100
      namespace: 0298b122-a60d-47f5-9be3-9ea149f17185
      group: DEFAULT_GROUP
      username: nacos
      password: nacos
      #context-path:
      ##if use MSE Nacos with auth, mutex with username/password attribute
      #access-key:
      #secret-key:
      data-id: seata-tc-server.yaml
  registry:
    # support: nacos, eureka, redis, zk, consul, etcd3, sofa
    type: nacos
    nacos:
      application: nacos-seata-tc-server
      server-addr: 127.0.0.1:8100
      group: DEFAULT_GROUP
      namespace: 0298b122-a60d-47f5-9be3-9ea149f17185
      cluster: SH
      username: nacos
      password: nacos
      context-path:
  security:
    secretKey: SeataSecretKey0c382ef121d778043159209298fd40bf3850a017
    tokenValidityInMilliseconds: 1800000
    ignore:
      urls: /,/**/*.css,/**/*.js,/**/*.html,/**/*.map,/**/*.svg,/**/*.png,/**/*.ico,/console-fe/public/**,/api/v1/auth/login
注意配置项:seata.registry.nacos.cluster,目前指定的是 SH 上海。为什么要特意说这个配置项呢,因为在后期搭建 seata 集群部署、以及微服务节点中集成 seata 时需要指定 TC 服务的集群名,并根据 ncaos 的配置动态刷新实现 TC 服务的动态切换。总结下来就是 RM 不再依赖具体的 TC,而是依赖的 TC 集群,当 TC 集群发生故障时,可以快速切换 TC 集群。
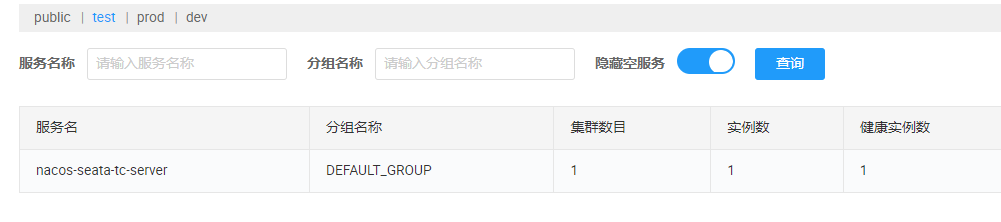
修改完配置后,直接通过脚本启动即可,浏览器访问:http://localhost:8600 即可进入管控台。

并且可以在 nacos 管控台中查看注册的服务:
微服务集成 Seata
以订单服务为例:
引入依赖:
<dependencies>
    <!-- nacos -->
    <dependency>
        <groupId>com.alibaba.cloud</groupId>
        <artifactId>spring-cloud-starter-alibaba-nacos-discovery</artifactId>
    </dependency>
    <dependency>
        <groupId>com.alibaba.cloud</groupId>
        <artifactId>spring-cloud-starter-alibaba-nacos-config</artifactId>
    </dependency>

    <!-- seata -->
    <dependency>
        <groupId>com.alibaba.cloud</groupId>
        <artifactId>spring-cloud-starter-alibaba-seata</artifactId>
    </dependency>

    <!-- springboot starter -->
    <dependency>
        <groupId>org.springframework.boot</groupId>
        <artifactId>spring-boot-starter-test</artifactId>
        <scope>test</scope>
    </dependency>
</dependencies>
bootstrap.yaml:
spring:
  main:
    allow-bean-definition-overriding: true
  cloud:
    nacos:
      # 通用配置
      # server-addr: 127.0.0.1:8000 # 1. nacos 集群服务地址
      server-addr: 127.0.0.1:8100 # 1. nacos 服务地址
      username: nacos
      password: nacos

      # 服务治理
      discovery:
        namespace: 0298b122-a60d-47f5-9be3-9ea149f17185
        group: DEFAULT_GROUP
        service: nacos-order-service
        cluster-name: order-service-cluster
        weight: 1

      # 服务配置
      config:
        namespace: 0298b122-a60d-47f5-9be3-9ea149f17185
        group: DEFAULT_GROUP
        name: order-service
        file-extension: yaml
        refresh-enabled: true

# feign 配置
feign:
  hystrix:
    enabled: true

# seata 配置
seata:
  # 配置 TC 在注册中心中的的信息,以此在注册中心中获取到 TC 服务的实例
  registry:
    type: nacos
    nacos:
      server-addr: 127.0.0.1:8100
      namespace: 0298b122-a60d-47f5-9be3-9ea149f17185
      group: DEFAULT_GROUP
      application: nacos-seata-tc-server
      username: nacos
      password: nacos
      # cluster-name: 取 vgroup-mapping 配置的事务组与 TC 集群的映射关系中的集群名称
  tx-service-group: seata-tx-test-group # 事务组名称
  service:
    vgroup-mapping: # 事务组与 TC cluster 的映射关系. 获取 TC 服务节点实例时的 TC 集群名称
      seata-tx-test-group: SH
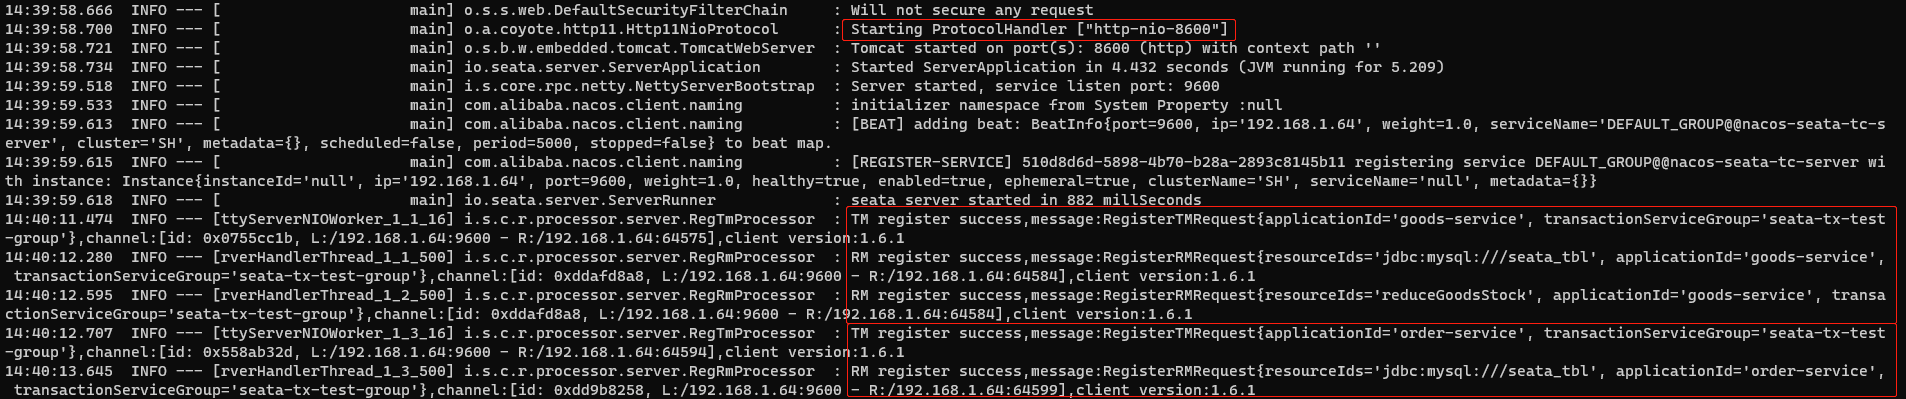
启动订单服务,如果 TC 服务的终端出现了:

则表明 RM 在 TC 已经注册成功。
XA 模式
XA 规范 是 X/Open 组织定义的分布式事务处理(DTP,Distributed Transaction Processing)标准,XA 规范 描述了全局的TM与局部的RM之间的接口,几乎所有主流的数据库都对 XA 规范 提供了支持。
正常情况:
异常情况:
XA 模式的优缺点就是强一致性的优缺点:
优点:数据强一致性,不会读到脏数据
缺点:使得部分事务提交较快节点处于弱可用状态。也就是说,全局事务的提交,取决于执行时间最长的分支事务。
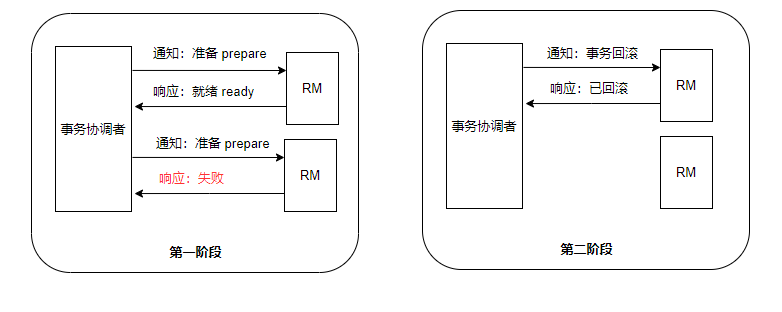
Seata 实现的 XA 模式
seata 的 XA 模式做了一些调整,但大体相似。工作模型如下:
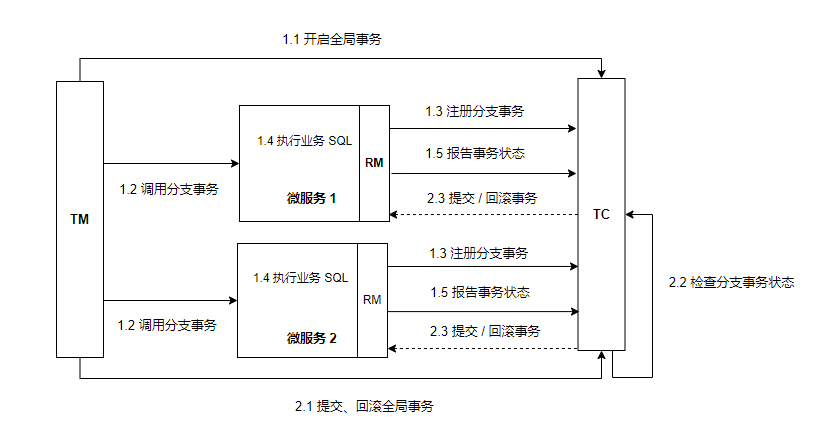
RM 一阶段:
- 注册分支事务到 TC
- 执行业务 SQL
- 报告执行状态到 TC
RM 二阶段:
- 接收 TC 指令进行事务提交或回滚
TC 二阶段:
- 检测各分支的事务状态
- 若都成功则通知所有 RM 进行提交
- 若有任意节点失败,则通知所有 RM 进行回滚
XA 模式的具体实践
分别在 order service、goods service 中添加 seata 配置:
# seata 配置
seata:
  registry:
    type: nacos
    nacos:
      server-addr: 127.0.0.1:8100
      namespace: 0298b122-a60d-47f5-9be3-9ea149f17185
      group: DEFAULT_GROUP
      application: nacos-seata-tc-server
      username: nacos
      password: nacos
  tx-service-group: seata-tx-test-group # 事务组名称
  service:
    vgroup-mapping: # 事务组与 TC cluster 的映射关系. 获取 TC 服务节点实例时的 TC 集群名称
      seata-tx-test-group: SH
  data-source-proxy-mode: XA
注意:data-source-proxy-mode: XA,该配置项可以指定使用的模式。
添加 @GlobalTransactional 注解,测试代码如下:
@RestController
public class OrderController {

    @Autowired
    private GoodsFeignClient goodsFeignClient;

    @Autowired
    private OrderMapper orderMapper;

    @PostMapping("/seata/order")
    @GlobalTransactional
    public R<Boolean> create(Order order) {
        order.setCreateTime(LocalDateTime.now());
        orderMapper.insert(order);
        return goodsFeignClient.reduceStock(order.getGoodsId(), order.getTotal());
    }
}

@RestController
public class GoodsFeignController {

    @Autowired
    private GoodsMapper goodsMapper;

    @PostMapping("/seata/reduceStock")
    public R<Boolean> reduceStock(@RequestParam Long goodsId, @RequestParam Integer num) {
        int reduce = goodsMapper.reduce(goodsId, num);
        if (reduce <= 0) {
            throw new BusinessException("库存不足");
        }
        return R.success(true);
    }
}
数据库数据如下:
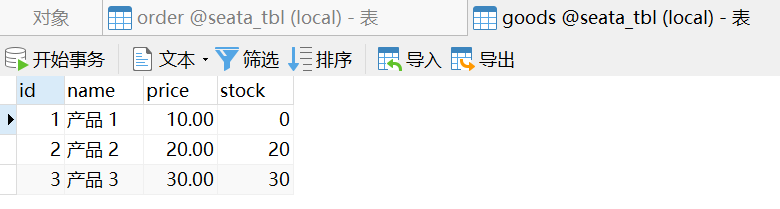
模拟请求:
POST http://localhost:6200/seata/order

goodsId=1&total=1
最终 goods service 会抛出库存不足异常,导致 order service 新增的数据进行回滚。
并且,如果此时尝试手动在数据库终端中修改数据,会被一直阻塞,因为数据已经加了行锁。
AT 模式
AT 模式是最终一致的分阶段事务模式,牺牲了一定的一致性,无业务侵入。弥补了 XA 模式中锁定资源数据周期长的问题,但也引入了一些数据正确性的问题。也是 Seata 的默认模式。
工作模型如下:
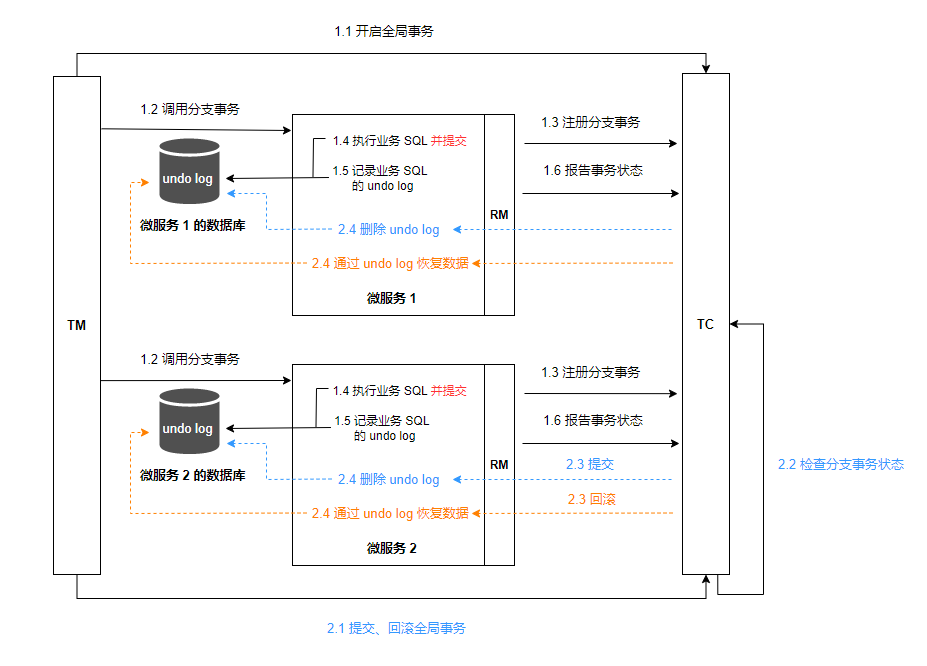
RM 一阶段:
- 注册分支事务到 TC
- 执行业务 SQL 并提交
- 记录业务 SQL 的 undo log 在业务表的数据库的 undo_log 表
- 报告执行状态到 TC
RM 二阶段:接收 TC 指令进行事务提交或回滚
- 接收 TC 提交指令:删除 undo log 记录
- 接收 TC 回滚指令:通过 undo log 恢复数据
TC 二阶段:
- 检测各分支的事务状态。若都成功则通知所有 RM 进行提交,若有任意节点失败,则通知所有 RM 进行回滚
AT 模式与 XA 模式最大的区别
- XA 模式一阶段不提交事务,锁定资源;AT 模式一阶段直接提交,不锁定资源。
- XA 模式依赖数据库机制实现回滚;AT 模式利用数据快照实现数据回滚。
- XA 模式采用强一致性;AT 模式采用最终一致性。
AT 模式下的脏写问题
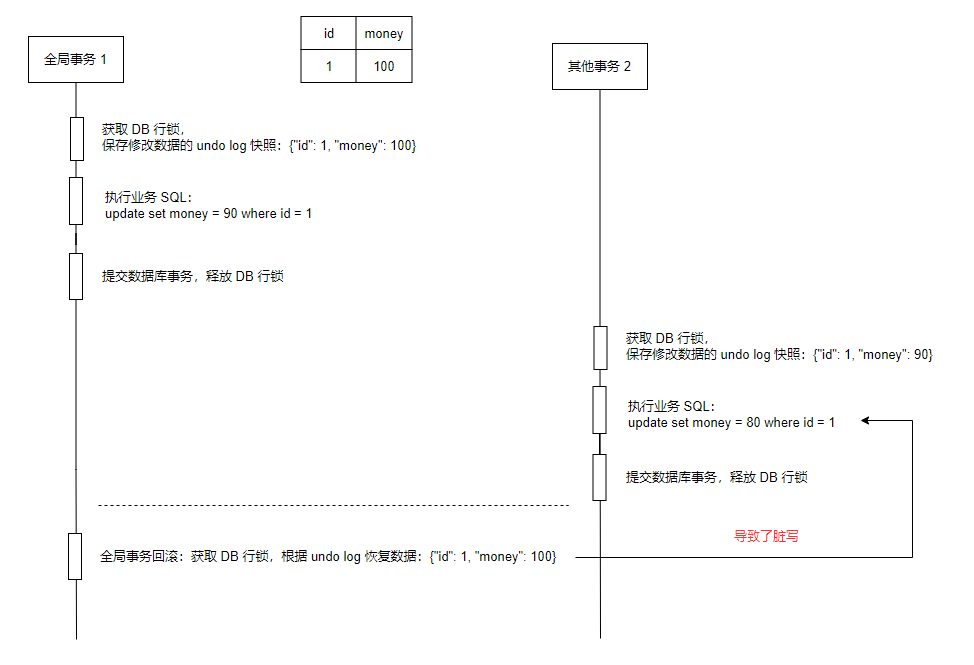
Seata 解决脏写
1. 数据加 seata 全局锁
通过 seata 实现的数据全局锁,保证写冲突时,使得其他的全局事务不能再次对数据进行修改。
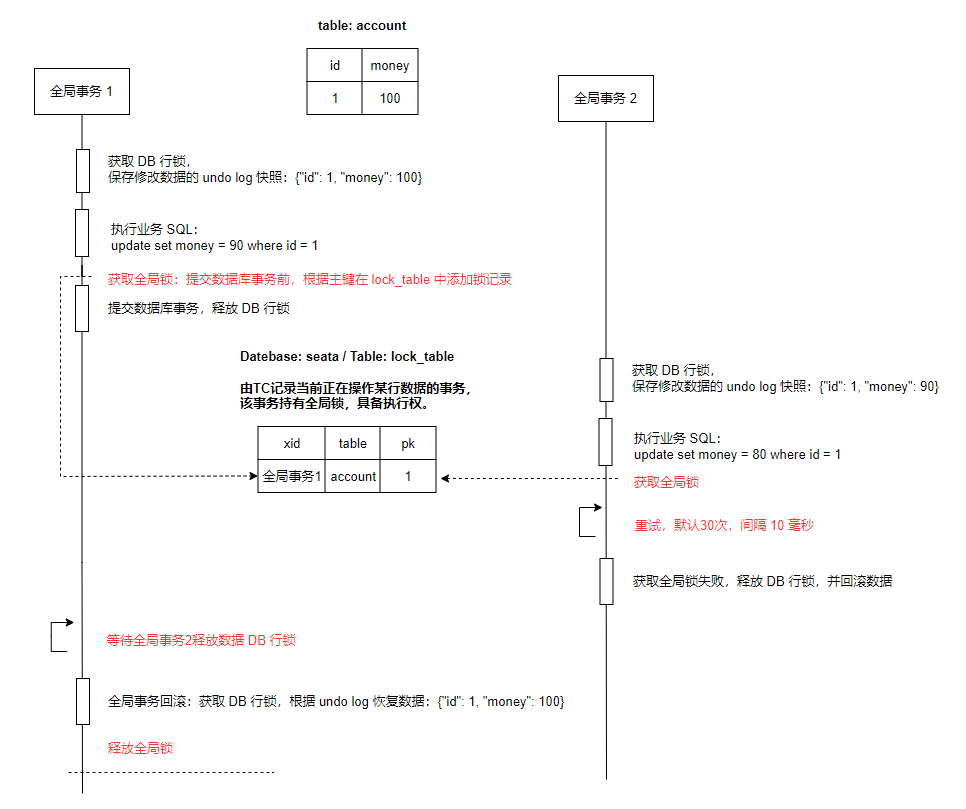
为了防止 seata 全局锁 与 数据库锁之间出现死锁:
全局事务1回滚时,全局事务2正在尝试修改数据:
全局事务1等待全局事务2释放数据库行锁,全局事务2等待全局事务1释放全局锁。
引入了全局锁获取超时机制,全局事务2获取全局锁失败,释放 DB 行锁,并回滚数据。全局事务1可以再次获取数据的行锁,完成事务数据的回滚,最终释放全局锁。
2. 兼容非全局事务
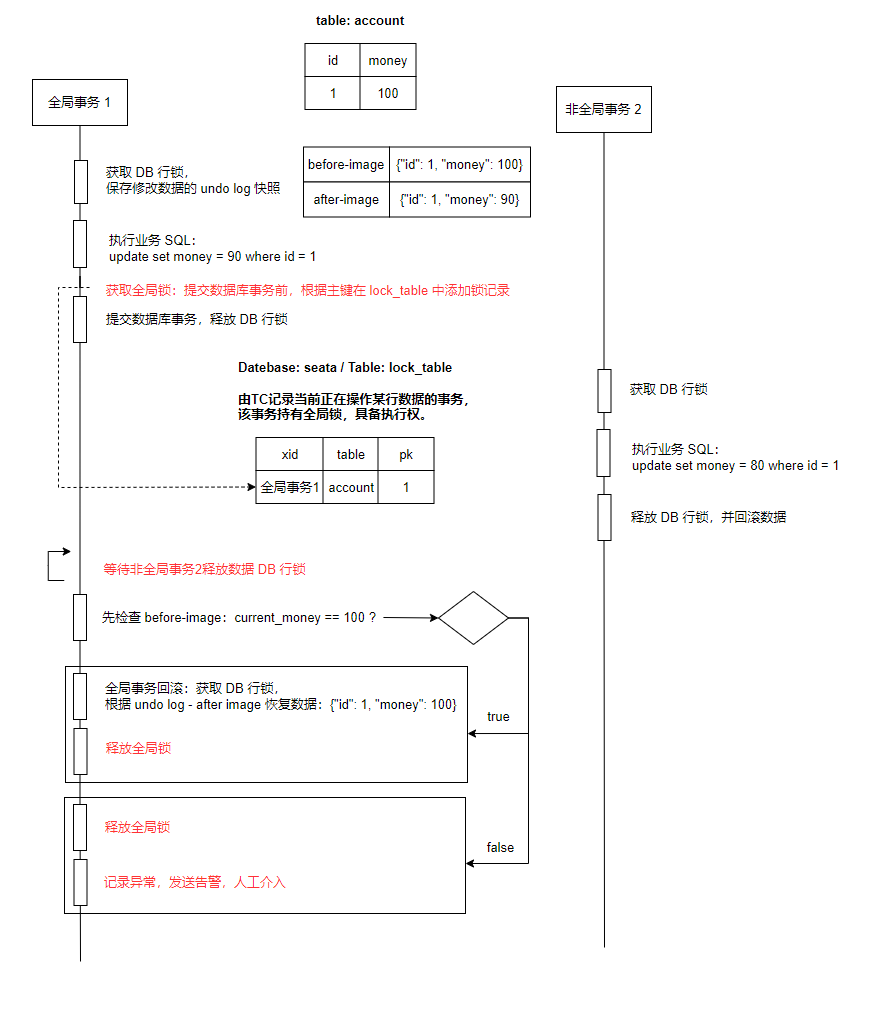
如果有不经过 seata 的管理的数据库事务与全局事务发生了写冲突,那么由于前者不会去尝试获取锁,会直接修改数据库数据并提交。当全局事务获取到数据的行锁后,如果直接进行回滚,会又会发生脏写的问题。
seata 是这样解决的:记录 undo log 时,不仅仅只记录修改之前的数据 before-image,还记录修改之后的数据 after-image。
- after-image:当全局事务回滚时,会先检查当前的数据是否等于 after-image,如果不相等则说明有人修改过数据,此时不能进行数据的回滚,需要发送告警,人工介入处理。
- before-image:如果当前数据等于 after-image,则根据 before-image 进行数据回滚。
AT 模式的具体实践
AT 模式中的快照生成、回滚等动作都是由框架自动完成,没有任何代码侵入,因此实现非常简单。
- 在 TC 服务关联的 seata 库中导入:lock_table 表,用于加全局锁。
- 在微服务节点关联的所有业务数据库中导入: undo_log 表,用于记录 before-image、after-image。
- 在具体的微服务项目中修改 seata 配置:
seata:
  ...
  data-source-proxy-mode: AT
TCC 模式
TCC模式与AT模式非常相似,每阶段都是独立事务,不同的是TCC通过人工编码来实现数据恢复。需要实现三个方法:
- Try:资源的检测和预留;
- Confirm:完成资源操作业务;要求 Try 成功 Confirm 一定要能成功。
- Cancel:预留资源释放,可以理解为try的反向操作。
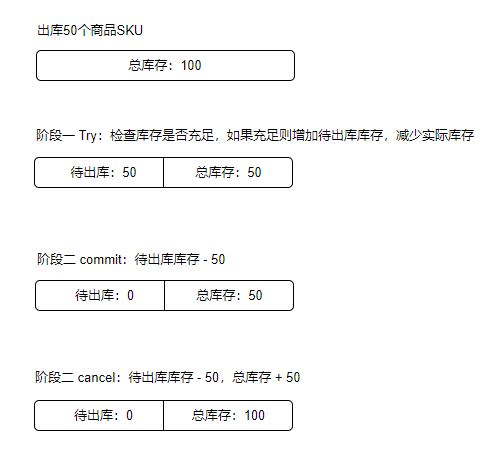
TCC 冻结概念
以库存为例,在库存中一般不仅仅只会有一个实际库存字段,还会有一个待出库库存字段。表示用户已经下单,但是还没有发货这个阶段的冻结库存。
后续的每次下单校验库存时,需要判断下单商品购买数量是否不超过实际库存去减待出库的差值。并仅在待出库库存字段中增加商品出库量,不修改实际库存字段。
当发货后,对待出库库存与实际库存进行双减,此时才表明商品已出库。
在 TCC 中的,由于不会在业务表中添加字段,而是会在另起这一张表,记录冻结数量。为了方便校验,每次记录冻结数量时,直接扣减掉实际总数量,后面直接判断实际库存即可。相对的,实际发货时也直接清除待出库库存即可。
工作模型如下:
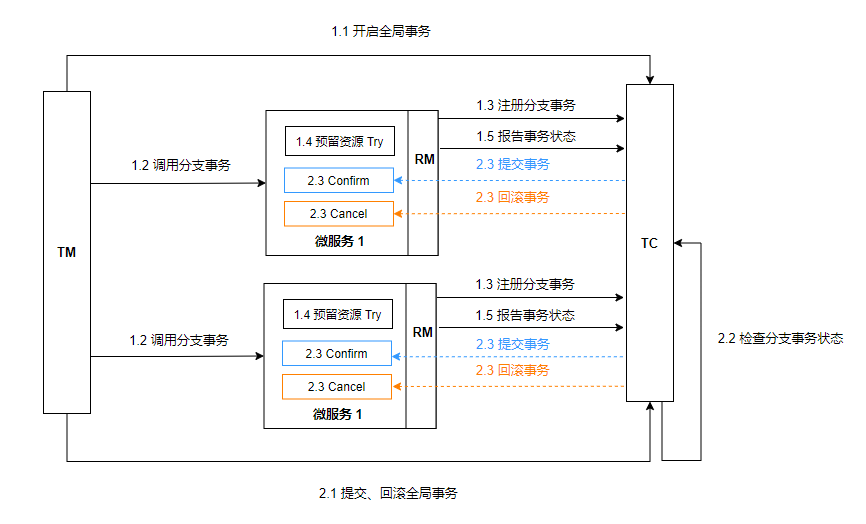
RM 一阶段:
- 注册分支事务到 TC
- 预留资源 Try
- 报告执行状态到 TC
RM 二阶段:接收 TC 指令进行事务提交或回滚
- 接收 TC 提交指令:执行编写的 Confirm 逻辑
- 接收 TC 回滚指令:执行编写的 Canel 逻辑
TC 二阶段:
- 检测各分支的事务状态。若都成功则通知所有 RM 进行提交,若有任意节点失败,则通知所有 RM 进行回滚
TCC 的空回滚与业务悬挂
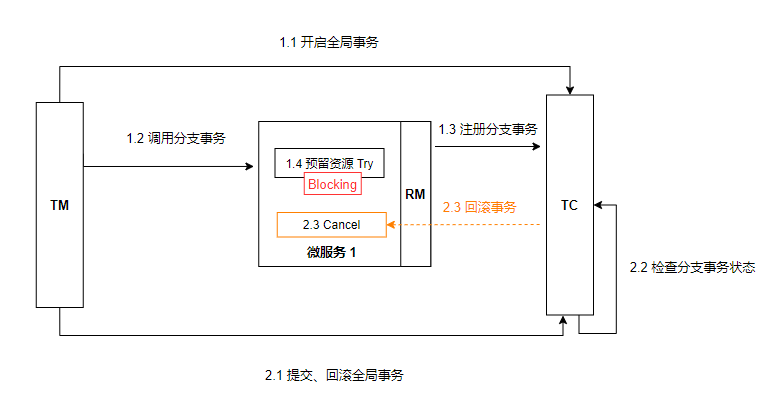
空回滚:
当执行阶段一 Try 时,若发生了阻塞,可能会使得全局事务超时从而触发二阶段的 cancel。
seata 会发起 cancel 请求,发生:try 未执行,但先执行了 cancel。此时 canel 不应去执行回滚逻辑,就叫做空回滚。总结下来即:cancel 在 try 之前执行。
业务悬挂:
对于已经空回滚的事务,如果继续执行 try 就意味着永远不会被执行 confirm 或 cancel,这个就叫做业务悬挂。当 try 从阻塞态度恢复时,应不执行任何操作,避免悬挂。
总结下来即:try 在 cancel 之后执行。
TCC 的优缺点
TCC的优点:
- 一阶段完成直接提交事务,释放数据库资源,性能好
- 相比AT模型,无需生成快照数据,无需使用全局锁。使用本地数据即可,性能最好
- 不依赖数据库事务,而是依赖补偿操作,可以用于非事务型数据库
TCC的缺点:
- 有代码侵入,需要人为编写 try、confirm、cancel 接口,太麻烦
- 采用最终一致性,数据存在短暂的不一致性
- 需要考虑 confirm 和 cancel 的失败情况,seata 会进行重试调用,需要做好幂等处理
- 需要处理 业务悬挂、空回滚问题
TCC 的具体实践
新增 TCC 测试接口:
@RestController
public class OrderController {

    @Autowired
    private GoodsFeignClient goodsFeignClient;

    @Autowired
    private OrderMapper orderMapper;

    @PostMapping("/TCCOrder")
    @GlobalTransactional
    public ResponseEntity<Long> TCCCreate(Order order) {
        order.setCreateTime(LocalDateTime.now());
        orderMapper.insert(order);
        goodsFeignClient.TCCReduceStock(order.getGoodsId(), order.getTotal());
        return ResponseEntity.status(HttpStatus.CREATED).body(order.getId());
    }
}


@RestController
public class GoodsFeignController {

    // TCC 测试

    @Autowired
    private GoodsStockReduceTCCService goodsStockReduceTCCService;

    @PostMapping("/TCCReduceStock")
    public Boolean TCCReduceStock(@RequestParam Long goodsId, @RequestParam Integer num) {
        goodsStockReduceTCCService.reduceGoodsStock(goodsId, num);
        return true;
    }
}
关键在于 goodsStockReduceTCCService.reduceGoodsStock 方法:
@LocalTCC
public interface GoodsStockReduceTCCService {

    // Try
    @TwoPhaseBusinessAction(name = "reduceGoodsStock", commitMethod = "reduceGoodsStockCommit", rollbackMethod = "reduceGoodsStockRollback")
    void reduceGoodsStock(@BusinessActionContextParameter("goodsId") Long goodsId, @BusinessActionContextParameter("num") Integer num);

    // Confirm
    Boolean reduceGoodsStockCommit(BusinessActionContext context);

    // Cancel(Rollback)
    Boolean reduceGoodsStockRollback(BusinessActionContext context);
}
这个接口中定义了 TCC 的三个步骤:try、confirm、cancel
- 接口标记为 @LocalTCC。
@TwoPhaseBusinessAction注解标识的方法为 try 方法,并在注解中配置 confirm、cancel 步骤对应的方法。- try 方法中 @BusinessActionContextParameter 标记的形参,可以在 confirm、cancel 中通过
BusinessActionContext..getActionContext("paramName")进行获取。
实现类如下:
- 需要借助辅助表 GoodsStockFreeze 中的数据,处理各种异常情况(业务悬挂、空回滚、幂等)
- try 方法:
- 幂等:因为只会被调用一次,无需处理
- 业务悬挂:若 try 执行超时,seata 提前发起了 cancel 执行请求,则 try 不应继续执行,否则会发生后续 confirm、cancel 永远不被调用的问题。
- confirm:
- 幂等:若执行超时,seata 可能会发起多次执行请求。因为是删除操作,所以天生具有幂等性。
当然,这个需要根据具体的需求须要操作的数据而定。
- 幂等:若执行超时,seata 可能会发起多次执行请求。因为是删除操作,所以天生具有幂等性。
- cancel:
- 幂等:若执行超时,seata 可能会发起多次执行请求,需要处理幂等。
- 空回滚:若 try 执行超时,seata 提前发起了 cancel 执行请求。此时的 cancel 执行不应该执行任何操作。同时记录一条数据,以便 try 方法中可以通过该条数据判断业务悬挂,注意:空回滚时,新增的流水数据,不设置冻结库存数量。根据该字段是否有值 & 状态为 CANCEL 就可以判断出是正常回滚,还是空回滚。
@Slf4j
@Service
public class GoodsStockReduceTCCServiceImpl implements GoodsStockReduceTCCService {

    @Autowired
    private GoodsMapper goodsMapper;

    @Autowired
    private GoodsStockFreezeMapper goodsStockFreezeMapper;

    @Override
    @Transactional
    public void reduceGoodsStock(Long goodsId, Integer num) {
        // 只会调用一次,无需处理幂等

        GoodsStockFreeze stockFreeze = goodsStockFreezeMapper.selectById(goodsId);
        // 处理业务悬挂
        if (Objects.nonNull(stockFreeze)) {
            return;
        }
        // 1. 增加库存扣减流水
        GoodsStockFreeze goodsStockFreeze = new GoodsStockFreeze();
        goodsStockFreeze.setXid(RootContext.getXID());
        goodsStockFreeze.setFreezeStock(num);
        goodsStockFreeze.setState(GoodsStockFreeze.State.TRY);
        goodsStockFreezeMapper.insert(goodsStockFreeze);
        // 2. 减少实际库存
        int reduceRes = goodsMapper.reduce(goodsId, num);
        if (reduceRes <= 0) {
            throw new BusinessException("库存不足");
        }
    }

    @Override
    public Boolean reduceGoodsStockCommit(BusinessActionContext context) {
        log.info("事务 [{}] 提交", context.getXid());

        // 删除天生幂等,无序处理幂等

        // 1. 删除库存冻结流水
        return goodsStockFreezeMapper.deleteById(context.getXid()) == 1;
    }

    @Override
    @Transactional
    public Boolean reduceGoodsStockRollback(BusinessActionContext context) {
        String xid = context.getXid();

        log.info("事务 [{}] 回滚", xid);

        GoodsStockFreeze stockFreeze = goodsStockFreezeMapper.selectById(xid);
        Long goodsId = Long.parseLong(Objects.requireNonNull(context.getActionContext("goodsId")).toString());
        int num = Integer.parseInt(Objects.requireNonNull(context.getActionContext("num")).toString());
        // 处理空回滚
        if (Objects.isNull(stockFreeze)) {
            // 新增已回滚数据,以便阶段一的 Try 中可以以此判断业务悬挂
            GoodsStockFreeze goodsStockFreeze = new GoodsStockFreeze();
            goodsStockFreeze.setXid(xid);
            goodsStockFreeze.setFreezeStock(num);
            goodsStockFreeze.setState(GoodsStockFreeze.State.CANCEL);
            goodsStockFreezeMapper.insert(goodsStockFreeze);
            return true;
        }
        // 处理幂等
        if (GoodsStockFreeze.State.CANCEL == stockFreeze.getState()) {
            return true;
        }
        // 1. 增加实际库存
        goodsMapper.plus(goodsId, num);
        // 2. 修改库存冻结流水: 冻结库存为0 & 状态为已回滚
        GoodsStockFreeze goodsStockFreeze = new GoodsStockFreeze();
        goodsStockFreeze.setXid(xid);
        goodsStockFreeze.setFreezeStock(0);
        goodsStockFreeze.setState(GoodsStockFreeze.State.CANCEL);
        return goodsStockFreezeMapper.updateById(goodsStockFreeze) == 1;
    }
}
上面的案例是与 AT 模式嵌套使用的,当 AT 模式回滚时,也会触发 TCC 的 cancel 补偿方法。
需要说一下,即使上面的案例处理了很多特殊情况,但还是存在一个没有处理的问题:若 try 方法业务逻辑执行完成但在数据库事务提交前超时,seata 触发了 cancel 执行请求,那么最终就会发生业务悬挂的情况,所以需要加一个互斥锁。try 方法与 cancel 方法应该是串行执行的。
可见 TCC 的模式编写起来多麻烦,实际开发中一般很少用此种模式。
SAGA 模式
Saga 模式是 SEATA 提供的长事务解决方案。也分为两个阶段:
- 一阶段:直接提交本地事务
- 二阶段:成功则什么都不做;失败则通过编写补偿业务来回滚
优点:
- 事务参与者可以基于事件驱动实现异步调用,吞吐高
- 一阶段直接提交事务,无锁,性能好
- 不用编写TCC中的三个阶段,实现简单
缺点:
- 软状态持续时间不确定,时效性差
- 没有锁,没有事务隔离,会有脏写
AT 的全局锁,TCC 模式的资源冻结,都是解决脏写的解决方式。而 SAGA 是没有脏写的解决方法的,所以会出现脏写。
不同模式的对比
| XA | AT | TCC | SAGA | |
|---|---|---|---|---|
| 一致性 | 强一致性 | 最终一致性 | 最终一致性 | 最终一致性 |
| 隔离性 | 完全隔离 | 基于全局锁隔离 | 基于资源预留隔离 | 无隔离 |
| 代码侵入性 | 无 | 无 | 需要编写 try、confirm、cancel 接口 | 需要编写状态机与补偿 |
| 性能 | 差 | 好 | 非常好 | 非常好 |
| 场景 | 对一致性、隔离性有高要求的业务 | 基于关系型数据库的大多数分布式事务场景都可以 | 1.对性能要求高的事务 2.有非关系型数据库要参与的事务 | 1. 业务流程长、业务流程多 2.参与者包含其它公司或遗留系统服务,无法提供TCC 模式要求的三个接口 |
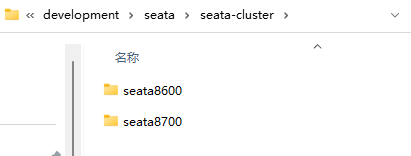
集群搭建
在新起一个 seata server,端口为 8700,gRPC 端口则为 9700。
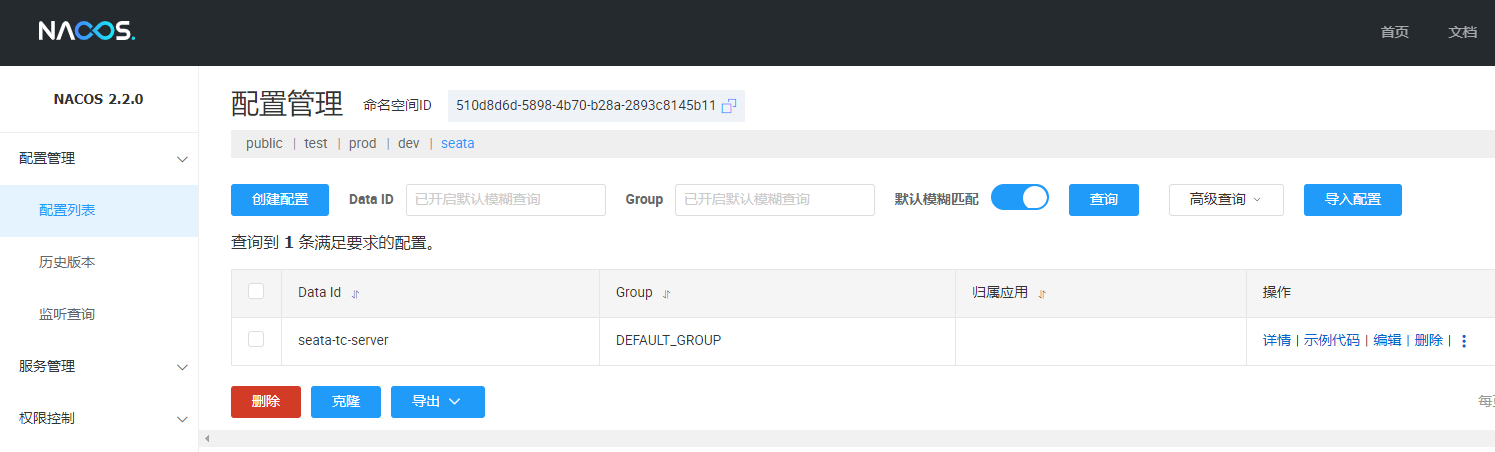
在 Nacos 中新建一个 seata 的独立命名空间:
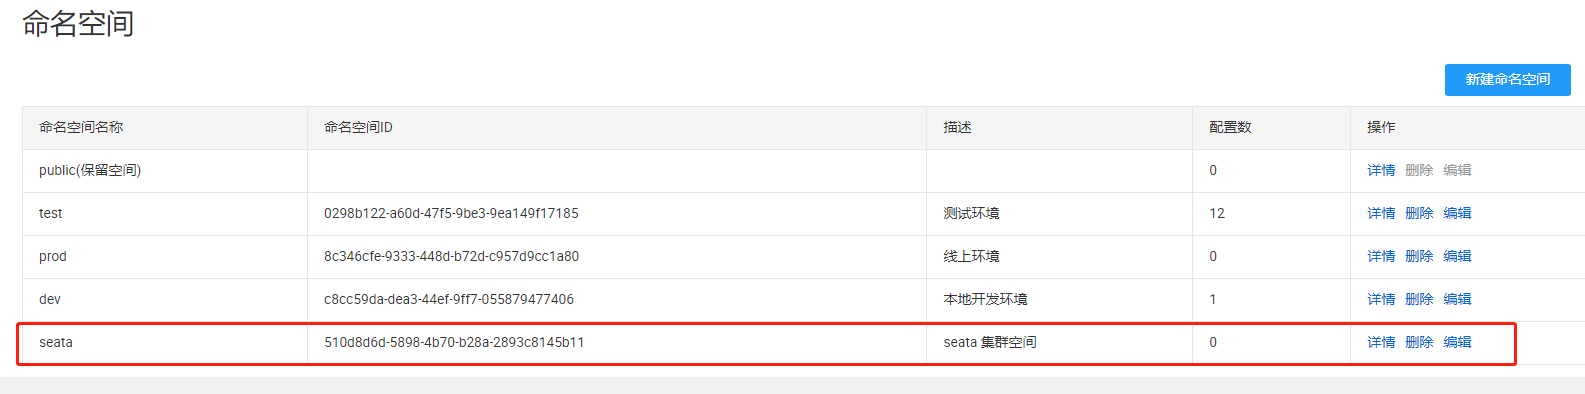
将在 test 命名空间的 seata 配置文件 clone 到该命名空间下:
下面,分别修改两个 seata server 的启动配置文件 application.yaml:
server:
  port: 8600

spring:
  application:
    name: seata-tc-server

logging:
  config: classpath:logback-spring.xml
  file:
    path: ${user.home}/logs/seata
  extend:
    logstash-appender:
      destination: 127.0.0.1:4560
    kafka-appender:
      bootstrap-servers: 127.0.0.1:9092
      topic: logback_to_logstash

console:
  user:
    username: seata
    password: seata

seata:
  config:
    type: nacos
    nacos:
      server-addr: 127.0.0.1:8100
      # 1. seata 配置的命名空间
      namespace: 510d8d6d-5898-4b70-b28a-2893c8145b11
      group: DEFAULT_GROUP
      username: nacos
      password: nacos
      #context-path:
      ##if use MSE Nacos with auth, mutex with username/password attribute
      #access-key:
      #secret-key:
      data-id: seata-tc-server.yaml
  registry:
    type: nacos
    nacos:
      application: nacos-seata-tc-server
      server-addr: 127.0.0.1:8100
      group: DEFAULT_GROUP
      # 2. seata 服务注册的命名空间
      namespace: 510d8d6d-5898-4b70-b28a-2893c8145b11
      # 3. 注册集群:上海
      cluster: SH
      username: nacos
      password: nacos
  security:
    secretKey: SeataSecretKey0c382ef121d778043159209298fd40bf3850a017
    tokenValidityInMilliseconds: 1800000
    ignore:
      urls: /,/**/*.css,/**/*.js,/**/*.html,/**/*.map,/**/*.svg,/**/*.png,/**/*.ico,/console-fe/public/**,/api/v1/auth/login
server:
  port: 8700

spring:
  application:
    name: seata-tc-server

logging:
  config: classpath:logback-spring.xml
  file:
    path: ${user.home}/logs/seata
  extend:
    logstash-appender:
      destination: 127.0.0.1:4560
    kafka-appender:
      bootstrap-servers: 127.0.0.1:9092
      topic: logback_to_logstash

console:
  user:
    username: seata
    password: seata

seata:
  config:
    type: nacos
    nacos:
      server-addr: 127.0.0.1:8100
       # 1. seata 配置的命名空间
      namespace: 510d8d6d-5898-4b70-b28a-2893c8145b11
      group: DEFAULT_GROUP
      username: nacos
      password: nacos
      #context-path:
      ##if use MSE Nacos with auth, mutex with username/password attribute
      #access-key:
      #secret-key:
      data-id: seata-tc-server.yaml
  registry:
    type: nacos
    nacos:
      application: nacos-seata-tc-server
      server-addr: 127.0.0.1:8100
      group: DEFAULT_GROUP
       # 2. seata 服务注册的命名空间
      namespace: 510d8d6d-5898-4b70-b28a-2893c8145b11
      # 3. 注册集群:北京
      cluster: BJ
      username: nacos
      password: nacos
  security:
    secretKey: SeataSecretKey0c382ef121d778043159209298fd40bf3850a017
    tokenValidityInMilliseconds: 1800000
    ignore:
      urls: /,/**/*.css,/**/*.js,/**/*.html,/**/*.map,/**/*.svg,/**/*.png,/**/*.ico,/console-fe/public/**,/api/v1/auth/login
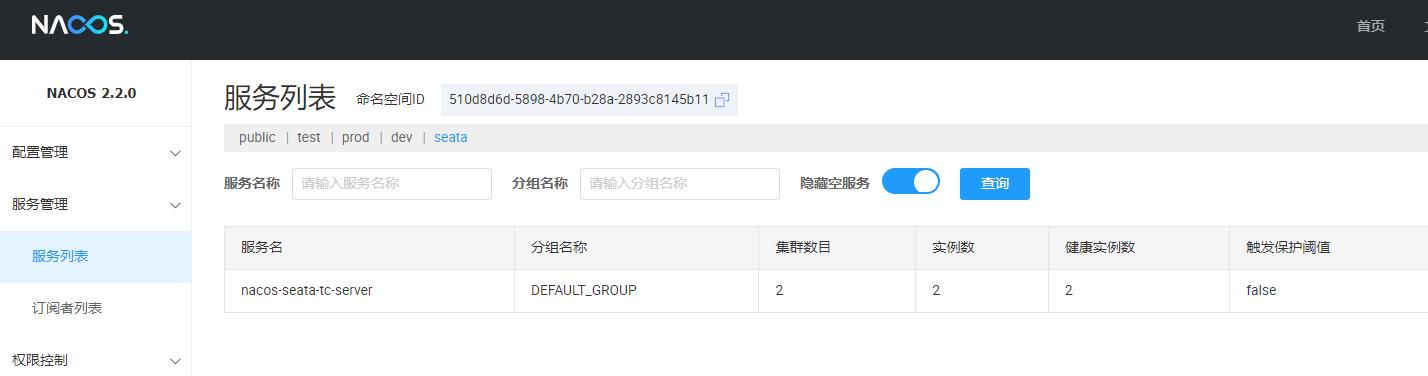
启动两个服务后查看 nacos 服务列表:
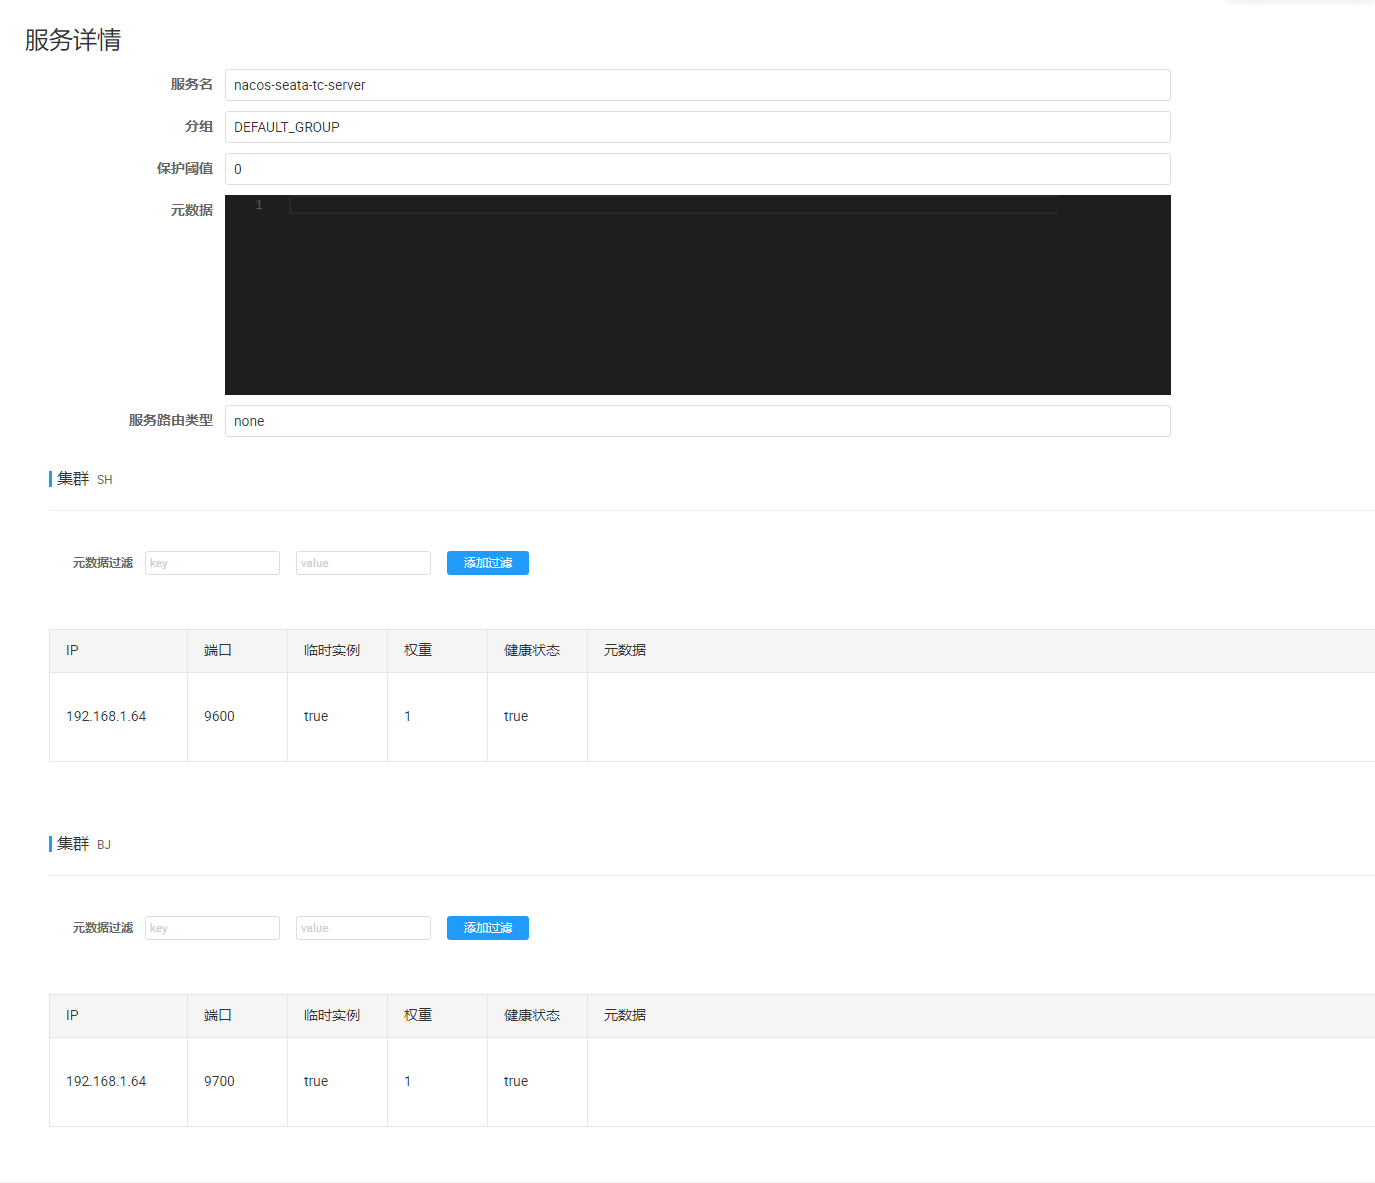
查看服务详情:
下面修改微服务节点的 seata 配置,接入 seata 集群,并可以根据 nacos 中的配置动态切换应用集群:
order-service、goods-service 的 bootstrap.yaml:
...

seata:
  registry:
    type: nacos
    nacos:
      server-addr: 127.0.0.1:8100
      namespace: 510d8d6d-5898-4b70-b28a-2893c8145b11
      group: DEFAULT_GROUP
      application: nacos-seata-tc-server
      username: nacos
      password: nacos
  # 1. 指定使用的 seata nacos 配置
  config:
    type: nacos
    nacos:
      server-addr: 127.0.0.1:8100
      namespace: 510d8d6d-5898-4b70-b28a-2893c8145b11
      username: nacos
      password: nacos
      group: DEFAULT_GROUP
  # 2. 配置服务所在的事务组,在结合 seata nacos 配置中的事务组映射,
  #    即可拿到使用的 seata server 所属的 cluster
  #    这样当我们动态修改 seata nacos 配置中的事务组映射,即可变更服务节点使用的 seata server
  tx-service-group: seata-tx-test-group
  data-source-proxy-mode: AT
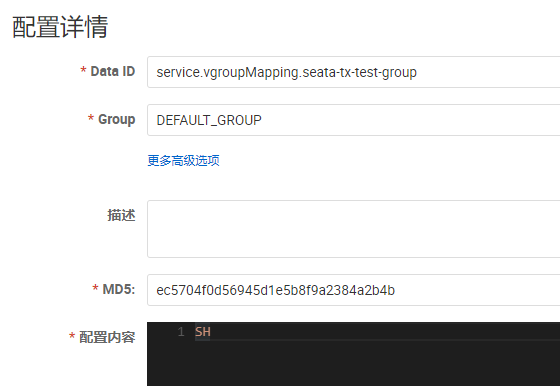
注意:无需配置 data-id,因为 seata 最终会拼接: service.vgroupMapping.${tx-service-group} 作为 data-id,据此在 nacos 中寻找配置文件。
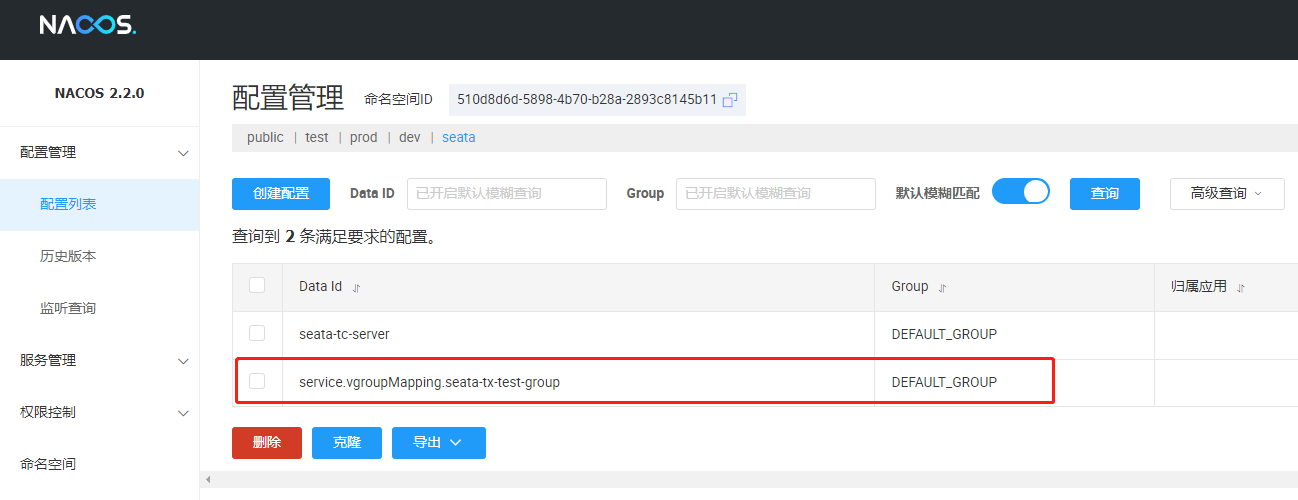
详情中就是纯文本值:
最后,我们启动订单、商品服务,查看 seata server 打印的日志:
修改 service.vgroupMapping.seata-tx-test-group nacos 配置文件中的值为 BJ,看看是否可以成功切换使用的 seata server:


 2285
2285

 被折叠的 条评论
为什么被折叠?
被折叠的 条评论
为什么被折叠?
 到【灌水乐园】发言


