


 文章讨论了如何在光栅图像上画直线的问题,从简单的线性插值方法开始,逐步引入像素步进法,但这种方法在处理长线段时会出现采样不足的问题。接着,文章提出了Bresenham画线算法,该算法减少了浮点运算,优化了效率,并确保了直线的连续性。最后给出了Bresenham算法的实现代码。
画线算法是指在屏幕上根据两个点画出一条直线,我们会一步一步通过一些简单的算法深入到bresenham画线算法当中去;
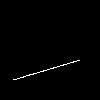
首先提出问题,给定两个点,我们如何在光栅格图像上画一条直线?最先想到的方式就是根据给出的两个点,在中间做线性插值,将步进值设置为0.01,代码很简单:
voiddrawLineOptionStep(int x0, int y0, int x1, int y1, TGAImage& image,TGAColor& color) {
for(float t = 0.0f; t < 1.0f; t += 0.01f) {
    intx = x0 + (x1 - x0) * t;
    inty = y0 + (y1 - y0) * t;
    image.set(x,y, color);
    }
}
这样能够得到一条直线
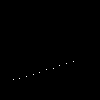
但是这样会有个问题:线段长一点就需要用更小的步进值进行计算,要不就会画成一行点
很容易想到,我们为什么不每一行都进行计算呢?然后我们编写下面这段代码:
voiddrawLinePixelStep(int x0, int y0, int x1, int y1, TGAImage& image,TGAColor& color) {
for(int x = x0; x <= x1; x++) {
    floatt = (x - x0) / (float)(x1 - x0);
    inty = y0 + (y1 - y0) * t;
    image.set(x,y, color);
    }
}
int main(int argc,char** argv) {
TGAImageimg(width, height, TGAImage::RGB);
drawLinePixelStep(13,20, 80, 40, img, WHITE);
drawLinePixelStep(20,13, 40, 80, img, RED);
drawLinePixelStep(80,40, 13, 20, img, RED);
//翻转图像,让我们定义的原点在左下角
img.flip_vertically();
img.write_tga_file("output.tga");
return0;
}
输出是这样的
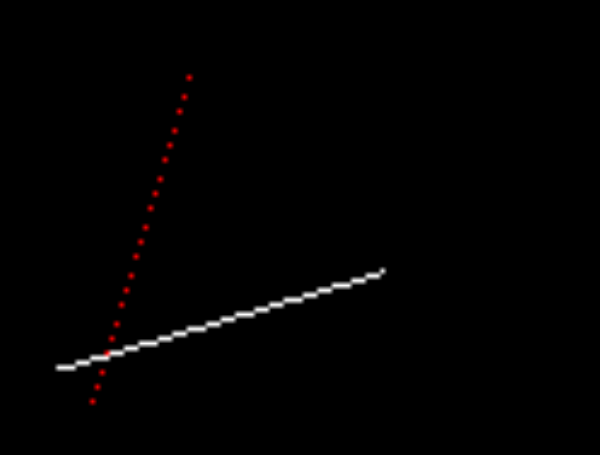
可以看到,白色线正常,红色线又变成了虚线,很显然红色线每次对x进行步进一个像素,但是y方向上的对应跨度就有点大了,导致采样不足,形成了虚线。
我们还可以发现还有一条红线不见了,以为这个函数需要x方向上x0<x1,不然根本就不会进入循环。
为了解决这两个问题,我们加入一些条件判断,挑选坡度较小的维度进行像素步进,保证线段的连续,但是并且判断该维度上的大小,如果不满足就调转两个点在进行绘制。
编写代码如下:
void line(int x0,int y0, int x1, int y1, TGAImage& image, TGAColor& color) {
    boolsteep = false;
    //保证
    if(abs(x1 - x0) < abs(y1 - y0)) {
        steep= true;
        std::swap(x0,y0);
        std::swap(x1,y1);
    }
    if(x0 > x1) {
        std::swap(x0,x1);
        std::swap(y0,y1);
    }
    floatdistant = (float)(x1 - x0);
    for(int x = x0; x <= x1; x++) {
    floatt = (x - x0) / distant;
    inty = y0 + t * (y1 - y0);
    //如果改变了参考轴,那么还要翻转回来
    if (steep)
        image.set(x, y, color);
    else
        Image.set(y, x, color);
    }
}
这样就能保证绘制直线的连续了
但是这个计算中有太多浮点运算了,要知道这是个非常底层的操作,可能会被大量调用,所以需要考虑效率。
能不能拿不用浮点运算,并且少点条件判断?
带着这个思想我们就可以进入bresenham画线算法了
这里推荐Bresenham 直线算法 - 知乎 (zhihu.com) 烧烤摊摊主老蔡的文章,里面有图片很好
最终代码如下:
voidbresenhamLine(Vec2i t0, Vec2i t1, TGAImage& image, TGAColor& color) {
    boolsteep = false;
    intx0 = t0.x, x1 = t1.x;
    inty0 = t0.y, y1 = t1.y;
    if(abs(x1 - x0) < abs(y1 - y0)) {
        steep= true;
        std::swap(x0,y0);
        std::swap(x1,y1);
    }
    if(x0 > x1) {
        std::swap(x0,x1);
        std::swap(y0,y1);
    }
    intdx = x1 - x0;
    intdy = y1 - y0;
    intderror = 2 * abs(dy);
    interror = 0;
    inty = y0;
    for(int x = x0; x <= x1; x++) {
        if(steep) {
            image.set(y,x, color);
        }
        else{
            image.set(x,y, color);
        }
        error+= derror;
        if(error > dx) {
            y+= (y1 > y0 ? 1 : -1);
            error-= 2 * dx;
        }
    }
}
虽然不是最终的版本,但是这样会比较好理解。


 被折叠的 条评论
为什么被折叠?
被折叠的 条评论
为什么被折叠?
 到【灌水乐园】发言


