


SpringBoot 整合 RabbitMQ
生产者
- 创建生产者SpringBoot工程
- 引入start,依赖坐标
org.springframework.boot
spring-boot-starter-amqp
- 编写yml配置,基本信息配置
- 定义交换机,队列以及绑定关系的配置类
- 注入RabbitTemplate,调用方法,完成消息发送
步骤
1.引入依赖
<?xml version="1.0" encoding="UTF-8"?>
<project xmlns="http://maven.apache.org/POM/4.0.0" xmlns:xsi="http://www.w3.org/2001/XMLSchema-instance"
         xsi:schemaLocation="http://maven.apache.org/POM/4.0.0 https://maven.apache.org/xsd/maven-4.0.0.xsd">
    <modelVersion>4.0.0</modelVersion>
    <parent>
        <groupId>org.springframework.boot</groupId>
        <artifactId>spring-boot-starter-parent</artifactId>
        <version>2.7.2</version>
        <relativePath/> <!-- lookup parent from repository -->
    </parent>
    <groupId>com.ll.rabbitmq</groupId>
    <artifactId>springboot-rabbitmq-producer</artifactId>
    <version>0.0.1-SNAPSHOT</version>
    <name>springboot-rabbitmq-producer</name>
    <description>Demo project for Spring Boot</description>
    <properties>
        <java.version>1.8</java.version>
    </properties>
    <dependencies>
        <dependency>
            <groupId>org.springframework.boot</groupId>
            <artifactId>spring-boot-starter</artifactId>
        </dependency>

        <dependency>
            <groupId>org.springframework.boot</groupId>
            <artifactId>spring-boot-starter-test</artifactId>
            <scope>test</scope>
        </dependency>
        <!--2. rabbitmq-->
        <dependency>
            <groupId>org.springframework.boot</groupId>
            <artifactId>spring-boot-starter-amqp</artifactId>
        </dependency>
        <dependency>
            <groupId>org.springframework.boot</groupId>
            <artifactId>spring-boot-starter-web</artifactId>
        </dependency>
        <dependency>
            <groupId>junit</groupId>
            <artifactId>junit</artifactId>
            <version>4.12</version>
        </dependency>
    </dependencies>

    <build>
        <plugins>
            <plugin>
                <groupId>org.springframework.boot</groupId>
                <artifactId>spring-boot-maven-plugin</artifactId>
            </plugin>
        </plugins>
    </build>

</project>
2.创建配置文件application.yml
# 配置RabbitMQ的基本信息  ip 端口 username  password..
spring:
  rabbitmq:
    host: 101.35.230.210 # ip
    port: 5672
    username: guest
    password: guest
    virtual-host: /
3.定义交换机、队列、路由键等绑定关系的配置类
package com.ll.rabbitmq.config;

import org.springframework.amqp.core.*;
import org.springframework.beans.factory.annotation.Qualifier;
import org.springframework.context.annotation.Bean;
import org.springframework.context.annotation.Configuration;

/**
 * @Author 奥特曼
 * @Date 2022/8/7 0007 16:52
 * @Description 定义交换机、队列、路由键等绑定关系的配置类
 **/
@Configuration
public class RabbitMQConfig {

    public static final String EXCHANGE_NAME = "springBoot_topic_exchange";
    public static final String QUEUE_NAME = "springBoot_queue";

    //1.交换机
    @Bean("springBootExchange")
    public Exchange springBootExchange() {
        return ExchangeBuilder.topicExchange(EXCHANGE_NAME).durable(true).build();
    }


    //2.Queue 队列
    @Bean("springBootQueue")
    public Queue bootQueue() {
        return QueueBuilder.durable(QUEUE_NAME).build();
    }

    //3. 队列和交互机绑定关系 Binding
    /*
        1. 知道哪个队列
        2. 知道哪个交换机
        3. routing key
     */
    @Bean
    public Binding bindQueueExchange(@Qualifier("springBootQueue") Queue queue, @Qualifier("springBootExchange") Exchange exchange) {
        return BindingBuilder.bind(queue).to(exchange).with("springBoot.#").noargs();
    }
}
4.编写controller
package com.ll.rabbitmq.controller;
import com.ll.rabbitmq.config.RabbitMQConfig;
import org.springframework.amqp.rabbit.core.RabbitTemplate;
import org.springframework.web.bind.annotation.RequestMapping;
import org.springframework.beans.factory.annotation.Autowired;
import org.springframework.stereotype.Controller;
/**
* @Author 奥特曼
* @Date 2022/8/7 0007 17:06
* @Description TODO
**/
@Controller
public class SendMesssge {
@Autowired
private RabbitTemplate rabbitTemplate;
@RequestMapping("/send")
public void sendMessage(){
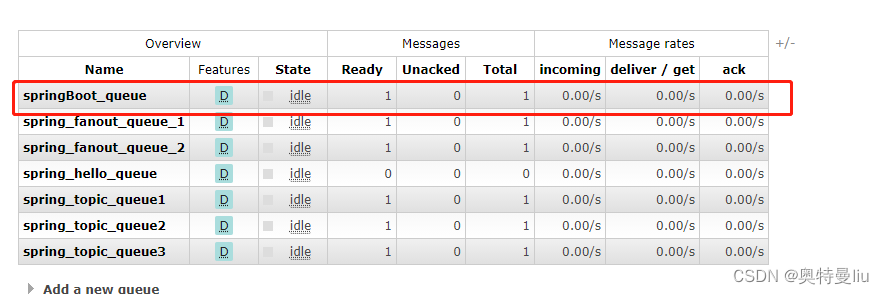
rabbitTemplate.convertAndSend(RabbitMQConfig.EXCHANGE_NAME,"springBoot.haha","springboot hello rabbitmq~~~");
}
}
消费者
- 创建消费者SpringBoot工程
- 引入start,依赖坐标
org.springframework.boot
spring-boot-starter-amqp
- 编写yml配置,基本信息配置
- 定义监听类,使用@RabbitListener注解完成队列监听。
步骤
1.引入依赖
<?xml version="1.0" encoding="UTF-8"?>
<project xmlns="http://maven.apache.org/POM/4.0.0" xmlns:xsi="http://www.w3.org/2001/XMLSchema-instance"
         xsi:schemaLocation="http://maven.apache.org/POM/4.0.0 https://maven.apache.org/xsd/maven-4.0.0.xsd">
    <modelVersion>4.0.0</modelVersion>
    <parent>
        <groupId>org.springframework.boot</groupId>
        <artifactId>spring-boot-starter-parent</artifactId>
        <version>2.7.2</version>
        <relativePath/> <!-- lookup parent from repository -->
    </parent>
    <groupId>com.ll.rabbitmq</groupId>
    <artifactId>springboot-rabbitmq-consumer</artifactId>
    <version>0.0.1-SNAPSHOT</version>
    <name>springboot-rabbitmq-consumer</name>
    <description>Demo project for Spring Boot</description>
    <properties>
        <java.version>17</java.version>
    </properties>
    <dependencies>
        <dependency>
            <groupId>org.springframework.boot</groupId>
            <artifactId>spring-boot-starter</artifactId>
        </dependency>

        <dependency>
            <groupId>org.springframework.boot</groupId>
            <artifactId>spring-boot-starter-test</artifactId>
            <scope>test</scope>
        </dependency>
        <!--2. rabbitmq-->
        <dependency>
            <groupId>org.springframework.boot</groupId>
            <artifactId>spring-boot-starter-amqp</artifactId>
        </dependency>
        <dependency>
            <groupId>org.springframework.boot</groupId>
            <artifactId>spring-boot-starter-web</artifactId>
        </dependency>
        <dependency>
            <groupId>junit</groupId>
            <artifactId>junit</artifactId>
            <version>4.12</version>
        </dependency>
    </dependencies>

    <build>
        <plugins>
            <plugin>
                <groupId>org.springframework.boot</groupId>
                <artifactId>spring-boot-maven-plugin</artifactId>
            </plugin>
        </plugins>
    </build>

</project>
2.创建配置文件application.yml
# 配置RabbitMQ的基本信息  ip 端口 username  password..
spring:
  rabbitmq:
    host: 101.35.230.210 # ip
    port: 5672
    username: guest
    password: guest
    virtual-host: /
3.编写配置监听类
package com.ll.rabbitmq.listener;
import org.springframework.amqp.core.Message;
import org.springframework.amqp.rabbit.annotation.RabbitListener;
import org.springframework.stereotype.Component;
/**
* @Author 奥特曼
* @Date 2022/8/7 0007 17:41
* @Description 消费者配置监听类
**/
@Component
public class RabbimtMQListener {
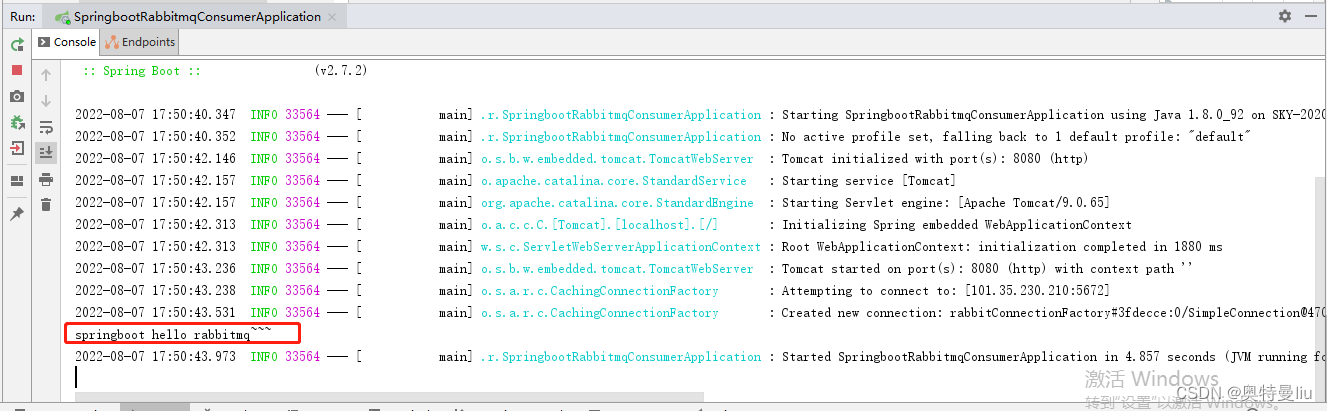
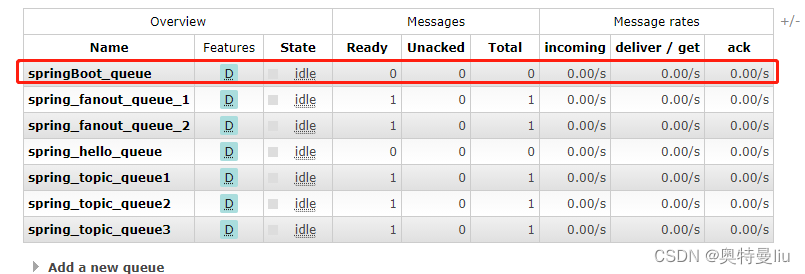
@RabbitListener(queues = "springBoot_queue")
public void ListenerQueue(Message message){
System.out.println(new String(message.getBody()));
}
}
4.启动工程
总结
⚫ SpringBoot提供了快速整合RabbitMQ的方式
⚫ 基本信息再yml中配置,队列交互机以及绑定关系在配置类中使用Bean的方式配置
⚫ 生产者直接注入RabbitTemplate完成消息发送
⚫ 消费者直接使用@RabbitListener完成消息接收


 1651
1651

 被折叠的 条评论
为什么被折叠?
被折叠的 条评论
为什么被折叠?
 到【灌水乐园】发言


