


	protected void invokeBeanFactoryPostProcessors(ConfigurableListableBeanFactory beanFactory) {
		//注意:getBeanFactoryPostProcessors()是获取自定义的(什么是自定义?就是我们自己写的,而且还没有交给spring管理,即还没有加上@Component)
		//测试方法。在refresh之前使用addBeanFactoryPostProcessor方法来达到自定义 。
		PostProcessorRegistrationDelegate.invokeBeanFactoryPostProcessors(beanFactory, getBeanFactoryPostProcessors());

		// Detect a LoadTimeWeaver and prepare for weaving, if found in the meantime
		// (e.g. through an @Bean method registered by ConfigurationClassPostProcessor)
		if (beanFactory.getTempClassLoader() == null && beanFactory.containsBean(LOAD_TIME_WEAVER_BEAN_NAME)) {
			beanFactory.addBeanPostProcessor(new LoadTimeWeaverAwareProcessor(beanFactory));
			beanFactory.setTempClassLoader(new ContextTypeMatchClassLoader(beanFactory.getBeanClassLoader()));
		}
	}
为什么要把这个方法单独拿出来说呢?因为这个方法跟普通的理解并不一样。上面的注释可能没有说服力。下面就用实际操作解释一下。
首先,我们建立几个文件并加上@Component。像这样:
package com.test.com.test.App;

import org.springframework.context.annotation.Import;
import org.springframework.stereotype.Component;

@Component
@Import(X.class)
public class Ctest {
}
可以自己多加类似的文件,要让@ComponentScan扫描到这个类,然后断点调试。调试后结果如下:
 由图片可以知道此时beanFactoryPostProcessors的size为0,说明加@Component并没有用。下面就试试使用addBeanFactoryPostProcessor方法。
首先编写一个类,不交给spring管理,即不加@Component。如下:
package com.test.mytest;

import org.springframework.beans.BeansException;
import org.springframework.beans.factory.config.BeanFactoryPostProcessor;
import org.springframework.beans.factory.config.ConfigurableListableBeanFactory;

public class MYgetBeanFactoryPostProcessors implements BeanFactoryPostProcessor {
	@Override
	public void postProcessBeanFactory(ConfigurableListableBeanFactory beanFactory) throws BeansException {

	}
}
主函数上这样写:
package com.test;

import com.test.com.test.App.Appconfig;
import com.test.mytest.MYgetBeanFactoryPostProcessors;
import org.springframework.context.annotation.AnnotationConfigApplicationContext;


public class Test {
	public static void main(String[] args) {
		AnnotationConfigApplicationContext ac=new AnnotationConfigApplicationContext();
		ac.register(Appconfig.class);
		ac.addBeanFactoryPostProcessor(new MYgetBeanFactoryPostProcessors());
		ac.refresh();
	}
}
再次断点执行,结果如下:
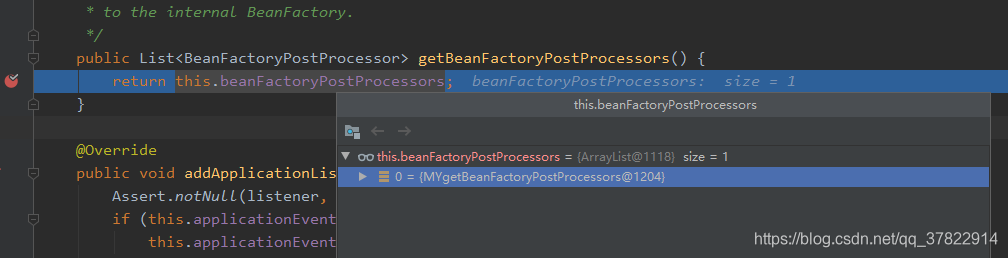 可以看见MYgetBeanFactoryPostProcessors已经被添加到beanFactoryPostProcessors中了,为什么要专门说这个呢,主要是为了更方便的看源码。


 6526
6526

 被折叠的 条评论
为什么被折叠?
被折叠的 条评论
为什么被折叠?
 到【灌水乐园】发言


