


 本文介绍了一种基于深度学习的人脸检测与识别方法,使用了MTCNN模型进行人脸定位,并通过OpenCV和Matplotlib展示检测结果。文章详细展示了如何在Python环境中利用Scipy、TensorFlow等库实现人脸识别流程,包括设置参数、加载模型、读取图片、检测人脸位置及绘制边界框。
from scipy import misc
import tensorflow as tf
import align.detect_face
import cv2
import matplotlib.pyplot as plt
minsize = 20 # minimum size of face
threshold = [0.6, 0.7, 0.7] # three steps's threshold
factor = 0.709 # scale factor
gpu_memory_fraction = 1.0
print('Creating networks and loading parameters')
with tf.Graph().as_default():
gpu_options = tf.GPUOptions(per_process_gpu_memory_fraction=gpu_memory_fraction)
sess = tf.Session(config=tf.ConfigProto(gpu_options=gpu_options, log_device_placement=False))
with sess.as_default():
pnet, rnet, onet = align.detect_face.create_mtcnn(sess, None)
image_path = 'C:\\Users\\rjx\\PycharmProjects\\untitled1\\facenet-master\\data\\test\\test2.jpg'
img = misc.imread(image_path)
bounding_boxes, _ = align.detect_face.detect_face(img, minsize, pnet, rnet, onet, threshold, factor)
nrof_faces = bounding_boxes.shape[0] # 人脸数目
print('找到人脸数目为:{}'.format(nrof_faces))
print(bounding_boxes)
crop_faces = []
for face_position in bounding_boxes:
face_position = face_position.astype(int)
print(face_position[0:4])
cv2.rectangle(img, (face_position[0], face_position[1]), (face_position[2], face_position[3]), (0, 255, 0), 2)
crop = img[face_position[1]:face_position[3],
face_position[0]:face_position[2], ]
crop = cv2.resize(crop, (96, 96), interpolation=cv2.INTER_CUBIC)
print(crop.shape)
crop_faces.append(crop)
plt.imshow(crop)
plt.show()
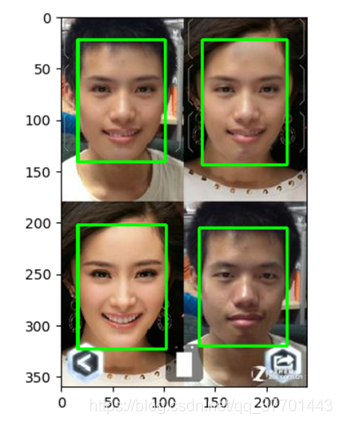
plt.imshow(img)
plt.show()
效果


 1379
1379

 被折叠的 条评论
为什么被折叠?
被折叠的 条评论
为什么被折叠?
 到【灌水乐园】发言


