


 本文介绍了Java中的引用拷贝和对象拷贝,重点讨论了浅拷贝(包括通过拷贝构造方法和重写clone方法实现)以及深拷贝(通过clone方法和对象序列化)。通过示例展示了如何在实际编程中区分和应用这两种复制方式。
1、拷贝的引入
1.1、引用拷贝
package blnp.net.cn.jvm.demos.clones;

/**
 * <p></p>
 *
 * @author lyb 2045165565@qq.com
 * @createDate 2024/4/18 10:47
 */
public class RefCloneTest {

    public static void main(String[] args) {
        Teacher teacher = new Teacher("Taylor",26);
        Teacher otherTeacher = teacher;
        System.out.println(teacher);
        System.out.println(otherTeacher);
    }
}

class Teacher {

    private String name;

    private Integer age;

    public Teacher(String name, int age) {
        this.age = age;
        this.name = name;
    }

    public String getName() {
        return name;
    }

    public void setName(String name) {
        this.name = name;
    }

    public Integer getAge() {
        return age;
    }

    public void setAge(Integer age) {
        this.age = age;
    }
}
创建一个指向对象的引用变量的拷贝。输出结果如下所示:
Connected to the target VM, address: '127.0.0.1:56069', transport: 'socket'
blnp.net.cn.jvm.demos.clones.Teacher@7d4793a8
blnp.net.cn.jvm.demos.clones.Teacher@7d4793a8
Disconnected from the target VM, address: '127.0.0.1:56069', transport: 'socket'
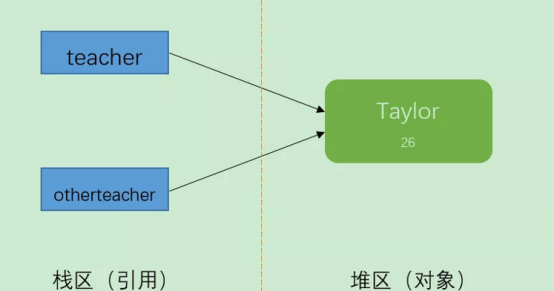
Process finished with exit code 0由输出结果可以看出,它们的地址值是相同的,那么它们肯定是同一个对象。teacher和otherTeacher的只是引用而已,他们都指向了一个相同的对象Teacher(“Taylor”,26)。这就叫做引用拷贝。
1.2、对象拷贝
package blnp.net.cn.jvm.demos.clones;

/**
 * <p></p>
 *
 * @author lyb 2045165565@qq.com
 * @createDate 2024/4/18 10:47
 */
public class RefCloneTest {

    public static void main(String[] args) throws CloneNotSupportedException {
        Teacher teacher = new Teacher("Swift",26);
        Teacher otherteacher = (Teacher)teacher.clone();
        System.out.println(teacher);
        System.out.println(otherteacher);
    }
}

class Teacher implements Cloneable {

    private String name;

    private Integer age;

    public Teacher(String name, int age) {
        this.age = age;
        this.name = name;
    }

    public String getName() {
        return name;
    }

    public void setName(String name) {
        this.name = name;
    }

    public Integer getAge() {
        return age;
    }

    public void setAge(Integer age) {
        this.age = age;
    }

    @Override
    protected Object clone() throws CloneNotSupportedException {
        return super.clone();
    }
}
执行结果:
Connected to the target VM, address: '127.0.0.1:59525', transport: 'socket'
blnp.net.cn.jvm.demos.clones.Teacher@7d4793a8
blnp.net.cn.jvm.demos.clones.Teacher@449b2d27
Disconnected from the target VM, address: '127.0.0.1:59525', transport: 'socket'
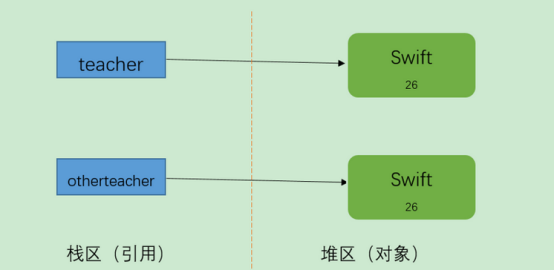
Process finished with exit code 0由输出结果可以看出,它们的地址是不同的,也就是说创建了新的对象, 而不是把原对象的地址赋给了一个新的引用变量,这就叫做对象拷贝。
注意:深拷贝和浅拷贝都是对象拷贝
Java中的对象拷贝(Object Copy)指的是将一个对象的所有属性(成员变量)拷贝到另一个有着相同类类型的对象中去。举例说明:比如,对象A和对象B都属于类S,具有属性a和b。那么对对象A进行拷贝操作赋值给对象B就是:B.a=A.a; B.b=A.b;
在程序中拷贝对象是很常见的,主要是为了在新的上下文环境中复用现有对象的部分或全部数据。Java中的对象拷贝主要分为:浅拷贝(Shallow Copy)、深拷贝(Deep Copy)。
2、浅拷贝
对于数据类型是基本数据类型的成员变量,浅拷贝会直接进行值传递,也就是将该属性值复制一份给新的对象。因为是两份不同的数据,所以对其中一个对象的该成员变量值进行修改,不会影响另一个对象拷贝得到的数据。
对于数据类型是引用数据类型的成员变量,比如说成员变量是某个数组、某个类的对象等,那么浅拷贝会进行引用传递,也就是只是将该成员变量的引用值(内存地址)复制一份给新的对象。因为实际上两个对象的该成员变量都指向同一个实例。在这种情况下,在一个对象中修改该成员变量会影响到另一个对象的该成员变量值。
2.1、拷贝构造方法实现
拷贝构造方法指的是该类的构造方法参数为该类的对象。使用拷贝构造方法可以很好地完成浅拷贝,直接通过一个现有的对象创建出与该对象属性相同的新的对象。
public class Person {
    private Age age;
    private String name;

    public Person(Age age,String name){
        this.age = age;
        this.name = name;
    }

    public Person(Person p){
        this.name = p.name;
        this.age = p.age;
    }
}

class Age{
    private int age;

    public Age(int age){
        this.age = age;
    }
}
需要注意:如果在拷贝构造方法中,对引用数据类型变量逐一开辟新的内存空间,创建新的对象,也可以实现深拷贝。而对于一般的拷贝构造,则一定是浅拷贝。
2.2、重写 clone 方法实现
Object类是类结构的根类,其中有一个方法为protected Object clone() throws CloneNotSupportedException,这个方法就是进行的浅拷贝。有了这个浅拷贝模板,我们可以通过调用clone()方法来实现对象的浅拷贝。但是需要注意:
-
Object类虽然有这个方法,但是这个方法是受保护的(被protected修饰),所以我们无法直接使用。
-
使用clone方法的类必须实现Cloneable接口,否则会抛出异常CloneNotSupportedException。
对于这两点,我们的解决方法是,在要使用clone方法的类中重写clone()方法,通过super.clone()调用Object类中的原clone方法。
package blnp.net.cn.jvm.demos.clones;

/**
 * <p></p>
 *
 * @author lyb 2045165565@qq.com
 * @createDate 2024/4/18 11:19
 */
public class ShallowCopy {

    public static void main(String[] args) throws CloneNotSupportedException {
        Teachers teacher = new Teachers();
        teacher.setName("riemann");
        teacher.setAge(27);

        Student student1 = new Student();
        student1.setName("Dream");
        student1.setAge(18);
        student1.setTeacher(teacher);

        Student student2 = (Student) student1.clone();
        System.out.println("拷贝后");
        System.out.println(student2.getName());
        System.out.println(student2.getAge());
        System.out.println(student2.getTeacher().getName());
        System.out.println(student2.getTeacher().getAge());

        System.out.println("修改老师的信息后-------------");
        // 修改老师的信息
        teacher.setName("Games");
        System.out.println(student1.getTeacher().getName());
        System.out.println(student2.getTeacher().getName());

    }
}

class Teachers implements Cloneable {
    private String name;
    private int age;

    public String getName() {
        return name;
    }

    public void setName(String name) {
        this.name = name;
    }

    public int getAge() {
        return age;
    }

    public void setAge(int age) {
        this.age = age;
    }
}

class Student implements Cloneable {
    private String name;
    private int age;
    private Teachers teacher;

    public String getName() {
        return name;
    }

    public void setName(String name) {
        this.name = name;
    }

    public int getAge() {
        return age;
    }

    public void setAge(int age) {
        this.age = age;
    }

    public Teachers getTeacher() {
        return teacher;
    }

    public void setTeacher(Teachers teacher) {
        this.teacher = teacher;
    }

    @Override
    public Object clone() throws CloneNotSupportedException {
        Object object = super.clone();
        return object;
    }
}
输出结果:
Connected to the target VM, address: '127.0.0.1:62096', transport: 'socket'
拷贝后
Dream
18
riemann
27
修改老师的信息后-------------
Games
Games
Disconnected from the target VM, address: '127.0.0.1:62096', transport: 'socket'
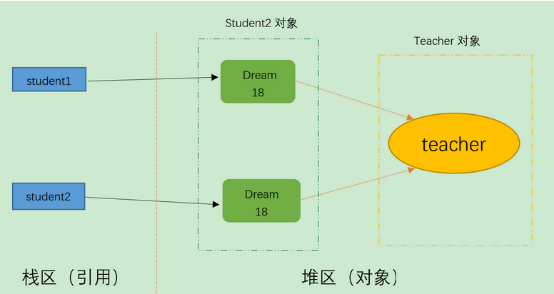
Process finished with exit code 0结果分析:两个引用student1和student2指向不同的两个对象,但是两个引用student1和student2中的两个teacher引用指向的是同一个对象,所以说明是浅拷贝。
3、深拷贝
首先介绍对象图的概念。设想一下,一个类有一个对象,其成员变量中又有一个对象,该对象指向另一个对象,另一个对象又指向另一个对象,直到一个确定的实例。这就形成了对象图。
那么,对于深拷贝来说,不仅要复制对象的所有基本数据类型的成员变量值,还要为所有引用数据类型的成员变量申请存储空间,并复制每个引用数据类型成员变量所引用的对象,直到该对象可达的所有对象。也就是说,对象进行深拷贝要对整个对象图进行拷贝!
简单地说,深拷贝对引用数据类型的成员变量的对象图中所有的对象都开辟了内存空间;而浅拷贝只是传递地址指向,新的对象并没有对引用数据类型创建内存空间。因为创建内存空间和拷贝整个对象图,所以深拷贝相比于浅拷贝速度较慢并且花销较大。深拷贝的实现方法主要有两种:
3.1、clone 方法实现
package blnp.net.cn.jvm.demos.clones;

/**
 * <p></p>
 *
 * @author lyb 2045165565@qq.com
 * @createDate 2024/4/18 11:53
 */
public class DeepCopy {

    public static void main(String[] args) throws CloneNotSupportedException {
        Teacher2 teacher = new Teacher2();
        teacher.setName("Delacey");
        teacher.setAge(27);

        Student3 student1 = new Student3();
        student1.setName("Dream");
        student1.setAge(18);
        student1.setTeacher(teacher);

        Student3 student2 = (Student3) student1.clone();
        System.out.println("拷贝后");
        System.out.println(student2.getName());
        System.out.println(student2.getAge());
        System.out.println(student2.getTeacher().getName());
        System.out.println(student2.getTeacher().getAge());

        System.out.println("修改老师的信息后-------------");
        //  修改老师的信息
        teacher.setName("Jam");
        System.out.println(student1.getTeacher().getName());
        System.out.println(student2.getTeacher().getName());
    }
}

class Teacher2 implements Cloneable {
    private String name;
    private int age;

    public String getName() {
        return name;
    }

    public void setName(String name) {
        this.name = name;
    }

    public int getAge() {
        return age;
    }

    public void setAge(int age) {
        this.age = age;
    }

    public Object clone() throws CloneNotSupportedException {
        return super.clone();
    }
}

class Student3 implements Cloneable {
    private String name;
    private int age;
    private Teacher2 teacher;

    public String getName() {
        return name;
    }

    public void setName(String name) {
        this.name = name;
    }

    public int getAge() {
        return age;
    }

    public void setAge(int age) {
        this.age = age;
    }

    public Teacher2 getTeacher() {
        return teacher;
    }

    public void setTeacher(Teacher2 teacher) {
        this.teacher = teacher;
    }

    public Object clone() throws CloneNotSupportedException {
        //  浅复制时:
        //  Object  object  =  super.clone();
        //  return  object;

        //  改为深复制:
        Student3 student = (Student3) super.clone();
        //  本来是浅复制,现在将Teacher对象复制一份并重新set进来
        student.setTeacher((Teacher2) student.getTeacher().clone());
        return student;

    }
}
执行结果:
Connected to the target VM, address: '127.0.0.1:52638', transport: 'socket'
拷贝后
Dream
18
Delacey
27
修改老师的信息后-------------
Jam
Delacey
Disconnected from the target VM, address: '127.0.0.1:52638', transport: 'socket'
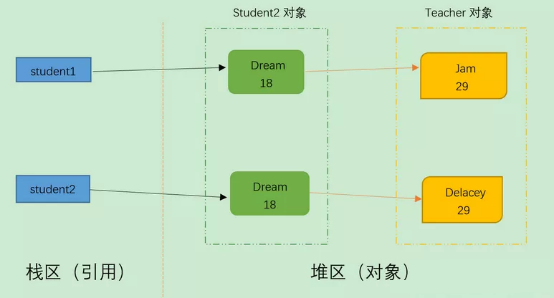
Process finished with exit code 0两个引用student1和student2指向不同的两个对象,两个引用student1和student2中的两个teacher引用指向的是两个对象,但对teacher对象的修改只能影响student1对象,所以说是深拷贝。
3.2、通过对象序列化实现深拷贝
虽然层次调用clone方法可以实现深拷贝,但是显然代码量实在太大。特别对于属性数量比较多、层次比较深的类而言,每个类都要重写clone方法太过繁琐。
将对象序列化为字节序列后,默认会将该对象的整个对象图进行序列化,再通过反序列即可完美地实现深拷贝。
package blnp.net.cn.jvm.demos.clones;

import java.io.*;

/**
 * <p></p>
 *
 * @author lyb 2045165565@qq.com
 * @createDate 2024/4/18 11:56
 */
public class DeepCopyBySerialization {

    public static void main(String[] args) throws IOException, ClassNotFoundException {
        Age a = new Age(20);
        DeepStudent stu1 = new DeepStudent("Tom", a, 175);
        //通过序列化方法实现深拷贝
        ByteArrayOutputStream bos = new ByteArrayOutputStream();
        ObjectOutputStream oos = new ObjectOutputStream(bos);
        oos.writeObject(stu1);
        oos.flush();
        ObjectInputStream ois = new ObjectInputStream(new ByteArrayInputStream(bos.toByteArray()));
        DeepStudent stu2 = (DeepStudent) ois.readObject();
        System.out.println(stu1.toString());
        System.out.println(stu2.toString());
        System.out.println();
        //尝试修改stu1中的各属性,观察stu2的属性有没有变化
        stu1.setName("Jerry");
        //改变age这个引用类型的成员变量的值
        a.setAge(99);
        stu1.setLength(216);
        System.out.println(stu1.toString());
        System.out.println(stu2.toString());
    }
}

/*
 * 创建年龄类
 */
class Age implements Serializable {
    //年龄类的成员变量(属性)
    private int age;

    //构造方法
    public Age(int age) {
        this.age = age;
    }

    public int getAge() {
        return age;
    }

    public void setAge(int age) {
        this.age = age;
    }

    @Override
    public String toString() {
        return this.age + "";
    }
}


class DeepStudent implements Serializable {
    /**
     * 学生类的成员变量(属性),其中一个属性为类的对象
     **/
    private String name;
    private Age aage;
    private int length;

    /**
     * 构造方法,其中一个参数为另一个类的对象
     **/
    public DeepStudent(String name, Age a, int length) {
        this.name = name;
        this.aage = a;
        this.length = length;
    }

    /**
     * eclipe中alt+shift+s自动添加所有的set和get方法
     **/
    public String getName() {
        return name;
    }

    public void setName(String name) {
        this.name = name;
    }

    public Age getaAge() {
        return this.aage;
    }

    public void setaAge(Age age) {
        this.aage = age;
    }

    public int getLength() {
        return this.length;
    }

    public void setLength(int length) {
        this.length = length;
    }

    /**
     * 用途:设置输出的字符串形式
     *
     * @param
     * @author liaoyibin
     * @date 11:57 2024/4/18
     * @params []
     **/
    @Override
    public String toString() {
        return "姓名是: " + this.getName() + ", 年龄为: " + this.getaAge().toString() + ", 长度是: " + this.getLength();
    }
}
执行结果:
Connected to the target VM, address: '127.0.0.1:53753', transport: 'socket'
姓名是: Tom, 年龄为: 20, 长度是: 175
姓名是: Tom, 年龄为: 20, 长度是: 175

姓名是: Jerry, 年龄为: 99, 长度是: 216
姓名是: Tom, 年龄为: 20, 长度是: 175
Disconnected from the target VM, address: '127.0.0.1:53753', transport: 'socket'

Process finished with exit code 0
可以通过很简洁的代码即可完美实现深拷贝。不过要注意的是,如果某个属性被transient修饰,那么该属性就无法被拷贝了。


 被折叠的 条评论
为什么被折叠?
被折叠的 条评论
为什么被折叠?
 到【灌水乐园】发言


