


(1)获取连接方法getConnectionDirect()线程:
这里是Druid的三个核心线程的交互逻辑图
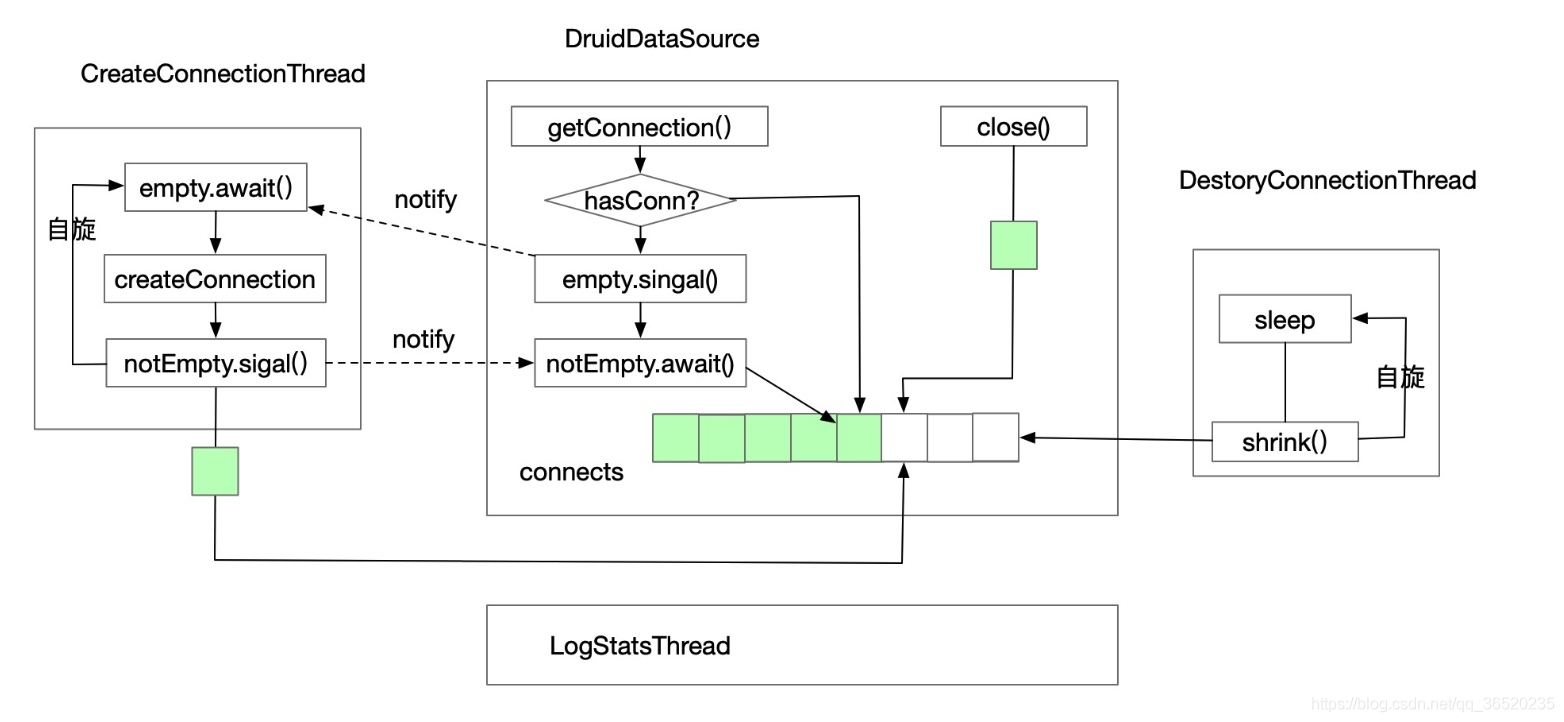
⚠️这里是init();初始化在这一步:主要核心就是创建这几个线程
createAndLogThread();  //打印日志线程其实就是统计监控信息
createAndStartCreatorThread(); //创建连接的线程
createAndStartDestroyThread(); //销毁连接的线程
-
首先第一大步骤就是先去获取DruidPooledConnection,通过getConnectionInternal()方法
-
进入到方法内:
- 先进行一个for死循环当createDirect = true时跳出循环,首次为false,所以下一步重要的就是创建ScheduledThreadPoolExecutor 对象,条件就是当:【poolingCount(池子中的值为0时) && 活跃的连接 < maxActive && createScheduler != null && createScheduler instanceof ScheduledThreadPoolExecutor】 , 然后ScheduledThreadPoolExecutor中的getQueue().size() > 0 时,把createDirect = true,然后继续往下走,
- 然后通过我们设置的setMaxWait 时间进行判断,如果MaxWait > 0 ,就会从LRU的队列中的尾部取出一个connection使用方法 pollLast(nanos); 否则走takeLast();
- 如果DruidConnectionHolder 不为null ,把【connection】活跃的ActiveCount++,然后跳出循环
- 此时的createDirect = true,所以会去创建一个物理连接 赋值给 DruidConnectionHolder对象
PhysicalConnectionInfo pyConnInfo = DruidDataSource.this.createPhysicalConnection(); holder = new DruidConnectionHolder(this, pyConnInfo);- 然后加锁,判断 activeCount < maxActive ,如果为True就把活跃的Connection连接进行➕1,跳出循环,如果 activeCount > maxActive,则需要丢弃创建好的这个创建好的物理连接
JdbcUtils.close(pyConnInfo.getPhysicalConnection()); -
如果成功继续走到下一步
-
如果失败捕获住错误的话,就继续尝试获取DruidPooledConnection
-
-
然后回到getConnectionDirect()方法中,走到第二个步骤中,先判断配置参数testOnBorrow是不是为True,然后去进行对连接进行校验,如果校验成功就继续往下走,
boolean validate = testConnectionInternal(poolableConnection.holder, poolableConnection.conn); if (!validate) { Connection realConnection = poolableConnection.conn; discardConnection(realConnection); continue; } -
如果配置参数testOnBorrow为True的话会先进行一次上面代码的校验,如果testOnBorrow为False的话,并且 testWhileIdle参数为True的话,会再进行判断,如果【timeBetweenEvictionRunsMillis <= 0】直接使用 60s 进行填充
-
继续走,如果当前连接的空闲时间【idleMillis >= timeBetweenEvictionRunsMillis || idleMillis < 0】时,会继续进行校验当前连接的健康情况,和上面代码一样,如果校验不成功就会discard当前的Connection
-
继续,然后判断配置参数removeAbandoned是不是为True,如果是就以当前连接poolableConnection 为Key,PRESENT作为Value放到activeConnections的Map集合中
  Map<DruidPooledConnection, Object> activeConnections                         = new IdentityHashMap<DruidPooledConnection, Object>();
//这里是判断逻辑
            if (removeAbandoned) {
                StackTraceElement[] stackTrace = Thread.currentThread().getStackTrace();
                poolableConnection.connectStackTrace = stackTrace;
                poolableConnection.setConnectedTimeNano();
                poolableConnection.traceEnable = true;

                activeConnectionLock.lock();
                try {
                    activeConnections.put(poolableConnection, PRESENT);
                } finally {
                    activeConnectionLock.unlock();
                }
            }
- 继续,如果配置的defaultAutoCommit参数是不是为False,如果为False,执行,poolableConnection.setAutoCommit(false);
- 最后 getConnectionDirect(long maxWaitMillis)方法 返回DruidPooledConnection 对象 poolableConnection
⚠️这里补充一下第一大步的第2小步中的pollLast(nanos)和takeLast(nanos)方法中如果没有从LRU队列中的尾部获取到Connection时,就会发送图中的notify信号,去通知创建连接的线程去创建连接**
建议对照源码进行分析:
1. 先进入到getConnection方法中
    public DruidPooledConnection getConnection(long maxWaitMillis) throws SQLException {
        init();

        if (filters.size() > 0) {
            FilterChainImpl filterChain = new FilterChainImpl(this);
            return filterChain.dataSource_connect(this, maxWaitMillis);
        } else {
            return getConnectionDirect(maxWaitMillis);
        }
    }
- 然后进入到getConnectionDirect()方法中:
    public DruidPooledConnection getConnectionDirect(long maxWaitMillis) throws SQLException {
        int notFullTimeoutRetryCnt = 0;
        for (;;) {
            // handle notFullTimeoutRetry
            DruidPooledConnection poolableConnection;
            try {
            //这里的getConnectionInternal方法,其实对应的就是上面分析中的第一大步里面的逻辑
                poolableConnection = getConnectionInternal(maxWaitMillis);
            } catch (GetConnectionTimeoutException ex) {
                if (notFullTimeoutRetryCnt <= this.notFullTimeoutRetryCount && !isFull()) {
                    notFullTimeoutRetryCnt++;
                    if (LOG.isWarnEnabled()) {
                        LOG.warn("get connection timeout retry : " + notFullTimeoutRetryCnt);
                    }
                    continue;
                }
                throw ex;
            }

            if (testOnBorrow) {
                boolean validate = testConnectionInternal(poolableConnection.holder, poolableConnection.conn);
                if (!validate) {
                    if (LOG.isDebugEnabled()) {
                        LOG.debug("skip not validate connection.");
                    }

                    Connection realConnection = poolableConnection.conn;
                    discardConnection(realConnection);
                    continue;
                }
            } else {
                Connection realConnection = poolableConnection.conn;
                if (poolableConnection.conn.isClosed()) {
                    discardConnection(null); // 传入null,避免重复关闭
                    continue;
                }

                if (testWhileIdle) {
                    final DruidConnectionHolder holder = poolableConnection.holder;
                    long currentTimeMillis             = System.currentTimeMillis();
                    long lastActiveTimeMillis          = holder.lastActiveTimeMillis;
                    long lastKeepTimeMillis            = holder.lastKeepTimeMillis;

                    if (lastKeepTimeMillis > lastActiveTimeMillis) {
                        lastActiveTimeMillis = lastKeepTimeMillis;
                    }

                    long idleMillis                    = currentTimeMillis - lastActiveTimeMillis;

                    long timeBetweenEvictionRunsMillis = this.timeBetweenEvictionRunsMillis;

                    if (timeBetweenEvictionRunsMillis <= 0) {
                        timeBetweenEvictionRunsMillis = DEFAULT_TIME_BETWEEN_EVICTION_RUNS_MILLIS;
                    }

                    if (idleMillis >= timeBetweenEvictionRunsMillis
                            || idleMillis < 0 // unexcepted branch
                            ) {
                        boolean validate = testConnectionInternal(poolableConnection.holder, poolableConnection.conn);
                        if (!validate) {
                            if (LOG.isDebugEnabled()) {
                                LOG.debug("skip not validate connection.");
                            }

                            discardConnection(realConnection);
                             continue;
                        }
                    }
                }
            }

            if (removeAbandoned) {
                StackTraceElement[] stackTrace = Thread.currentThread().getStackTrace();
                poolableConnection.connectStackTrace = stackTrace;
                poolableConnection.setConnectedTimeNano();
                poolableConnection.traceEnable = true;

                activeConnectionLock.lock();
                try {
                    activeConnections.put(poolableConnection, PRESENT);
                } finally {
                    activeConnectionLock.unlock();
                }
            }

            if (!this.defaultAutoCommit) {
                poolableConnection.setAutoCommit(false);
            }

            return poolableConnection;
        }
    }
参考文章:http://zhengjianglong.cn/2019/07/14/framework/druid-db-connection/


 1566
1566

 被折叠的 条评论
为什么被折叠?
被折叠的 条评论
为什么被折叠?
 到【灌水乐园】发言


