


1.HBASE集群部署
1.1 准备安装包
tar -zxvf hbase-2.2.6-bin.tar.gz -C /opt/module/
1.2 修改HBase配置⽂件
1.2.1 hbase-env.sh
cd /opt/module/hbase-2.2.6/conf

 vim hbase-env.sh

修改如下两项内容,值如下:

export JAVA_HOME=/opt/install/jdk1.8.0_141

export HBASE_MANAGES_ZK=false
1.2.2 hbase-site.xml
vim hbase-site.xml

内容如下:

 <!-- 指定hbase在HDFS上存储的路径 -->

<property>
<name>hbase.rootdir</name>
<value>/hbase</value>
</property>

<!-- 指定hbase是否分布式运⾏ -->
<property>
<name>hbase.cluster.distributed</name>
<value>true</value>
</property>

<!-- 指定zookeeper的地址,多个⽤“,”分割 -->
<property>
<name>hbase.zookeeper.quorum</name>
<value>hadoop001,hadoop002,hadoop003:2181</value>
</property>

<!--指定hbase管理⻚⾯-->
<property>
<name>hbase.master.info.port</name>
<value>60010</value>
</property>

<!-- 在分布式的情况下⼀定要设置,不然容易出现Hmaster起不来的情况 -->
<property>
<name>hbase.unsafe.stream.capability.enforce</name>
<value>false</value>
</property>
1.2.3 regionservers
vim regionservers

指定HBase集群的从节点;原内容清空,添加如下三⾏

hadoop001
hadoop002
hadoop003
1.2.4 back-masters
 vim backup-masters

hadoop002
1.3 分发安装包
将 hadoop001上的HBase安装包,拷贝到其他机器上
cd /opt/module

scp -r  hbase-2.2.6/  hadoop002:$PWD

scp -r  hbase-2.2.6/  hadoop003:$PWD
1.4 创建软连接
注意:三台机器均做如下操作
因为HBase集群需要读取hadoop的core-site.xml、hdfs-site.xml的配置⽂件信息,所以我们三台机器都要执⾏以下命令,在相应的⽬录创建这两个配置⽂件的软连接
ln -s /opt/module/hadoop-2.7.3/etc/hadoop/core-site.xml /opt/module/hbase-2.2.6/conf/core-site.xml

ln -s /opt/module/hadoop-2.7.3/etc/hadoop/hdfs-site.xml /opt/module/hbase-2.2.6/conf/hdfs-site.xml
1.5 添加HBase环境变量
注意:三台机器均执⾏以下命令,添加环境变量
vim /etc/profile

export HBASE_HOME=/opt/module/hbase-2.2.6

export PATH=$PATH:$HBASE_HOME/bin

source /etc/profile
1.6 HBase的启动与停⽌
-
需要提前启动HDFS及ZooKeeper集群
-
如果没开启hdfs,请在hadoop001运⾏start-dfs.sh命令
-
如果没开启zookeeper,请在3个节点分别运⾏zkServer.sh start命令
-
第⼀台机器hadoop001(HBase主节点)执⾏以下命令,启动HBase集群
start-hbase.sh
-
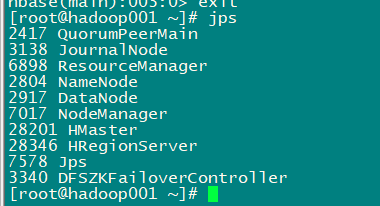
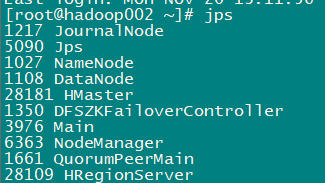
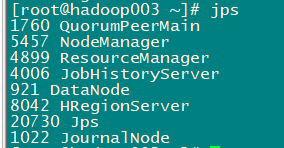
启动完成后,jps查看HBase相关进程
-
hadoop001、hadoop002上有进程HMaster、HRegionServer,hadoop003上有进程HRegionServer
我们也可以执⾏以下命令,单节点启动相关进程:

\#HMaster节点上启动HMaster命令

hbase-daemon.sh start master

\#启动HRegionServer命令

hbase-daemon.sh start regionserver
1.7 访问WEB⻚⾯
浏览器页⾯访问

http://hadoop001:60010

1.8 停⽌HBase集群
停⽌HBase集群的==正确顺序==

关闭ZooKeeper集群

关闭Hadoop集群

hadoop001上运⾏,关闭hbase集群

 stop-hbase.sh
2.HBase shell 命令基本操作
2.1 进⼊HBase客户端命令操作界⾯
- hadoop01执⾏以下命令,进⼊HBase的shell客户端
cd /opt/module/hbase-2.2.6/

bin/hbase shell

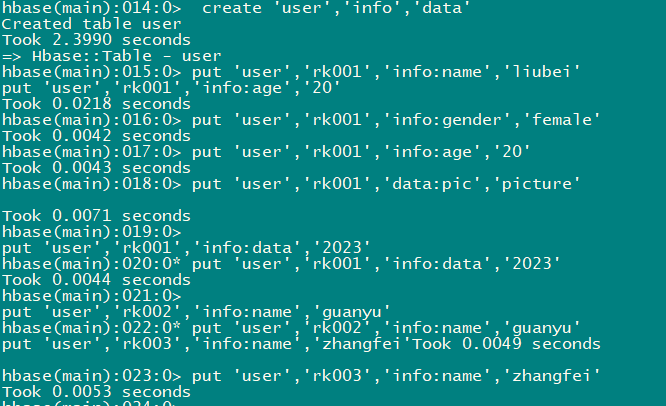
2.2 create 创建表
-
创建user表,包含info、data两个列族
-
使⽤create命令
hbase(main):005:0> create 'user','info','data'

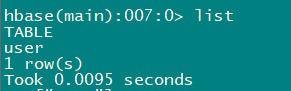
2.3 list 查看有哪些表
- 查看当前数据库中有哪些表
hbase(main):007:0> list
2.4 put 插⼊数据操作
- 向表中插⼊数据,使⽤put命令
put 'user','rk001','info:name','liubei'
put 'user','rk001','info:gender','female'
put 'user','rk001','info:age','20'
put 'user','rk001','data:pic','picture'
put 'user','rk001','info:data','2023'
put 'user','rk002','info:name','guanyu'
put 'user','rk003','info:name','zhangfei'

2.5 查询数据操作
2.5.1 通过rowkey进⾏查询
-
获取user表中row key为rk001的所有信息(即所有cell的数据)
-
使⽤get命令
hbase(main):012:0> get 'user','rk001'

2.5.2 查看rowkey下某个列族的信息
- 获取user表中row key为rk001,info列族的所有信息
hbase(main):013:0> get 'user','rk001','info'

2.5.3 查看rowkey指定列族指定字段的值
- 获取user表中row key为rk001,info列族的name、age列的信息
hbase(main):016:0> get 'user','rk001','info:name','info:age'

2.5.4 查看rowkey指定多个列族的信息
- 获取user表中row key为rk001,info、data列族的信息
hbase(main):025:0> get 'user','rk001','info','data'

2.5.5 指定rowkey与列值过滤器查询
- 获取user表中row key为rk001,cell的值为zhangsan的信息
get 'user','rk001',{FILTER => "ValueFilter(=, 'binary:liubei')"}

2.5.6 指定rowkey与列名模糊查询
- 获取user表中row key为rk0001,列标⽰符中含有a的信息
get 'user','rk001',{FILTER => "QualifierFilter(=, 'substring:a')"}

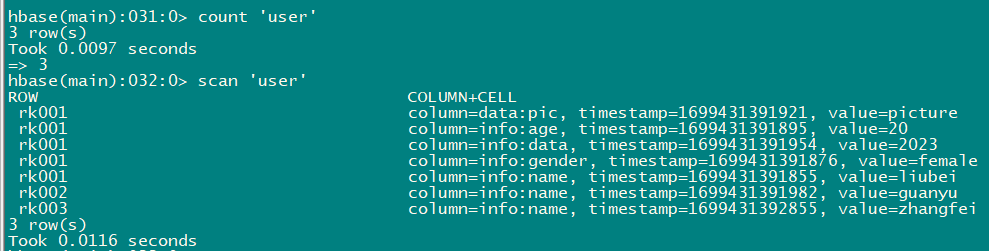
2.5.7 查询所有行的数据
#查询user表中的所有信息

#使⽤scan命令

scan 'user'

2.5.8 列族查询
- 查询user表中列族为info的信息
scan 'user',{COLUMNS => 'info'}

2.5.9 多列族查询
- 查询user表中列族为info和data的信息
scan 'user',{COLUMNS => [ 'info','data']}

2.5.10 指定列族与某个列名查询
- 查询user表中列族为info、列标⽰符为name的信息
scan 'user',{COLUMNS => 'info:name'}

- 查询info:name列、data:pic列的数据
scan 'user',{COLUMNS => ['info:name','data:pic']}

- 查询user表中列族为info、列标⽰符为name的信息,并且版本最新的5个
scan 'user',{COLUMNS => ['info:name',VERSIONS => 5]}

2.5.11 指定多个列族与条件模糊查询
- 查询user表中列族为info和data且列标⽰符中含有a字符的信息
scan 'user', {COLUMNS => ['info', 'data'],FILTER => "QualifierFilter(=,'substring:a')"}

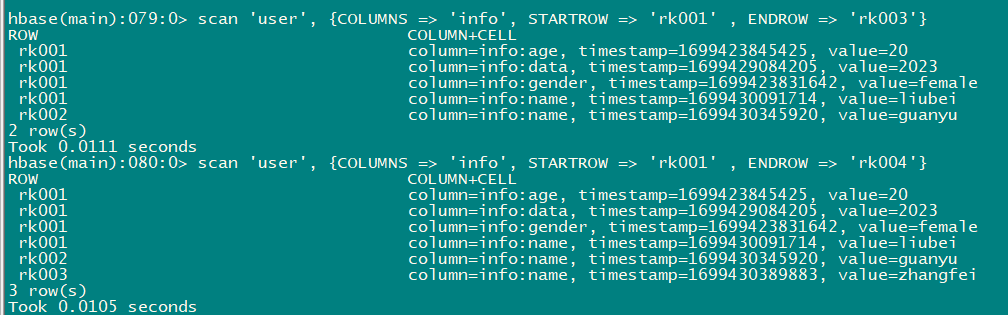
2.5.12 指定rowkey的范围查询
- 查询user表中列族为info,rk范围是[rk001, rk003)的数据
scan 'user', {COLUMNS => 'info', STARTROW => 'rk001' , ENDROW => 'rk003'}
2.5.13 指定rowkey模糊查询
- 查询user表中row key以rk字符开头的数据
scan 'user', {FILTER => "PrefixFilter('rk')"}

2.5.14 指定数据版本的范围查询
- 查询user表中指定范围的数据(前闭后开)
scan 'user', {TIMERANGE => [1699423861846,1699430091714]}

2.6更新数据操作
2.6.1 更新数据值
-
更新操作同插⼊操作⼀模⼀样,只不过有数据就更新,没数据就添加
-
使⽤put命令
2.6.2 更新版本号
- 将user表的info列族版本数改为5
alter 'user', NAME => 'info', VERSIONS => 5

2.7 删除数据以及删除表操作
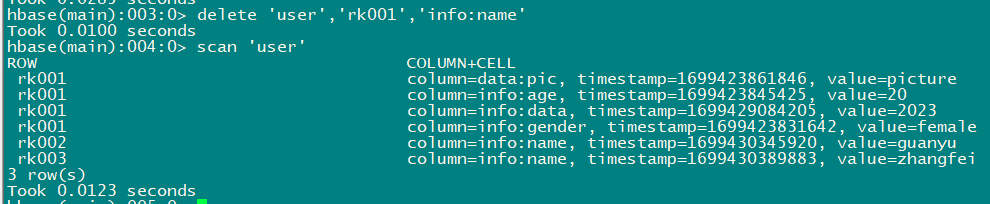
2.7.1 指定rowkey以及列名进⾏删除
- 删除user表row key为rk001,列标⽰符为info:name的数据
delete 'user','rk001','info:name'
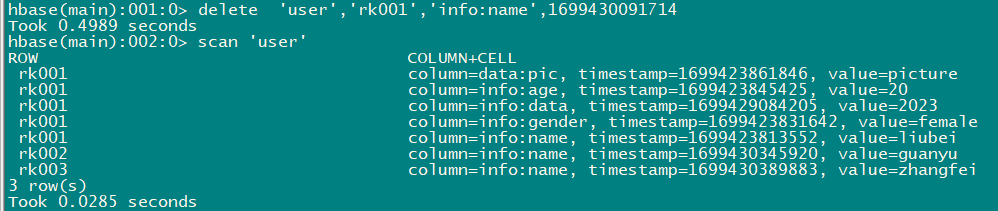
2.7.2 指定rowkey**,列名以及版本号进⾏删除**
- 删除user表row key为rk0001,列标⽰符为info:name,timestamp为1699430091714的数据
delete 'user','rk001','info:name',1699430091714
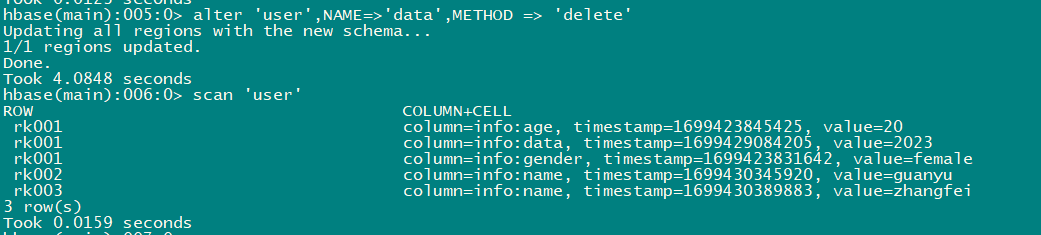
2.7.3 删除⼀个列族
alter 'user',NAME=>'data',METHOD => 'delete'
2.7.4 清空表数据
truncate 'user'
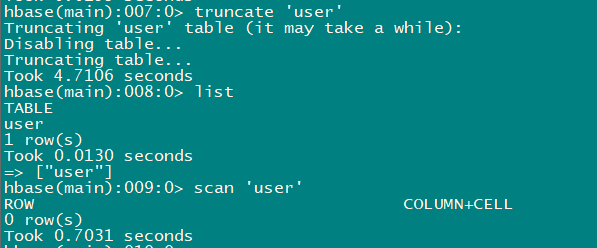
2.7.5删除表
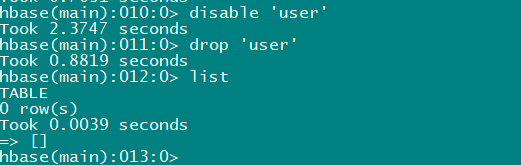
- ⾸先需要先让该表为disable状态,使⽤命令:
hbase(main):010:0> disable 'user'
hbase(main):011:0> drop 'user'
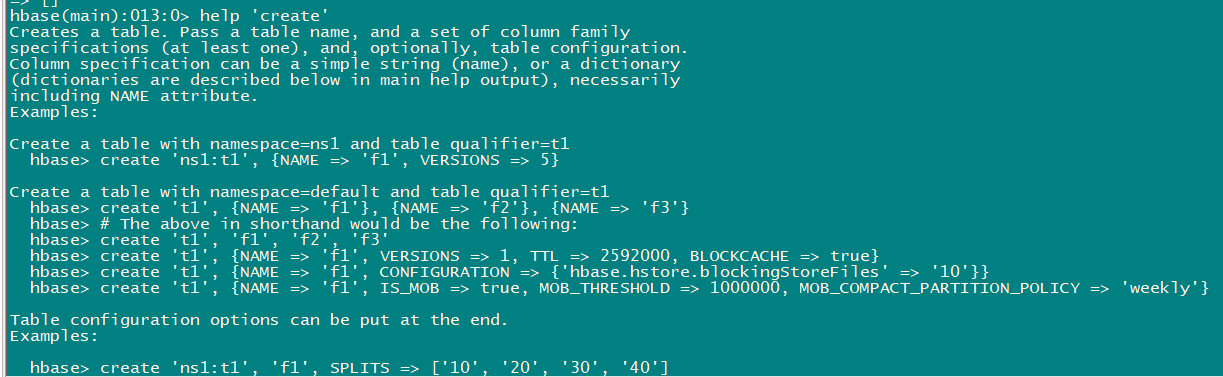
2.8 帮助命令
help

# 查看具体命令的帮助信息

help 'create
3.8 统计⼀张表有多少⾏数据
count 'user'
3.HBase的⾼级shell管理命令
3.1 status
- 例如:显⽰服务器状态
status 'hadoop001'

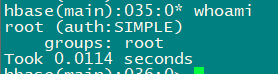
3.2 whoami
- 显⽰HBase当前⽤户,例如:
whoami
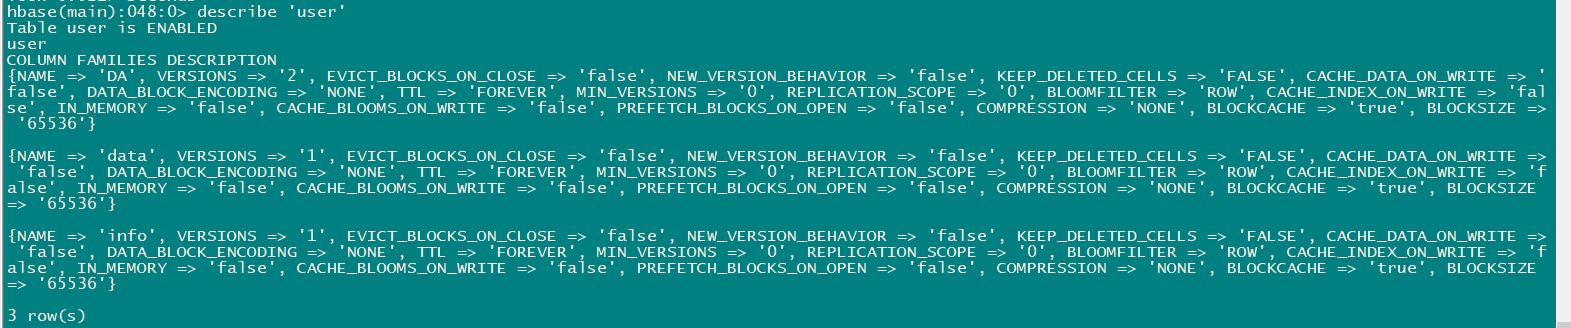
3.3 describe
- 展⽰表结构信息
describe 'user'

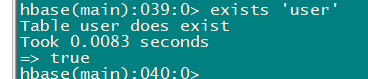
3.4 exists
- 检查表是否存在,适⽤于表量特别多的情况
exists 'user'
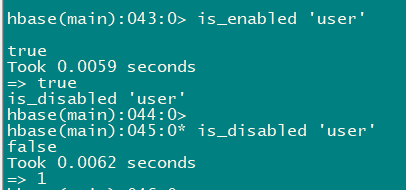
3.5 is_enabled**、**is_disabled
- 检查表是否启⽤或禁⽤
is_enabled 'user'

is_disabled 'user'
3.6 alter
#该命令可以改变表和列族的模式,例如:

#为当前表增加列族:

alter 'user',NAME => 'DA',VERSIONS=>2

#为当前表删除列族:

alter 'user','delete' => 'DA'


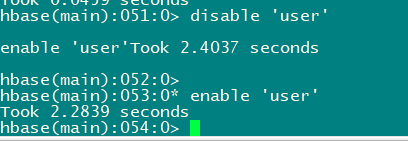
3.7 disable/enable
#禁⽤⼀张表/启⽤⼀张表

disable 'user'
enable 'user'
4.HBase的JavaAPI操作
4.1 创建maven工程
<?xml version="1.0" encoding="UTF-8"?>
<project xmlns="http://maven.apache.org/POM/4.0.0"
         xmlns:xsi="http://www.w3.org/2001/XMLSchema-instance"
         xsi:schemaLocation="http://maven.apache.org/POM/4.0.0 http://maven.apache.org/xsd/maven-4.0.0.xsd">
    <parent>
        <artifactId>big_datacode</artifactId>
        <groupId>org.example</groupId>
        <version>1.0-SNAPSHOT</version>
    </parent>
    <modelVersion>4.0.0</modelVersion>

    <artifactId>hbase_opt</artifactId>

    <properties>
        <maven.compiler.source>8</maven.compiler.source>
        <maven.compiler.target>8</maven.compiler.target>
    </properties>


<dependencies>
<dependency>
    <groupId>org.apache.hadoop</groupId>
    <artifactId>hadoop-client</artifactId>
    <version>2.7.3</version>
</dependency>
<dependency>
    <groupId>org.apache.hadoop</groupId>
    <artifactId>hadoop-auth</artifactId>
    <version>2.7.3</version>
</dependency>
<!-- https://mvnrepository.com/artifact/org.apache.hbase/hbase-
client -->
<dependency>
    <groupId>org.apache.hbase</groupId>
    <artifactId>hbase-client</artifactId>
    <version>2.2.6</version>
</dependency>
<dependency>
    <groupId>org.apache.hbase</groupId>
    <artifactId>hbase-server</artifactId>
    <version>2.2.6</version>
</dependency>
<dependency>
    <groupId>junit</groupId>
    <artifactId>junit</artifactId>
    <version>4.12</version>
    <scope>test</scope>
</dependency>
<dependency>
    <groupId>org.testng</groupId>
    <artifactId>testng</artifactId>
    <version>6.14.3</version>
    <scope>test</scope>
</dependency>
<dependency>
    <groupId>org.testng</groupId>
    <artifactId>testng</artifactId>
    <version>6.14.3</version>
    <scope>compile</scope>
</dependency>
</dependencies>
<build>
<plugins>
    <plugin>
        <groupId>org.apache.maven.plugins</groupId>
        <artifactId>maven-compiler-plugin</artifactId>
        <version>3.0</version>
        <configuration>
            <source>1.8</source>
            <target>1.8</target>
            <encoding>UTF-8</encoding>
        </configuration>
    </plugin>
    <plugin>
        <groupId>org.apache.maven.plugins</groupId>
        <artifactId>maven-shade-plugin</artifactId>
        <version>2.2</version>
        <executions>
            <execution>
                <phase>package</phase>
                <goals>
                    <goal>shade</goal>
                </goals>
                <configuration>
                    <filters>
                        <filter>
                            <artifact>*:*</artifact>
                            <excludes>
                                <exclude>META-INF/*.SF</exclude>
                                <exclude>META-
                                    INF/*.DSA</exclude>
                                <exclude>META-
                                    INF/*/RSA</exclude>
                            </excludes>
                        </filter>
                    </filters>
                </configuration>
            </execution>
        </executions>
    </plugin>
</plugins>
</build>
</project>
4.2 创建users表
    @Test
    public void createTable() throws IOException {
        Configuration configuration = HBaseConfiguration.create();
        //连接hbase集群不需要指定HBASE主节点的ip地址和端口
        configuration.set("hbase.zookeeper.quorum","hadoop001:2181,hadoop002:2181,hadoop003:2181");
        //创建连接对象
        Connection connection = ConnectionFactory.createConnection(configuration);
        //获取连接对象,创建一张表
        //获取管理员对象,对数据库进行DDL操作
        Admin admin = connection.getAdmin();
        //指定表名
        TableName users = TableName.valueOf("users");
        HTableDescriptor hTableDescriptor = new HTableDescriptor(users);
        //指定列族
        HColumnDescriptor c1 = new HColumnDescriptor("c1");
        HColumnDescriptor c2 = new HColumnDescriptor("c2");
        hTableDescriptor.addFamily(c1);
        hTableDescriptor.addFamily(c2);
        admin.createTable(hTableDescriptor);
        admin.close();
        connection.close();
    }

4.3 向表中添加数据
//向表中添加数据
private Connection connection;
private final String TABLE_NAME = "users";
private Table table;

@Before
public void  initTable() throws IOException {
    Configuration configuration = HBaseConfiguration.create();
    configuration.set("hbase.zookeeper.quorum","hadoop001:2181,hadoop002:2181,hadoop003:2181");
    connection = ConnectionFactory.createConnection(configuration);
    table = connection.getTable(TableName.valueOf(TABLE_NAME));
}
@After
public void close() throws IOException {
    table.close();
    connection.close();
}
/*
*向users表添加数据
*/
     @Test
    public void addData() throws IOException {
        Put put = new Put("k001".getBytes(StandardCharsets.UTF_8));//创建put对象,并指定rowkey值
        put.addColumn("c1".getBytes(StandardCharsets.UTF_8), "id".getBytes(StandardCharsets.UTF_8), Bytes.toBytes(1));
        put.addColumn("c1".getBytes(StandardCharsets.UTF_8), "name".getBytes(StandardCharsets.UTF_8), Bytes.toBytes("zhangsan"));
        put.addColumn("c1".getBytes(StandardCharsets.UTF_8), "age".getBytes(StandardCharsets.UTF_8), Bytes.toBytes(32));
        put.addColumn("c2".getBytes(StandardCharsets.UTF_8), "sex".getBytes(StandardCharsets.UTF_8), Bytes.toBytes("female"));
        put.addColumn("c2".getBytes(StandardCharsets.UTF_8), "address".getBytes(StandardCharsets.UTF_8), Bytes.toBytes("beijing"));
        put.addColumn("c2".getBytes(StandardCharsets.UTF_8), "phone".getBytes(StandardCharsets.UTF_8), Bytes.toBytes("12345678"));
        put.addColumn("c2".getBytes(StandardCharsets.UTF_8), "say".getBytes(StandardCharsets.UTF_8),Bytes.toBytes( "hello world!"));
        table.put(put);
        table.close();
    }

4.4 查询数据
-
为了方便查询,先插入一些数据到users表中
@Test
    public void insertTable() throws IOException {
        //创建put对象,指定rowkey
        Put put = new Put("k002".getBytes(StandardCharsets.UTF_8));
        put.addColumn("c1".getBytes(StandardCharsets.UTF_8), "id".getBytes(StandardCharsets.UTF_8),Bytes.toBytes(2));
        put.addColumn("c1".getBytes(StandardCharsets.UTF_8), "name".getBytes(StandardCharsets.UTF_8), Bytes.toBytes("lisi"));
        put.addColumn("c1".getBytes(StandardCharsets.UTF_8), "age".getBytes(StandardCharsets.UTF_8), Bytes.toBytes(27));
        put.addColumn("c2".getBytes(StandardCharsets.UTF_8), "sex".getBytes(StandardCharsets.UTF_8), Bytes.toBytes("male"));
        put.addColumn("c2".getBytes(StandardCharsets.UTF_8), "address".getBytes(StandardCharsets.UTF_8), Bytes.toBytes("tianjin"));
        put.addColumn("c2".getBytes(StandardCharsets.UTF_8), "phone".getBytes(StandardCharsets.UTF_8), Bytes.toBytes("45679778"));
        put.addColumn("c2".getBytes(StandardCharsets.UTF_8), "say".getBytes(StandardCharsets.UTF_8), Bytes.toBytes("nice to meet u"));

        Put put1 = new Put("k003".getBytes(StandardCharsets.UTF_8));
        put1.addColumn("c1".getBytes(StandardCharsets.UTF_8), "id".getBytes(StandardCharsets.UTF_8), Bytes.toBytes(3));
        put1.addColumn("c1".getBytes(StandardCharsets.UTF_8), "name".getBytes(StandardCharsets.UTF_8),Bytes.toBytes( "wangwu"));
        put1.addColumn("c1".getBytes(StandardCharsets.UTF_8), "age".getBytes(StandardCharsets.UTF_8), Bytes.toBytes(29));
        put1.addColumn("c2".getBytes(StandardCharsets.UTF_8), "sex".getBytes(StandardCharsets.UTF_8), Bytes.toBytes("female"));
        put1.addColumn("c2".getBytes(StandardCharsets.UTF_8), "address".getBytes(StandardCharsets.UTF_8), Bytes.toBytes("hebei"));
        put1.addColumn("c2".getBytes(StandardCharsets.UTF_8), "phone".getBytes(StandardCharsets.UTF_8), Bytes.toBytes("32656946"));
        put1.addColumn("c2".getBytes(StandardCharsets.UTF_8), "say".getBytes(StandardCharsets.UTF_8), Bytes.toBytes("hey homie"));

        Put put2 = new Put("k004".getBytes(StandardCharsets.UTF_8));
        put2.addColumn("c1".getBytes(StandardCharsets.UTF_8), "id".getBytes(StandardCharsets.UTF_8), Bytes.toBytes(4));
        put2.addColumn("c1".getBytes(StandardCharsets.UTF_8), "name".getBytes(StandardCharsets.UTF_8),Bytes.toBytes( "liuliu"));
        put2.addColumn("c1".getBytes(StandardCharsets.UTF_8), "age".getBytes(StandardCharsets.UTF_8), Bytes.toBytes(21));
        put2.addColumn("c2".getBytes(StandardCharsets.UTF_8), "sex".getBytes(StandardCharsets.UTF_8), Bytes.toBytes("female"));
        put2.addColumn("c2".getBytes(StandardCharsets.UTF_8), "address".getBytes(StandardCharsets.UTF_8), Bytes.toBytes("heilongjiang"));
        put2.addColumn("c2".getBytes(StandardCharsets.UTF_8), "phone".getBytes(StandardCharsets.UTF_8), Bytes.toBytes("04511111"));
        put2.addColumn("c2".getBytes(StandardCharsets.UTF_8), "say".getBytes(StandardCharsets.UTF_8), Bytes.toBytes("hahaha"));

        Put put3 = new Put("k005".getBytes(StandardCharsets.UTF_8));
        put3.addColumn("c1".getBytes(StandardCharsets.UTF_8), "id".getBytes(StandardCharsets.UTF_8), Bytes.toBytes(5));
        put3.addColumn("c1".getBytes(StandardCharsets.UTF_8), "name".getBytes(StandardCharsets.UTF_8), Bytes.toBytes("liqi"));
        put3.addColumn("c1".getBytes(StandardCharsets.UTF_8), "age".getBytes(StandardCharsets.UTF_8), Bytes.toBytes(27));
        put3.addColumn("c2".getBytes(StandardCharsets.UTF_8), "sex".getBytes(StandardCharsets.UTF_8), Bytes.toBytes("female"));
        put3.addColumn("c2".getBytes(StandardCharsets.UTF_8), "address".getBytes(StandardCharsets.UTF_8), Bytes.toBytes("shanxi"));
        put3.addColumn("c2".getBytes(StandardCharsets.UTF_8), "phone".getBytes(StandardCharsets.UTF_8), Bytes.toBytes("01216564"));
        put3.addColumn("c2".getBytes(StandardCharsets.UTF_8), "say".getBytes(StandardCharsets.UTF_8), Bytes.toBytes("good"));

        Put put4 = new Put("k006".getBytes(StandardCharsets.UTF_8));
        put4.addColumn("c1".getBytes(StandardCharsets.UTF_8), "id".getBytes(StandardCharsets.UTF_8), Bytes.toBytes(6));
        put4.addColumn("c1".getBytes(StandardCharsets.UTF_8), "name".getBytes(StandardCharsets.UTF_8), Bytes.toBytes("mike"));
        put4.addColumn("c1".getBytes(StandardCharsets.UTF_8), "age".getBytes(StandardCharsets.UTF_8), Bytes.toBytes(32));
        put4.addColumn("c2".getBytes(StandardCharsets.UTF_8), "sex".getBytes(StandardCharsets.UTF_8), Bytes.toBytes("female"));
        put4.addColumn("c2".getBytes(StandardCharsets.UTF_8), "address".getBytes(StandardCharsets.UTF_8),Bytes.toBytes( "LA"));
        put4.addColumn("c2".getBytes(StandardCharsets.UTF_8), "phone".getBytes(StandardCharsets.UTF_8),Bytes.toBytes( "09895556"));
        put4.addColumn("c2".getBytes(StandardCharsets.UTF_8), "say".getBytes(StandardCharsets.UTF_8), Bytes.toBytes("Lakers"));

        Put put5 = new Put("k007".getBytes(StandardCharsets.UTF_8));
        put5.addColumn("c1".getBytes(StandardCharsets.UTF_8), "id".getBytes(StandardCharsets.UTF_8), Bytes.toBytes(7));
        put5.addColumn("c1".getBytes(StandardCharsets.UTF_8), "name".getBytes(StandardCharsets.UTF_8), Bytes.toBytes("lucy"));
        put5.addColumn("c1".getBytes(StandardCharsets.UTF_8), "age".getBytes(StandardCharsets.UTF_8), Bytes.toBytes(21));
        put5.addColumn("c2".getBytes(StandardCharsets.UTF_8), "sex".getBytes(StandardCharsets.UTF_8), Bytes.toBytes("male"));
        put5.addColumn("c2".getBytes(StandardCharsets.UTF_8), "address".getBytes(StandardCharsets.UTF_8), Bytes.toBytes("Dallas"));
        put5.addColumn("c2".getBytes(StandardCharsets.UTF_8), "phone".getBytes(StandardCharsets.UTF_8), Bytes.toBytes("54687899"));
        put5.addColumn("c2".getBytes(StandardCharsets.UTF_8), "say".getBytes(StandardCharsets.UTF_8), Bytes.toBytes("maverick"));

        ArrayList<Put> puts = new ArrayList<>();
        puts.add(put);
        puts.add(put1);
        puts.add(put2);
        puts.add(put3);
        puts.add(put4);
        puts.add(put5);
        table.put(puts);

    }

4.4.1 get查询
-
按照rowkey进行查询,获取所有列的所有值
-
查询主键rowkey为k003的人
 //get查询数据,rowkey => k003
    @Test
    public void getData() throws IOException {
        //通过get对象指定rowkey
        Get get = new Get(Bytes.toBytes("k003"));
        //查询c1列族下的所有列的值
        get.addFamily("c1".getBytes(StandardCharsets.UTF_8));
        //查询c2列族phone字段
        get.addColumn("c2".getBytes(StandardCharsets.UTF_8), "phone".getBytes(StandardCharsets.UTF_8));
        //通过get查询返回一个result对象,所有字段的数据都封装在result中
        Result result = table.get(get);
        //获取一条数据所有cell,所有值都在cell里面
        List<Cell> cells = result.listCells();
        if (cells != null) {
            for (Cell cell : cells) {
                //获取列族名
                byte[] familyName = CellUtil.cloneFamily(cell);
                //获取列名
                byte[] columnName = CellUtil.cloneQualifier(cell);
                //获取rowkey
                byte[] rowKey = CellUtil.cloneRow(cell);
                //获取cell值
                byte[] cellValue = CellUtil.cloneValue(cell);

                //判断字段的数据类型,才能获取到值
                if ("age".equals(Bytes.toString(columnName)) || "id".equals(Bytes.toString(columnName))) {
                    System.out.println(Bytes.toString(familyName));
                    System.out.println(Bytes.toString(columnName));
                    System.out.println(Bytes.toString(rowKey));
                    System.out.println(Bytes.toInt(cellValue));
                } else {
                    System.out.println(Bytes.toString(familyName));
                    System.out.println(Bytes.toString(columnName));
                    System.out.println(Bytes.toString(rowKey));
                    System.out.println(Bytes.toString(cellValue));
                }
            }
            table.close();
        }

    }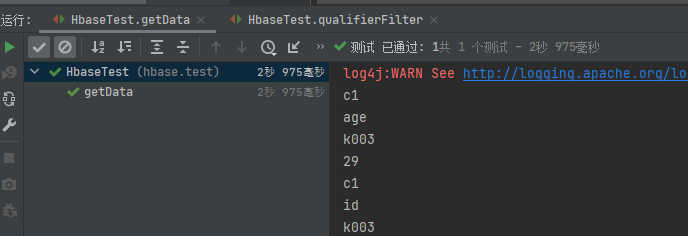
4.4.2 scan查询
- 查询k003–k006的人(前闭后开)
//scan查询数据
@Test
public void scanData() throws IOException {
Scan scan = new Scan();
//只扫描c1列族
scan.addFamily("c1".getBytes(StandardCharsets.UTF_8));
//只扫描c2列族phone字段
scan.addColumn("c2".getBytes(StandardCharsets.UTF_8), "phone".getBytes(StandardCharsets.UTF_8));
scan.withStartRow("k003".getBytes(StandardCharsets.UTF_8));
scan.withStopRow("k007".getBytes(StandardCharsets.UTF_8));
//通过getScanner查询获取到了表里面所有数据
ResultScanner scanner = table.getScanner(scan);
//遍历ResultScanner得到每条数据,每条数据都封装在result中
for (Result result : scanner) {
List<Cell> cells = result.listCells();
for (Cell cell : cells) {
byte[] familyName = CellUtil.cloneFamily(cell);
byte[] columnName = CellUtil.cloneQualifier(cell);
byte[] rowKey = CellUtil.cloneRow(cell);
byte[] value = CellUtil.cloneValue(cell);
//判断id和age字段,这两个字段是整型值
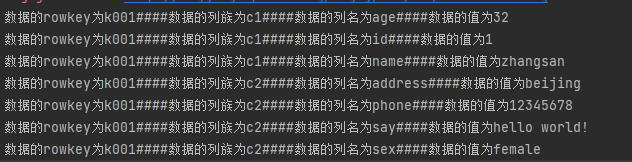
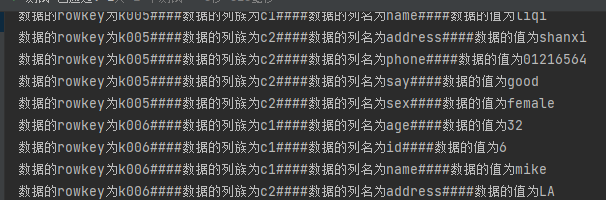
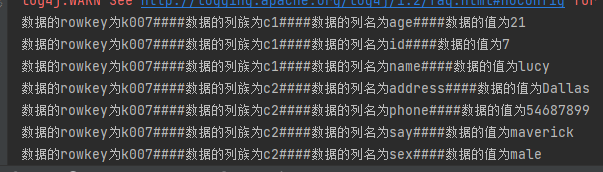
if ("age".equals(Bytes.toString(columnName)) || "id".equals(Bytes.toString(columnName))) {
System.out.println("数据的rowkey为" +
Bytes.toString(rowKey) + "####数据的列族为" +
Bytes.toString(familyName) + "####数据的列名为" +
Bytes.toString(columnName) + "####数据的值为" +
Bytes.toInt(value));
} else {
System.out.println("数据的rowkey为" +
Bytes.toString(rowKey) + "####数据的列族为" +
Bytes.toString(familyName) + "####数据的列名为" +
Bytes.toString(columnName) + "####数据的值为" +
Bytes.toString(value));
}
}
table.close();
}
}

4.5 HBASE过滤器查询
4.5.1 rowKey过滤器RowFilter
 //rowKey过滤器RowFilter
    //将rowkey比k003小的所有值列出来
    @Test
    public void rowFailter() throws IOException {
        Scan scan = new Scan();
        //获取比较对象
        BinaryComparator binaryComparator = new BinaryComparator("k003".getBytes(StandardCharsets.UTF_8));
        /*
         * rowFilter需要两参数
         * 一个是比较规则
         * 另一个是比较对象
         * */
        RowFilter rowFilter = new RowFilter(CompareFilter.CompareOp.LESS, binaryComparator);
        //为scan设置过滤器
        scan.setFilter(rowFilter);
        ResultScanner scanner = table.getScanner(scan);
        for (Result result : scanner) {
            List<Cell> cells = result.listCells();
            for (Cell cell : cells) {
                byte[] familyName = CellUtil.cloneFamily(cell);
                byte[] columnName = CellUtil.cloneQualifier(cell);
                byte[] rowKey = CellUtil.cloneRow(cell);
                byte[] value = CellUtil.cloneValue(cell);
                //判断id和age字段,这两个字段是整型值
                if ("age".equals(Bytes.toString(columnName)) || "id".equals(Bytes.toString(columnName))) {
                    System.out.println("数据的rowkey为" +
                            Bytes.toString(rowKey) + "####数据的列族为" +
                            Bytes.toString(familyName) + "####数据的列名为" +
                            Bytes.toString(columnName) + "####数据的值为" +
                            Bytes.toInt(value));
                } else {
                    System.out.println("数据的rowkey为" +
                            Bytes.toString(rowKey) + "####数据的列族为" +
                            Bytes.toString(familyName) + "####数据的列名为" +
                            Bytes.toString(columnName) + "####数据的值为" +
                            Bytes.toString(value));
                }
            }
            table.close();
        }
    }
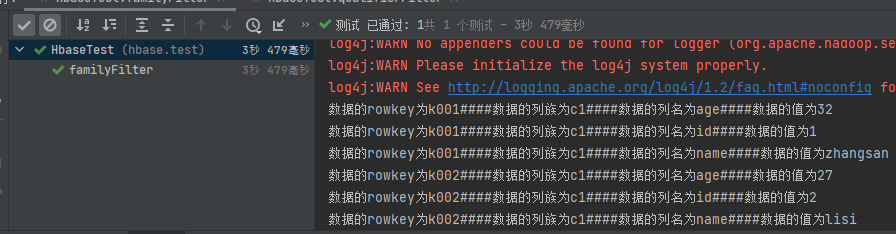
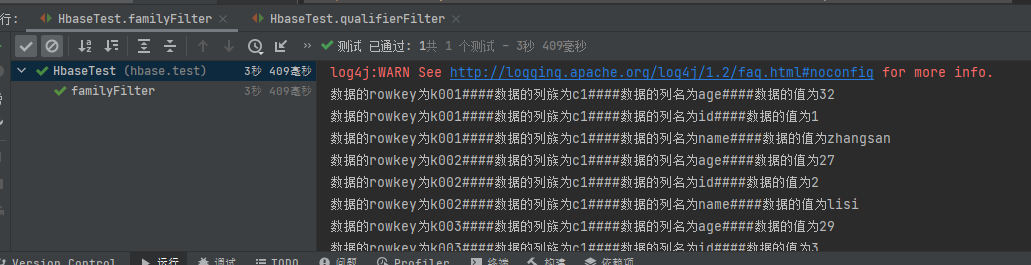
4.5.2 列族过滤器FamilyFilter
//列族过滤器FamilyFilter
    //查询列族包含c1的所有数据
    @Test
    public void familyFilter() throws IOException {
        Scan scan = new Scan();
        SubstringComparator substringComparator = new SubstringComparator("c1");
        //通过familyFilter设置列族的过滤器
        FamilyFilter familyFilter = new FamilyFilter(CompareFilter.CompareOp.EQUAL, substringComparator);
        scan.setFilter(familyFilter);
        ResultScanner scanner = table.getScanner(scan);
        //遍历ResultScanner得到每条数据,每条数据都封装在result中
        for (Result result : scanner) {
            List<Cell> cells = result.listCells();
            for (Cell cell : cells) {
                byte[] familyName = CellUtil.cloneFamily(cell);
                byte[] columnName = CellUtil.cloneQualifier(cell);
                byte[] rowKey = CellUtil.cloneRow(cell);
                byte[] value = CellUtil.cloneValue(cell);
                //判断id和age字段,这两个字段是整型值
                if ("age".equals(Bytes.toString(columnName)) || "id".equals(Bytes.toString(columnName))) {
                    System.out.println("数据的rowkey为" +
                            Bytes.toString(rowKey) + "####数据的列族为" +
                            Bytes.toString(familyName) + "####数据的列名为" +
                            Bytes.toString(columnName) + "####数据的值为" +
                            Bytes.toInt(value));
                } else {
                    System.out.println("数据的rowkey为" +
                            Bytes.toString(rowKey) + "####数据的列族为" +
                            Bytes.toString(familyName) + "####数据的列名为" +
                            Bytes.toString(columnName) + "####数据的值为" +
                            Bytes.toString(value));
              }
            }
            table.close();
        }
    }
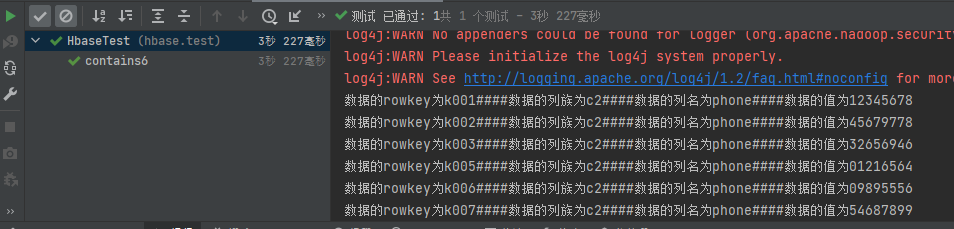
4.5.3 列过滤器QualifierFilte
    //列过滤器qualifierFilter
    //列出列名只包含name列的值
    @Test
    public void qualifierFilter() throws IOException {
        Scan scan = new Scan();
        SubstringComparator substringComparator = new SubstringComparator("name");
        //定义列名过滤器,只包含name的列
        QualifierFilter qualifierFilter = new QualifierFilter(CompareFilter.CompareOp.EQUAL, substringComparator);
        scan.setFilter(qualifierFilter);
        ResultScanner scanner = table.getScanner(scan);
        printResult(scanner);
    }

    private void printResult(ResultScanner scanner) throws IOException {
        for (Result result : scanner) {
            List<Cell> cells = result.listCells();
            for (Cell cell : cells) {
                byte[] familyName = CellUtil.cloneFamily(cell);
                byte[] columnName = CellUtil.cloneQualifier(cell);
                byte[] rowKey = CellUtil.cloneRow(cell);
                byte[] value = CellUtil.cloneValue(cell);
                //判断id和age字段,这两个字段是整型值
                if ("age".equals(Bytes.toString(columnName)) || "id".equals(Bytes.toString(columnName))) {
                    System.out.println("数据的rowkey为" +
                            Bytes.toString(rowKey) + "####数据的列族为" +
                            Bytes.toString(familyName) + "####数据的列名为" +
                            Bytes.toString(columnName) + "####数据的值为" +
                            Bytes.toInt(value));
                } else {
                    System.out.println("数据的rowkey为" +
                            Bytes.toString(rowKey) + "####数据的列族为" +
                            Bytes.toString(familyName) + "####数据的列名为" +
                            Bytes.toString(columnName) + "####数据的值为" +
                            Bytes.toString(value));
                }
            }
            table.close();
        }
    }

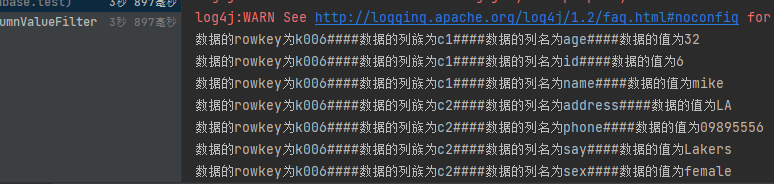
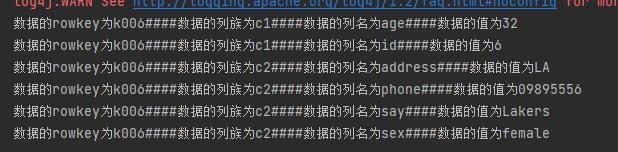
4.5.4 列值过滤器ValueFilter
  //列值过滤器ValueFilter
    //查询字段值包含6的数据
    @Test
    public void contains6() throws IOException {
        Scan scan = new Scan();
        SubstringComparator substringComparator = new SubstringComparator("6");
        ValueFilter valueFilter = new ValueFilter(CompareFilter.CompareOp.EQUAL, substringComparator);
        scan.setFilter(valueFilter);
        ResultScanner scanner = table.getScanner(scan);
        printResult(scanner);
    }
4.6 专用过滤器
4.6.1 单列值过滤器SingleColumnValueFilter
    @Test
    public void singleColumnValueFilter() throws IOException {
        Scan scan = new Scan();
        //单列值过滤器,过滤c1列族为mike的数据
        SingleColumnValueFilter singleColumnValueFilter = new SingleColumnValueFilter("c1".getBytes(StandardCharsets.UTF_8), "name".getBytes(StandardCharsets.UTF_8), CompareFilter.CompareOp.EQUAL, "mike".getBytes(StandardCharsets.UTF_8));
        scan.setFilter(singleColumnValueFilter);
        ResultScanner scanner = table.getScanner(scan);
        printResult(scanner);
    }
4.6.2 列值排除过滤器SingleColumnValueExcludeFilter
- 如果指定列的值符合Filter条件,则排除掉row中指定的列,其他列全部返回
- 如果列不存在或不符合Filter条件,则不返回row中的列
    //列值排除过滤器SingleColumnValueExcludeFilter
    @Test
    public void singleColumnValueExcludeFilter() throws IOException {
        Scan scan = new Scan();
        //单列值过滤器,过滤c1列族为mike的数据
        SingleColumnValueExcludeFilter singleColumnValueExcludeFilter = new SingleColumnValueExcludeFilter("c1".getBytes(StandardCharsets.UTF_8), "name".getBytes(StandardCharsets.UTF_8), CompareFilter.CompareOp.EQUAL, "mike".getBytes(StandardCharsets.UTF_8));
        scan.setFilter(singleColumnValueExcludeFilter);
        ResultScanner scanner = table.getScanner(scan);
        printResult(scanner);
    }
4.6.3 Rowkey前缀过滤器PrefixFilter
    //rowkey前缀过滤器PrefixFilter
    //查询以k001开头的所有前缀rowkey
    @Test
    public void prefixFilter() throws IOException {
        Scan scan = new Scan();
        //过滤rowkey以k001开头的数据
        PrefixFilter prefixFilter = new PrefixFilter("k001".getBytes(StandardCharsets.UTF_8));
        scan.setFilter(prefixFilter);
        ResultScanner scanner = table.getScanner(scan);
        printResult(scanner);
    }
4.6.4 分页过滤器PageFilter
//分页过滤器PageFilter
    @Test
    public void pageFilter() throws IOException {
        int pageNum = 3;
        int pageSize = 2;
        Scan scan = new Scan();
        String startRow = "";
        //扫描五条数据
        int scanDatas = (pageNum - 1) * pageSize + 1;
        //设置一步往前扫描多少条数据
        scan.setMaxResultSize(scanDatas);
        PageFilter pageFilter = new PageFilter(scanDatas);
        scan.setFilter(pageFilter);
        ResultScanner scanner = table.getScanner(scan);
        for (Result result : scanner) {
            //获取rowkey
            byte[] row = result.getRow();
            //最后一次startRow值就是k005
            //循环遍历所有得到的数据的rowkey
            startRow = Bytes.toString(row);
            //最后一条数据的rowkey就是需要的起始的rowkey
        }
        //获取第三页数据
        scan.withStartRow(startRow.getBytes(StandardCharsets.UTF_8));
        //设置扫描多少条数据
        PageFilter pageFilter1 = new PageFilter(pageSize);
        scan.setFilter(pageFilter1);
        ResultScanner scanner1 = table.getScanner(scan);
        printResult(scanner1);
    }
4.6.5 多过滤器综合查询FilterList
    //多过滤器综合查询FilterList
    //使用SingleColumnValueFilter查询c1列族,name为lucy的数据,并且同时满足rowkey为k00开头的数据(PrefixFilter)
    @Test
    public void filterList() throws IOException {
        Scan scan = new Scan();
        SingleColumnValueFilter singleColumnValueFilter = new SingleColumnValueFilter("c1".getBytes(StandardCharsets.UTF_8), "name".getBytes(StandardCharsets.UTF_8), CompareFilter.CompareOp.EQUAL, "lucy".getBytes(StandardCharsets.UTF_8));
        PrefixFilter prefixFilter = new PrefixFilter("k00".getBytes(StandardCharsets.UTF_8));
        FilterList filterList = new FilterList();
        filterList.addFilter(singleColumnValueFilter);
        filterList.addFilter(prefixFilter);
        scan.setFilter(filterList);
        ResultScanner scanner = table.getScanner(scan);
        printResult(scanner);
    }
5.HBASE集成MapReduce
5.1 需求一
- 需求:读取hbase当中的users表c1:age,c1:name数据,写入到users2表中c1列族中
- 第一步:在项目的pom.xml加入如下配置
    <dependency>
        <groupId>org.apache.hbase</groupId>
        <artifactId>hbase-mapreduce</artifactId>
        <version>2.2.2</version>
    </dependency>
-
第二步:创建users2表(列族的名字要与users表相同)
create 'users2','c1' -
第三步:开发MapReduce程序实现功能
-
自定义mapper类
package hbase.mr;

import org.apache.hadoop.hbase.Cell;
import org.apache.hadoop.hbase.CellUtil;
import org.apache.hadoop.hbase.client.Put;
import org.apache.hadoop.hbase.client.Result;
import org.apache.hadoop.hbase.io.ImmutableBytesWritable;
import org.apache.hadoop.hbase.mapreduce.TableMapper;
import org.apache.hadoop.hbase.util.Bytes;
import org.apache.hadoop.io.Text;

import java.io.IOException;

public class HbaseReadMapper extends TableMapper<Text,Put> {
    /**
     * @param key rowKey
     * @param value rowKey此⾏的数据 Result类型
     * @param context
     * @throws IOException
     * @throws InterruptedException
     */
    @Override
    protected void map(ImmutableBytesWritable key, Result value, Context context) throws IOException,InterruptedException {
        //获得rowkey的字节数组
        byte[] rowKeyBytes = key.get();
        String rowKeyStr = Bytes.toString(rowKeyBytes);
        Text text = new Text(rowKeyStr);
        //输出数据--写数据--构建put对象
        Put put = new Put(rowKeyBytes);
        //获取一行中所有cell对象
        Cell[] rawCells = value.rawCells();
        //将c1:name\age输出
        for (Cell rawCell : rawCells) {
            //判断cell是否是c1列族
            byte[] familyBytes = CellUtil.cloneFamily(rawCell);
            String familyStr = Bytes.toString(familyBytes);
            if ("c1".equals(familyStr)){
                //判断是否是name,age
                byte[] qualifierBytes = CellUtil.cloneQualifier(rawCell);
                String qualifierStr = Bytes.toString(qualifierBytes);
                if ("name".equals(qualifierStr)){
                    put.add(rawCell);
                }
                if ("age".equals(qualifierStr)){
                    put.add(rawCell);
                }
            }

        }
        //判断是否为空,不为空才输出
        if (!put.isEmpty()){
            context.write(text,put);
        }
    }
}
- 自定义reducer类
package hbase.mr;

import org.apache.hadoop.hbase.client.Put;
import org.apache.hadoop.hbase.io.ImmutableBytesWritable;
import org.apache.hadoop.hbase.mapreduce.TableReducer;
import org.apache.hadoop.io.Text;

import java.io.IOException;

public class HbaseWriteReducer extends TableReducer<Text, Put, ImmutableBytesWritable> {
  //将map传输过来的数据写入到hbase表中
    @Override
    protected void reduce(Text key, Iterable<Put> values,Context context) throws IOException, InterruptedException {
        //rowkey
        ImmutableBytesWritable immutableBytesWritable = new ImmutableBytesWritable();
        immutableBytesWritable.set(key.toString().getBytes());
        //遍历put对象并输出
        for (Put put : values) {
            context.write(immutableBytesWritable,put);
        }
    }

}
- 定义程序入口类main
package hbase.mr;

import org.apache.hadoop.conf.Configuration;
import org.apache.hadoop.conf.Configured;
import org.apache.hadoop.hbase.HBaseConfiguration;
import org.apache.hadoop.hbase.client.Put;
import org.apache.hadoop.hbase.client.Scan;
import org.apache.hadoop.hbase.mapreduce.TableMapReduceUtil;
import org.apache.hadoop.io.Text;
import org.apache.hadoop.mapreduce.Job;
import org.apache.hadoop.util.Tool;
import org.apache.hadoop.util.ToolRunner;

public class HbaseMrMain extends Configured implements Tool {
    public static void main(String[] args) throws Exception {
        Configuration configuration = HBaseConfiguration.create();
        //设置绑定的zooKeeper集群
        configuration.set("hbase.zookeeper.quorum", "hadoop001:2181,hadoop002:2181,hadoop003:2181");

        int run = ToolRunner.run(configuration, new HbaseMrMain(), args);
        System.exit(run);
    }
    @Override
    public int run(String[] args) throws Exception {
        Job job = Job.getInstance(super.getConf());
        job.setJarByClass(HbaseMrMain.class);
        //mapper
        TableMapReduceUtil.initTableMapperJob("users", new Scan(), HbaseReadMapper.class, Text.class, Put.class, job);
        //reducer
        TableMapReduceUtil.initTableReducerJob("users2", HbaseWriteReducer.class, job);
        boolean b = job.waitForCompletion(true);
        return b ? 0 : 1;
    }
}
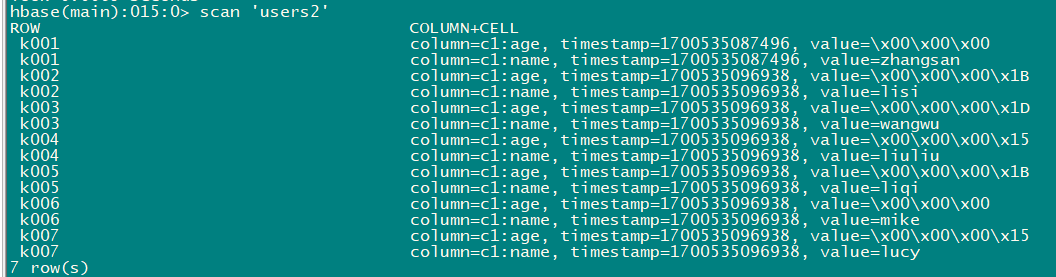
5.2 需求二
-
读取HDFS的数据,写入到hbase的users2表中
cd /opt/module/
[root@hadoop003 module]# vim user.txt
0008 liubei 50
0009 gaunyu 50
00010 zhangfei 45
[root@hadoop003 module]# hdfs dfs -mkdir -p /hbase/input
[root@hadoop003 module]# hdfs dfs -put user.txt /hbase/input
package hdfs.hbase.mr;

import org.apache.hadoop.conf.Configuration;
import org.apache.hadoop.fs.Path;
import org.apache.hadoop.hbase.HBaseConfiguration;
import org.apache.hadoop.hbase.client.Put;
import org.apache.hadoop.hbase.io.ImmutableBytesWritable;
import org.apache.hadoop.hbase.mapreduce.TableMapReduceUtil;
import org.apache.hadoop.hbase.mapreduce.TableReducer;
import org.apache.hadoop.hbase.util.Bytes;
import org.apache.hadoop.io.LongWritable;
import org.apache.hadoop.io.NullWritable;
import org.apache.hadoop.io.Text;
import org.apache.hadoop.mapreduce.Job;
import org.apache.hadoop.mapreduce.Mapper;
import org.apache.hadoop.mapreduce.lib.input.FileInputFormat;
import org.apache.hadoop.mapreduce.lib.input.TextInputFormat;

import java.io.IOException;
import java.nio.charset.StandardCharsets;

public class Hdfs2Hbase {
    public static class HdfsMapper extends Mapper<LongWritable, Text,Text, NullWritable>{
        protected void map(LongWritable key,Text value,Context context) throws IOException, InterruptedException {
            context.write(value,NullWritable.get());
        }
    }
    public static class HdfsReducer extends TableReducer<Text,NullWritable, ImmutableBytesWritable>{
        protected void reduce(Text key,Iterable<NullWritable> values,Context context) throws IOException, InterruptedException {
            String[] split = key.toString().split("\t");
            Put put = new Put(Bytes.toBytes(split[0]));
            put.addColumn("c1".getBytes(StandardCharsets.UTF_8),"name".getBytes(StandardCharsets.UTF_8),split[1].getBytes(StandardCharsets.UTF_8));
            put.addColumn("c1".getBytes(StandardCharsets.UTF_8),("age").getBytes(StandardCharsets.UTF_8),split[2].getBytes(StandardCharsets.UTF_8));

            context.write(new ImmutableBytesWritable(Bytes.toBytes(split[0])),put);
        }
    }

    public static void main(String[] args) throws IOException, InterruptedException, ClassNotFoundException {
        Configuration configuration = HBaseConfiguration.create();
        configuration.set("hbase.zookeeper.quorum", "hadoop001:2181,hadoop002:2181,hadoop003:2181");
        Job job = Job.getInstance(configuration);
        job.setJarByClass(Hdfs2Hbase.class);
        job.setInputFormatClass(TextInputFormat.class);
        //输入文件路径
        FileInputFormat.addInputPath(job,new Path("hdfs://hadoop001:9000/hbase/input/"));
        job.setMapperClass(HdfsMapper.class);
        job.setReducerClass(HdfsReducer.class);
        //map端输出的key value类型
        job.setMapOutputKeyClass(Text.class);
        job.setMapOutputValueClass(NullWritable.class);
        //指定表名
        TableMapReduceUtil.initTableReducerJob("users2",HdfsReducer.class,job);
        //设置reducer个数
        job.setNumReduceTasks(1);
        System.exit(job.waitForCompletion(true) ? 0 : 1);
    }
}

5.3 需求三
- 通过bulkload方式批量加载数据到Hbase表中
- 将HDFS的/hbase/input/user.txt转换成hfile格式,然后load到users表中
- 优点:
- 不占用region资源
- 快速导入海量数据
- 节省内存
- 自定义mapper类
package bulkload.hbase.mr;

import org.apache.hadoop.hbase.client.Put;
import org.apache.hadoop.hbase.io.ImmutableBytesWritable;
import org.apache.hadoop.io.LongWritable;
import org.apache.hadoop.io.Text;
import org.apache.hadoop.mapreduce.Mapper;

import java.io.IOException;
import java.nio.charset.StandardCharsets;

public class BulkLoadMapper extends Mapper<LongWritable, Text, ImmutableBytesWritable, Put> {
    @Override
    protected void map(LongWritable key, Text value, Context context) throws IOException, InterruptedException {
        String[] split = value.toString().split("\t");
        //封装输出的rowkey类型
        ImmutableBytesWritable immutableBytesWritable = new ImmutableBytesWritable(split[0].getBytes());
        //构建put对象
        Put put = new Put(split[0].getBytes(StandardCharsets.UTF_8));
        put.addColumn("c1".getBytes(StandardCharsets.UTF_8), "name".getBytes(StandardCharsets.UTF_8), split[1].getBytes(StandardCharsets.UTF_8));
        put.addColumn("c1".getBytes(StandardCharsets.UTF_8), "age".getBytes(StandardCharsets.UTF_8), split[2].getBytes(StandardCharsets.UTF_8));

        context.write(immutableBytesWritable, put);
    }
}
- 定义程序入口类
package bulkload.hbase.mr;

import org.apache.hadoop.conf.Configuration;
import org.apache.hadoop.conf.Configured;
import org.apache.hadoop.fs.Path;
import org.apache.hadoop.hbase.HBaseConfiguration;
import org.apache.hadoop.hbase.TableName;
import org.apache.hadoop.hbase.client.Connection;
import org.apache.hadoop.hbase.client.ConnectionFactory;
import org.apache.hadoop.hbase.client.Put;
import org.apache.hadoop.hbase.client.Table;
import org.apache.hadoop.hbase.io.ImmutableBytesWritable;
import org.apache.hadoop.hbase.mapreduce.HFileOutputFormat2;
import org.apache.hadoop.mapreduce.Job;
import org.apache.hadoop.mapreduce.lib.input.FileInputFormat;
import org.apache.hadoop.util.Tool;
import org.apache.hadoop.util.ToolRunner;

import java.io.IOException;


public class HbaseBulkload extends Configured implements Tool {
    public static void main(String[] args) throws Exception {
        Configuration configuration = HBaseConfiguration.create();
        //设置绑定的zooKeeper集群
        configuration.set("hbase.zookeeper.quorum", "hadoop001:2181,hadoop002:2181,hadoop003:2181");

        int run= ToolRunner.run(configuration,new HbaseBulkload(),args);
        System.exit(run);
    }
    @Override
    public int run(String[] args) throws IOException, InterruptedException, ClassNotFoundException {
        Configuration conf = super.getConf();
        Job job = Job.getInstance(conf);
        job.setJarByClass(HbaseBulkload.class);
        FileInputFormat.addInputPath(job,new Path("hdfs://hadoop001:9000/hbase/input/"));
        job.setMapperClass(BulkLoadMapper.class);
        job.setMapOutputKeyClass(ImmutableBytesWritable.class);
        job.setMapOutputValueClass(Put.class);

        Connection connection = ConnectionFactory.createConnection(conf);
        Table table = connection.getTable(TableName.valueOf("users"));

        //使mr可以向users表中增加数据
        HFileOutputFormat2.configureIncrementalLoad(job,table,connection.getRegionLocator(TableName.valueOf("users")));
        //数据写回到hdfs,生成hfile
        job.setOutputFormatClass(HFileOutputFormat2.class);
        HFileOutputFormat2.setOutputPath(job,new Path("hdfs://hadoop001:9000/hbase/outhfile"));

        //开始执行
        boolean b = job.waitForCompletion(true);
        return b ? 0 : 1;
    }
}

- 加载hfile到hbase中–代码加载
package bulkload.hbase.mr;

import org.apache.hadoop.conf.Configuration;
import org.apache.hadoop.fs.Path;
import org.apache.hadoop.hbase.HBaseConfiguration;
import org.apache.hadoop.hbase.TableName;
import org.apache.hadoop.hbase.client.*;
import org.apache.hadoop.hbase.tool.BulkLoadHFiles;

import java.io.IOException;

public class LoadData {
    public static void main(String[] args) throws IOException {
        Configuration configuration = HBaseConfiguration.create();
        //设置绑定的zooKeeper集群
        configuration.set("hbase.zookeeper.quorum", "hadoop001:2181,hadoop002:2181,hadoop003:2181");
        //获取数据库连接
        Connection connection = ConnectionFactory.createConnection(configuration);
        //获取数据库管理员对象
        Admin admin = connection.getAdmin();
        //获取table对象
        TableName tableName = TableName.valueOf("users");
        //RegionLocator regionLocator = connection.getRegionLocator(TableName.valueOf("users"));
        Table table = connection.getTable(tableName);
        //构建bulkload加载hfile的API
        BulkLoadHFiles bulkLoadHFiles = BulkLoadHFiles.create(configuration);
      /*  LoadIncrementalHFiles loadIncrementalHFiles = new LoadIncrementalHFiles(configuration);
        loadIncrementalHFiles.doBulkLoad(new Path("hdfs://hadoop001:9000/hbase/outhfile"),admin,table,regionLocator);*/
       bulkLoadHFiles.bulkLoad(tableName,new Path("hdfs://hadoop001:9000/hbase/outhfile"));
    }
}
//代码没问题,查看region日志之后,HBASE参数也修改了还是报这个错误...

6.HBASE集成Hive
6.1 安装hive
- 之前的文章里有写到,这里就略过了
6.2 安装Hbase
- 安装HBASE具体查看第一条内容
6.3 整合安装
6.3.1 拷贝jar包
-
删除hive安装目录lib目录下的所有HBASE开头的jar包,从HBASE的lib目录下拷贝过来
cd /opt/module/apache-hive-3.1.2-bin/lib
[root@hadoop001 lib]# rm -f hbase*
cp /opt/module/hbase-2.2.6/lib/hbase* .
6.3.2 修改hive配置
[root@hadoop002 lib]# cd ../conf/
[root@hadoop002 conf]# vim hive-site.xml
#添加如下内容
<property>
 <name>hive.zookeeper.quorum</name>
 <value>hadoop001,hadoop002,hadoop003</value>
 </property>
<property>
 <name>hbase.zookeeper.quorum</name>
 <value>hadoop001,hadoop002,hadoop003</value>
 </property>
vim hive-env.sh
#添加如下内容
export HBASE_HOME=/opt/module/hbase-2.2.6
export HADOOP_HOME=/opt/module/hadoop-2.7.3
export HIVE_HOME=/opt/module/apache-hive-3.1.2-bin
export HIVE_CONF_DIR=$HIVE_HOME/conf
6.4 需求一:将hive的表分析结果保存到HBASE中
6.4.1 在hive中建表
- 进入hive客户端并建表
cd /opt/module/apache-hive-3.1.2-bin
bin/hive

#创建hive数据库与对应的表
hive> create database course;
OK
Time taken: 1.043 seconds

create external table if not exists course.score(id int,cname string,score int) row format delimited fields terminated by '\t' stored as textfile;

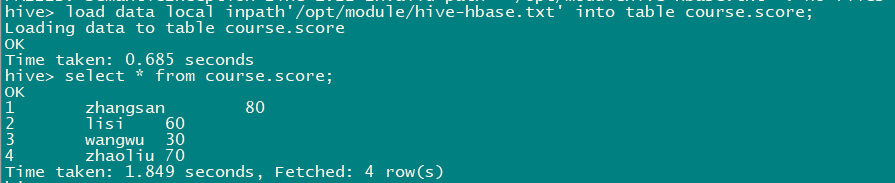
6.4.2 加载数据到hive表
[root@hadoop001 module]# cd /opt/module/
[root@hadoop001 module]# vim hive-hbase.txt
1       zhangsan        80
2       lisi    60
3       wangwu  30
4       zhaoliu 70
#进入hive加载数据
cd /opt/module/apache-hive-3.1.2-bin
bin/hive

load data local inpath'/opt/modulehive-hbase.txt' into table course.score;
6.4.3 创建hive管理表与hbase映射
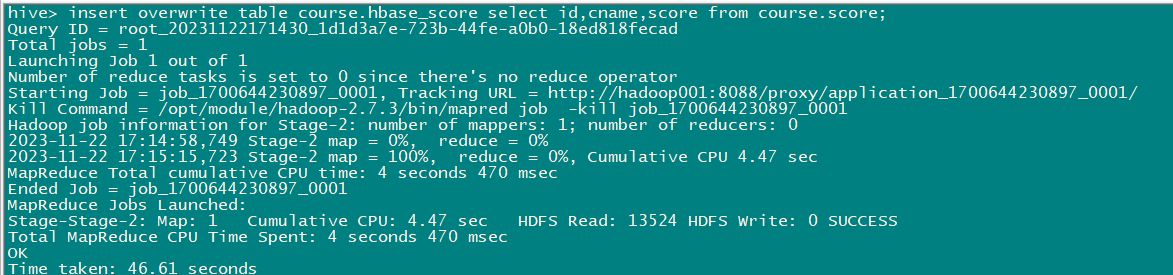
create table course.hbase_score(id int,cname string,score int) stored by 'org.apache.hadoop.hive.hbase.HBaseStorageHandler' with serdeproperties("hbase.columns.mapping"="cf:name,cf:score") tblproperties("hbase.table.name"="hbase_score");

- 通过insert overwrite select 插入数据
insert overwrite table course.hbase_score select id,cname,score from course.score;
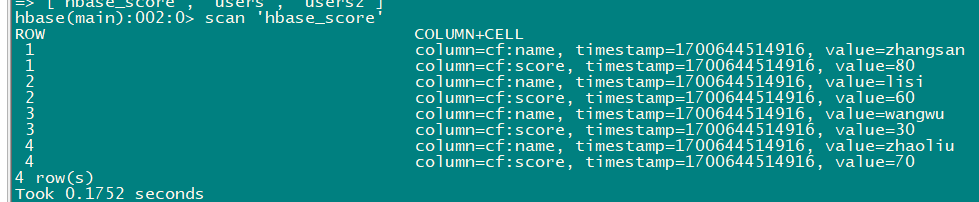
6.4.4 在hbase中查看hbase_score表
hbase(main):001:0> list
hbase(main):002:0> scan 'hbase_score'
6.5 需求二:建立hive的外部表,映射HBASE中的表和字段
6.5.1 hbase创建一张表并插入一些数据
create 'hbase_hive_score','cf'

put 'hbase_hive_score','1','cf:name','zhangfei'
put 'hbase_hive_score','1','cf:score','90'
put 'hbase_hive_score','2','cf:name','liubei'
put 'hbase_hive_score','2','cf:score','99'
put 'hbase_hive_score','3','cf:name','guanyu'
put 'hbase_hive_score','3','cf:score','97'

6.5.2 建立hive外部表,映射hbase当中的表以及字段
hive> create external table course.hbase2hive(id int,name string,score int) stored by 'org.apache.hadoop.hive.hbase.HBaseStorageHandler' with serdeproperties ("hbase.columns.mapping"=":key,cf:name,cf:score") tblproperties ("hbase.table.name"="hbase_hive_score");
hive> select * from hbase2hive;

7.Phoenix二级索引使用
7.1 安装配置
#上传并解压安装包
cd /opt/module/software
 tar -zxvf phoenix-hbase-2.2-5.1.1-bin.tar.gz -C /opt/module/

 #拷贝jar包
  cd ../phoenix-hbase-2.2-5.1.1-bin/
 [root@hadoop001 phoenix-hbase-2.2-5.1.1-bin]# scp phoenix-server-hbase-2.2-5.1.1.jar hadoop002:/opt/module/hbase-2.2.6/lib/
phoenix-server-hbase-2.2-5.1.1.jar
[root@hadoop001 phoenix-hbase-2.2-5.1.1-bin]# scp phoenix-server-hbase-2.2-5.1.1.jar hadoop003:/opt/module/hbase-2.2.6/lib/
phoenix-server-hbase-2.2-5.1.1.jar

#拷贝hbase和hdfs配置文件
cd bin/
[root@hadoop001 bin]# mv hbase-site.xml hbase-site.xml.bak
[root@hadoop001 bin]# cp /opt/module/hbase-2.2.6/conf/hbase-site.xml .
[root@hadoop001 bin]# cp /opt/module/hadoop-2.7.3/etc/hadoop/hdfs-site.xml .


#配置环境变量
vim /etc/profile
export PHOENIX_HOME=/opt/module/phoenix-hbase-2.2-5.1.1-bin
export PHOENIX_CLASSPATH=$PHOENIX_HOME
export PATH=$PATH:$PHOENIX_HOME/bin

source /etc/profile

#三台hbase修改配置⽂件hbase-site.xml,添加以下属性
cd /opt/module/hbase-2.2.6/conf
vim hbase-site.xml
 <property>
 <name>hbase.table.sanity.checks</name>
 <value>false</value>
 </property>
 scp hbase-site.xml hadoop002:$PWD
 scp hbase-site.xml hadoop003:$PWD
 #重启hbase集群
stop-hbase.sh
start-hbase.sh

#验证是否安装成功
 sqlline.py hadoop001:2181

7.2 批处理操作
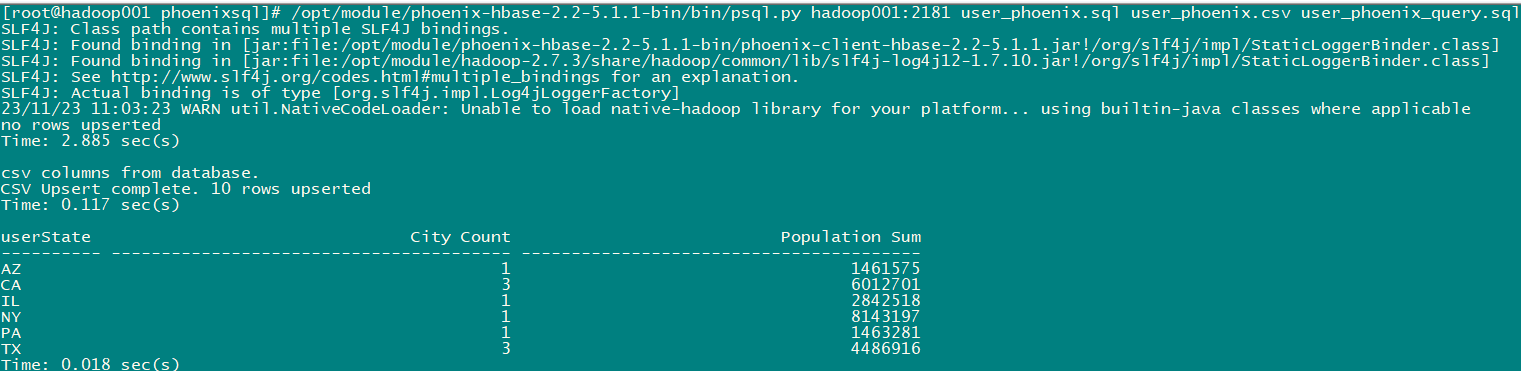
7.2.1 创建user_phoenix.sql文件
[root@hadoop001 module]# mkdir -p /opt/module/phoenixsql
[root@hadoop001 module]# cd phoenixsql/
[root@hadoop001 phoenixsql]# vim user_phoenix.sql
create table is not exists user_phoenix(state varchar(10) NOT NULL,city varchar(20) NOT NULL,population BIGINT CONSTRAINT my_pk PRIMARY KEY(state,city));
7.2.2 创建user_phoenix.csv数据文件
vim user_phoenix.csv

NY,New York,8143197
CA,Los Angeles,3844829
IL,Chicago,2842518
TX,Houston,2016582
PA,Philadelphia,1463281
AZ,Phoenix,1461575
TX,San Antonio,1256509
CA,San Diego,1255540
TX,Dallas,1213825
CA,San Jose,912332
7.2.3 创建user_phoenix_query.sql
vim user_phoenix_query.sql
select state as "userState",count(city) as "City Count",sum(population) as "Population Sum" FROM user_phoenix GROUP BY state;
[root@hadoop001 phoenixsql]# /opt/module/phoenix-hbase-2.2-5.1.1-bin/bin/psql.py hadoop001:2181 user_phoenix.sql user_phoenix.csv user_phoenix_query.sql
7.3 命令行操作
cd /opt/module/phoenix-hbase-2.2-5.1.1-bin/
bin/sqlline.py hadoop001:2181

#Phoenix命令需要在前面加一个感叹号 !
0: jdbc:phoenix:hadoop001:2181> !quit
7.3.1 表的映射
- 在hbase中创建employee表
[root@hadoop001 phoenixsql]# hbase shell
create 'employee','company','family'
- 插入数据
put 'employee','row1','company:name','ted'
put 'employee','row1','company:position','worker'
put 'employee','row1','family:tel','13600912345'
put 'employee','row1','family:age','18'
put 'employee','row2','company:name','michael'
put 'employee','row2','company:position','manager'
put 'employee','row2','family:tel','1894225698'
put 'employee','row2','family:age','20'
- 建立hbase到Phoenix的映射表,进入Phoenix客户端创建
- 说明:在建⽴映射表之前要说明的是,Phoenix是大小写敏感的,并且所有命令都是⼤写, 如果你建的表名没有⽤双引号括起来,⽆论你输⼊的是⼤写还是⼩写,建⽴出来的表名都是⼤写的,
- 如果你需要建⽴出同时包含⼤写和⼩写的表名和字段名,请把表名或者字段名⽤双引号括起来
 sqlline.py hadoop001:2181
create table if not exists "employee"("no" VARCHAR(10) NOT NULL PRIMARY KEY,"company"."name" VARCHAR(30),"company"."position" VARCHAR(20),"family"."tel" VARCHAR(20) ,"family"."age" VARCHAR(20)) column_encoded_bytes=0;
- 查询数据
select * from "employee";
select * from "employee" where "tel"='1894225698'


7.4 JDBC操作
7.4.1 创建maven⼯程并导⼊jar包
- 在Maven工程的pom.xml文件中添加如下内容
  	<dependency>
        <groupId>org.apache.phoenix</groupId>
        <artifactId>phoenix-core</artifactId>
        <version>5.0.0-HBase-2.0</version>
    </dependency>
- 代码开发
import org.junit.Before;
import org.junit.Test;
import java.sql.*;
public class PhoenixSearch {
/**
* 定义phoenix的url地址
* connection
* 构建Statement对象
* 定义查询的sql语句,⼀定注意⼤⼩写
* 构建好的对象执⾏sql语句
*/
private Statement statement;
private ResultSet resultSet;
private Connection connection;
@Before
public void init() throws SQLException {
//定义Phoenix的url
String url = "jdbc:phoenix:hadoop001:2181";
//connection
connection = DriverManager.getConnection(url);
//构建statement对象
statement = connection.createStatement();
}
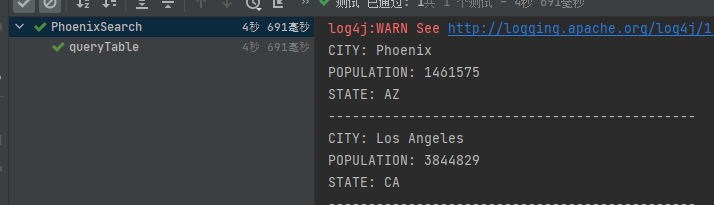
@Test
public void queryTable() throws SQLException {
//定义查询的sql语句,注意大小写
String sql = "select * from USER_PHOENIX";
//执行sql语句
try{
resultSet = statement.executeQuery(sql);
while (resultSet.next()){
System.out.println("CITY: "+resultSet.getString("CITY"));
System.out.println("POPULATION: "+resultSet.getString("POPULATION"));
System.out.println("STATE: "+resultSet.getString("STATE"));
System.out.println("----------------------------------------------");
}
}catch (SQLException e){
e.printStackTrace();
}finally {
if (connection!=null){
connection.close();
}
}
}
}
7.5 修改配置使其支持二级索引
- 三台机器修改hbase-site.xml, 然后重启hbase集群
<!-- 添加配置 -->
<property>
 <name>hbase.regionserver.wal.codec</name>
<value>org.apache.hadoop.hbase.regionserver.wal.IndexedWALEditCodec</value>
</property>
<property>
<name>hbase.region.server.rpc.scheduler.factory.class</name>
<value>org.apache.hadoop.hbase.ipc.PhoenixRpcSchedulerFactory</value>
</property>
<property>
 <name>hbase.rpc.controllerfactory.class</name>
<value>org.apache.hadoop.hbase.ipc.controller.ServerRpcControllerFactory</value>
</property>

[root@hadoop001 conf]# scp hbase-site.xml hadoop002:$PWD
[root@hadoop001 conf]# scp hbase-site.xml hadoop003:$PWD

[root@hadoop001 conf]# stop-hbase.sh
[root@hadoop001 conf]# start-hbase.sh
7.6 实际操作
7.6.1 在Phoenix中创建表
sqlline.py hadoop001:2181

create table user(
"sesseion_id" varchar(100) not null primary key,
"f"."cookie_id" varchar(100),
"f"."visit_time" varchar(100),
"f"."user_id" varchar(100),
"f"."age" varchar(100),
"f"."sex" varchar(100),
"f"."visit_url" varchar(100),
"f"."visit_os" varchar(100),
"f"."visit_ip" varchar(100),
"f"."browser_name" varchar(100),
"f"."province" varchar(100),
"f"."city" varchar(100),
"f"."page_id" varchar(100),
"f"."goods_id" varchar(100),
"f"."shop_id" varchar(100))column_encoded_bytes=0;
7.6.2 导入测试数据
psql.py -t USER hadoop001:2181 user50w.csv

7.6.3 GlobalIndexing二级索引测试
- 正常查询一条数据所需时间
select * from user where "cookie_id"='99738fd1-2084-44e9';

-
查看执行计划, 可以看到走的全表扫描
explain select * from user where "cookie_id" = '99738fd1-2084-44e9';

- 创建global Indexing二级索引
create index USER_COOKIE_ID_INDEX on USER("f"."cookie_id");
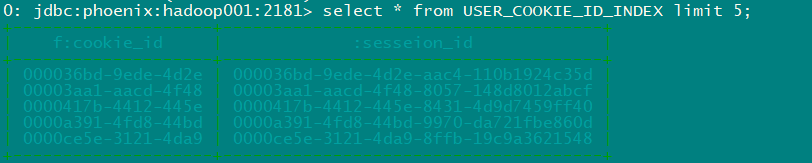
- 查看索引表数据
select * from USER_COOKIE_ID_INDEX limit 5;
- 再次执行查询,查询时间大大缩短,执行计划走了索引
 select "cookie_id" from user where "cookie_id"='99738fd1-2084-44e9';
 explain  select "cookie_id" from user where "cookie_id"='99738fd1-2084-44e9';

- 以下查询不会走索引, 因为age字段不是索引字段, 同理查询不是索引字段不会走索引
select "cookie_id","age" from user where "cookie_id"='99738fd1-2084-44e9';

7.6.4 LocalIndexing二级索引测试
- 正常查询一条数据所需时间
select * from user where "user_id"='371e963d-c-487065';
explain select * from user where "user_id"='371e963d-c-487065';


- 给user表创建Local Indexing二级索引
create local index USER_ID_INDEX on USER("f"."user_id");
- 再次执⾏查询,可以看到,对名为user_id的列进⾏按值查询仅需要0.1秒左右
select * from user where "user_id"='371e963d-c-487065';
explain select "user_id","age","sex" from user where
"user_id"='371e963d-c-487065';


7.6.5 如何确保query使用index
-
如果在某次查询中,查询项或者查询条件中包含除被索引列之外的列(主键除外)
-
默认情况下,该查询会触发full table scan(全表扫描),但是使⽤covered index则可以避免全表扫描。创建包含某个字段的覆盖索引,创建⽅式如下
7.6.5.1 创建covered index
create index USER_COOKIE_ID_AGE_INDEX on USER("f"."cookie_id") include("f"."age");
select * from USER_COOKIE_ID_AGE_INDEX  limit 5;

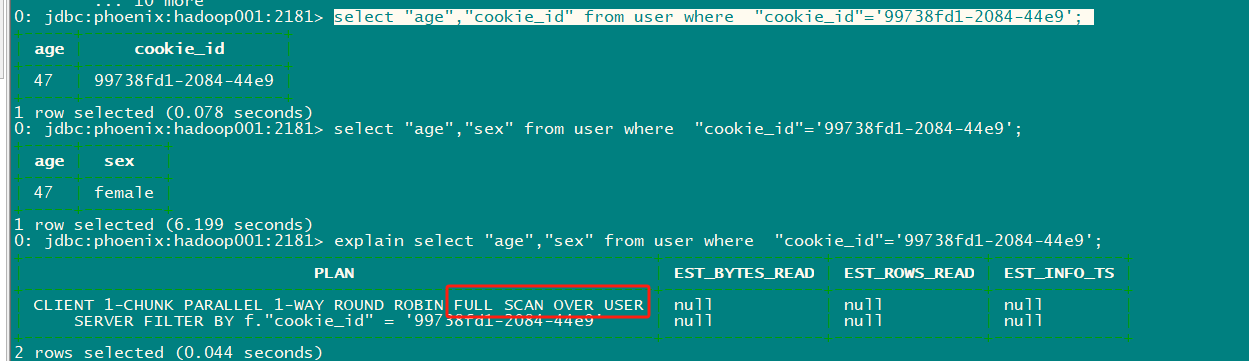
 select "age","cookie_id" from user where  "cookie_id"='99738fd1-2084-44e9';
+-----+--------------------+
| age |     cookie_id      |
+-----+--------------------+
| 47  | 99738fd1-2084-44e9 |
+-----+--------------------+
1 row selected (0.078 seconds)
0: jdbc:phoenix:hadoop001:2181> select "age","sex" from user where  "cookie_id"='99738fd1-2084-44e9';
+-----+--------+
| age |  sex   |
+-----+--------+
| 47  | female |
+-----+--------+
1 row selected (6.199 seconds)
0: jdbc:phoenix:hadoop001:2181> explain select "age","sex" from user where  "cookie_id"='99738fd1-2084-44e9';

7.6.5.2 强制使用索引
- 在select和列名之间加上/+Index(<表名>,<索引表名>)/
select /*+Index(user,USER_COOKIE_ID_AGE_INDEX)*/ "age" from user where "cookie_id"='99738fd1-2084-44e9';

-
如果age是索引字段,那么就会直接从索引表中查询
-
如果age不是索引字段,那么将会进⾏全表扫描,所以当⽤户明确知道表中数据较少且符合检索条件时才适⽤,此时的性能才是最佳的
7.6.6 索引重建
- Phoenix索引重建就是把索引表清空后重新装配数据
alter index USER_COOKIE_ID_INDEX on user rebuild;

7.6.7 删除索引
- 语法 drop index indexname on tablename;
drop index USER_COOKIE_ID_INDEX on user;


 被折叠的 条评论
为什么被折叠?
被折叠的 条评论
为什么被折叠?
 到【灌水乐园】发言


