


如何用Python调用本地模型实现DeepSeek提示词模板:一步步教你高效解决13种应用场景
从零到一:纯代码联合PyQt5、Ollama、Deepseek打造简易版智能聊天助手
用外接知识库武装大模型:基于Deepseek、Ollama、LangChain的RAG实战解析
纯代码实战–用Deepseek+SQLite+Ollama搭建数据库助手
概要
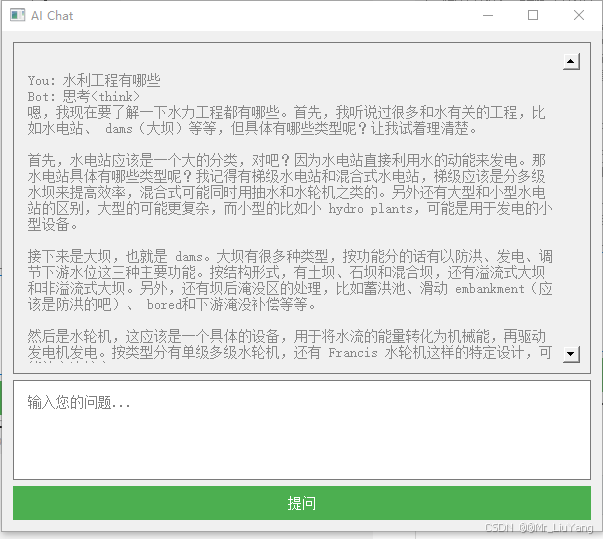
本文介绍基于PyQt5框架与Ollama大语言模型搭建的智能对话系统。通过QT实现简易的GUI界面,结合多线程技术实现AI模型的异步调用,支持流式响应输出。项目实现了类ChatGPT的交互体验,具有实时对话、流式响应、错误处理等核心功能。
提示:完整代码看最后,复制后可直接运行
整体架构流程
- 界面层:采用PyQt5构建聊天窗口框架
- 逻辑层:通过QThread实现异步调用
- 模型层:对接Ollama本地大模型服务
- 数据流:用户输入→界面展示→后台处理→流式输出
代码模块详解
AIWorker: 模型调用与流式处理
ChatWindow:界面管理与用户交互
StyleSheet:界面美化配置
- 导入模块
import sys
from PyQt5.QtWidgets import QApplication, QWidget, QVBoxLayout, QTextEdit, QPushButton
from PyQt5.QtCore import Qt, QThread, pyqtSignal
from ollama import chat
sys 用于处理程序的命令行参数。
PyQt5.QtWidgets 提供了图形用户界面组件,如 QApplication、QWidget、QVBoxLayout、QTextEdit、QPushButton 等。
PyQt5.QtCore 提供了核心功能,如 QThread(用于后台线程)和 pyqtSignal(用于信号与槽机制)。
ollama.chat 用于与AI模型进行交互。
2、AIWorker 类
class AIWorker(QThread):
    update_signal = pyqtSignal(str)
AIWorker 继承自 QThread,用于在后台线程中运行与AI模型的对话。
update_signal 是一个自定义信号,用于将AI模型的响应传递回主线程。
    def __init__(self, user_input):
        super().__init__()
        self.user_input = user_input
构造函数接受用户输入并初始化线程。
    def run(self):
        try:
            stream = chat(
                model='deepseek-r1:7b',
                messages=[{'role': 'user', 'content': self.user_input}],
                stream=True,
            )
            for chunk in stream:
                content = chunk['message']['content']
                self.update_signal.emit(content)
        except Exception as e:
            self.update_signal.emit(f"\n[Error] {str(e)}")
run 方法在后台线程中执行,发送用户输入到AI模型并接收模型的流式输出。
stream 为一个迭代器,逐步接收AI模型的响应。
如果有异常,错误消息将通过信号发送回主线程。
3、ChatWindow 类
class ChatWindow(QWidget):
    def __init__(self):
        super().__init__()
        self.init_ui()
        self.ai_thread = None
ChatWindow 类继承自 QWidget,表示聊天窗口的主界面。
ai_thread 用于存储后台执行的AI线程。
3.1界面初始化
    def init_ui(self):
        self.setWindowTitle("AI Chat")
        self.setGeometry(100, 100, 600, 500)

        layout = QVBoxLayout()
设置窗口标题和大小。
使用 QVBoxLayout 垂直布局组件。
        self.chat_display = QTextEdit()
        self.chat_display.setReadOnly(True)
        self.chat_display.setStyleSheet("""
            background-color: #f0f0f0;
            font-size: 14px;
            padding: 10px;
        """)
chat_display 用于显示聊天内容,设为只读模式。
使用CSS样式来定制文本框的外观。
        self.input_area = QTextEdit()
        self.input_area.setMaximumHeight(100)
        self.input_area.setPlaceholderText("输入您的问题...")
        self.input_area.setStyleSheet("""
            background-color: white;
            font-size: 14px;
            padding: 10px;
        """)
input_area 用于用户输入消息。
设置最大高度并添加占位符文本。
        self.send_btn = QPushButton("提问")
        self.send_btn.setStyleSheet("""
            QPushButton {
                background-color: #4CAF50;
                color: white;
                border: none;
                padding: 10px;
                font-size: 14px;
            }
            QPushButton:hover { background-color: #45a049; }
        """)
        self.send_btn.clicked.connect(self.send_message)
send_btn 是一个按钮,点击时会调用 send_message 方法发送消息。
使用CSS样式定制按钮外观。
        layout.addWidget(self.chat_display)
        layout.addWidget(self.input_area)
        layout.addWidget(self.send_btn)
        self.setLayout(layout)
添加聊天框、输入框和按钮到布局中,并将布局设置为窗口的布局。
3.2 发送消息
    def send_message(self):
        user_input = self.input_area.toPlainText().strip()
        if not user_input:
            return
获取用户输入的文本,如果输入为空,则直接返回。
        self._append_message("You", user_input)
        self.input_area.clear()
将用户输入的消息添加到聊天显示框中,并清空输入框。
self._append_message("Bot", "思考中...", is_streaming=True)
在聊天显示框中显示“思考中…”以提示用户AI正在生成回应。
        self.ai_thread = AIWorker(user_input)
        self.ai_thread.update_signal.connect(self.update_bot_response)
        self.ai_thread.finished.connect(self.finalize_response)
        self.ai_thread.start()
创建并启动一个 AIWorker 线程处理AI响应。
update_signal 连接到 update_bot_response 方法,用于更新聊天框内容。
finished 信号连接到 finalize_response 方法,确保在响应完成后进行处理。
3.3 更新聊天显示
    def _append_message(self, sender, message, is_streaming=False):
        cursor = self.chat_display.textCursor()
        cursor.movePosition(cursor.End)
_append_message 方法用于将消息插入到 chat_display 中。
设置光标位置到文本末尾,确保新消息被添加到显示区的底部。
        if sender == "You":
            prefix = "\nYou: "
            color = "#333333"
        else:
            prefix = "\nBot: "
            color = "#2196F3" if not is_streaming else "#888888"
为不同发送者(用户和Bot)设置不同的颜色和前缀。
        cursor.insertText(prefix)
        cursor.insertHtml(f'<span style="color:{color}">{message}</span>')
        self.chat_display.ensureCursorVisible()
将消息插入到文本框中,并确保光标可见。
3.4 更新Bot的响应
    def update_bot_response(self, content):
        current_text = self.chat_display.toPlainText()
        if current_text.endswith("思考中..."):
            self.chat_display.setPlainText(current_text[:-4] + content)
        else:
            cursor = self.chat_display.textCursor()
            cursor.movePosition(cursor.End)
            cursor.insertText(content)
        self.chat_display.ensureCursorVisible()
当接收到Bot的流式内容时,更新显示区。
如果当前显示的是“思考中…”,则将其替换为实际响应。
3.5 完成响应
    def finalize_response(self):
        current = self.chat_display.toPlainText()
        if not current.endswith("\n"):
            self.chat_display.append("")
确保聊天显示区的最后一行有换行符,避免显示不完整。
搭建后示例如:
待改进
| 存在问题 |
|---|
| 透明字体不清晰 |
| 点击提问后聊天窗口跳转至首行 |
| 历史记录保存 |
| 多模型切换 |
完整代码
提示:pyQt5需通过pip自行安装 Deepseek预训练模型下载见本人上篇博客:https://blog.youkuaiyun.com/qq_36112576/article/details/145510585?spm=1001.2014.3001.5502 一、2模型下载部分
代码中model='deepseek-r1:7b’根据个人情况自行替换
import sys
from PyQt5.QtWidgets import QApplication, QWidget, QVBoxLayout, QTextEdit, QPushButton
from PyQt5.QtCore import Qt, QThread, pyqtSignal
from ollama import chat


# AIWorker类,继承自QThread,用于在后台线程中处理与AI的交互
class AIWorker(QThread):
    # 自定义信号,用于更新UI上的聊天内容
    update_signal = pyqtSignal(str)

    def __init__(self, user_input):
        super().__init__()
        # 接收用户输入,准备与AI进行对话
        self.user_input = user_input

    def run(self):
        try:
            # 使用Ollama API与AI模型进行对话,启动流式响应
            stream = chat(
                model='deepseek-r1:7b',
                messages=[{'role': 'user', 'content': self.user_input}],
                stream=True,
            )

            # 遍历返回的流式数据,逐块接收消息
            for chunk in stream:
                content = chunk['message']['content']
                # 将接收到的内容通过信号发射到UI
                self.update_signal.emit(content)
        except Exception as e:
            # 如果出现异常,将错误信息通过信号发射
            self.update_signal.emit(f"\n[Error] {str(e)}")


# 主聊天窗口类
class ChatWindow(QWidget):
    def __init__(self):
        super().__init__()
        # 初始化UI界面
        self.init_ui()
        self.ai_thread = None

    def init_ui(self):
        self.setWindowTitle("AI Chat")  # 设置窗口标题
        self.setGeometry(100, 100, 600, 500)  # 设置窗口初始大小与位置

        layout = QVBoxLayout()  # 创建垂直布局

        # 创建聊天显示框,设置为只读,方便显示聊天内容
        self.chat_display = QTextEdit()
        self.chat_display.setReadOnly(True)
        self.chat_display.setStyleSheet("""
            background-color: #f0f0f0;
            font-size: 14px;
            padding: 10px;
        """)

        # 创建输入框,用户输入消息
        self.input_area = QTextEdit()
        self.input_area.setMaximumHeight(100)
        self.input_area.setPlaceholderText("输入您的问题...")
        self.input_area.setStyleSheet("""
            background-color: white;
            font-size: 14px;
            padding: 10px;
        """)

        # 创建发送按钮,点击时发送消息
        self.send_btn = QPushButton("提问")
        self.send_btn.setStyleSheet("""
            QPushButton {
                background-color: #4CAF50;
                color: white;
                border: none;
                padding: 10px;
                font-size: 14px;
            }
            QPushButton:hover { background-color: #45a049; }
        """)
        self.send_btn.clicked.connect(self.send_message)  # 点击按钮时调用send_message

        # 将组件添加到布局中
        layout.addWidget(self.chat_display)
        layout.addWidget(self.input_area)
        layout.addWidget(self.send_btn)
        self.setLayout(layout)

    def send_message(self):
        # 获取用户输入的文本并去掉空白
        user_input = self.input_area.toPlainText().strip()
        if not user_input:
            return  # 如果输入为空,返回

        # 在聊天窗口中显示用户输入的消息
        self._append_message("You", user_input)
        self.input_area.clear()  # 清空输入框

        # 在聊天窗口中显示“思考中...”提示
        self._append_message("Bot", "思考中...", is_streaming=True)

        # 启动后台线程,处理与AI的对话
        self.ai_thread = AIWorker(user_input)
        # 连接信号和槽函数,更新聊天内容
        self.ai_thread.update_signal.connect(self.update_bot_response)
        # 连接线程完成后的槽函数
        self.ai_thread.finished.connect(self.finalize_response)
        # 启动线程
        self.ai_thread.start()

    def _append_message(self, sender, message, is_streaming=False):
        # 获取文本光标,确保内容插入到聊天窗口的末尾
        cursor = self.chat_display.textCursor()
        cursor.movePosition(cursor.End)

        # 设置消息的前缀和颜色,用户消息和机器人消息区分开
        if sender == "You":
            prefix = "\nYou: "
            color = "#333333"  # 用户消息颜色
        else:
            prefix = "\nBot: "
            color = "#2196F3" if not is_streaming else "#888888"  # 机器人消息颜色,正在处理时颜色较灰

        # 插入消息
        cursor.insertText(prefix)
        cursor.insertHtml(f'<span style="color:{color}">{message}</span>')
        # 确保文本框显示最新内容
        self.chat_display.ensureCursorVisible()

    def update_bot_response(self, content):
        # 如果聊天框正在显示“思考中...”提示,则替换为实际响应内容
        current_text = self.chat_display.toPlainText()
        if current_text.endswith("思考中..."):
            self.chat_display.setPlainText(current_text[:-4] + content)
        else:
            # 否则直接插入新的消息
            cursor = self.chat_display.textCursor()
            cursor.movePosition(cursor.End)  # 确保插入文本到末尾
            cursor.insertText(content)  # 插入文本
        self.chat_display.ensureCursorVisible()

    def finalize_response(self):
        # 确保最后有换行符,使聊天内容整洁
        current = self.chat_display.toPlainText()
        if not current.endswith("\n"):
            self.chat_display.append("")


# 主程序入口
if __name__ == "__main__":
    app = QApplication(sys.argv)  # 创建应用程序
    window = ChatWindow()  # 创建聊天窗口实例
    window.show()  # 显示窗口
    sys.exit(app.exec_())  # 进入应用的主循环


 3067
3067

 被折叠的 条评论
为什么被折叠?
被折叠的 条评论
为什么被折叠?
 到【灌水乐园】发言


