


 本文档介绍如何结合OpenCV和PYQT5创建一个图像处理的GUI应用,包括使用Mask R-CNN模型进行图像处理,QT Designer进行界面设计,以及实现中英切换和灾害统计功能。
提示:文章写完后,目录可以自动生成,如何生成可参考右边的帮助文档
前言
提示:本博客涉及图像处理的GUI
主要应用场景:遥感图像灾害检测
提示:以下是本篇文章正文内容,下面案例可供参考
一、图像处理模型
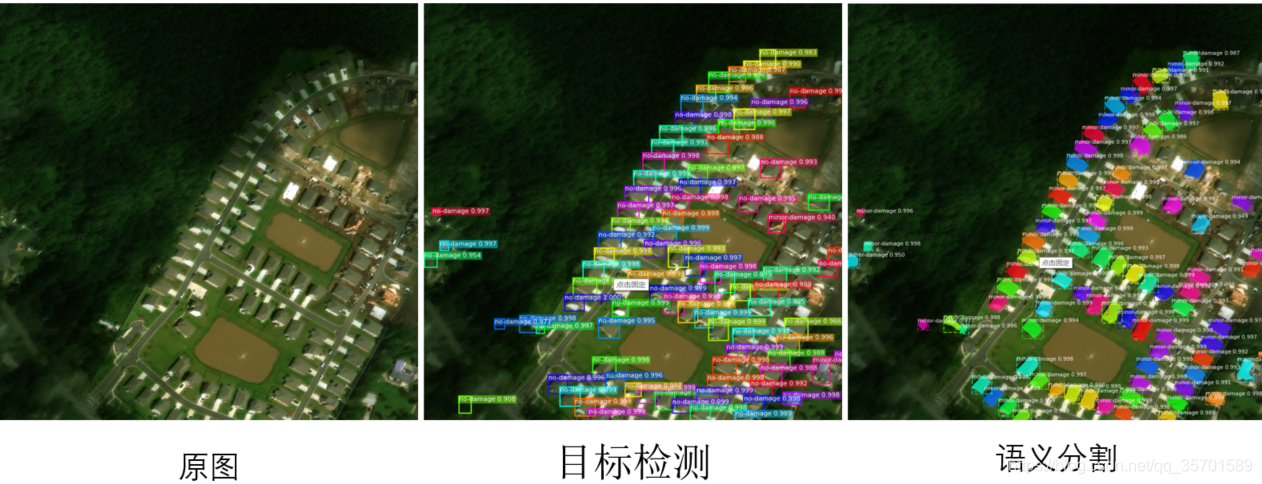
示例:模型使用的是Mask R-CNN,详细内容不展开细讲。由于这是一个实例分割模型,根据不同的Demo可以生成目标检测、语义分割和实例分割的输出。
代码详解可以参考以下博客:https://blog.youkuaiyun.com/ghw15221836342/article/details/80084984
输出如下(示例):
核心代码如下(示例):
def Object_Detectron_Visual(image_path):
    image = skimage.io.imread(image_path)
    dataset_test = xBD.xBDDataset()
    dataset_test.load_xBD('F:/Python_Project/Data/xBD/hurricane-florence/', "train")
    dataset_test.prepare()

    mrcnn = model.run_graph([image], [
        ("proposals", model.keras_model.get_layer("ROI").output),
        ("probs", model.keras_model.get_layer("mrcnn_class").output),
        ("deltas", model.keras_model.get_layer("mrcnn_bbox").output),
        ("masks", model.keras_model.get_layer("mrcnn_mask").output),
        ("detections", model.keras_model.get_layer("mrcnn_detection").output),
    ])

    det_class_ids = mrcnn['detections'][0, :, 4].astype(np.int32)
    det_count = np.where(det_class_ids == 0)[0][0]
    det_class_ids = det_class_ids[:det_count]
    detections = mrcnn['detections'][0, :det_count]

    captions = ["{} {:.3f}".format(dataset_test.class_names[int(c)], s) if c > 0 else ""
                for c, s in zip(detections[:, 4], detections[:, 5])]
    visualize.draw_boxes(image, refined_boxes=utils.denorm_boxes(detections[:, :4], image.shape[:2]),visibilities=[2] * len(detections),captions=captions, title="Detections",ax=get_ax())
    return det_class_ids

def Instance_Segmentation_Visual(image_path):
    # config.display()
    image
最低0.47元/天 解锁文章


 1834
1834

 被折叠的 条评论
为什么被折叠?
被折叠的 条评论
为什么被折叠?
 到【灌水乐园】发言


