


大家好,很久没有更新博客了,最近由于工作需要,正在学习有关Shrio的一些知识,网上关于Shrio的教程与资料十分丰富,在这里就不做过多说明了,下面的简要说明摘自张开涛老师的《跟我学Shrio》教程:Apache Shiro 是一个强大易用的 Java 安全框架,提供了认证、授权、加密和会话管理等功能,对于任何一个应用程序,Shiro 都可以提供全面的安全管理服务。并且相对于其他安全框架,Shiro 要简单的多。本篇博客不会对Shrio使用做说明,如果想详细了解其使用,可以参考上面张开涛老师的教程,下面要说明的源码调用过程是本人自己尝试并进行了测试的。首先测试代码如下:
import org.apache.shiro.SecurityUtils;
import org.apache.shiro.authc.UsernamePasswordToken;
import org.apache.shiro.config.IniSecurityManagerFactory;
import org.apache.shiro.mgt.SecurityManager;
import org.apache.shiro.subject.Subject;
import org.junit.Assert;
import org.junit.Test;


/**
 * ---------------------------
 * |@author |zonglin.zhang    |
 * ---------------------------
 * |@version|v1.0             |
 * ---------------------------
 * |@date   |2018/4/19        |
 * ---------------------------
 **/
public class ShrioTest1 {

    private Subject testLogin() {
        IniSecurityManagerFactory factory = new IniSecurityManagerFactory("classpath:shiro.ini");
        SecurityManager manager = factory.getInstance();

        SecurityUtils.setSecurityManager(manager);
        Subject subject = SecurityUtils.getSubject();
        UsernamePasswordToken token = new UsernamePasswordToken("zzl", "123");
        subject.login(token);
        return subject;
    }

    @Test
    public void testIsPermitted() {
        Subject subject = testLogin();
        Assert.assertFalse(subject.isPermitted("user:create"));

        Assert.assertTrue(subject.isPermittedAll("user:update", "user:delete"));
        Assert.assertTrue(subject.isPermitted("user:view"));
    }
}
ini配置文件内容如下:
[users]
zzl=123
fmy=123

[main]
myRealm1=zhangzl.realm.TestRealm
securityManager.realms=$myRealm1
自定义Realm代码如下:
import org.apache.shiro.authc.*;
import org.apache.shiro.authz.AuthorizationInfo;
import org.apache.shiro.authz.SimpleAuthorizationInfo;
import org.apache.shiro.realm.AuthorizingRealm;
import org.apache.shiro.subject.PrincipalCollection;

import java.util.HashSet;
import java.util.Set;

/**
 * ---------------------------
 * |@author |zonglin.zhang    |
 * ---------------------------
 * |@version|v1.0             |
 * ---------------------------
 * |@date   |2018/4/20        |
 * ---------------------------
 **/
public class TestRealm extends AuthorizingRealm {
    @Override
    protected AuthorizationInfo doGetAuthorizationInfo(PrincipalCollection principals) {
        Set<String> roleNames = new HashSet<>();
        Set<String> permissions = new HashSet<>();
        roleNames.add("role1");
        roleNames.add("role2");
        permissions.add("user:update");
        permissions.add("user:delete");
        permissions.add("user:add");
        SimpleAuthorizationInfo info = new SimpleAuthorizationInfo(roleNames);
        info.setStringPermissions(permissions);
        return info;
    }

    @Override
    protected AuthenticationInfo doGetAuthenticationInfo(AuthenticationToken token) throws AuthenticationException {
        String username = (String) token.getPrincipal();
        String password = new String((char[]) token.getCredentials());
        return new SimpleAuthenticationInfo(username, password, "testRealm");
    }
}
大家会发现我在ini中并没有配置角色以及角色相对应的权限设置,但是在测试代码中却校验了相应的权限,这是因为本人在测试的时候将权限以及角色解析在自定义Realm中写死了,所以是可以校验成功的。好了,闲话少说,我们来看一下Shrio源码:
首先Shrio核心功能中有两个,一个是身份认证,一个是权限校验,身份认证是用来校验是否可以进行登录,权限认证是用来确认用户是否拥有对资源的操作权限。
我们先来看身份认证。身份认证通常是我们进行安全控制的第一道关卡,所以我们先对身份认证的实现来进行说明。
首先我们身份认证的入口是Subject的login()方法:
void login(AuthenticationToken token) throws AuthenticationException该方法传入一个实现了AuthenticationToken接口的类的对象作为参数,这个参数中包含了登录用户的用户信息,例如我们代码中使用的UsernamePasswordToken用来存储用户的用户名和密码:
public class UsernamePasswordToken implements HostAuthenticationToken, RememberMeAuthenticationToken而他的两个父接口均实现了AuthenticationToken。Sgubject是一个抽象接口,其默认实现为DelegatingSubject:
 public void login(AuthenticationToken token) throws AuthenticationException {
        clearRunAsIdentitiesInternal();
        Subject subject = securityManager.login(this, token);

        PrincipalCollection principals;

        String host = null;

        if (subject instanceof DelegatingSubject) {
            DelegatingSubject delegating = (DelegatingSubject) subject;
            //we have to do this in case there are assumed identities - we don't want to lose the 'real' principals:
            principals = delegating.principals;
            host = delegating.host;
        } else {
            principals = subject.getPrincipals();
        }

        if (principals == null || principals.isEmpty()) {
            String msg = "Principals returned from securityManager.login( token ) returned a null or " +
                    "empty value.  This value must be non null and populated with one or more elements.";
            throw new IllegalStateException(msg);
        }
        this.principals = principals;
        this.authenticated = true;
        if (token instanceof HostAuthenticationToken) {
            host = ((HostAuthenticationToken) token).getHost();
        }
        if (host != null) {
            this.host = host;
        }
        Session session = subject.getSession(false);
        if (session != null) {
            this.session = decorate(session);
        } else {
            this.session = null;
        }
}我们可以看到,在我们调用login方法的时候,我们将方法代理到我们的Manager中进行处理,在处理完成之后,我们获取到一个Subject的对象,然后再根据Subject对象类型进行相应的逻辑处理,其中principals是一个身份集合,因为我们可以在Shiro中同时配置多个Realm,所以身份信息可能就有多个;因此其提供了PrincipalCollection用于聚合这些身份信息。而authenticated标记是否认证成功。SecrityManager中的login()方法由实现类DefaultSecrityManager来实现,具体代码如下:
public Subject login(Subject subject, AuthenticationToken token) throws AuthenticationException {
    AuthenticationInfo info;
    try {
        info = authenticate(token);
    } catch (AuthenticationException ae) {
        try {
            onFailedLogin(token, ae, subject);
        } catch (Exception e) {
            if (log.isInfoEnabled()) {
                log.info("onFailedLogin method threw an " +
                        "exception.  Logging and propagating original AuthenticationException.", e);
            }
        }
        throw ae; //propagate
    }

    Subject loggedIn = createSubject(token, info, subject);

    onSuccessfulLogin(token, info, loggedIn);

    return loggedIn;
}
DefaultSecurityManager实现了SessionSecurityManager,SessionSecurityManager实现了AuthorizatingSecurityManager,其中核心方法authenticate(token)的实现就在AuthorizatingSecurityManager中:
public AuthenticationInfo authenticate(AuthenticationToken token) throws AuthenticationException {
        return this.authenticator.authenticate(token);
    }
其中authenticator变量可以通过ini文件进行配置,authenticator是进行认证的核心组件,是Authenticator类型,其中的authenticate方法由其抽象实现类AbstratictAuthenticator进行实现:其中核心代码是调用doAuthenticate方法。
public final AuthenticationInfo authenticate(AuthenticationToken token) throws AuthenticationException {

        if (token == null) {
            throw new IllegalArgumentException("Method argumet (authentication token) cannot be null.");
        }

        log.trace("Authentication attempt received for token [{}]", token);

        AuthenticationInfo info;
        try {
            info = doAuthenticate(token);
            if (info == null) {
                String msg = "No account information found for authentication token [" + token + "] by this " +
                        "Authenticator instance.  Please check that it is configured correctly.";
                throw new AuthenticationException(msg);
            }
        } catch (Throwable t) {
            AuthenticationException ae = null;
            if (t instanceof AuthenticationException) {
                ae = (AuthenticationException) t;
            }
            if (ae == null) {
                //Exception thrown was not an expected AuthenticationException.  Therefore it is probably a little more
                //severe or unexpected.  So, wrap in an AuthenticationException, log to warn, and propagate:
                String msg = "Authentication failed for token submission [" + token + "].  Possible unexpected " +
                        "error? (Typical or expected login exceptions should extend from AuthenticationException).";
                ae = new AuthenticationException(msg, t);
            }
            try {
                notifyFailure(token, ae);
            } catch (Throwable t2) {
                if (log.isWarnEnabled()) {
                    String msg = "Unable to send notification for failed authentication attempt - listener error?.  " +
                            "Please check your AuthenticationListener implementation(s).  Logging sending exception " +
                            "and propagating original AuthenticationException instead...";
                    log.warn(msg, t2);
                }
            }


            throw ae;
        }

        log.debug("Authentication successful for token [{}].  Returned account [{}]", token, info);

        notifySuccess(token, info);

        return info;
    }
authenticator通过打点测试,发现默认的实现是ModularRealmAuthenticator:
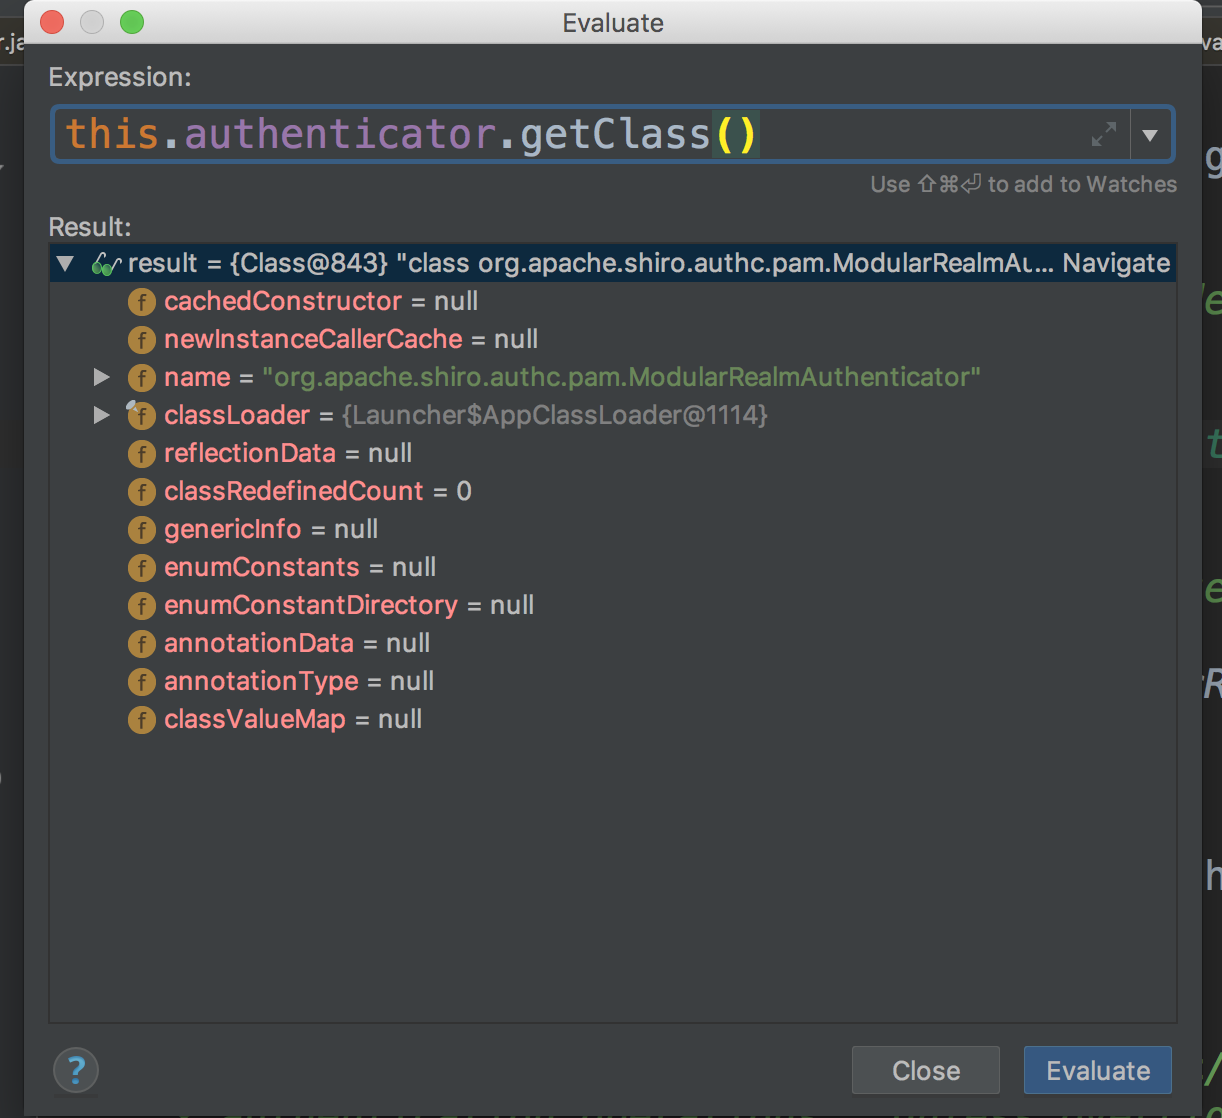
该类可以整合多个Realm进行校验。其中的doAuthenticate方法实现如下:
protected AuthenticationInfo doAuthenticate(AuthenticationToken authenticationToken) throws AuthenticationException {
        assertRealmsConfigured();
        Collection<Realm> realms = getRealms();
        if (realms.size() == 1) {
            return doSingleRealmAuthentication(realms.iterator().next(), authenticationToken);
        } else {
            return doMultiRealmAuthentication(realms, authenticationToken);
        }
    }
由于我们只配置了一个Realm,所以调用doSingleRealmAuthentication()方法进行校验:
 protected AuthenticationInfo doSingleRealmAuthentication(Realm realm, AuthenticationToken token) {
        if (!realm.supports(token)) {
            String msg = "Realm [" + realm + "] does not support authentication token [" +
                    token + "].  Please ensure that the appropriate Realm implementation is " +
                    "configured correctly or that the realm accepts AuthenticationTokens of this type.";
            throw new UnsupportedTokenException(msg);
        }
        AuthenticationInfo info = realm.getAuthenticationInfo(token);
        if (info == null) {
            String msg = "Realm [" + realm + "] was unable to find account data for the " +
                    "submitted AuthenticationToken [" + token + "].";
            throw new UnknownAccountException(msg);
        }
        return info;
    }
在其中会首先调用Realm的support方法看是否支持该token类型,如果支持将会调用getAuthenticationInfo()方法获取到身份认证信息。在这里我们自定义Realm实现了AuthorizingRealm类,该类的getAuthenticationInfo方法实现在其父类AuthenticatingRealm中:
public final AuthenticationInfo getAuthenticationInfo(AuthenticationToken token) throws AuthenticationException {

        AuthenticationInfo info = getCachedAuthenticationInfo(token);
        if (info == null) {
            //otherwise not cached, perform the lookup:
            info = doGetAuthenticationInfo(token);
            log.debug("Looked up AuthenticationInfo [{}] from doGetAuthenticationInfo", info);
            if (token != null && info != null) {
                cacheAuthenticationInfoIfPossible(token, info);
            }
        } else {
            log.debug("Using cached authentication info [{}] to perform credentials matching.", info);
        }

        if (info != null) {
            assertCredentialsMatch(token, info);
        } else {
            log.debug("No AuthenticationInfo found for submitted AuthenticationToken [{}].  Returning null.", token);
        }

        return info;
    }
首先根据token值从缓存中获取身份信息,之后如果缓存中没有,则调用我们重写的doGetAuthenticationInfo方法进行获取。获取后的身份信息将按照上述流程的相反顺序返回,并进行下一步处理,生成一个Subject对象,然后将身份信息存储在Subject对象中,以进行下一步的权限认证。以上就是进行身份认证的全部源码流程。
--------------------------------------------分割线----------------------------------------------
上面我们说了身份认证流程,下面我们来说一下权限认证流程:
权限认证流程入口为Subject的isPermitted()方法,该方法的调用流程与身份认证流程大体一致,直到调用到ModularRealmAuthenticator类的isPermitted()方法:
 public boolean isPermitted(PrincipalCollection principals, String permission) {
        assertRealmsConfigured();
        for (Realm realm : getRealms()) {
            if (!(realm instanceof Authorizer)) continue;
            if (((Authorizer) realm).isPermitted(principals, permission)) {
                return true;
            }
        }
        return false;
    }
该方法解析了我们配置的Realm信息,然后逐一进行匹配,只要有一个匹配通过则验证通过,其中realm的isPermitted()方法的具体实现是由AuthorzingRealm负责的:
public boolean isPermitted(PrincipalCollection principals, Permission permission) {
        AuthorizationInfo info = getAuthorizationInfo(principals);
        return isPermitted(permission, info);
    }
该方法是经过多层同名方法代理后进行调用的,首先获取权限认证信息:
 protected AuthorizationInfo getAuthorizationInfo(PrincipalCollection principals) {

        if (principals == null) {
            return null;
        }

        AuthorizationInfo info = null;

        if (log.isTraceEnabled()) {
            log.trace("Retrieving AuthorizationInfo for principals [" + principals + "]");
        }

        Cache<Object, AuthorizationInfo> cache = getAvailableAuthorizationCache();
        if (cache != null) {
            if (log.isTraceEnabled()) {
                log.trace("Attempting to retrieve the AuthorizationInfo from cache.");
            }
            Object key = getAuthorizationCacheKey(principals);
            info = cache.get(key);
            if (log.isTraceEnabled()) {
                if (info == null) {
                    log.trace("No AuthorizationInfo found in cache for principals [" + principals + "]");
                } else {
                    log.trace("AuthorizationInfo found in cache for principals [" + principals + "]");
                }
            }
        }


        if (info == null) {
            // Call template method if the info was not found in a cache
            info = doGetAuthorizationInfo(principals);
            // If the info is not null and the cache has been created, then cache the authorization info.
            if (info != null && cache != null) {
                if (log.isTraceEnabled()) {
                    log.trace("Caching authorization info for principals: [" + principals + "].");
                }
                Object key = getAuthorizationCacheKey(principals);
                cache.put(key, info);
            }
        }

        return info;
    }
第一步是从缓存中获取,如果获取失败,则调用我们重写的doGetAuthorizationInfo()方法进行获取,获取到之后返回给isPermitted()方法进行判断:
 private boolean isPermitted(Permission permission, AuthorizationInfo info) {
        Collection<Permission> perms = getPermissions(info);
        if (perms != null && !perms.isEmpty()) {
            for (Permission perm : perms) {
                if (perm.implies(permission)) {
                    return true;
                }
            }
        }
        return false;
    }
该方法会首先取出权限认证信息中的权限信息,然后对权限信息进行遍历,看是否包含我们需要认证的权限,如果包含关系成立,则返回成功,否则返回失败。
以上便是Shrio的身份认证以及权限认证的简要调用顺序,当然,其中还要其他的调用顺序,这里只是介绍了一种,有兴趣的朋友可以自行查看源码,这里就不做过多介绍了,最后十分感谢各位的支持,鉴于本人能力有限,若有错误请多多包涵,也请多多指教。


 6701
6701

 被折叠的 条评论
为什么被折叠?
被折叠的 条评论
为什么被折叠?
 到【灌水乐园】发言


