


 提出了一种基于实例分割的场景文字检测新方法PixelLink,它简化了文本检测流程,通过像素链接实现文本实例分割,无需位置回归即可直接提取边界框。
PixelLink: Detecting Scene Text via Instance Segmentation
一篇通过实例分割(没有用回归哦)的场景文字检测论文,发表于AAAI(2018)
github项目源码地址:
https://github.com/ZJULearning/pixel_link
看完论文后觉得本方法的重点是将文本检测问题进行简化,而不是像很多文本检测方法使用普通物体检测的思路,即文本/非文本分类(text/nontext classification)和位置回归(location regression)。该篇论文提出了直接通过实例分割进行文本/非文本的分类和边界框抽取的方法模型:PixelLink
重点:
1、使用Instance Segmentation的思路(利用了二分类+每个像素点与周围8个顶点的link分类
2、边界框不需要通过回归进行预测,直接通过positive pixel组成的Connected Components (CC)通过类似minAreaRect的方法OpenCV实现
3、利用图像处理的方法进行后处理,不需要NMS,具体什么方法在后面会写到滴,比较简单
方法概述
本文的方法采用实例分割的思路,预测text/non-text和pixel-lin的关系,再使用简单的图像处理方式进行后处理(post-Filtering)进行滤波去除噪声。

3.1 Network Architecture(paper)
与大多数物体检测特征提取方法相同,本文使用的是VGG-16作为特征提取模型,对提取的特征图进行不同CONV层上的11卷积,用作后面反卷积进行(类似FCN结构),整个模型有两个独立的“头部”,一个是text/non-text prediction,另一个是link prediction,两者都使用SoftMax,所以输出是12+82=18通道的。text/non-text占两个通道,后面的8指像素点相邻的其余8个link pixel。
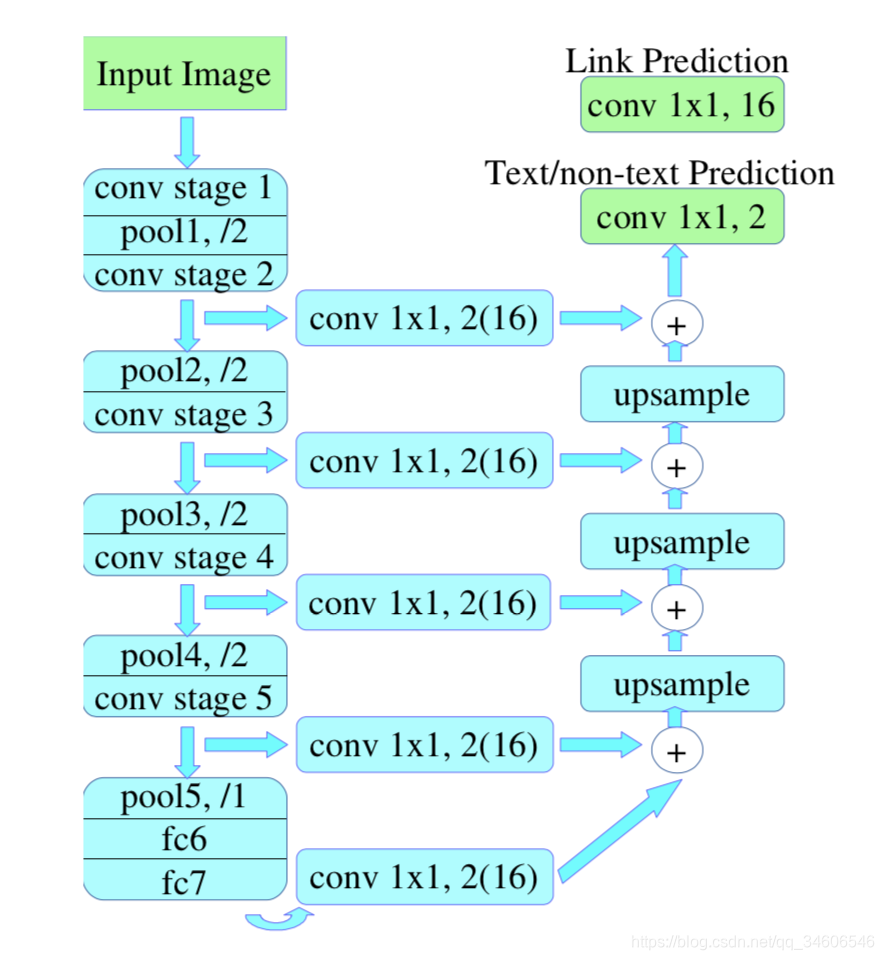
文章还指出,根据conv11在不同的conv stage上链接,分为两类模型:PixelLink+VGG16 2s, and PixelLink+VGG16 4s(Two settings of feature fusion layers are implemented: {conv2 2, conv3 3, conv4 3, conv5 3, fc 7}, and {conv3 3, conv4 3, conv5 3, fc 7}, denoted as PixelLink+VGG16 2s, and PixelLink+VGG16 4s, respectively.),PixelLink+VGG16 2s模型的预测尺度是PixelLink+VGG16 4s的二倍,所以需要更多的计算但是同时具有更好的效果。
3.2 Linking Pixels Together(paper)
从网络模型输出后(图1的CNN),会得到pixels和links的预测,positive pixels组成了Connected Components (CC),每一个CC表示一个检测实例,至此,实例分割结束。link的规则(given two neighboring positive pixels, their link are predicted by both of them, and they should be connected when one or both of the two link predictions are positive.)1、两个像素都是positive --> link是positive的;2、一个是text,另一个是non-text --> link是positive的; 3、两个都是non-text时 --> link是nagative的。文章还表示,这种link的处理可以使用disjoint-set的数据结构,这是一种什么样的数据结构还需要我下来再继续学习,不过这里不清楚无伤大雅了,可以继续往下看。
3.3 Extraction of Bounding Boxes
边界框提取前面提到过,是采用OpenCV种类似minAreaRect(直译过来是最小面积矩形)的方法进行边界框提取的,这一步也是本方法与其他主要方法的不同之处,即边界框直接通过实例分割得到,而不是通过基于位置回归的方式。
3.4 Post Filtering after Segmentation
为了去除噪声的干扰,添加了这个后滤波部分,其实也就是后处理,这里的方法比较直观,作者举了一个例子,他们在IC15数据集的实验中去除了短边小于10,和面积小于300的检测框。
第四章主要讲的是该方法的细节部分,包括ground truth计算,loss设计和数据增强。
4.1 Ground Truth Calculation
pixels:文本框内的像素点被标记为positive,如果存在重叠区域,则重叠区域像素点为negative。
links:给定pixel和8个临域点其中之一,两者都在实例内则他们之间的link是positive的,否则是negative。
Ground Truth计算是在resize到与预测层图像相同尺寸的输入图像上进行的。
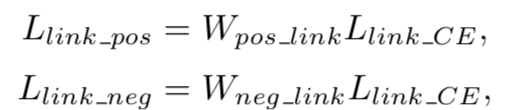
4.2 Loss Function

整体损失函数由pixel loss和link loss组成,因为link loss只在positive pixel上进行计算,所以pixel loss的分类损失赋予了更高的权重,本文所有实验中λ 都设置为2.0
Loss on Pixels
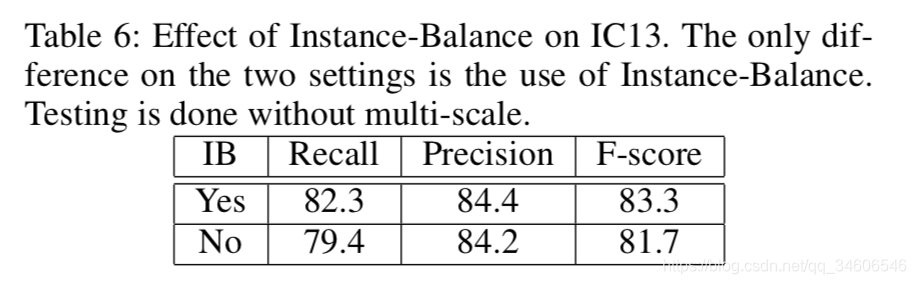
针对小面积文本实例与大面积实例使用相同的损失权重,对小面积的instance而言有点不太公平,所以为了能够更好的对小面积instance进行分割,本文提出了Instance-Balanced Cross-Entropy Loss(实例平衡交叉熵损失)。

第i个instance,他的权重为wi = Bi / Si,Si是该instance的面积,Bi=S/N,都是相同的,是指全部面积/实例个数,即平均每个实例的面积。
像素分类损失为:

其中Lpixel_ce是文本/非文本预测的交叉熵损失矩阵,r是negative-positive数量比,所以(1+r)*S就是整幅图的面积。
Loss on Links
positive links和negative links的loss是独立计算的,对于pixel(i,j)的第k个临域有

W是公式3中的W,由此有
Link_ce是预测link时的交叉熵损失矩阵,最后的link loss为:

rsum是将一个tensor内全部元素求和,得到一个标量。
4.3 Data Augmentation
百分之二十的图像进行了旋转的增强,旋转角度分别为0, π/2, π, or 3π/2(是否意味着其余旋转角度的文本检测效果会不是那么好呢),0.1-1范围的随机裁剪,所有图像统一resize成512*512。数据增强后,这里好像有一个预处理的滤除噪声的操作,与后处理类似,去掉了短边小于10的文本实例,小于百分之二十的也被去掉,这些忽略掉的实例,在loss计算的时候其权重始终为0。
第五部分就是实验部分了
***PixelLink models are optimized by SGD with momentum = 0.9 and weight decay = 5 × 10⁻⁴. Instead of fine-tuning from an ImageNet-pretrained model, the VGG net is ran- domly initialized via the xavier method (Glorot and Bengio 2010). Learning rate is set to 10−3 for the first 100 iterations, and fixed at 10−2 for the rest.***训练过程这里只提到了随机梯度下降,动量0.9,权重衰减0.0005,并且这里没有用fine-tuning预训练好的vgg,二十通过Xavier初始化方法,随机初始化了vgg的权重。学习率设置为0.001在前100次迭代?(100?),后续训练使用固定的学习率0.01(这里也有点疑问,为什么学习率还提高了10倍?)
下面是实验结果对比,直接上图了:
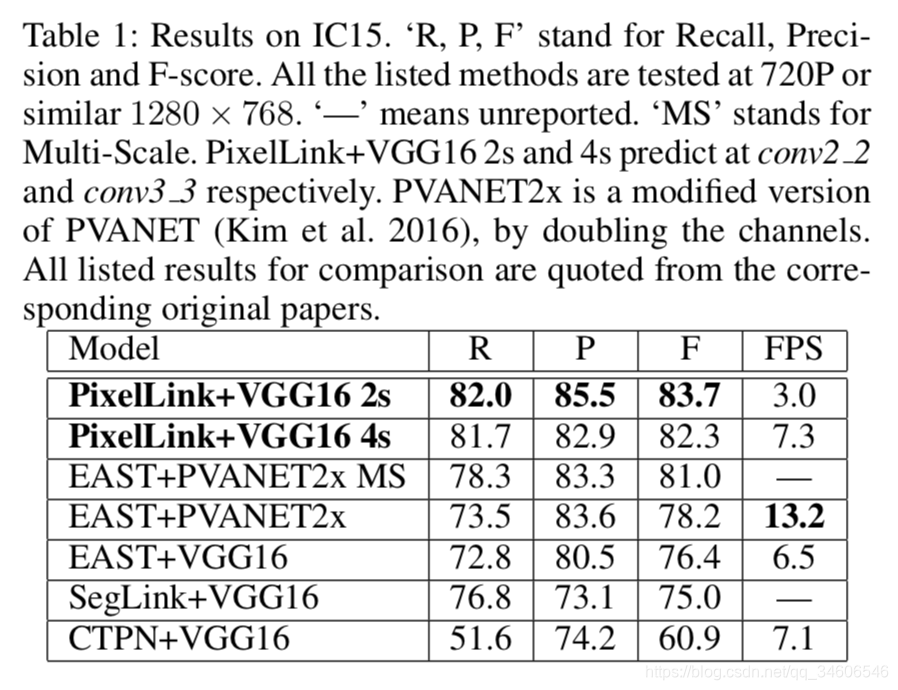
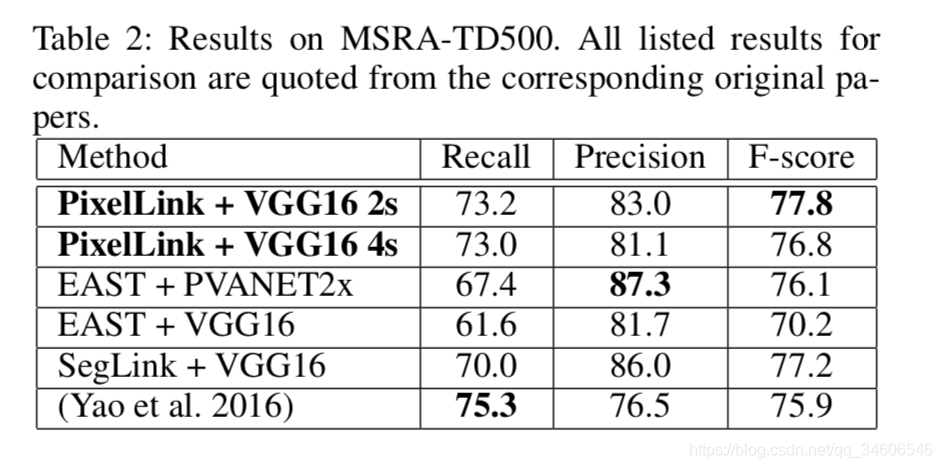
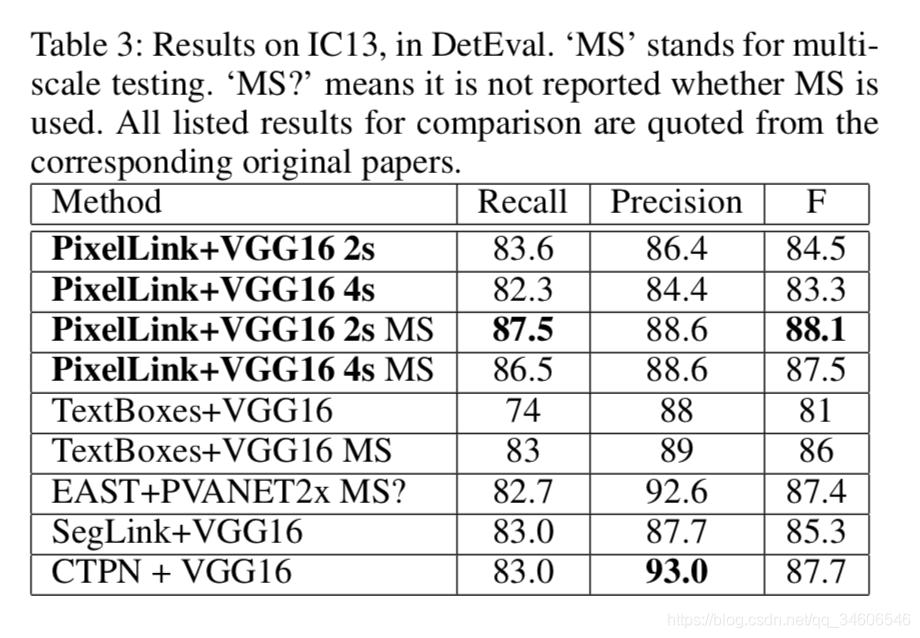
对比指标:Recall、Precision、F-score(应该是F1)还有帧率。
第六章很重要,至少我觉的是非常重要滴,作者在这一章指引读者进行了一些思考和讨论。
6.1 The Advantages of PixelLink
数据对比得出本文的PixelLink方法,即使trained from scratch,训练25K次迭代即可达到EAST和SegLink相同的标准,25K差不多是EAST和SegLink训练次数的一半。作者启发了一个问题, why PixelLink can achieve a bet- ter performance with many fewer training iterations and less training data?
Requirement on receptive fields
对比了EAST和SegLink,大致意思是模型分割text时需要的内容越少,效果越好。EAST为了找出任何长度的文本需要获取整幅图像,而SegLink只需要预测文本片段(奥坎姆剃刀定律)。
Difficulty of tasks
相比于分类加回归的方法,PixelLink只需要知道像素本身和其临域在特征图上的状态,所以pixelLink具有更小的Requirement on receptive fields 和 difficulty of tasks。作者还发人深省的提到,文本检测较于一般物体检测,是一个较为简单的任务,因为需要的是大量的低级纹理特征和小量的高层分隔特征。(text detection is much simpler than general object detection. Text detection may rely more on low-level texture feature and less on high- level semantic feature.)
6.2 Model Analysis
1、link是很关键滴,将link的阈值设置为0,导致精度和召回率巨幅下降,作者解释因为link是语义分隔到实例分割的关键。
2、还记得loss那里(4.2)为了权衡大面积与小面积实例的问题,作者提出了**Instance-Balanced Cross-Entropy Loss***,实验对比了有无IB的效果:
3、图像尺寸对实验效果影响也很明显,换成384384的图像训练,精度和召回率都有明显的下降。(This phenomenon is in
accordance with SSD.)为什么是因为SSD呢?图像小,细节少,难以学习到特征吗?
4、后处理也很关键,取消Post-filtering,recall略微上升(当然拉,Post-filtering删掉了一些经验认为是噪声的instance,取消Post-filtering召回率会上升,即查全率上升),可是随之而来的是精确度的大幅下降。
5、高分辨率的图像预测更加精准,但是更加耗时。
最后贴出原文conclusion部分:
7 Conclusion and Future Work
PixelLink, a novel text detection algorithm is proposed in this paper. The detection task is achieved through instance segmentation by linking pixels within the same text instance together. Bounding boxes of detected text are directly ex- tracted from the segmentation result, without performing lo- cation regression. Since smaller receptive fields are required and easier tasks are to be learned, PixelLink can be trained from scratch with less data in fewer iterations, while achiev- ing on par or better performance on several benchmarks than state-of-the-art methods based on location regression.
VGG16 is chosen as the backbone for convenient compar- isons in the paper. Some other deep models will be investi- gated for better performance and higher speed.
Different from current prevalent instance segmentation methods (Li et al. 2016) (He et al. 2017a), PixelLink does not rely its segmentation result on detection performance. Applications of PixelLink will be explored on some other tasks that require instance segmentation.
写在后面:
最近准备研究自然场景文字识别的内容,本文全部纯手码,是自己阅读后的一点总结,未来会不断整理该方向的论文,希望能帮助读者有所收获。更重要的是这里的总结内容是自己拙见,必定有错误或者不准确的理解,希望大家能够批评指正,也祝愿大家都更加博学,哈哈哈…


 3110
3110

 被折叠的 条评论
为什么被折叠?
被折叠的 条评论
为什么被折叠?
 到【灌水乐园】发言


