


前两天看到了前端的Web Components学习了一下。组件是前端的发展方向。而Web Components是浏览器的原生组件。相比第三方框架,其简单直接,不用加载任何外部模块,代码量小。现在其还在不断发展,但已经可用于生产环境。
Web Components 包含的内容很多,我只是做了一个简单的弹框案例。其他的功能则需要你自己去学习、去扩展了。
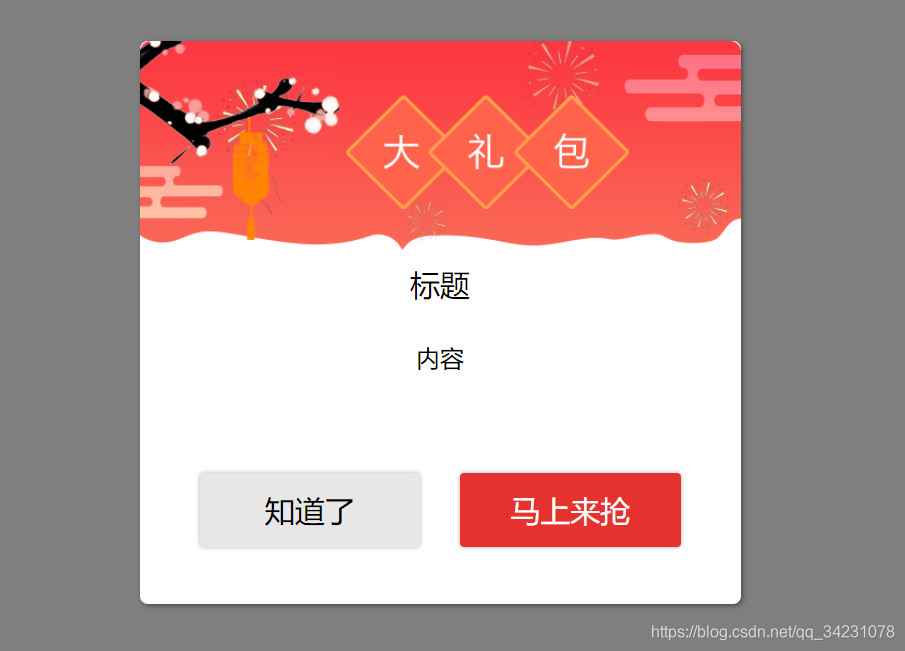
1、静态弹框(以前的写法)
<!DOCTYPE html>
<html lang="en">
<head>
    <meta charset="UTF-8">
    <title>Title</title>
    <style>
        body {
            margin: 0;
        }
        .dialog_box {
            width: 521px;
            height: 563px;
            border-radius: 8px;
            box-shadow: 2px 2px 5px 0 rgba(0, 0, 0, 0.4);
            background-color: #fff;
            position: absolute;
            padding: 0 40px;
            top: 0;
            left: 0;
            right: 0;
            bottom: 0;
            margin: auto;
        }
        .dialog_box.bg1 {
            background-image: url("img/bg_03.png");
            background-repeat: no-repeat;
            background-size: 100%;
        }

        .dialog_box.bg2 {
            background-image: url("img/bg_06.png");
            background-repeat: no-repeat;
            background-size: 100%;
        }
        .dialog_header {
            height: 215px;
        }
        .dialog_title {
            height: 57px;
            font-size: 30px;
            text-align: center;
            line-height: 57px;
        }
        .dialog_content {
            height: 130px;
            text-align: center;
            font-size: 24px;
            line-height: 29px;
            padding: 30px 52px 0;
        }

        .btn_line {
            height: 110px;
            display: flex;
            justify-content: center;
        }
        .btn {
            width: 221px;
            height: 74px;
            border-radius: 4px;
            box-shadow: 0 0 5px 0 rgba(0, 0, 0, 0.3);
            font-size: 30px;
            line-height: 74px;
            text-align: center;
            cursor: pointer;
            margin: 0 20px;
        }
        .btn.cancel {
            background: #e7e7e7;
        }
        .btn.confirm {
            background: #e5322e;
            color: #fff;
        }
        .mask {
            background: rgba(0, 0, 0, 0.5);
            position: fixed;
            top: 0;
            left: 0;
            right: 0;
            bottom: 0;
        }
    </style>
</head>
<body>
    <div class="mask"></div>
    <div class="dialog_box bg2">
        <div class="dialog_header"></div>
        <div class="dialog_title">标题</div>
        <div class="dialog_content">内容</div>
        <div class="btn_line">
            <div class="btn cancel">知道了</div>
            <div class="btn confirm">马上来抢</div>
        </div>
    </div>
</body>
</html>
效果:
二、利用Web Components
主要是利用DOM HTMLElement对象和windows属性customElements来实现。
<my-com></my-com>
<script type="module">
    class myCom extends HTMLElement{
        constructor(){
            super();
            this.render();  //初始化弹框
        }
        render(){
            this.obj = document.createElement('div');
            this.obj.innerHTML = `
             <div class="mask"></div>
            <div class="dialog_box bg2">
                <div class="dialog_header"></div>
                <div class="dialog_title">标题</div>
                <div class="dialog_content">内容</div>
                <div class="btn_line">
                    <div class="btn cancel">知道了</div>
                    <div class="btn confirm">马上来抢</div>
                </div>
            </div>
            `
            this.append(this.obj);
        }
    }
    customElements.define('my-com',myCom)
</script>
三、添加组件属性,修改弹框内容
给my-com组件添加title和content属性,在再js中修改获取到属性值,更改相应的数据。
<my-com  title='这里是自定义的标题' content='这里是我们自定义的内容'></my-com>
constructor(){
  super();
  let attr = this.attributes;
   this._data = {
       title:attr.title?attr.title.value:'默认标题',
       content:attr.content?attr.content.value:'默认内容'
   }
   this.render();  //初始化弹框
}
render(){
   this.obj = document.createElement('div');
   this.obj.innerHTML = `
    <div class="mask"></div>
   <div class="dialog_box bg2">
       <div class="dialog_header"></div>
       <div class="dialog_title">${this._data.title}</div>
       <div class="dialog_content">${this._data.content}</div>
       <div class="btn_line">
           <div class="btn cancel">知道了</div>
           <div class="btn confirm">马上来抢</div>
       </div>
   </div>
   `
   this.append(this.obj);
}
四、添加事件
先新写一个事件构造函数。在利用弹框相应的元素上添加data-[事件名]的属性。
点击相应的元素,会触发响应。
class popEvent {
 constructor(option) {
     /*
      * 接收四个参数:
      * 1,对象的this
      * 2,要监听的元素, 不传则为对象this
      * 3,要监听的事件,默认监听点击事件
      * 4,是否冒泡, 默认冒泡
      * */
     this.eventObj = option.obj;
     console.log(this.eventObj.__proto__['hide'])
     this.target = option.target || this.eventObj;
     this.eventType = option.eventType || 'click';
     this.popup = option.popup || true;
     this.bindEvent();
 }
 bindEvent() {
     let _this = this;
     _this.target.addEventListener(_this.eventType, function (ev) {
         let target = ev.target;
         let dataset, parent, num, b;
         popup(target);

         function popup(obj) {
             if (obj === document) {
                 return false;
             }
             dataset = obj.dataset;
             num = Object.keys(dataset).length;
             parent = obj.parentNode;
             if (num < 1) {
                 popup(parent);
                 num = 0;
             } else {
                 for (b in dataset) {
                     console.log(b);
                     if (_this.eventObj.__proto__[b]) {
                         _this.eventObj.__proto__[b].call(_this.eventObj, {
                             obj: obj,
                             ev: ev,
                             target: dataset[b],
                             data: _this.eventObj
                         });
                     }
                 }
                 _this.popup && popup(parent);
             }
         }
     })
 }


 constructor(){
  super();
    let attr = this.attributes;
    this._data = {
        title:attr.title?attr.title.value:'默认标题',
        content:attr.content?attr.content.value:'默认内容'
    }
    this.render();  //初始化弹框
    this.event = new popEvent({
        obj: this
    });
}
hide(){
    console.log("点击了hide")
    this.obj.style.display = 'none';
}
cancle(){
    console.log("点击了concle")
}
confirm(){
    console.log("点击了confirm")
}
render(){
 this.obj = document.createElement('div');
    this.obj.innerHTML = `
     <div class="mask"  data-hide='true'></div>
    <div class="dialog_box bg2">
        <div class="dialog_header"></div>
        <div class="dialog_title">${this._data.title}</div>
        <div class="dialog_content">${this._data.content}</div>
        <div class="btn_line">
            <div class="btn cancel"  data-hide='true' data-cancel='true'>知道了</div>
            <div class="btn confirm" data-confirm='true'>马上来抢</div>
        </div>
    </div>
    `
    this.append(this.obj);
}
创建img标签时注意因素
在img标签上添加is属性,利用HTMLImageElement 对象和customElements来实现。
    <img is="my-img" src="" alt="">
    <script>
        class myIMG extends HTMLImageElement {
            constructor() {
                super();
                setTimeout(() => {
                    this.src =
                        'https://hbimg.huabanimg.com/67bcf019c3aba12abc19624e1afe3418a03fb2021cf00-iDEjac_fw658/format/webp';
                }, 2000);
            }
        }
        customElements.define('my-img', myIMG, {
            extends: 'img'
        });
    </script>
欢迎关注公众号(web学习吧),一起学习进步:


 367
367

 被折叠的 条评论
为什么被折叠?
被折叠的 条评论
为什么被折叠?
 到【灌水乐园】发言


