


简介
这篇文章是在生产环境遇到的问题实现的解决方案。
在使用GateWay网关做路由转发时,要转发的服务启动过后,网关总是不能及时去感知上线或下线的服务,导致服务会有一小段空白期不可访问。
针对这个问题,本人通过了解了Ribbon的执行过程,在网关层最终最大程度上解决了这个问题。
用到的组件:
注册中心:Nacos 1.4.1。
网关:Spring Cloud Gateway 2.2.5.RELEASE。
版本别整错了!
解决办法: 基于Nacos事件推送立即刷新客户端服务列表。
1.开始
先简单分析一下ribbon的配置类:
- RibbonClientConfiguration:默认的配置
- NacosRibbonClientConfiguration:Nacos定制化的配置
RibbonClientConfiguration:
public class RibbonClientConfiguration {

	@RibbonClientName
	private String name = "client";

	// 自定义文件配置的时候,配置读取工厂类
	@Autowired
	private PropertiesFactory propertiesFactory;

	@Bean
	@ConditionalOnMissingBean
	public IClientConfig ribbonClientConfig() {
		// IClientConfig 就代表每个 Ribbon Client ,也就是每个微服务
		DefaultClientConfigImpl config = new DefaultClientConfigImpl();
		config.loadProperties(this.name);
		config.set(CommonClientConfigKey.ConnectTimeout, DEFAULT_CONNECT_TIMEOUT);
		config.set(CommonClientConfigKey.ReadTimeout, DEFAULT_READ_TIMEOUT);
		config.set(CommonClientConfigKey.GZipPayload, DEFAULT_GZIP_PAYLOAD);
		return config;
	}

	// 这个就是负载均衡规则
	@Bean
	@ConditionalOnMissingBean
	public IRule ribbonRule(IClientConfig config) {
		if (this.propertiesFactory.isSet(IRule.class, name)) {
			return this.propertiesFactory.get(IRule.class, config, name);
		}
		ZoneAvoidanceRule rule = new ZoneAvoidanceRule();
		rule.initWithNiwsConfig(config);
		return rule;
	}

	@Bean
	@ConditionalOnMissingBean
	public IPing ribbonPing(IClientConfig config) {
		if (this.propertiesFactory.isSet(IPing.class, name)) {
			return this.propertiesFactory.get(IPing.class, config, name);
		}
		return new DummyPing();
	}

	// ribbon 服务拉取的地方
	@Bean
	@ConditionalOnMissingBean
	@SuppressWarnings("unchecked")
	public ServerList<Server> ribbonServerList(IClientConfig config) {
		if (this.propertiesFactory.isSet(ServerList.class, name)) {
			return this.propertiesFactory.get(ServerList.class, config, name);
		}
		ConfigurationBasedServerList serverList = new ConfigurationBasedServerList();
		serverList.initWithNiwsConfig(config);
		return serverList;
	}

	// 重要:内部维护了一个线程,定时去拉取服务列表
	@Bean
	@ConditionalOnMissingBean
	public ServerListUpdater ribbonServerListUpdater(IClientConfig config) {
		return new PollingServerListUpdater(config);
	}

	// 重要:把上面的所有类都传了进来
	@Bean
	@ConditionalOnMissingBean
	public ILoadBalancer ribbonLoadBalancer(IClientConfig config,
			ServerList<Server> serverList, ServerListFilter<Server> serverListFilter,
			IRule rule, IPing ping, ServerListUpdater serverListUpdater) {
		if (this.propertiesFactory.isSet(ILoadBalancer.class, name)) {
			return this.propertiesFactory.get(ILoadBalancer.class, config, name);
		}
		return new ZoneAwareLoadBalancer<>(config, rule, ping, serverList,
				serverListFilter, serverListUpdater);
	}

	@Bean
	@ConditionalOnMissingBean
	@SuppressWarnings("unchecked")
	public ServerListFilter<Server> ribbonServerListFilter(IClientConfig config) {
		if (this.propertiesFactory.isSet(ServerListFilter.class, name)) {
			return this.propertiesFactory.get(ServerListFilter.class, config, name);
		}
		ZonePreferenceServerListFilter filter = new ZonePreferenceServerListFilter();
		filter.initWithNiwsConfig(config);
		return filter;
	}
}
这个是Ribbon提供的默认实现。
NacosRibbonClientConfiguration:
public class NacosRibbonClientConfiguration {

	@Autowired
	private PropertiesFactory propertiesFactory;

	// Nacos 定制了 ServerList,从nacos里面拉取。
	@Bean
	@ConditionalOnMissingBean
	public ServerList<?> ribbonServerList(IClientConfig config,
			NacosDiscoveryProperties nacosDiscoveryProperties) {
		if (this.propertiesFactory.isSet(ServerList.class, config.getClientName())) {
			ServerList serverList = this.propertiesFactory.get(ServerList.class, config,
					config.getClientName());
			return serverList;
		}
		NacosServerList serverList = new NacosServerList(nacosDiscoveryProperties);
		serverList.initWithNiwsConfig(config);
		return serverList;
	}

}
nacos 定制了其中的一些组件。
我们简要对Nacos 定制的 ServerList 做简单的分析:
public class NacosServerList extends AbstractServerList<NacosServer> {

	private String serviceId;

	@Override
	public List<NacosServer> getInitialListOfServers() {
		return getServers();
	}

	@Override
	public List<NacosServer> getUpdatedListOfServers() {
		return getServers();
	}

	private List<NacosServer> getServers() {
		String group = discoveryProperties.getGroup();
		// 核心就这一句,向Nacos Server 端发送Http请求,获取要拉取的服务实例信息
		List<Instance> instances = discoveryProperties.namingServiceInstance()
				.selectInstances(serviceId, group, true);
		return instancesToServerList(instances);
	}

	@Override
	public void initWithNiwsConfig(IClientConfig iClientConfig) {
		this.serviceId = iClientConfig.getClientName();
	}
}
很简单,感兴趣的可以自己接着点进去看看。
我们在看和这个ServerList有关的其他组件:
- ServerListUpdater:Ribbon提供的client的默认配置,默认实现是PollingServerListUpdater,见明知意,负责ServerList的更新。
简要分析一下 ServerListUpdater :
最核心的就是 这个 start 方法,启动了一个定时任务 执行 updateAction.doUpdate()。
@Override
  public synchronized void start(final UpdateAction updateAction) {
      if (isActive.compareAndSet(false, true)) {
          final Runnable wrapperRunnable = new Runnable() {
              @Override
              public void run() {
                  if (!isActive.get()) {
                      if (scheduledFuture != null) {
                          scheduledFuture.cancel(true);
                      }
                      return;
                  }
                  try {
                      updateAction.doUpdate();
                      lastUpdated = System.currentTimeMillis();
                  } catch (Exception e) {
                      logger.warn("Failed one update cycle", e);
                  }
              }
          };

          scheduledFuture = getRefreshExecutor().scheduleWithFixedDelay(
                  wrapperRunnable,
                  initialDelayMs,
                  refreshIntervalMs,
                  TimeUnit.MILLISECONDS
          );
      } else {
          logger.info("Already active, no-op");
      }
  }
start() 方法何时被调用的,以及 updateAction 是什么,这里就要用到另外的一个Ribbon核心组件:LoadBalancer,其默认实现是:ZoneAwareLoadBalancer。
简要分析一下这个核心类:

可以明确的是这是个实现负载均衡的类,代码很多,这里只分析核心的部分:
 public ZoneAwareLoadBalancer(IClientConfig clientConfig, IRule rule,
                              IPing ping, ServerList<T> serverList, ServerListFilter<T> filter,
                              ServerListUpdater serverListUpdater) {
     super(clientConfig, rule, ping, serverList, filter, serverListUpdater);
 }

public DynamicServerListLoadBalancer(IClientConfig clientConfig, IRule rule, IPing ping,ServerList<T> serverList, ServerListFilter<T> filter,ServerListUpdater serverListUpdater) {
     super(clientConfig, rule, ping);
     this.serverListImpl = serverList;
     this.filter = filter;
     this.serverListUpdater = serverListUpdater;
     if (filter instanceof AbstractServerListFilter) {
         ((AbstractServerListFilter) filter).setLoadBalancerStats(getLoadBalancerStats());
     }
     // 这一步
     restOfInit(clientConfig);
 }

void restOfInit(IClientConfig clientConfig) {
    boolean primeConnection = this.isEnablePrimingConnections();
    this.setEnablePrimingConnections(false);
    // 这一步 调用 上面提到的 ServerListUpdater 的 start()方法
    enableAndInitLearnNewServersFeature();
    // 立即拉取服务
    updateListOfServers();
}

// updateAction 是个内部定义的字段,内部类的方式
protected final ServerListUpdater.UpdateAction updateAction = new ServerListUpdater.UpdateAction() {
        @Override
        public void doUpdate() {
            // 内部调用了updateListOfServers()
            updateListOfServers();
        }
    };

public void enableAndInitLearnNewServersFeature() {
    LOGGER.info("Using serverListUpdater {}", serverListUpdater.getClass().getSimpleName());
    // start()
    serverListUpdater.start(updateAction);
}

/*
 * 上面的地方都调用了这个方法,
 * 这个方法就是 拉取服务
 */
 @VisibleForTesting
 public void updateListOfServers() {
     List<T> servers = new ArrayList<T>();
     if (serverListImpl != null) {
     	 // serverListImpl 就是 Nacos 实现的 ServerList
         servers = serverListImpl.getUpdatedListOfServers();
         if (filter != null) {
             servers = filter.getFilteredListOfServers(servers);
         }
     }
     // 更新内部的实例列表
     updateAllServerList(servers);
 }
上面就是实现了Ribbon对服务实例更新的分析。
接下来,我们再来看一个比较核心且重要的类:SpringClientFactory。
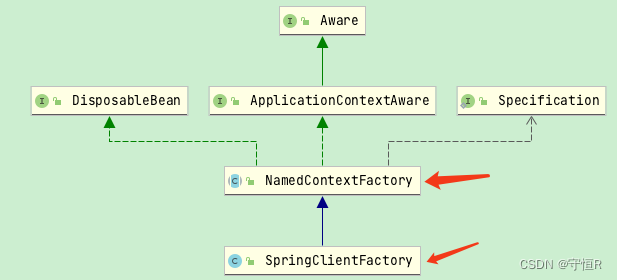
这个类里面有几个核心的方法:
- public <C extends IClient<?, ?>> C getClient(String name, Class clientClass);
- public ILoadBalancer getLoadBalancer(String name)
- public IClientConfig getClientConfig(String name)
它们的第一个参数都是name,name是什么呢?name其实就是注册在nacos中的服务名。
我们选择一个比较重要的分析:
public ILoadBalancer getLoadBalancer(String name) {
	return getInstance(name, ILoadBalancer.class);
}

@Override
public <C> C getInstance(String name, Class<C> type) {
	// 父类的 super.getInstance()
	C instance = super.getInstance(name, type);
	if (instance != null) {
		return instance;
	}
	IClientConfig config = getInstance(name, IClientConfig.class);
	return instantiateWithConfig(getContext(name), type, config);
}


public <T> T getInstance(String name, Class<T> type) {
	// 通过name 获得一个Spring容器,对你没看错就是获取一个Spring容器
	AnnotationConfigApplicationContext context = getContext(name);
	if (BeanFactoryUtils.beanNamesForTypeIncludingAncestors(context,
			type).length > 0) {
			// 从容器里面get出这个实现类
		return context.getBean(type);
	}
	return null;
}

protected AnnotationConfigApplicationContext getContext(String name) {
	// this.contexts 是个map结构
	if (!this.contexts.containsKey(name)) {
		synchronized (this.contexts) {
			if (!this.contexts.containsKey(name)) {
				// 获取不到这个spring容器就直接创建
				this.contexts.put(name, createContext(name));
			}
		}
	}
	return this.contexts.get(name);
}

/*
* 比较重要的就是这个方法了
*/
protected AnnotationConfigApplicationContext createContext(String name) {
   // 手动创建一个容器
	AnnotationConfigApplicationContext context = new AnnotationConfigApplicationContext();
	if (this.configurations.containsKey(name)) {
		for (Class<?> configuration : this.configurations.get(name)
				.getConfiguration()) {
			context.register(configuration);
		}
	}
	// 这个地方会注入进来两个配置类,就是上面说到的配置类
	// - RibbonClientConfiguration, NacosRibbonClientConfiguration
	for (Map.Entry<String, C> entry : this.configurations.entrySet()) {
		if (entry.getKey().startsWith("default.")) {
			for (Class<?> configuration : entry.getValue().getConfiguration()) {
				context.register(configuration);
			}
		}
	}
	// 注入一些必要的组件类
	context.register(PropertyPlaceholderAutoConfiguration.class,
			this.defaultConfigType);
	context.getEnvironment().getPropertySources().addFirst(new MapPropertySource(
			this.propertySourceName,
			Collections.<String, Object>singletonMap(this.propertyName, name)));
	if (this.parent != null) {
		// Uses Environment from parent as well as beans
		// 设置父容器为当前项目启动的主容器
		context.setParent(this.parent);
		// jdk11 issue
		// https://github.com/spring-cloud/spring-cloud-netflix/issues/3101
		context.setClassLoader(this.parent.getClassLoader());
	}
	context.setDisplayName(generateDisplayName(name));
	// 刷新容器
	context.refresh();
	return context;
}
上面这段代码算是最核心的部分了:
- ribbon会为每个服务单独创建一个容器,容器里面注入了这个ribbon client必要的组件。
SpringClientFactory是在我们项目启动的主容器全局注入的,是单例的, 我们能够直接获取到的。
我们下面的事件感知过后的服务刷新也是利用了这个特性,这点非常重要。
了解完了上面的部分内容,才会能看懂下面链接中代码的意思,代码我直接放到gitee上,下面给出仓库地址链接:
https://gitee.com/shouhengR/ribbon-watch.git
码字不易,代码中也都写了注释,不懂的可以给我留言,最后,感谢岁月,感谢青春!


 2089
2089

 被折叠的 条评论
为什么被折叠?
被折叠的 条评论
为什么被折叠?
 到【灌水乐园】发言


