


前言
在看这篇文章之前请至少了解一下组件的作用和基本操作,在文章的最后会附上简单的demo,其中不提供Nacos-Server请自行搭建,搭建步骤参照官方文档,花一点时间很快就能上手。
版本
| 依赖 | 版本 |
|---|---|
| Spring Boot | 2.1.2.RELEASE |
| Spring Cloud | Greenwich.RELEASE |
| Spring Cloud Alibaba | 0.2.1.RELEASE |
| Sentinel | 1.5.1(Nacos-client-0.8.0) |
| Nacos-Client | 1.0.0-RC2 |
| Nacos-Server | 1.0.0-RC2 |
目标
本文章的最终目标是实现Nacos作为Sentinel数据源对Zuul限流,因此其他诸如降级、热点等不在本文章范畴内。
过程
Sentinel
- 直接去官方Github上下载1.5.1的源码,导入到idea中
- 直接使用官方提供的几个类
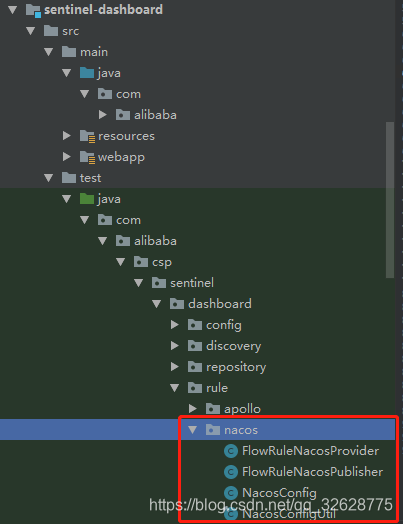
在我提供的demo中这几个类的位置如下
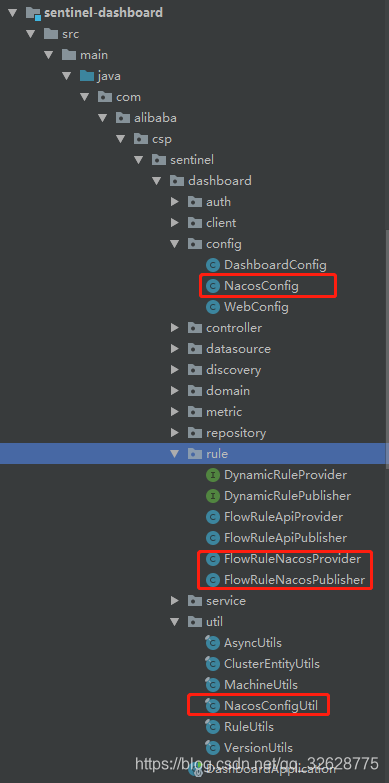
- 修改
NacosConfigUtil的GROUP_ID为你Nacos中对应网关的GROUPID
public static final String GROUP_ID = “sentinel-nacos”;
修改NacosConfig
@Bean
public ConfigService nacosConfigService() throws Exception {
//这里是你NacosServer的ip地址
return ConfigFactory.createConfigService(“localhost”);
}
- 通过拦截
Sentinel Dashboard请求定位到请求都是指向com.alibaba.csp.sentinel.dashboard.controller.FlowControllerV1而其中的规则实现是在内存中进行的,不过在com.alibaba.csp.sentinel.dashboard.controller.v2.FlowControllerV2类中可以找到动态数据源的实现,逻辑基本一样,这两个类的接口分别作用于resources/app/views/flow_v1.html和resources/app/views/flow_v2.html不过官方目前注释了flow_v2的跳转,根据注释v2应该是做集群配置的。 - 有能力和时间的小伙伴可以通过修改前端页面的方式来保证内存和动态数据源的共存,这里就直接暴力替换了,将V2中各接口的实现代码替换到V1(注意不要修改请求路径),并重新指定
ruleProvider和rulePublisher,代码如下:

- 启动DashboardApplication
Nacos-Server
下载官方jar包,以单机模式运行,然后请求nacos/v1/ns/operator/switches?entry=serverMode&value=AP接口修改服务注册为AP模式。
Zuul
- 新建一个SpringCloud项目,里面包括一个Zuul和一个Server,其中zuul的核心配置如下
# sentinel流量卫士
spring.cloud.sentinel.transport.dashboard=localhost:8080
#心跳包的端口(目前只支持客户端和控制台处于同一内网)
spring.cloud.sentinel.transport.port=1${server.port}
#sentinel配置到nacos
#example-zuul 表示ReadableDataSource的名称,可随意编写。ds1 和 ds2 后面的 file 和 nacos 表示ReadableDataSource的类型。
spring.cloud.sentinel.datasource.example-zuul.nacos.server-addr=${nacos.server-addr}
#展示在nacos中的名称
spring.cloud.sentinel.datasource.example-zuul.nacos.dataId=${spring.application.name}-flow-rules
#要与Sentienl中设置的一样!
spring.cloud.sentinel.datasource.example-zuul.nacos.groupId=sentinel-nacos
spring.cloud.sentinel.datasource.example-zuul.nacos.data-type=json
#好像没用?,默认生成在public命名空间
spring.cloud.sentinel.datasource.example-zuul.nacos.namespace=d34ef72b-8f09-4eef-b687-10794bbf9eb3
zuul.semaphore.max-semaphores=5000
zuul.routes.example-server.path=/example/**
zuul.routes.example-server.strip-prefix=true
zuul.routes.example-server.service-id=example-server
- 官方提供了两种注册动态数据源的方式一种继承是继承InitFunc ,另一种是手动注入,下面使用简单的注入方式
/**
 * @Author daFa
 * @create 2019/4/1 14:15
 */
@Component
public class DataSourceInitFunc {
    @Autowired
    private SentinelProperties sentinelProperties;
    @Bean
    public DataSourceInitFunc init() throws Exception {
        sentinelProperties.getDatasource().entrySet().stream().filter(map -> {
            return map.getValue().getNacos() != null;
        }).forEach(map -> {
            NacosDataSourceProperties nacos = map.getValue().getNacos();
            ReadableDataSource<String, List<FlowRule>> flowRuleDataSource = new NacosDataSource<>(nacos.getServerAddr(), nacos.getGroupId(), nacos.getDataId(),
                    source -> JSON.parseObject(source, new TypeReference<List<FlowRule>>() {
                    }));
            FlowRuleManager.register2Property(flowRuleDataSource.getProperty());
        });
        return new DataSourceInitFunc();
    }
}
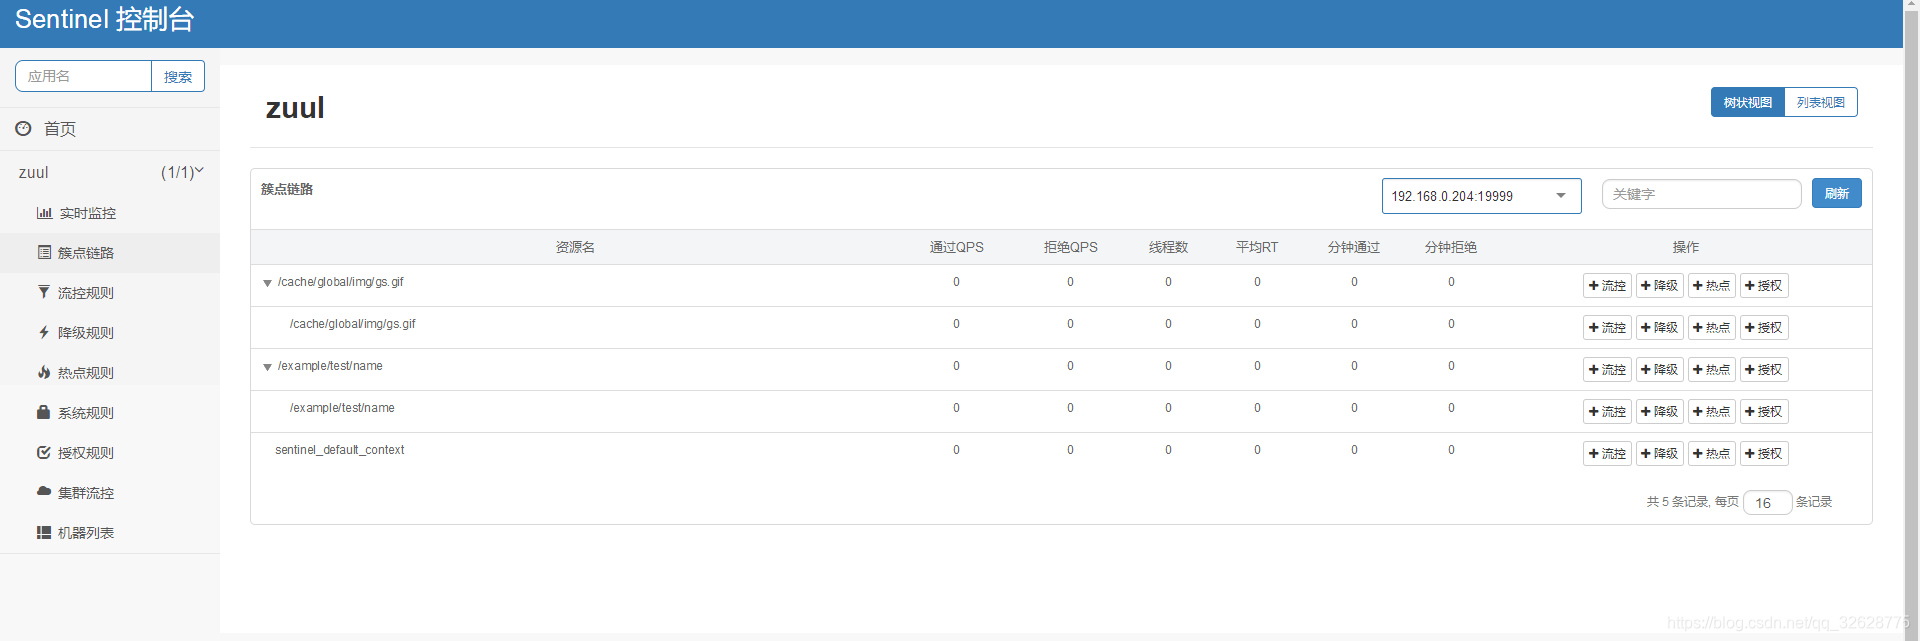
- 在Server中写一个简单的接口,并配置NacsoDiscovery,启动Server和Zuul,请求相关接口地址,激活Sentienl的Nacos配置,可以在Sentinel Dashboard上看到Zuul的实例,在Nacos的public中看到你的限流规则配置
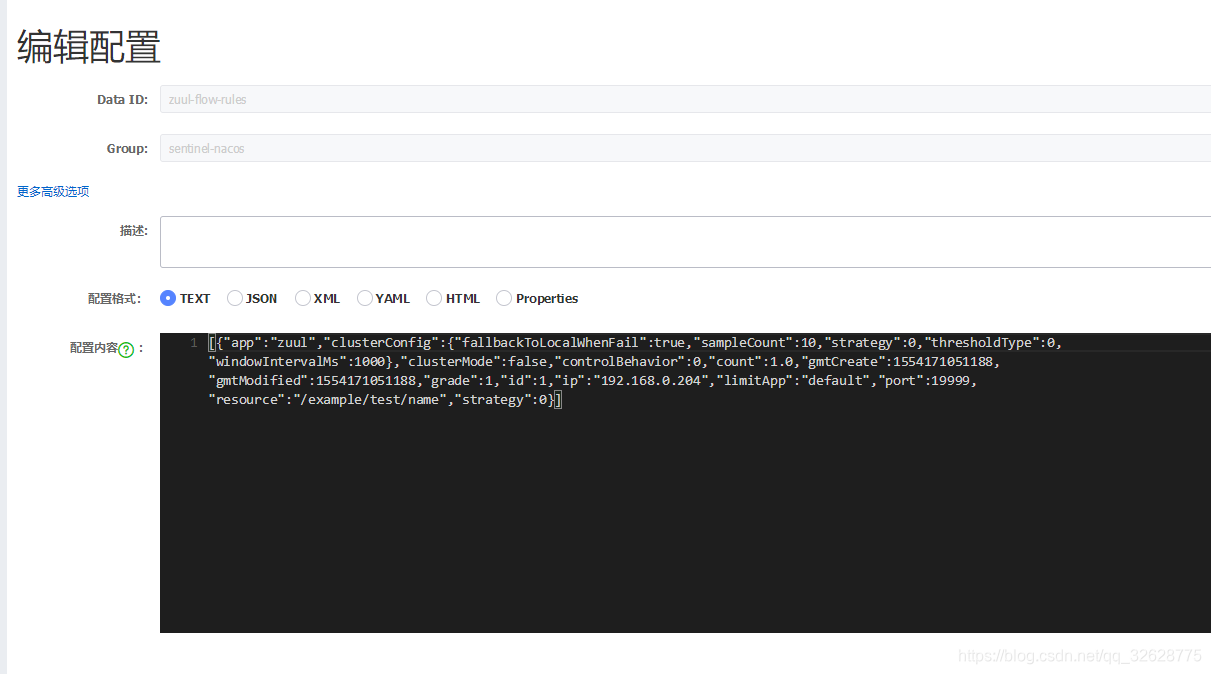
- 在Sentinel Dashboard中设置限流规则,然后再Nacos中可以看到相关的配置已经被保存,再次请求接口也会根据限流规则提示异常。
在Nacos中修改count字段后保存,Sentinel Dashboard中的配置也会一起修改,并且生效到限流规则
结尾
本人表达能力和代码水平有限对于看的云里雾里的小伙伴我只能说声抱歉,下面提供了使用的Demo,通过修改Zuul和Server的Nacos配置就可以正常启动了。


 869
869

 被折叠的 条评论
为什么被折叠?
被折叠的 条评论
为什么被折叠?
 到【灌水乐园】发言


