


 本文详细介绍了YOLO4目标检测算法的网络结构,包括基于CSPNet的主干网络、PANet的SPP、FPN和PAN模块,以及目标检测头的设计。此外,还讨论了损失函数的计算,特别是成员函数get_target和get_ignore在目标检测中的作用。YOLO4通过结合多个尺度的特征来提升检测性能,优化了目标检测的精度和速度。
欢迎访问我的博客首页。
YOLO4
1. body:基于 CSPNet 的主干网络
YOLO4 的主干网络基于 CSPNet,CSPNet 的特点在于它的 Cross Stage Partial Network,下面是它论文中给出的网络结构图:

图
1.1
C
S
P
N
e
t
网
络
结
构
图\ 1.1\quad CSPNet\ 网络结构
图 1.1CSPNet 网络结构
从图中可以看出 CSPNet 的特点:把特征图前 n 2 \frac{n}{2} 2n 个通道的特征输入网络的某一层得到输出,然后把特征图后 n 2 \frac{n}{2} 2n 个通道的特征与这个输出进行通道维度的叠加,叠加结果作为下一层网络的输入。下面是 YOLO4 的主干网络,称为 body,它基于 CSPNet:

图
1.2
主
干
网
络
b
o
d
y
图\ 1.2\quad 主干网络\ body
图 1.2主干网络 body
其中 CBM 表示卷积层、BN 层、Mish 激活函数层的组合,两个参数分别表示卷积核的边长和卷积步长。最上部红色字体的 CSPx 代表下面的灰色区域有 x 个串联。
2. neck:基于 PANet 提取更高维度特征
neck 部分有 3 个概念:SPP、FPN 和 PAN。
2.1 SPP
SPP 是 spatial pyramid pooling 的简称,即空间金字塔池化。它是把输入特征经过三个不同尺寸的 kernel_size 的最大池化操作的结果沿通道维度叠加。实现如下:
class SpatialPyramidPooling(nn.Module):
    def __init__(self, pool_sizes=[5, 9, 13]):
        super(SpatialPyramidPooling, self).__init__()
        self.maxpools = nn.ModuleList([nn.MaxPool2d(pool_size, 1, pool_size // 2) for pool_size in pool_sizes])

    def forward(self, x):
        features = [maxpool(x) for maxpool in self.maxpools[::-1]]
        features = torch.cat(features + [x], dim=1)
        return features
参数 pool_size, 1, pool_size // 2 分别代表 kernel_size、步长、每个边外的填充行/列数。虽然 SPP 的三个池化的 kernel_size 不同,但步长都为 1 且填充都是 kernel_size//2,所以它们三个的输出尺寸相等,都等于输入特征的尺寸。SPP 的结构见图 2.2。
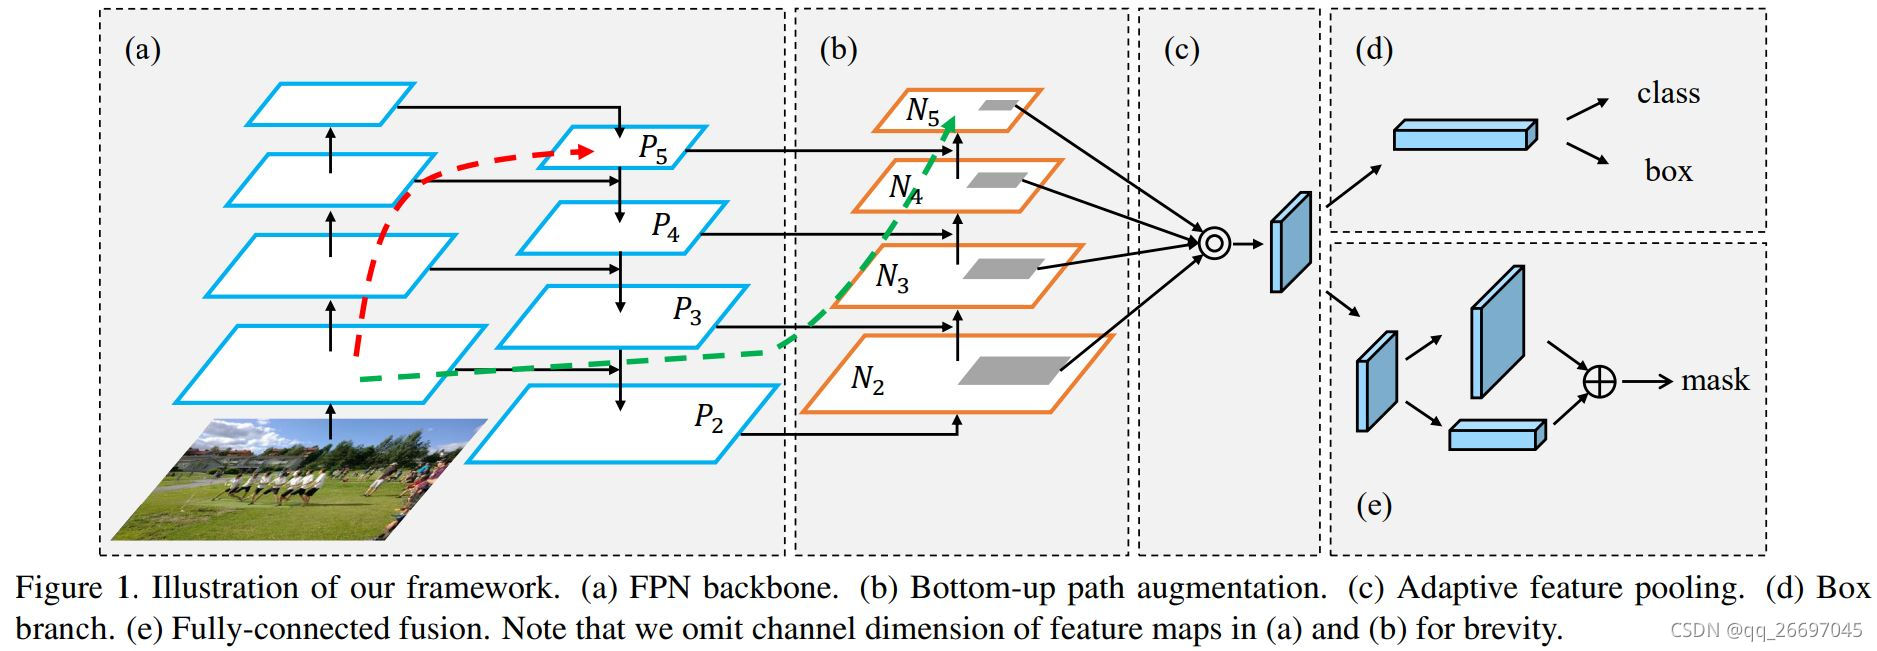
2.2 FPN 和 PAN
FPN 是 feature pyramid network 的简称,即特征金字塔网络。PAN 是 path aggregation network 的简称,即路径聚合网络。下面是 PANet 论文中给出的网络结构图,其中 (a) 是 FPN 的结构,(b) 是 PAN 的结构。
图
2.1
F
P
N
和
P
A
N
e
t
图\ 2.1\quad FPN和PANet
图 2.1FPN和PANet
FPN 是一个上采样过程,使用 torch.nn.Upsample 实现。上采样算法可以选择最近邻、线性、双线性、双三次、三线性。PAN 是一个下采样过程,使用步长为 2 的卷积实现。它们的结构见图 2.2。
2.3 neck 和 head 结构

图
2.2
Y
O
L
O
4
的
n
e
c
k
和
h
e
a
d
图\ 2.2\quad YOLO4\ 的\ neck 和\ head
图 2.2YOLO4 的 neck和 head
图 2.2 是 YOLO4 的网络结构,主要是 neck 和 head 部分。neck 部分的每个块包含若干个卷积,限于篇幅没有详细画出。head 部分的 CBL 代表卷积层、BN 层、LeakyReLU 激活函数层。
3. head:从三个尺度的特征图检测目标
head 部分的网络结构在图 2.2。
4. 整体网络结构
YOLO4 的网络结构图已经在前面的 body、neck 和 head 部分给出了,下面是在网上找到的其他作者画的 YOLO4 的整体网络结构图。

图
4.1
Y
O
L
O
4
网
络
结
构
图
(
1
)
图\ 4.1\quad YOLO4\ 网络结构图(1)
图 4.1YOLO4 网络结构图(1)

图
4.2
Y
O
L
O
4
网
络
结
构
图
(
2
)
图\ 4.2\quad YOLO4\ 网络结构图(2)
图 4.2YOLO4 网络结构图(2)
5. 损失函数
损失函数定义在类 YOLOLoss 中。
尺度:YOLO4 从 3 个尺度的特征检测目标,以输入图像宽高为 416 为例,由图 1.2 可以看出:尺度 0 的特征图的边长为原图的 1/32,栅格边长为 32;尺度 1 的特征图的边长为原图的 1/16,栅格边长为 16;尺度 2 的特征图的边长为原图的 1/8,栅格边长为 8。
class YOLOLoss(nn.Module):
    def __init__(self, anchors, num_classes, input_shape, cuda, anchors_mask=None, label_smoothing=0):
        super(YOLOLoss, self).__init__()
        if anchors_mask is None:
            anchors_mask = [[6, 7, 8], [3, 4, 5], [0, 1, 2]]
        self.anchors = anchors
        self.num_classes = num_classes
        self.bbox_attrs = 5 + num_classes
        self.input_shape = input_shape
        self.anchors_mask = anchors_mask
        self.label_smoothing = label_smoothing
        self.ignore_threshold = 0.5
        self.cuda = cuda
- anchors:值为 [[12, 16], [19, 36], [40, 28], [36, 75], [76, 55], [72, 146], [142, 110], [192, 243], [459, 410]]。
- anchors_mask:用于指定 anchors 与特征尺度的对应关系。anchors_mask[0] = [6, 7, 8]:尺度 0 上每个栅格内 3 个先验框的边长是 anchors[6]/32、anchors[7]/32、anchors[8]/32。
最重要的两个成员函数是 get_target 和 get_ignore,前者找到每个特征点对应的标注信息,后者找到每个特征点对应的预测信息,然后就可以计算损失函数了。下面就介绍几个重要的成员函数。
5.1 成员函数 get_target
特征点:我们把维度为 [w, h, c] 的特征图上的每个维度为 [1, 1, c] 的特征称为特征点。显然,一个特征点是从原图上一个栅格区域提取的特征。
成员函数 get_targets 用于返回每个特征点对应的标注信息(y_true)、每个特征点是否有标注信息(noobj_mask)、供计算损失函数使用的权重(box_loss_scale)。它的五个输入:
- 整数 l:尺度序号。
- 列表 targets:len(targets) = bs,即 batch size,targets[i].shape = [n, 5] 代表 n 个标注信息,每个标注信息包括 4 个坐标[cx, cy, w, h] 和 1 个类别标签。
- scaled_anchors:
- 整数 in_h, in_w:特征图的高宽。值为 13、26 或 52。
它的三个输出:
- y_true:shape = [bs, 3, 特征图高, 特征图宽, 5+num_classes]。每个特征点包含的标注结果。
- noobj_mask:shape = [bs, 3, 特征图高, 特征图宽]。该特征点是否包含标注信息。
- box_loss_scale:shape = [bs, 3, 特征图高, 特征图宽]。该特征点的权重,为了让小目标权重更大。
def get_target(self, l, targets, anchors, in_h, in_w):
    # 1.batch size。
    bs = len(targets)
    # 2.特征点是否包含标注信息,包含则值为 0,否则值为 1。shape = [bs, 3, 特征图高, 特征图宽]。
    noobj_mask = torch.ones(bs, len(self.anchors_mask[l]), in_h, in_w, requires_grad=False)
    # 3.权重:让网络更加去关注小目标。
    box_loss_scale = torch.zeros(bs, len(self.anchors_mask[l]), in_h, in_w, requires_grad=False)
    # 4.每个特征点包含的标注信息。shape =[bs, 3, 特征图高, 特征图宽, 5+num_classes]。
    y_true = torch.zeros(bs, len(self.anchors_mask[l]), in_h, in_w, self.bbox_attrs, requires_grad=False)
    for b in range(bs):
        if len(targets[b]) == 0:
            continue
        # 5. 标注框在特征图上的坐标[cx, cy, w, h]。shape = [n, 5]。
        batch_target = torch.zeros_like(targets[b])
        batch_target[:, [0, 2]] = targets[b][:, [0, 2]] * in_w
        batch_target[:, [1, 3]] = targets[b][:, [1, 3]] * in_h
        batch_target[:, 4] = targets[b][:, 4]
        batch_target = batch_target.cpu()
        # gt_box = [0, 0, w, h]。shape = [n, 4]。
        gt_box = torch.FloatTensor(torch.cat((torch.zeros((batch_target.size(0), 2)), batch_target[:, 2:4]), 1))
        # 6.anchors.shape = [9, 2], anchor_shapes.shape = [9, 4]。
        anchor_shapes = torch.FloatTensor(torch.cat((torch.zeros((len(anchors), 2)), torch.FloatTensor(anchors)), 1))
        # 7.计算交并比。self.calculate_iou等价于torchvision.ops.box_iou。
        #   self.calculate_iou(gt_box, anchor_shapes).shape = [n, 9]:每个标注框和 9 个先验框的重合情况。
        #   best_ns.shape = [n]。best_ns[i] = j:与标注框 i 重合程度最好的先验框序号是 j。
        best_ns = torch.argmax(self.calculate_iou(gt_box, anchor_shapes), dim=-1)
        # 8.逐个处理每个标注框与其对应的先验框。
        for t, best_n in enumerate(best_ns):
            # 9.每个尺度的特征点对应 3 个先验框。
            if best_n not in self.anchors_mask[l]:
                continue
            # 10.判断这个先验框是当前特征点 3 个先验框中的哪一个。
            k = self.anchors_mask[l].index(best_n)
            # 11.标注框的中心坐标cx、cy与类别。
            i = torch.floor(batch_target[t, 0]).long()
            j = torch.floor(batch_target[t, 1]).long()
            c = batch_target[t, 4].long()
            # 12.noobj_mask.shape = [bs, 3, 特征图高, 特征图宽]。0 代表有目标,1 代表无目标。
            noobj_mask[b, k, j, i] = 0
            # 13.每个特征点包含的标注信息。
            y_true[b, k, j, i, 0] = batch_target[t, 0]
            y_true[b, k, j, i, 1] = batch_target[t, 1]
            y_true[b, k, j, i, 2] = batch_target[t, 2]
            y_true[b, k, j, i, 3] = batch_target[t, 3]
            y_true[b, k, j, i, 4] = 1
            y_true[b, k, j, i, c + 5] = 1 # 这个类别的置信度置 1。
            # 14.权重:标注框面积/特征图面积。这里的目标越大(标注框面积越大),权重越大。计算损失函数时取反,使目标越小权重越大。
            box_loss_scale[b, k, j, i] = batch_target[t, 2] * batch_target[t, 3] / in_w / in_h
    return y_true, noobj_mask, box_loss_scale
重点部分从第 5 步开始。第 5 步计算标注框在特征图上的坐标。第 6 步获取先验框坐标。注意标注框坐标和先验框坐标的形式都是 [cx, cy, w, h],其中所有 cx, cy 都是 0。这是因为计算 iou 时我们只关心标注框与先验框的相对位置。
5.2 成员函数 get_ignore
def get_ignore(self, l, x, y, h, w, targets, scaled_anchors, in_h, in_w, noobj_mask):
    # -----------------------------------------------------#
    #   计算一共有多少张图片
    # -----------------------------------------------------#
    bs = len(targets)

    FloatTensor = torch.cuda.FloatTensor if x.is_cuda else torch.FloatTensor
    LongTensor = torch.cuda.LongTensor if x.is_cuda else torch.LongTensor
    # -----------------------------------------------------#
    #   生成网格,先验框中心,网格左上角
    # -----------------------------------------------------#
    grid_x = torch.linspace(0, in_w - 1, in_w).repeat(in_h, 1).repeat(
        int(bs * len(self.anchors_mask[l])), 1, 1).view(x.shape).type(FloatTensor)
    grid_y = torch.linspace(0, in_h - 1, in_h).repeat(in_w, 1).t().repeat(
        int(bs * len(self.anchors_mask[l])), 1, 1).view(y.shape).type(FloatTensor)

    # 生成先验框的宽高
    scaled_anchors_l = np.array(scaled_anchors)[self.anchors_mask[l]]
    anchor_w = FloatTensor(scaled_anchors_l).index_select(1, LongTensor([0]))
    anchor_h = FloatTensor(scaled_anchors_l).index_select(1, LongTensor([1]))

    anchor_w = anchor_w.repeat(bs, 1).repeat(1, 1, in_h * in_w).view(w.shape)
    anchor_h = anchor_h.repeat(bs, 1).repeat(1, 1, in_h * in_w).view(h.shape)
    # -------------------------------------------------------#
    #   计算调整后的先验框中心与宽高
    # -------------------------------------------------------#
    pred_boxes_x = torch.unsqueeze(x + grid_x, -1)
    pred_boxes_y = torch.unsqueeze(y + grid_y, -1)
    pred_boxes_w = torch.unsqueeze(torch.exp(w) * anchor_w, -1)
    pred_boxes_h = torch.unsqueeze(torch.exp(h) * anchor_h, -1)
    pred_boxes = torch.cat([pred_boxes_x, pred_boxes_y, pred_boxes_w, pred_boxes_h], dim=-1)
    for b in range(bs):
        # -------------------------------------------------------#
        #   将预测结果转换一个形式
        #   pred_boxes_for_ignore      num_anchors, 4
        # -------------------------------------------------------#
        pred_boxes_for_ignore = pred_boxes[b].view(-1, 4)
        # -------------------------------------------------------#
        #   计算真实框,并把真实框转换成相对于特征层的大小
        #   gt_box      num_true_box, 4
        # -------------------------------------------------------#
        if len(targets[b]) > 0:
            batch_target = torch.zeros_like(targets[b])
            # -------------------------------------------------------#
            #   计算出正样本在特征层上的中心点
            # -------------------------------------------------------#
            batch_target[:, [0, 2]] = targets[b][:, [0, 2]] * in_w
            batch_target[:, [1, 3]] = targets[b][:, [1, 3]] * in_h
            batch_target = batch_target[:, :4]
            # -------------------------------------------------------#
            #   计算交并比
            #   anch_ious       num_true_box, num_anchors
            # -------------------------------------------------------#
            anch_ious = self.calculate_iou(batch_target, pred_boxes_for_ignore)
            # -------------------------------------------------------#
            #   每个先验框对应真实框的最大重合度
            #   anch_ious_max   num_anchors
            # -------------------------------------------------------#
            anch_ious_max, _ = torch.max(anch_ious, dim=0)
            anch_ious_max = anch_ious_max.view(pred_boxes[b].size()[:3])
            noobj_mask[b][anch_ious_max > self.ignore_threshold] = 0
    return noobj_mask, pred_boxes
5.3 成员函数 forward
forward 函数用于计算损失。它有三个输入参数:
- 整数 l:取值 0、1 或 2。表示尺度序号。
- input:shape = [bs, 3*(5+num_classes), 特征图高, 特征图宽]。是某一尺度的特征图。
- 列表 target:len(target) = bs。targets[i].shape = [n, 5] 代表 n 个标注信息,每个标注信息包括 4 个坐标[cx, cy, w, h] 和 1 个类别标签。
它的两个输出:
- 浮点数 loss:损失函数值。
- 整数 num_pos:正样本数量。
def forward(self, l, input, targets=None):
    # 1.获取 batch size 和特征图高宽。
    bs, in_h, in_w = input.size(0), input.size(2), input.size(3)
    # 2.栅格高宽。
    stride_h, stride_w = self.input_shape[0] / in_h, self.input_shape[1] / in_w
    # 3.anchors除以栅格边长得到预选框边长。
    scaled_anchors = [(a_w / stride_w, a_h / stride_h) for a_w, a_h in self.anchors]
    # 4.调整input:[bs, 3*(5+num_classes), in_h, in_w] -> [bs, 3, 5+num_classes, in_h, in_w] -> [bs, 3, in_h, in_w, 5+num_classes]。
    prediction = input.view(bs, len(self.anchors_mask[l]), self.bbox_attrs, in_h, in_w).permute(0, 1, 3, 4, 2).contiguous()
    # 5.获取预测的位置和类别。
    x = torch.sigmoid(prediction[..., 0])
    y = torch.sigmoid(prediction[..., 1])
    w = prediction[..., 2]
    h = prediction[..., 3]
    conf = torch.sigmoid(prediction[..., 4]) # 是否有目标。
    pred_cls = torch.sigmoid(prediction[..., 5:])
    # 6.每个特征点包含的标注信息。
    y_true, noobj_mask, box_loss_scale = self.get_target(l, targets, scaled_anchors, in_h, in_w)
    # 7.每个特征点包含的预测结果。
    noobj_mask, pred_boxes = self.get_ignore(l, x, y, h, w, targets, scaled_anchors, in_h, in_w, noobj_mask)
    # 8.数据转换。
    if self.cuda:
        y_true = y_true.cuda()
        noobj_mask = noobj_mask.cuda()
        box_loss_scale = box_loss_scale.cuda()
    # 9.标注框越小权重越大。
    box_loss_scale = 2 - box_loss_scale
    # 10.loss:CIoU。
    ciou = (1 - self.box_ciou(pred_boxes[y_true[..., 4] == 1], y_true[..., :4][y_true[..., 4] == 1])) * box_loss_scale[
        y_true[..., 4] == 1]
    loss_loc = torch.sum(ciou)
    # 11.loss:区分目标与背景。
    loss_conf = torch.sum(self.BCELoss(conf, y_true[..., 4]) * y_true[..., 4]) + \
                torch.sum(self.BCELoss(conf, y_true[..., 4]) * noobj_mask)
    # 12.loss:对目标分类。
    loss_cls = torch.sum(self.BCELoss(
        pred_cls[y_true[..., 4] == 1],
        self.smooth_labels(y_true[..., 5:][y_true[..., 4] == 1], self.label_smoothing, self.num_classes)
    ))
    # 13.计算总体 loss 并统计正样本数量,正样本数量用于计算平均 loss。
    loss = loss_loc + loss_conf + loss_cls
    num_pos = torch.sum(y_true[..., 4])
    num_pos = torch.max(num_pos, torch.ones_like(num_pos))
    return loss, num_pos
第 12 部分多分类时没有使用交叉熵损失,而是平滑标签后使用二分类损失。但 label_smoothing 为 0,所以并没有平滑处理,直接返回原标签。
6. 参考
- 论文 YOLO4
- Bubbliiiing 的 github
- Bubbliiiing 的 优快云
- Bubbliiiing 的 B站
- 论文 CSPNet,2020
- 论文 PANet,2018
- FPN 和 PAN
- IoU、GIoU、DIoU、CIoU,优快云。
- IoU、GIoU、DIoU、CIoU,arxiv,2019。


 5809
5809

 被折叠的 条评论
为什么被折叠?
被折叠的 条评论
为什么被折叠?
 到【灌水乐园】发言


