


 本文深入探讨Vue组件间的通信方式,包括父组件如何通过props、事件及$parent、$refs传递值给子组件,子组件如何通过$emit和props向父组件传递值。还介绍了如何获取和设置父组件的值,以及使用$attrs和$listeners在多层组件间传递属性和事件。最后,讨论了在不相关组件间使用事件总线、Vuex和localStorage进行通信的方法。
初始化项目:
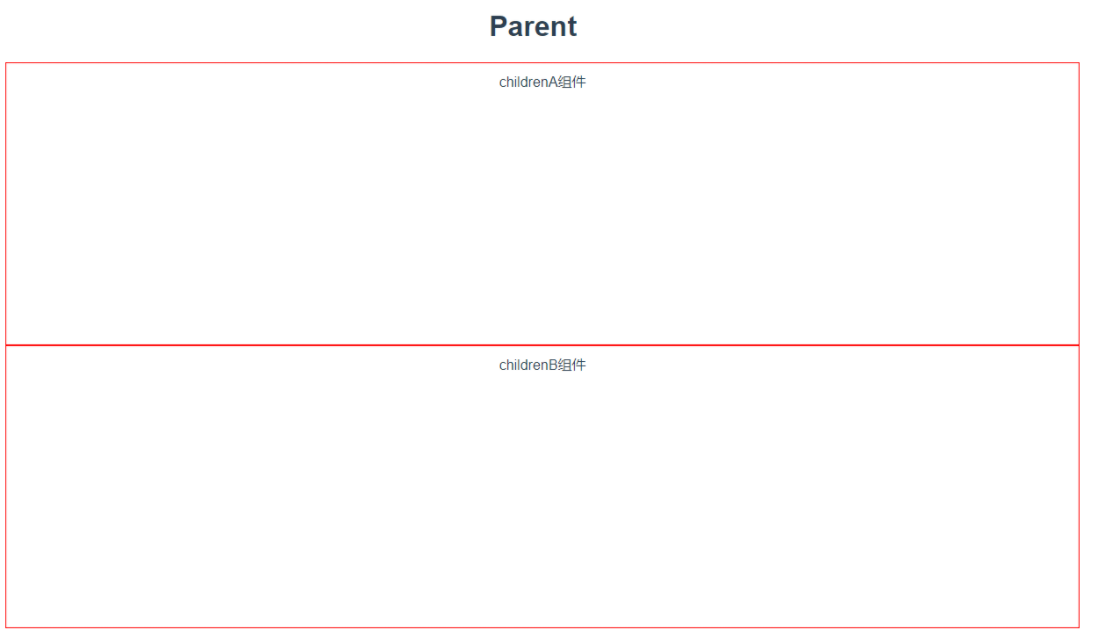
我们建立一个最简单的Vue项目,分别建了3个组件:parent、childrenA、childrenB,然后在APP.vue中引入parent组件,parent组件中引入childrenA和childrenB两个子组件,初始运行界面如下:


父组件传值给子组件
props 和$emit
这种方式通常用于父子组件之间的传值,父组件通过属性的方式将值传递给子组件,子组件通过props进行接收。子组件通过事件的方式向父组件传递数据。
代码
父组件代码
<template>
  <div class="parent">
    <div class="main">
      <h1>Parent</h1>
      <div>
        <button @click="changeMsg">更改父组件的数据</button>
      </div>


      <div class="children">
        <ChildrenA ></ChildrenA>
      </div>
      <div class="children">
        <ChildrenB :msg="msg"></ChildrenB>
      </div>
    </div>
  </div>
</template>

<script>
import ChildrenA from "./ChildrenA";
import ChildrenB from "./ChildrenB";

export default {
  name: "parent",
  data() {
    return {
      msg: "我是爸爸"
    };
  },
  components: {
    ChildrenB,
    ChildrenA
  },
  methods: {
    changeMsg(){
      //点击按钮更改数据
      this.msg = "我是爸爸,我更改了数据";
    }
  }
}
</script>

<style scoped>
.main {
  width: 1200px;
  margin: 0 auto;
}

.children {
  border: 1px solid red;
  padding: 10px;
  width: 100%;
  height: 300px;
}
</style>
我们将父组件中的msg通过:msg="msg"的方式传递给子组件,并且点击按钮的时候会修改父组件中的msg。
子组件A代码
<template>
  <div>
    childrenA组件

    <div>
      <p>接收parent组件数据:{{msg}}</p>
    </div>
  </div>

</template>

<script>
export default {
  name: "childrenA",
  props:{
    msg: {
      type: String,
      default: '',
    }
  },
  methods: {

  }
}
</script>

<style scoped>

</style>
子组件通过props属性的方式接收父组件传来的数据。
当我们点击按钮的时候,父组件的数据发生变化,子组件接收的数据也跟着发生了变化。
注意::msg="msg"接收的msg是一个变量,可以参考bind的使用原理,不加:则接收的就是一个字符串。
子组件传值给父组件
$emit
子组件可以通过$emit自定义事件的方式向父组件传递值,父组件需要监听该事件来进行接收子组件传来的值。
代码
父组件示例代码:
<template>
  <div class="parent">
    <div class="main">
      <h1>Parent</h1>
      <div>
        <button @click="changeMsg">更改父组件的数据</button>
        <div>
          <h1>子组件B的数据</h1>
          <p>{{childrenData}}</p>
        </div>
      </div>


      <div class="children">
        <ChildrenA :msg="msg"></ChildrenA>
      </div>
      <div class="children">
        <ChildrenB @childBData="childrendata"></ChildrenB>
      </div>

    </div>
  </div>
</template>

<script>
import ChildrenA from "./ChildrenA";
import ChildrenB from "./ChildrenB";

export default {
  name: "parent",
  data() {
    return {
      msg: "我是爸爸",
      childrenData: ""
    };
  },
  components: {
    ChildrenB,
    ChildrenA
  },
  methods: {
    changeMsg(){
      //点击按钮更改数据
      this.msg = "我是爸爸,我更改了数据";
    },
    childrendata(data){
      //子组件B传递过来的数据
      console.log(data);
      this.childrenData = data;
    }
  }
}
</script>

<style scoped>
.main {
  width: 1200px;
  margin: 0 auto;
}

.children {
  border: 1px solid red;
  padding: 10px;
  width: 100%;
  height: 300px;
}
</style>
子组件示例代码:
<template>
  <div>
    childrenB组件
    <div>
      <p>
        <button @click="sendData">传递数据给父组件吧</button>
      </p>
    </div>
  </div>

</template>

<script>
export default {
  name: "childrenB",
  methods: {
    sendData() {
      this.$emit("childBData", "我是子组件B的数据");
    }
  }
}
</script>

<style scoped>

</style>
我们在父组件中通过@childBData="childrendata"的方式来监听childrendata事件,从而获取子组件传递的数据,子组件中通过点击按钮触发$emit事件向父组件传递数据。当我们点击按钮“传递数据给父组件”时,父组件便可以获取到数据。
$parent获取父组件的值
$parent
这种方式可以让子组件非常方便的获取父组件的值,不仅仅包括数据,还可以是方法。
代码
子组件代码
<template>
  <div>
    childrenB组件
    <div>
      <p>
        <button @click="sendData">传递数据给父组件吧</button>
      </p>
      <p><button @click="getDataByParent">使用$patent获取父组件的值</button></p>
    </div>
  </div>

</template>

<script>
export default {
  name: "childrenB",
  methods: {
    sendData() {
      // 向父组件传递数据
      this.$emit("childBData", "我是子组件B的数据");
    },
    getDataByParent() {
      // 使用$parent获取父组件的值
      console.log(this.$parent);
    }
  }
}
</script>

<style scoped>

</style>
点击使用$patent获取父组件的值t按钮时,通过使用$patent获取父组件的值按钮时,通过$parent获取父组件的属性或数据。
我们可以看到控制台打印出了父组件的所有属性,不仅仅包含了data数据,还有里面定义的一些方法等。
$children和$refs获取子组件的值
$children和$refs
这两种方式和$parent非常的类似,它们可以直接获取子组件的相关属性或方法,不仅限于数据。
父组件代码
<template>
  <div class="parent">
    <div class="main">
      <h1>Parent</h1>
      <div>
        <button @click="changeMsg">更改父组件的数据</button>
        <div>
          <h1>子组件B的数据</h1>
          <p>{{childrenData}}</p>
        </div>
        <div>
          <button @click="getChildenDataByRef">使用`$children`和`$refs`</button>
        </div>
      </div>


      <div class="children">
        <ChildrenA :msg="msg" ref="childrenA"></ChildrenA>
      </div>
      <div class="children">
        <ChildrenB @childBData="childrendata" ref="childrenB"></ChildrenB>
      </div>

    </div>
  </div>
</template>

<script>
import ChildrenA from "./ChildrenA";
import ChildrenB from "./ChildrenB";

export default {
  name: "parent",
  data() {
    return {
      msg: "我是爸爸",
      childrenData: ""
    };
  },
  components: {
    ChildrenB,
    ChildrenA
  },
  methods: {
    changeMsg(){
      //点击按钮更改数据
      this.msg = "我是爸爸,我更改了数据";
    },
    childrendata(data){
      //子组件B传递过来的数据
      console.log(data);
      this.childrenData = data;
    },
    getChildenDataByRef(){
      //使用`$children`和`$refs`
      console.log(`children:`,this.$children);
      console.log(`resf:`,this.$refs);
    }
  }
}
</script>

<style scoped>
.main {
  width: 1200px;
  margin: 0 auto;
}

.children {
  border: 1px solid red;
  padding: 10px;
  width: 100%;
  height: 300px;
}
</style>
输出结果

上段代码中,我们点击按钮,分别通过children和children和children和refs的方式获取到了子组件,从而拿到子组件数据。需要注意的是,children会返回当前组件所包含的所有子组件数组,使用children会返回当前组件所包含的所有子组件数组,使用children会返回当前组件所包含的所有子组件数组,使用refs时,需要在子组件上添加ref属性,有点类似于直接获取DOM节点的操作。
使用$attrs和$listeners
$attrs是在Vue2.4.0之后新提出的,通常在多层组件传递数据的时候使用。很多小伙伴如果遇到多层组件数据传递的场景,他可能会直接选用Vuex进行传递,但是如果我们需要传递的数据没有涉及到数据的更新和修改时,建议使用$arrts的方式,毕竟Vuex还是比较重。
官网解释:
包含了父作用域中不作为 prop 被识别 (且获取) 的 attribute 绑定 (class 和 style 除外)。当一个组件没有声明任何 prop 时,这里会包含所有父作用域的绑定 (class 和 style 除外),并且可以通过 v-bind=“$attrs” 传入内部组件——在创建高级别的组件时非常有用。
官网的解释还是比较难理解的,我们可以用更加通俗一点的话在解释一遍。
通俗解释:
当父组件传递了很多数据给子组件时,子组件没有声明
props来进行接收,那么子组件中的attrs属性就包含了所有父组件传来的数据(除开已经props声明了的),子组件还可以使用v−bind="attrs“”属性就包含了所有父组件传来的数据(除开已经props声明了的),子组件还可以使用v−bind="attrs"的形式向它的子组件(孙子组件)传递数据,孙子组件使用$attrs的方式和它的父组件原理类似。
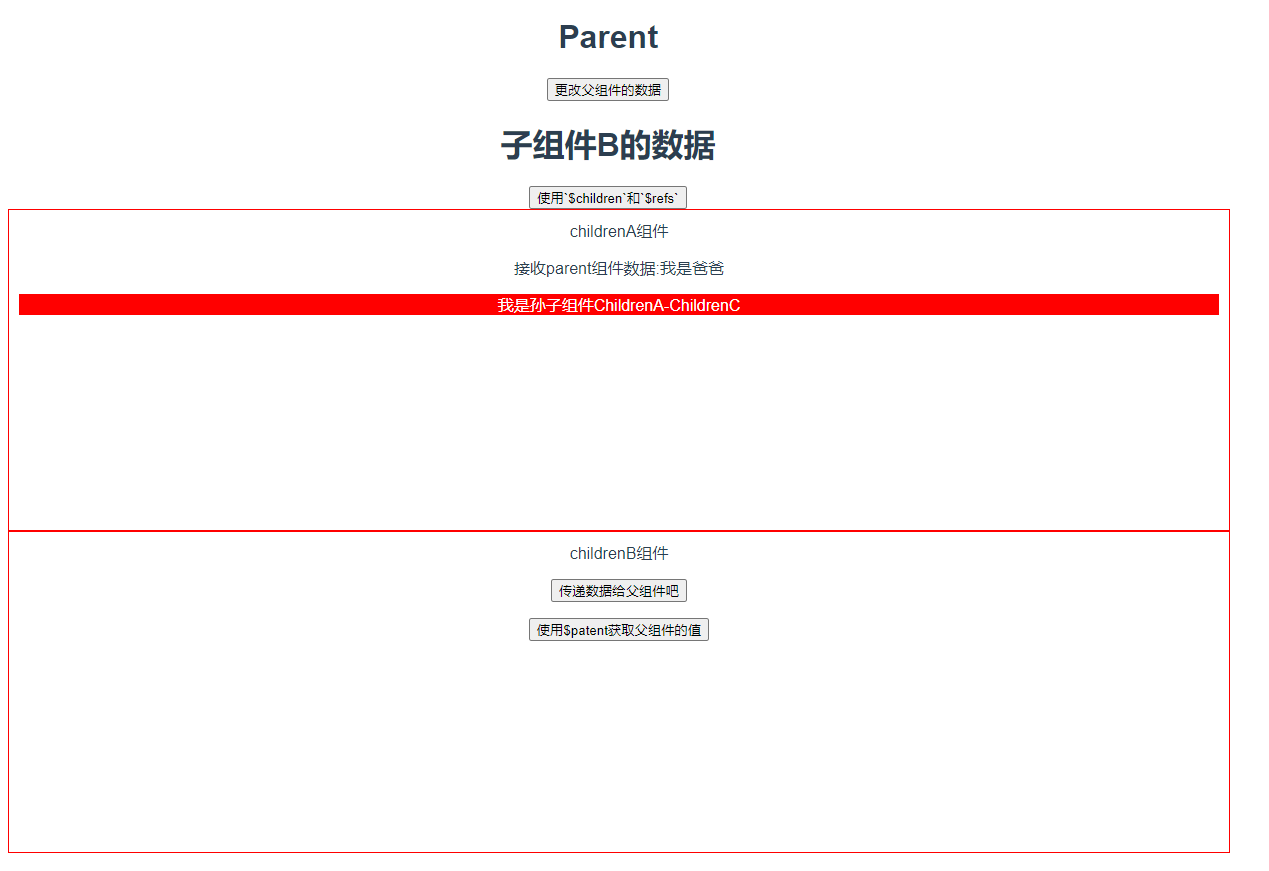
说的再多可能还是没有代码来得简单易懂,我们新建一个孙子组件ChildrenA-ChildrenC.vue,编写之后界面如下:
$attrs的使用
我们在parent父组件中多传一点数据给childrenA组件。
父组件代码
<template>
  <div class="parent">
    <div class="main">
      <h1>Parent</h1>
      <div>
        <button @click="changeMsg">更改父组件的数据</button>
        <div>
          <h1>子组件B的数据</h1>
          <p>{{childrenData}}</p>
        </div>
        <div>
          <button @click="getChildenDataByRef">使用`$children`和`$refs`</button>
        </div>
      </div>


      <div class="children">
        <ChildrenA :msg="msg" ref="childrenA" :msg2="msg2" :msg3="msg3" :msg4="msg4" :msg5="msg5"></ChildrenA>
      </div>
      <br/>
      <div class="children">
        <ChildrenB @childBData="childrendata" ref="childrenB"></ChildrenB>
      </div>

    </div>
  </div>
</template>

<script>
import ChildrenA from "./ChildrenA";
import ChildrenB from "./ChildrenB";

export default {
  name: "parent",
  data() {
    return {
      msg: "我是爸爸",
      msg2: "我是爸爸,我的第二个数据",
      msg3: "我是爸爸,我的第三个数据",
      msg4: "我是爸爸,我的第四个数据",
      msg5: "我是爸爸,我的第五个数据",
      childrenData: ""
    };
  },
  components: {
    ChildrenB,
    ChildrenA
  },
  methods: {
    changeMsg(){
      //点击按钮更改数据
      this.msg = "我是爸爸,我更改了数据";
    },
    childrendata(data){
      //子组件B传递过来的数据
      console.log(data);
      this.childrenData = data;
    },
    getChildenDataByRef(){
      //使用`$children`和`$refs`
      console.log(`children:`,this.$children);
      console.log(`resf:`,this.$refs);
    }
  }
}
</script>

<style scoped>
.main {
  width: 1200px;
  margin: 0 auto;
}

.children {
  border: 1px solid red;
  padding: 10px;
  width: 100%;
  height: 300px;
}
</style>
子组件ChildrenA组件代码
<template>
  <div>
    childrenA组件

    <div>
      <p>接收parent组件数据:{{msg}}</p>
    </div>
    <div>
      <ChildrenAC v-bind="$attrs"></ChildrenAC>
    </div>
  </div>

</template>

<script>
import ChildrenAC from './ChildrenA-ChildrenC.vue'
export default {
  name: "childrenA",
  components: {
    ChildrenAC
  },
  props:{
    msg: {
      type: String,
      default: '',
    }
  },
  mounted() {
      console.log(`子组件ChildrenA获取$attrs:`,this.$attrs)

  }
}
</script>

<style scoped>

</style>
输出结果

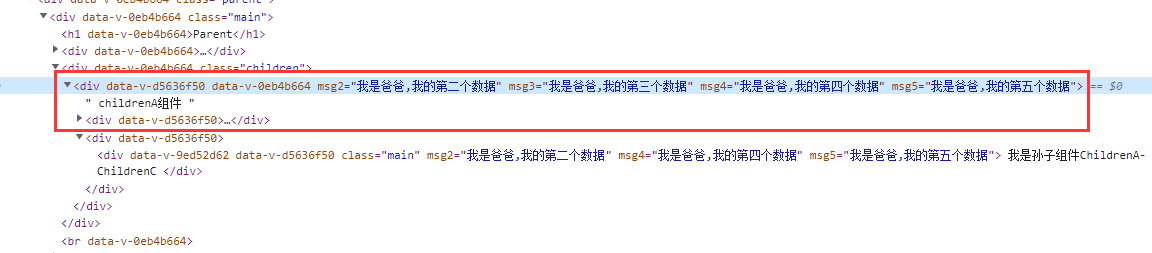
上段代码中我们的parent父组件传递了5个数据给子组件:msg、msg1、msg2、msg3、msg4。但是在子组件中的props属性里面,我们只接收了msg。然后我们在子组件mounted中打印了$attrs,发现恰好少了props接收过的msg数据。
当我们在childrenA组件中使用attrs接收了组件后,可以使用v−bind="attrs“接收了组件后,可以使用v−bind="attrs"的形式在传递给它的子组件ChildrenA-ChildrenC.vue,上段代码中我们已经加上了v-bind。
孙子组件ChildrenA-ChildrenC.vue代码:
<template>
  <div class="main">
    我是孙子组件ChildrenA-ChildrenC
  </div>

</template>

<script>
export default {
  name: "ChildrenA-ChildrenC",
  props: {
    msg3: {
      type: String,
      default: "我是孙子组件ChildrenA-ChildrenC"
    }
  },
  mounted() {

    console.log(`我是孙子组件ChildrenA-ChildrenC获取$attrs`, this.$attrs);
  }
}
</script>

<style scoped>
.main{
  background: red;
  color: #fff;
  height: 100%;
}

</style>
输出结果
[外链图片转存失败,源站可能有防盗链机制,建议将图片保存下来直接上传(img-zW1JKGWo-1650791375947)(https://cdn.jsdelivr.net/gh/huanghui0906/typoraImg@main/image-20220424160644881.png)]
我们发现
ChildrenA-ChildrenC.vue组件中打印的$attrs中少了msg3,因为我们已经在props中接收了msg3。
$listeners 的使用
listeners属性和attrs属性和类型,只是它们传递的东西不一样。
官网的解释:
包含了父作用域中的 (不含 .native 修饰器的) v-on 事件监听器。它可以通过 v-on=“$listeners” 传入内部组件——在创建更高层次的组件时非常有用。
通俗的解释:
当父组件在子组件上定义了一些自定义的非原生事件时,在子组件内部可以通过$listeners属性获取到这些自定义事件。
它和attrs的区别很明显,attrs的区别很明显,attrs的区别很明显,attrs用来传递属性,$listeners用来传递非原生事件,我们在ChildrenB组件中打印一下看看。
ChildrenB组件示例代码:
<template>
  <div>
    childrenB组件
    <div>
      <p>
        <button @click="sendData">传递数据给父组件吧</button>
      </p>
      <p><button @click="getDataByParent">使用$patent获取父组件的值</button></p>
    </div>
  </div>

</template>

<script>
export default {
  name: "childrenB",
  mounted() {
    console.log(`子组件ChildrenB获取$listeners:`,this.$listeners)
  },
  methods: {
    sendData() {
      // 向父组件传递数据
      this.$emit("childBData", "我是子组件B的数据");
    },
    getDataByParent() {
      // 使用$parent获取父组件的值
      console.log(this.$parent);
    }
  }
}
</script>

<style scoped>

</style>
输出结果

可以发现输出了childData方法,这是我们在它的父组件自定义的监听事件。除次之外,$listeners可以通过v-on的形式再次传递给下层组件。
childrenB代码2
<template>
  <div>
    childrenB组件
    <div>
      <p>
        <button @click="sendData">传递数据给父组件吧</button>
      </p>
      <p><button @click="getDataByParent">使用$patent获取父组件的值</button></p>
    </div>

    <div>
      <ChildrenAC v-on="$listeners"></ChildrenAC>
    </div>
  </div>

</template>

<script>
import ChildrenAC from './ChildrenA-ChildrenC.vue'

export default {
  name: "childrenB",
  components: {
    ChildrenAC
  },
  mounted() {
    console.log(`子组件ChildrenB获取$listeners:`,this.$listeners)
  },
  methods: {
    sendData() {
      // 向父组件传递数据
      this.$emit("childBData", "我是子组件B的数据");
    },
    getDataByParent() {
      // 使用$parent获取父组件的值
      console.log(this.$parent);
    }
  }
}
</script>

<style scoped>

</style>
ChildrenA-ChildrenC孙子组件代码
 mounted() {
    console.log(`我是孙子组件ChildrenA-ChildrenC获取$attrs`, this.$attrs);
    console.log(`我是孙子组件ChildrenA-ChildrenC获取$listeners`, this.$listeners);
  }
输出结果

可以看到在孙子组件中也获得了parent父组件中的childData自定义事件。使用listeners的好处在于:如果存在多层级组件,无需使用listeners的好处在于:如果存在多层级组件,无需使用listeners的好处在于:如果存在多层级组件,无需使用emit的方式逐级向上触发事件,只需要使用$listerners就可以得到父组件中的自定义事件,相当于偷懒了。
inheritAttrs
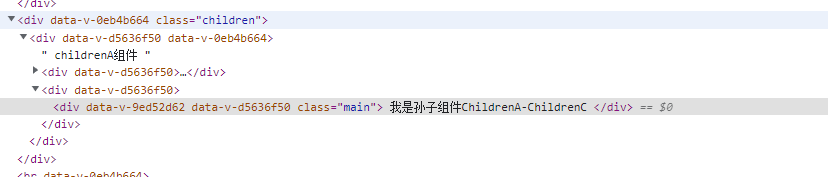
可能细心的小伙伴会发现,我们在使用$attrs时,子组件childenA渲染的DOM节点上将我们传递的属性一起渲染了出来,如下图所示:
这并不是我们想要的,为了解决这个问题,我们可以在子组件中设置inheritAttrs属性。
官网解释:
默认情况下父作用域的不被认作 props 的 attribute 绑定 (attribute bindings) 将会“回退”且作为普通的 HTML attribute 应用在子组件的根元素上。当撰写包裹一个目标元素或另一个组件的组件时,这可能不会总是符合预期行为。通过设置 inheritAttrs 到 false,这些默认行为将会被去掉。而通过 (同样是 2.4 新增的) 实例 property $attrs 可以让这些 attribute 生效,且可以通过 v-bind 显性的绑定到非根元素上。
官网说了非常多,但是不太通俗,我们可以简单的理解。
通俗解释:
父组件传递了很多数据给子组件,子组件的props没有完全接收,那么父组件传递的这些数据就会渲染到HTML上,我们可以给子组件设置inheritAttrs 为false,避免这样渲染。
childrenA子组件代码
<template>
  <div>
    childrenA组件

    <div>
      <p>接收parent组件数据:{{msg}}</p>
    </div>
    <div>
      <ChildrenAC v-bind="$attrs"></ChildrenAC>
    </div>
  </div>

</template>

<script>
import ChildrenAC from './ChildrenA-ChildrenC.vue'
export default {
  name: "childrenA",
  components: {
    ChildrenAC
  },
  props:{
    msg: {
      type: String,
      default: '',
    }
  },
  inheritAttrs: false,
  mounted() {
      console.log(`子组件ChildrenA获取$attrs:`,this.$attrs)


  }
}
</script>

<style scoped>

</style>
孙子组件代码
<template>
  <div class="main">
    我是孙子组件ChildrenA-ChildrenC
  </div>

</template>

<script>
export default {
  name: "ChildrenA-ChildrenC",
  props: {
    msg3: {
      type: String,
      default: "我是孙子组件ChildrenA-ChildrenC"
    }
  },
  inheritAttrs: false,
  mounted() {

    console.log(`我是孙子组件ChildrenA-ChildrenC获取$attrs`, this.$attrs);
    console.log(`我是孙子组件ChildrenA-ChildrenC获取$listeners`, this.$listeners);
  }
}
</script>

<style scoped>
.main{
  background: red;
  color: #fff;
  height: 100%;
}

</style>
输出结果
此时我们节点上就没有那些无关的节点属性了。
总结
$attrs:用来传递属性,出了class、style之类的,它是一个对象。
$listeners:用来传递事件,出了原生事件,它也是一个对象。
attrs和listeners这两个属性可以解决多层组件之间数据和事件传递的问题。
inheritAttrs解决未使用props接收的数据的属性渲染。
自定义事件:事件总线(不相关的组件间通讯)
在我们做项目的时候,会发现不相关的组件之间的数据传递是较为麻烦的,比如兄弟组件、跨级组件,在不使用Vuex情况下,我们可以使用自定义事件(也可以称作事件中心)的方式来实现数据传递。
事件中心的思想也比较简单:中间中心主要就两个作用:触发事件和监听事件。假如两个组件之间需要传递数据,组件A可以触发事件中心的事件,组件B监听事件中心的事件,从而让两个组件之间产生关联,实现数据传递。
实现步骤:
为了演示简单,我们在全局注册一个事件中心,修改main.js。
main.js代码如下:
import Vue from 'vue'
import App from './App.vue'
import router from './router'
import store from './store'

Vue.config.productionTip = false
//自定义事件
Vue.prototype.$EvenBus = new Vue()

new Vue({
  router,
  store,
  render: h => h(App)
}).$mount('#app')
A组件代码
<template>
<div class="main">
  <p>我是A组件</p>
  <button @click="toChildB">向B组件发送数据</button>
</div>
</template>

<script>
export default {
  name: "A",
  methods: {
    toChildB() {
      this.$EvenBus.$emit("sendMsg", {
        msg: "我是A组件发送的数据"
      });
    }
  }
}
</script>

<style scoped>
.main{
  background: blue;
  height: 500px;
  color: #fff;
}
</style>
A组件中调用
$EvenBus.emit向事件中心添加sendMsg事件,这个用法有点类似与props和$emit的关系。
B组件代码
<template>
  <div class="main">
    <p>我是B组件</p>
    <div>
      <p>接收其它组件的数据:</p>
      {{msg}}
    </div>
  </div>
</template>

<script>
export default {
  name: "B",
  props:{
    msg:{
      type:String,
      default:''
    }
  },
  mounted() {
    this.$EvenBus.$on("sendMsg", (data) => {
      this.msg = data.msg;
    });
  },
  methods: {
    // 这里的方法可以在组件中使用

  }
}
</script>

<style scoped>
.main{
  background: red;
  height: 300px;
  color: #fff;
}
</style>
当我们点击A组件中的按钮时,就会触发sendMsg事件,在B组件中我们监听了该事件,所以会接收到A组件发来的数据。
事件中心实现数据传递的这种方式,其实就是一个发布者和订阅者的模式,这种方式可以实现任何组件之间的通信。
provide和inject
这两个是在Vue2.2.0新增的API,provide和inject需要在一起使用。它们也可以实现组件之间的数据通信,但是需要确保组件之间是父子关系。
官网的解释:
这对选项需要一起使用,以允许一个祖先组件向其所有子孙后代注入一个依赖,不论组件层次有多深,并在其上下游关系成立的时间里始终生效。
官网的解释就已经说得很明确了,所以这里我们就不需要通俗的解释了,简单一句话:父组件可以向子组件(无论层级)注入依赖,每个子组件都可以获得这个依赖,无论层级。
parent示例代码:
<template>
  <div class="parent">
    <div class="main">
      <h1>Parent</h1>
      <div>
        <button @click="changeMsg">更改父组件的数据</button>
        <div>
          <h1>子组件B的数据</h1>
          <p>{{childrenData}}</p>
        </div>
        <div>
          <button @click="getChildenDataByRef">使用`$children`和`$refs`</button>
        </div>
      </div>


      <div class="children">
        <ChildrenA :msg="msg" ref="childrenA" :msg2="msg2" :msg3="msg3" :msg4="msg4" :msg5="msg5"></ChildrenA>
      </div>
      <br/>
      <div class="children">
        <ChildrenB @childBData="childrendata" ref="childrenB"></ChildrenB>
      </div>

      <div class="children">
        <A></A>
        <B></B>
      </div>

    </div>
  </div>
</template>

<script>
import ChildrenA from "./ChildrenA";
import ChildrenB from "./ChildrenB";
import A from "./A";
import B from "./B";

export default {
  name: "parent",
  provide() {
    return {
     parentData:this.msg
    };
  },
  data() {
    return {
      msg: "我是爸爸",
      msg2: "我是爸爸,我的第二个数据",
      msg3: "我是爸爸,我的第三个数据",
      msg4: "我是爸爸,我的第四个数据",
      msg5: "我是爸爸,我的第五个数据",
      childrenData: ""
    };
  },
  components: {
    A,
    B,
    ChildrenB,
    ChildrenA
  },
  methods: {
    changeMsg(){
      //点击按钮更改数据
      this.msg = "我是爸爸,我更改了数据";
    },
    childrendata(data){
      //子组件B传递过来的数据
      console.log(data);
      this.childrenData = data;
    },
    getChildenDataByRef(){
      //使用`$children`和`$refs`
      console.log(`children:`,this.$children);
      console.log(`resf:`,this.$refs);
    }
  }
}
</script>

<style scoped>
.main {
  width: 1200px;
  margin: 0 auto;
}

.children {
  border: 1px solid red;
  padding: 10px;
  width: 100%;
  height: 300px;
}
</style>
孙子组件代码
<template>
  <div class="main">
    我是孙子组件ChildrenA-ChildrenC
  </div>

</template>

<script>
export default {
  name: "ChildrenA-ChildrenC",
  inject: ['parentData'],
  props: {
    msg3: {
      type: String,
      default: "我是孙子组件ChildrenA-ChildrenC"
    }
  },
  inheritAttrs: false,
  mounted() {

    console.log(`我是孙子组件ChildrenA-ChildrenC获取$attrs`, this.$attrs);
    console.log(`我是孙子组件ChildrenA-ChildrenC获取$listeners`, this.$listeners);
    console.log(`我是孙子组件ChildrenA-ChildrenC获取parent组件数据`, this.parentData);
  }
}
</script>

<style scoped>
.main{
  background: red;
  color: #fff;
  height: 100%;
}

</style>
输出结果

通过provide和inject结合的方式,我们在child1-child组件中获取到了parent组件中的数据。如果你下来尝试过的话,可能会发现一个问题,此时数据不是响应式,也就是parent组件更改了数据,child1-child组件中的数据不会更新。
想要变为响应式的,我们需要修改一下provide传递的方式。
parent代码如下:
<template>
  <div class="parent">
    <div class="main">
      <h1>Parent</h1>
      <div>
        <button @click="changeMsg">更改父组件的数据</button>
        <div>
          <h1>子组件B的数据</h1>
          <p>{{childrenData}}</p>
        </div>
        <div>
          <button @click="getChildenDataByRef">使用`$children`和`$refs`</button>
        </div>
      </div>


      <div class="children">
        <ChildrenA :msg="msg" ref="childrenA" :msg2="msg2" :msg3="msg3" :msg4="msg4" :msg5="msg5"></ChildrenA>
      </div>
      <br/>
      <div class="children">
        <ChildrenB @childBData="childrendata" ref="childrenB"></ChildrenB>
      </div>

      <div class="children">
        <A></A>
        <B></B>
      </div>

    </div>
  </div>
</template>

<script>
import ChildrenA from "./ChildrenA";
import ChildrenB from "./ChildrenB";
import A from "./A";
import B from "./B";

export default {
  name: "parent",
  provide() {
    return {parentData:this.getmsg};
  },
  data() {
    return {
      msg: "我是爸爸",
      msg2: "我是爸爸,我的第二个数据",
      msg3: "我是爸爸,我的第三个数据",
      msg4: "我是爸爸,我的第四个数据",
      msg5: "我是爸爸,我的第五个数据",
      childrenData: ""
    };
  },
  components: {
    A,
    B,
    ChildrenB,
    ChildrenA
  },
  methods: {
    changeMsg(){
      //点击按钮更改数据
      this.msg = "我是爸爸,我更改了数据";
    },
    childrendata(data){
      //子组件B传递过来的数据
      console.log(data);
      this.childrenData = data;
    },
    getChildenDataByRef(){
      //使用`$children`和`$refs`
      console.log(`children:`,this.$children);
      console.log(`resf:`,this.$refs);
    },
    getMsg(){
      //获取父组件的数据
      // console.log(this.msg);
      return this.msg
    }
  }
}
</script>

<style scoped>
.main {
  width: 1200px;
  margin: 0 auto;
}

.children {
  border: 1px solid red;
  padding: 10px;
  width: 100%;
  height: 300px;
}
</style>
这个时候我们会发现数据变为响应式的了。
Vuex和localStorage
这两种方式应该是小伙伴们在实际项目中使用最多的了,所以这里就不但展开细说,只是提一下这两者的区别即可。
Vuex:
- Vuex是状态管理器,它存储的数据不是持久化存储,一旦刷新页面或者关闭项目数据便不见了。
- Vuex存储的数据是响应式的。
localstorage:
- loacalStorage是HTML5中的一种数据存储方式,持久化存储,存储的数据不是响应式的。
v-model
v-model是vue中的一个内置指令,它通常用在表单元素上以此来实现数据的双向绑定,它的本质是v-on和v-bind的语法糖。在这里我们也可以借助它来实现某些场景下的数据传递。注意,这儿的场景必须是父子组件。
parent组件示例代码:
<template>
  <div class="parent-box">
    <p>父级组件</p>
    <div>modelData: {{modelData}}</div>
    <child2 :msg="msg" v-model="modelData"></child2>
    <!-- 实际等同于 -->
    <!-- <child2 v-bind:value="modelData" v-on:input="modelData=$event"></child2>  -->
  </div>
</template>
<script>
import child2 from "./child2.vue";
export default {
  provide() {
    return { parentData: this.getMsg };
  },
  data() {
    return {
      modelData: "parent组件的model数据"
    };
  },
  components: {
    child1,
  },
};
</script>
child2组件示例代码:
<template>
  <div class="child-2">
    <p>child2组件</p>
    <div>
      <button @click="confirm">修改v-model数据</button>
    </div>
  </div>
</template>
<script>
export default {
  props: {
    value: {
      type: String,
      default: "",
    },
  },
  mounted() {
    console.log("child2组件接收附件见v-model传递的数据", this.value);
  },
  methods: {
    // 通过$emit触发父组件的input事件,并将第二个参数作为值传递给父组件
    confirm() {
      this.$emit("input", "修改parent传递的v-model数据");
    },
  },
};
</script>
我们在父组件中使用v-model向child2子组件传递数据,子组件的props中使用默认的value属性接收,在子组件中利用$emit触发父组件中默认input事件,此时传递的数据便会在子组件和父组件中发生变化,这就是数据双向绑定。
如果想要更加详细的学习v-model的使用,可以参考官网。
总结
Vue中组件通讯的方式有很多种,每一种应用的场景可能都有一些不一样,我们需要在合适的场景下选择合适的通讯方式。
- 父子组件间通讯:props和emit、emit、emit、parent、refs和refs和refs和children、v-model
- 兄弟组件间通讯:事件总线、Vuex、localStorage
- 隔代组件间通讯:provide和inject
- 无相关组件间通讯:事件总线、Vuex、localStorage
于 -->
**child2组件示例代码:**

```javascript
<template>
  <div class="child-2">
    <p>child2组件</p>
    <div>
      <button @click="confirm">修改v-model数据</button>
    </div>
  </div>
</template>
<script>
export default {
  props: {
    value: {
      type: String,
      default: "",
    },
  },
  mounted() {
    console.log("child2组件接收附件见v-model传递的数据", this.value);
  },
  methods: {
    // 通过$emit触发父组件的input事件,并将第二个参数作为值传递给父组件
    confirm() {
      this.$emit("input", "修改parent传递的v-model数据");
    },
  },
};
</script>
我们在父组件中使用v-model向child2子组件传递数据,子组件的props中使用默认的value属性接收,在子组件中利用$emit触发父组件中默认input事件,此时传递的数据便会在子组件和父组件中发生变化,这就是数据双向绑定。
如果想要更加详细的学习v-model的使用,可以参考官网。
总结
Vue中组件通讯的方式有很多种,每一种应用的场景可能都有一些不一样,我们需要在合适的场景下选择合适的通讯方式。
- 父子组件间通讯:props和emit、emit、emit、parent、refs和refs和refs和children、v-model
- 兄弟组件间通讯:事件总线、Vuex、localStorage
- 隔代组件间通讯:provide和inject
- 无相关组件间通讯:事件总线、Vuex、localStorage


 2311
2311

 被折叠的 条评论
为什么被折叠?
被折叠的 条评论
为什么被折叠?
 到【灌水乐园】发言


