


AI
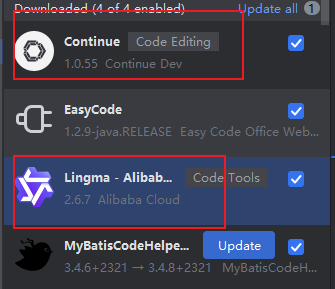
一、编程辅助插件
二、阿里云百炼
为了在原有SpringBoot版本的基础上,添加AI的功能,无法使用SpringAI
同类产品--火山引擎
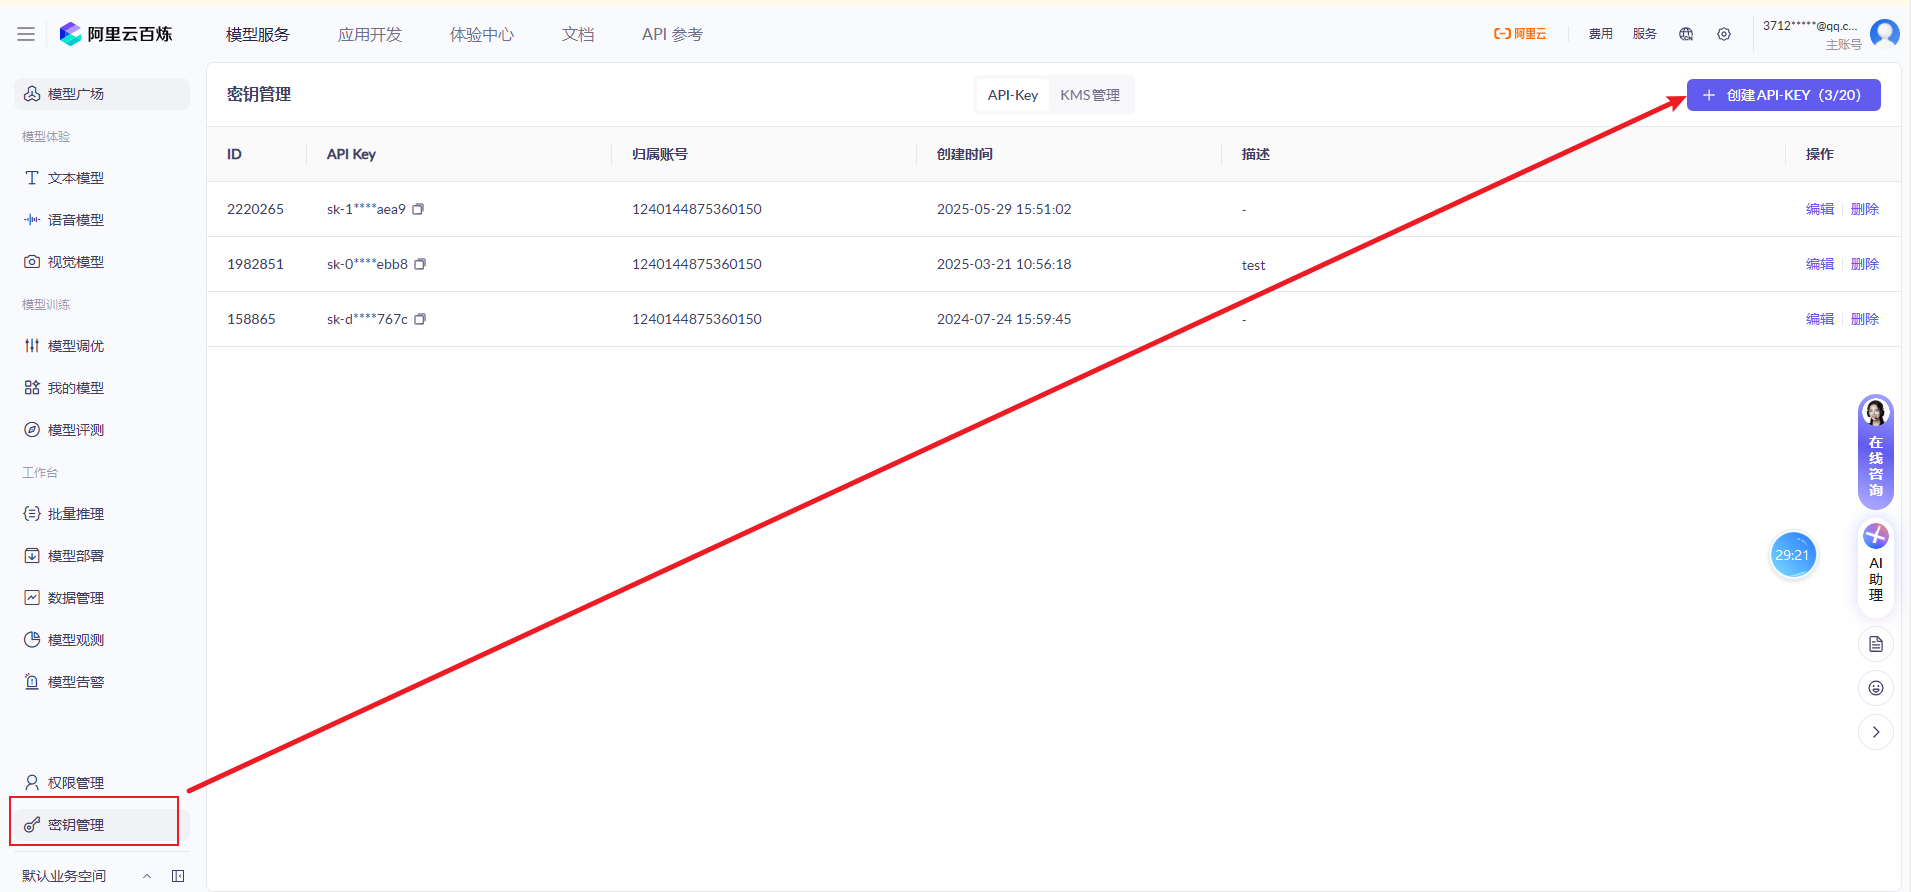
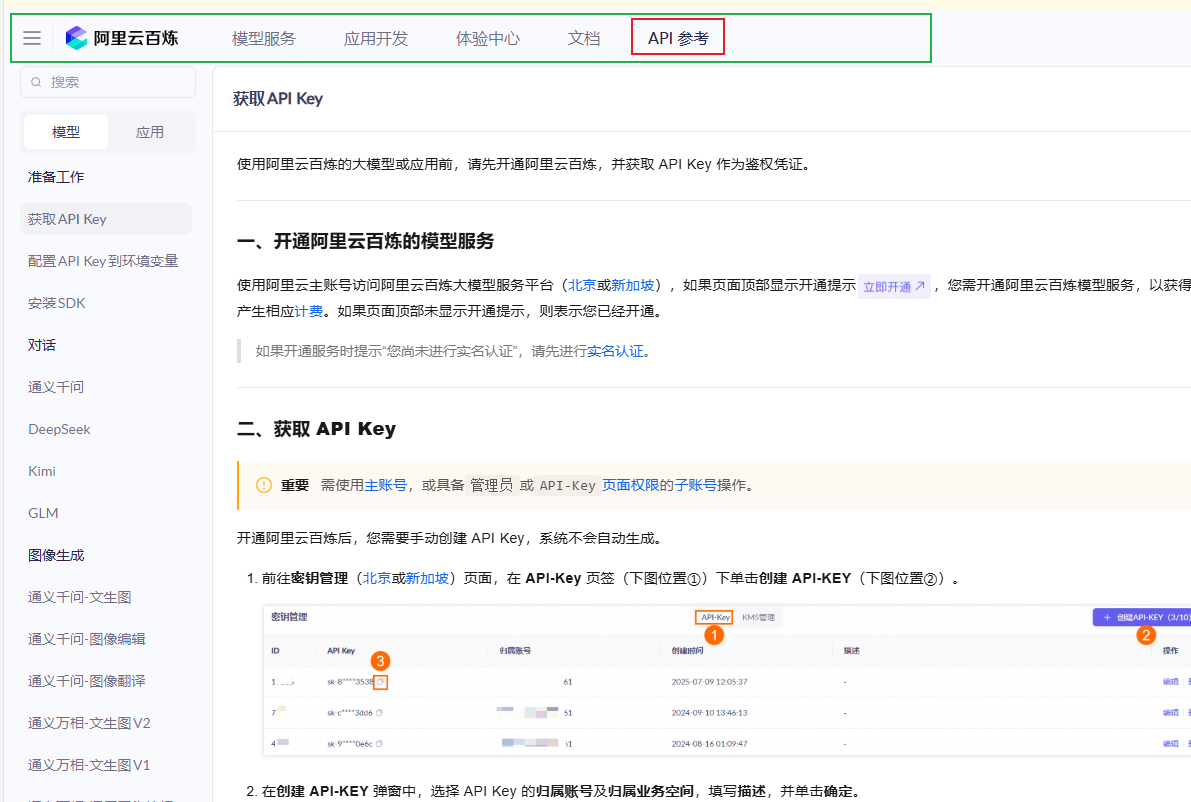
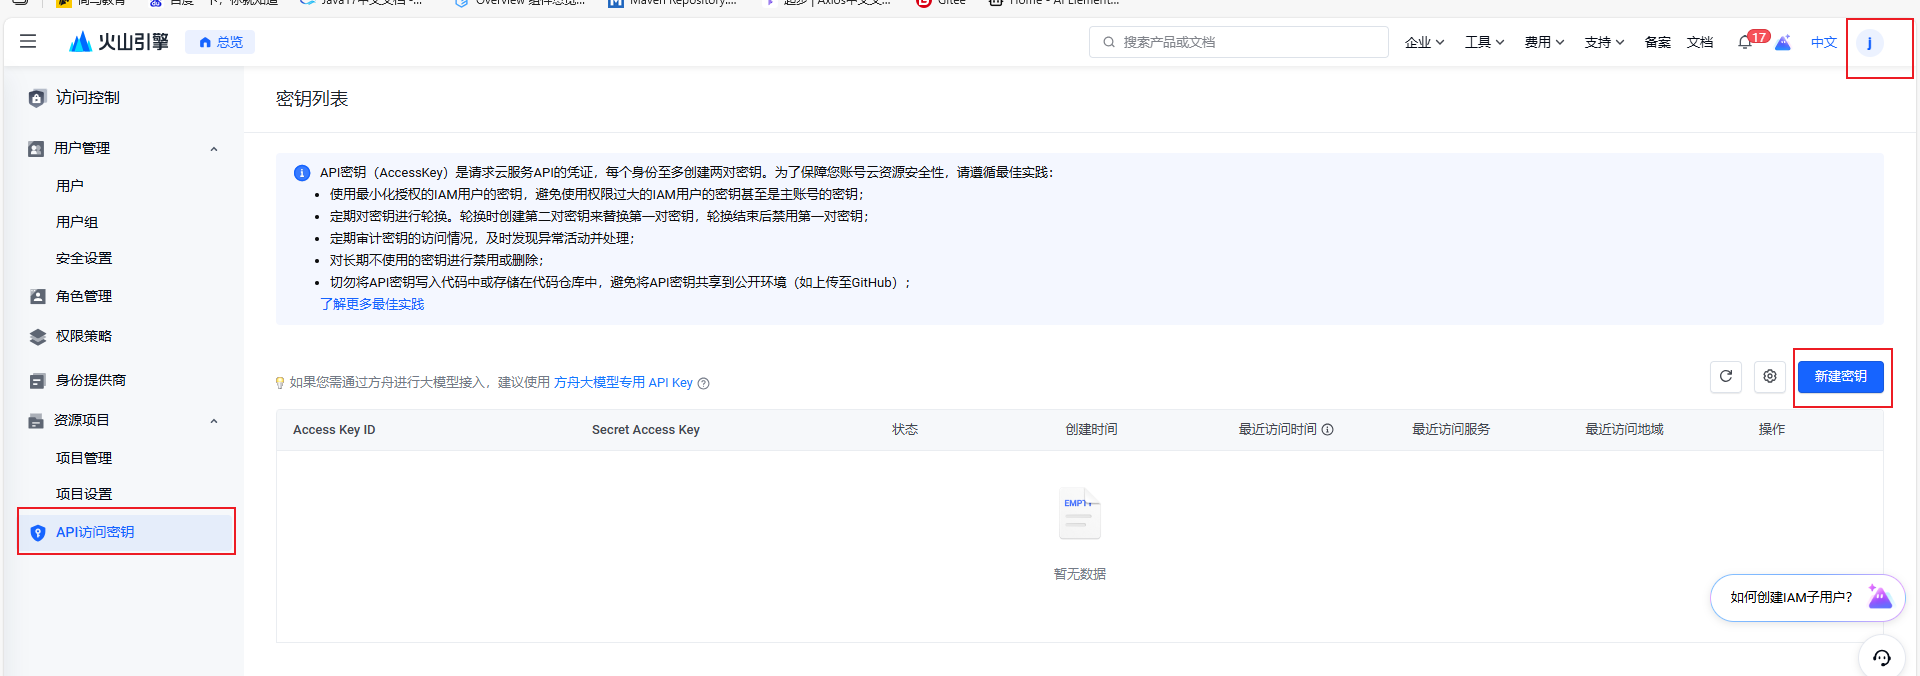
1、申请Api-Key
当前账号的唯一标识
2、配置环境变量

-
配置环境变量,包含Api-Key
-
减少泄露的风险
-
配置完环境变量之后,记得【重启Idea】
-
对接API
3、测试官方案例
3.1 引入依赖
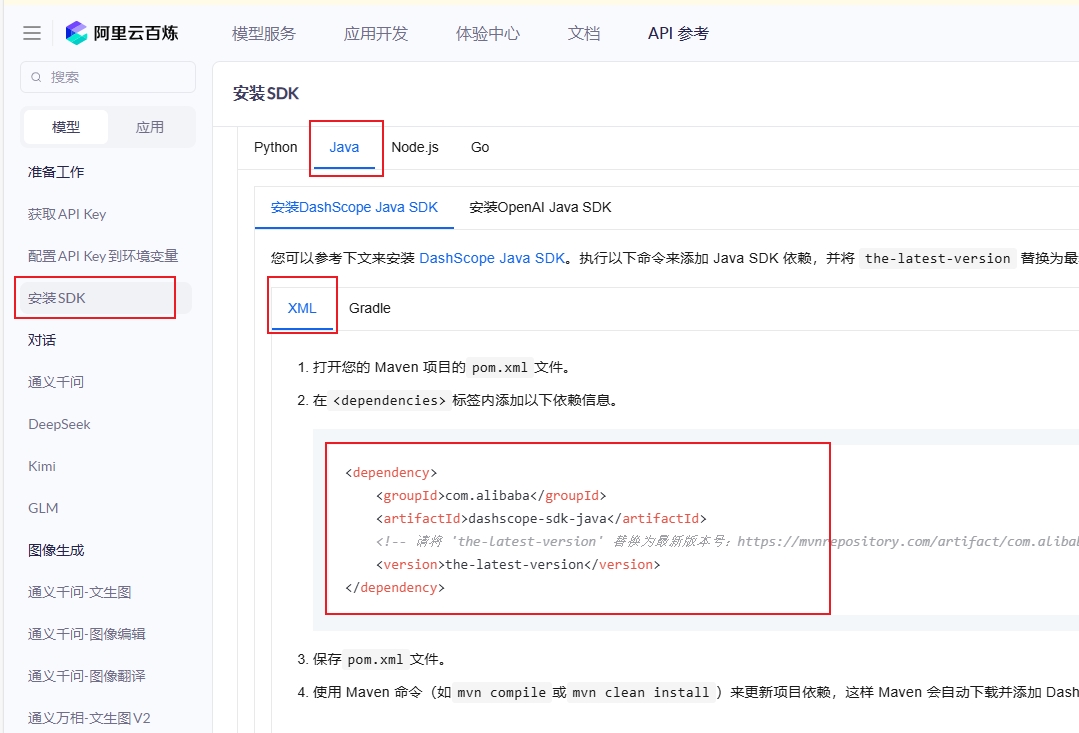
直接引入之后,有一个jar包冲突
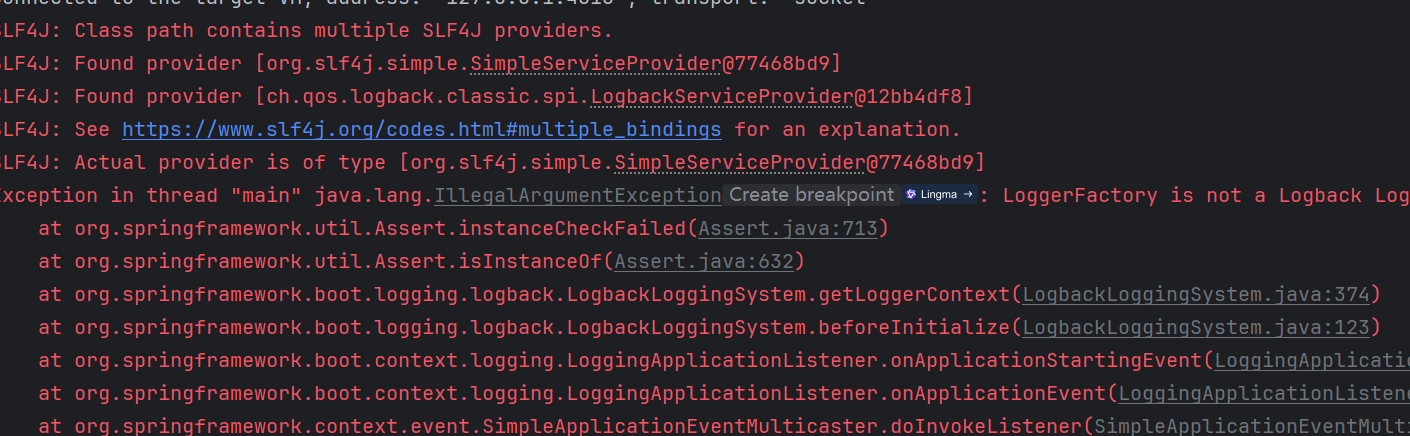
        <!--阿里云百炼-->
        <dependency>
            <groupId>com.alibaba</groupId>
            <artifactId>dashscope-sdk-java</artifactId>
            <version>2.22.2</version>
            <exclusions>
                <exclusion>
                    <groupId>org.slf4j</groupId>
                    <artifactId>slf4j-simple</artifactId>
                </exclusion>
            </exclusions>
        </dependency>
        <dependency>
            <groupId>com.google.code.gson</groupId>
            <artifactId>gson</artifactId>
            <version>2.10.1</version>
        </dependency>
3.2 寻找执行官方案例
package com.javasm.qingqing.aitest;

import java.util.Arrays;
import java.lang.System;
import com.alibaba.dashscope.aigc.generation.Generation;
import com.alibaba.dashscope.aigc.generation.GenerationParam;
import com.alibaba.dashscope.aigc.generation.GenerationResult;
import com.alibaba.dashscope.common.Message;
import com.alibaba.dashscope.common.Role;
import com.alibaba.dashscope.exception.ApiException;
import com.alibaba.dashscope.exception.InputRequiredException;
import com.alibaba.dashscope.exception.NoApiKeyException;
import com.alibaba.dashscope.protocol.Protocol;

public class Demo1 {
    public static GenerationResult callWithMessage() throws ApiException, NoApiKeyException, InputRequiredException {
        Generation gen = new Generation(Protocol.HTTP.getValue(), "https://dashscope.aliyuncs.com/api/v1");
        Message systemMsg = Message.builder()
                .role(Role.SYSTEM.getValue())
                .content("You are a helpful assistant.")
                .build();
        Message userMsg = Message.builder()
                .role(Role.USER.getValue())
                .content("你是谁?")
                .build();
        GenerationParam param = GenerationParam.builder()
                // 若没有配置环境变量,请用百炼API Key将下行替换为:.apiKey("sk-xxx")
                .apiKey(System.getenv("DASHSCOPE_API_KEY"))
                .model("qwen3-max")
                .messages(Arrays.asList(systemMsg, userMsg))
                .resultFormat(GenerationParam.ResultFormat.MESSAGE)
                .build();
        return gen.call(param);
    }
    public static void main(String[] args) {
        try {
            GenerationResult result = callWithMessage();
            System.out.println(result.getOutput().getChoices().get(0).getMessage().getContent());
        } catch (ApiException | NoApiKeyException | InputRequiredException e) {
            System.err.println("错误信息:"+e.getMessage());
        }
    }
}
3.2 测试其他案例
文字生成图片
package com.javasm.qingqing.aitest;

import com.alibaba.dashscope.aigc.multimodalconversation.MultiModalConversation;
import com.alibaba.dashscope.aigc.multimodalconversation.MultiModalConversationParam;
import com.alibaba.dashscope.aigc.multimodalconversation.MultiModalConversationResult;
import com.alibaba.dashscope.common.MultiModalMessage;
import com.alibaba.dashscope.common.Role;
import com.alibaba.dashscope.exception.ApiException;
import com.alibaba.dashscope.exception.NoApiKeyException;
import com.alibaba.dashscope.exception.UploadFileException;
import com.alibaba.dashscope.utils.Constants;
import com.alibaba.dashscope.utils.JsonUtils;

import java.io.IOException;
import java.util.Arrays;
import java.util.Collections;
import java.util.HashMap;
import java.util.Map;

public class QwenImage {

    static {
        // 以下为北京地域url,若使用新加坡地域的模型,需将url替换为:https://dashscope-intl.aliyuncs.com/api/v1
        Constants.baseHttpApiUrl = "https://dashscope.aliyuncs.com/api/v1";
    }

    // 新加坡和北京地域的API Key不同。获取API Key:https://help.aliyun.com/zh/model-studio/get-api-key
    // 若没有配置环境变量,请用百炼API Key将下行替换为:static String apiKey ="sk-xxx"
    static String apiKey = System.getenv("DASHSCOPE_API_KEY");

    public static void call() throws ApiException, NoApiKeyException, UploadFileException, IOException {

        MultiModalConversation conv = new MultiModalConversation();

        MultiModalMessage userMessage = MultiModalMessage.builder().role(Role.USER.getValue())
                .content(Arrays.asList(
                        Collections.singletonMap("text",
                                "一副背景是白色的对联黑体字,悬挂在灵堂中央,房间是一个安静古典的中式布局,红木的茶桌茶几,上面摆放着一些青花瓷和茶碗,大厅的正中央,摆放着一副黑木棺材,棺材前面挂着太阳的照片,对联上左书“感恩金将军”,右书“将军光芒万丈”, 横批“开会”,字体飘逸,在中间挂着一幅中国风的画作,内容是富士山。")
                )).build();

        Map<String, Object> parameters = new HashMap<>();
        parameters.put("watermark", false);
        parameters.put("prompt_extend", true);
        parameters.put("negative_prompt", "");
        parameters.put("size", "1472*1140");

        MultiModalConversationParam param = MultiModalConversationParam.builder()
                .apiKey(apiKey)
                .model("qwen-image-plus")
                .messages(Collections.singletonList(userMessage))
                .parameters(parameters)
                .build();

        MultiModalConversationResult result = conv.call(param);
        System.out.println(JsonUtils.toJson(result));
    }

    public static void main(String[] args) {
        try {
            call();
        } catch (ApiException | NoApiKeyException | UploadFileException | IOException e) {
            System.out.println(e.getMessage());
        }
        System.exit(0);
    }
}
-
文字生成视频
package com.javasm.qingqing.aitest;

// Copyright (c) Alibaba, Inc. and its affiliates.

import com.alibaba.dashscope.aigc.videosynthesis.VideoSynthesis;
import com.alibaba.dashscope.aigc.videosynthesis.VideoSynthesisListResult;
import com.alibaba.dashscope.aigc.videosynthesis.VideoSynthesisParam;
import com.alibaba.dashscope.aigc.videosynthesis.VideoSynthesisResult;
import com.alibaba.dashscope.exception.ApiException;
import com.alibaba.dashscope.exception.InputRequiredException;
import com.alibaba.dashscope.exception.NoApiKeyException;
import com.alibaba.dashscope.task.AsyncTaskListParam;
import com.alibaba.dashscope.utils.JsonUtils;
import com.alibaba.dashscope.utils.Constants;
import java.util.HashMap;
import java.util.Map;

public class Text2Video {


    static {
        // 以下为北京地域url,若使用新加坡地域的模型,需将url替换为:https://dashscope-intl.aliyuncs.com/api/v1
        Constants.baseHttpApiUrl = "https://dashscope.aliyuncs.com/api/v1";
    }

    // 若没有配置环境变量,请用百炼API Key将下行替换为:api_key="sk-xxx"
    // 新加坡和北京地域的API Key不同。获取API Key:https://www.alibabacloud.com/help/zh/model-studio/get-api-key
    public static String apiKey = System.getenv("DASHSCOPE_API_KEY");

    /**
     * Create a video compositing task and wait for the task to complete.
     */
    public static void text2Video() throws ApiException, NoApiKeyException, InputRequiredException {
        VideoSynthesis vs = new VideoSynthesis();
        Map<String, Object> parameters = new HashMap<>();
        parameters.put("prompt_extend", true);
        parameters.put("watermark", false);
        parameters.put("seed", 12345);

        VideoSynthesisParam param =
                VideoSynthesisParam.builder()
                        .apiKey(apiKey)
                        .model("wan2.5-t2v-preview")
                        .prompt("一幅史诗级可爱的场景。一只小巧可爱的卡通小猫将军,身穿细节精致的金色盔甲,头戴一个稍大的头盔,勇敢地站在悬崖上。他骑着一匹虽小但英勇的战马,说:”青海长云暗雪山,孤城遥望玉门关。黄沙百战穿金甲,不破楼兰终不还。“。悬崖下方,一支由老鼠组成的、数量庞大、无穷无尽的军队正带着临时制作的武器向前冲锋。这是一个戏剧性的、大规模的战斗场景,灵感来自中国古代的战争史诗。远处的雪山上空,天空乌云密布。整体氛围是“可爱”与“霸气”的搞笑和史诗般的融合。")
                        .audioUrl("https://help-static-aliyun-doc.aliyuncs.com/file-manage-files/zh-CN/20250923/hbiayh/%E4%BB%8E%E5%86%9B%E8%A1%8C.mp3")
                        .negativePrompt("")
                        .size("832*480")
                        .duration(10)
                        // .audio(true)
                        .parameters(parameters)
                        .build();

        // 异步调用
        VideoSynthesisResult task = vs.asyncCall(param);
        System.out.println(JsonUtils.toJson(task));
        System.out.println("please wait...");

        //获取结果
        VideoSynthesisResult result = vs.wait(task, apiKey);
        System.out.println(JsonUtils.toJson(result));
    }

    // 获取任务列表
    public static void listTask() throws ApiException, NoApiKeyException {
        VideoSynthesis is = new VideoSynthesis();
        AsyncTaskListParam param = AsyncTaskListParam.builder().build();
        param.setApiKey(apiKey);
        VideoSynthesisListResult result = is.list(param);
        System.out.println(result);
    }

    // 获取单个任务结果
    public static void fetchTask(String taskId) throws ApiException, NoApiKeyException {
        VideoSynthesis is = new VideoSynthesis();
        // 如果已设置 DASHSCOPE_API_KEY 为环境变量,apiKey 可为空
        VideoSynthesisResult result = is.fetch(taskId, apiKey);
        System.out.println(result.getOutput());
        System.out.println(result.getUsage());
    }

    public static void main(String[] args) {
        try {
            text2Video();
        } catch (ApiException | NoApiKeyException | InputRequiredException e) {
            System.out.println(e.getMessage());
        }
        System.exit(0);
    }
}
三、WebSocket + 云百炼
1、案例:AI陪聊
-
实现思路
-
点击首页游戏列表中,推荐的陪玩头像
-
跳转到个人用户的私聊页面
-
模拟AI与用户聊天
-
-
跳转传值
-
url中携带聊天id,根据聊天id的值,查询到当前聊天用户的信息
-
把首页中,已经查询到的用户信息,通过pinia传输
-
-
页面接收参数
-
首页跳转传入的参数接收到
-
从pina中取出
-
-
整体思路
-
使用WebSocket,做前后端分离的数据传输
-
前端项目和后端项目,可以互相发消息
-
使用JSON作为互相传输的格式
-
先写好WebSocket端的代码
-
WebSocket中,接入AI,改造官方的Demo案例
-
测试AI的官方案例代码
-
实现AI的调用
-
发送用户的信息,服务端接收问题,把问题发送给AI
-
服务端把AI的答案,返回给前端
-
保存聊天记录
-
前端处理显示回答
-
-
先后端,后前端
1.1 生成代码
-
web_user_ai
-
一部分用户为ai用户
-
记录了ai用户的人设,和使用的模型
-
-
chat_history
-
记录了A用户和其他用户的聊天记录唯一编码
-
用户每和1个人聊天,都会产生一条聊天记录
-
-
chat_history_info
-
作为聊天记录表的副表
-
chat_history和当前表是一对多的关系
-
1条聊天记录,里面包含了很多条聊天内容
-
1.2 记录聊天记录详情
@Service("chatHistoryInfoService")
public class ChatHistoryInfoServiceImpl extends ServiceImpl<ChatHistoryInfoDao, ChatHistoryInfo> implements ChatHistoryInfoService {
@Override
public void saveHistory(Integer chatId, Integer uid, String msg) {
ChatHistoryInfo chatHistoryInfo = new ChatHistoryInfo();
chatHistoryInfo.setChatId(chatId);
chatHistoryInfo.setUid(uid);
chatHistoryInfo.setMessage(msg);
chatHistoryInfo.setCtime(new Date());
save(chatHistoryInfo);
}
@Override
@Transactional
public void saveHistory(Integer chatId, Integer touid, List<String> urlList) {
List<ChatHistoryInfo> saveList = new ArrayList<>();
urlList.forEach(url ->{
ChatHistoryInfo chatHistoryInfo = new ChatHistoryInfo();
chatHistoryInfo.setChatId(chatId);
chatHistoryInfo.setUid(touid);
chatHistoryInfo.setMessage(url);
chatHistoryInfo.setCtime(new Date());
saveList.add(chatHistoryInfo);
});
saveBatch(saveList);
}
@Override
public List<ChatHistoryInfo> queryListByChatId(Integer chatId) {
//根据聊天id 查询聊天记录
LambdaQueryWrapper<ChatHistoryInfo> queryWrapper = new LambdaQueryWrapper<>();
queryWrapper.eq(ChatHistoryInfo::getChatId,chatId);
//查询最后5条聊天记录
queryWrapper.orderByDesc(ChatHistoryInfo::getCtime);
queryWrapper.last("limit 5");
//聊天记录的结果
List<ChatHistoryInfo> list = list(queryWrapper);
//按照id 正序排列
list.sort((Comparator.comparing(ChatHistoryInfo::getId)));
return list;
}
}
1.3 获取聊天id
@Service("chatHistoryService")
public class ChatHistoryServiceImpl extends ServiceImpl<ChatHistoryDao, ChatHistory> implements ChatHistoryService {
@Override
public Integer queryIdByMyUidAndToUid(Integer myuid, Integer touid) {
//已知两个人的uid,查询出这两个人的聊天记录id
LambdaQueryWrapper<ChatHistory> queryWrapper = new LambdaQueryWrapper<>();
queryWrapper.eq(ChatHistory::getUid,myuid);
queryWrapper.eq(ChatHistory::getTouid,touid);
ChatHistory one = getOne(queryWrapper);
if (one != null){
return one.getId();
}
//如果之前没有聊过
ChatHistory chatHistory = new ChatHistory();
chatHistory.setUid(myuid);
chatHistory.setTouid(touid);
save(chatHistory);
return chatHistory.getId();
}
}
1.4 WebSocket
@Data
@NoArgsConstructor
@AllArgsConstructor
public class AiMessage {
    //协议
    private Integer agreement;
    //返回给前端的答案
    private String answer;
    //回答的状态 0开始回答,1正在回答,2回答结束
    private Integer status;
}
@Data
@NoArgsConstructor
@AllArgsConstructor
public class WebUserAi extends Model<WebUserAi> {
@TableId(type = IdType.INPUT)
private Integer uid;
//人物性格
@TableField("`character`")
private String character;
//模型
private String model;
}
1.5 页面
-
新建pina的js文件,用于存储数据
import {ref} from 'vue'
import {defineStore} from "pinia";
export default defineStore('chatUserStore',()=>{
const user = ref({
uid: -1,
gid: 1,
nickname: "",
headPic: "",
price: 0
})
return {
user
}
},{
persist:{
storage: sessionStorage,
paths:['user']
}
})
1.6 跳转的方法
<template>
<div class="hot-room">
<div class="row">
<h1>人气推荐</h1>
</div>
<div class="row">
<div v-for="game in game_list"
class="col-md-2 col-lg-1 card a game-card"
:id="'game-card-'+game.id" @click="viewUser(game.id)">
<img :src="game.icon">
<div class="card-body">
<h6 class="card-title">{{game.name}}</h6>
</div>
</div>
</div>
<div class="row skill-list">
<div v-for="user in game_user_list"
class="col-lg-2 col-md-4 card skill-card"
@click="jumpAiMessage(user)">
<img :src="user.headPic">
<div class="card-body">
<h5 class="card-title">{{user.nickname}}</h5>
</div>
<div class="card-body row">
<div class="col">
<span class="bg-success text-white p-1">{{user.gameName}}</span>
</div>
<div class="col">
<span class="text-danger a">{{user.price}}/小时</span>
</div>
</div>
</div>
</div>
</div>
</template>
<script setup>
import {ref, onMounted, nextTick} from "vue";
import router from '@/router/index'
import api from '@/utils/request.js'
import UserHomeGameStore from "@/stores/UserHomeGameStore.js";
let game_list = ref([])
let game_user_list=ref([])
import ChatUserSotre from "@/stores/ChatUserSotre.js";
let jumpAiMessage =(user)=>{
ChatUserSotre().user = user;
router.push("/ai/index")
}
let viewUser = (gameId) => {
//移除game-card的class属性 active
document.querySelectorAll(".game-card").forEach(item => {
item.classList.remove("active")
})
//添加当前game-card的class属性 active
document.querySelector("#game-card-" + gameId).classList.add("active")
game_user_list.value = game_map.value.get(gameId);
}
let query=()=>{
//先去SessionStorage中查询数据
if (UserHomeGameStore().gameList.length > 0){
//本地有数据,已经缓存了
game_list.value = UserHomeGameStore().gameList;
createMap(UserHomeGameStore().gameList)
nextTick(()=>{
viewUser(-1)
})
}else {
api.get("/home/game").then(result=>{
//本页循环需要使用的数据
game_list.value = result.data;
//本地SessionStorage缓存数据
UserHomeGameStore().gameList = result.data;
createMap(result.data)
nextTick(()=>{
viewUser(-1)
})
})
}
}
let game_map = ref({})
function createMap(list){
let map = new Map();
list.forEach(game=>{
map.set(game.id,game.gameSkillList);
})
game_map.value = map;
}
onMounted(() => {
query();
});
</script>
<style scoped>
</style>
1.7 聊天页面,显示对方的信息
<template>
<Top/>
<div class="container-fluid main-content-wrapper">
<div class="content-page-box-area">
<div class="all-messages-body">
<div class="all-messages-header d-flex justify-content-between align-items-center">
<h3>消息</h3>
</div>
<div class="messages-profile-box">
<a href="/ai">
<img :src="toUser.headPic" style="width: 100px;" class="rounded-circle" alt="image">
</a>
<h3><a href="#">{{toUser.nickname}}</a></h3>
</div>
<div class="messages-chat-container">
<div class="chat-content" id="chat-content"></div>
<div class="chat-list-footer">
<div class="d-flex align-items-center">
<div class="btn-box d-flex align-items-center me-3">
<button class="file-attachment-btn d-inline-block me-2" data-bs-toggle="tooltip"
data-bs-placement="top" title="File Attachment" type="button"><i
class="ri-attachment-2"></i></button>
<button class="emoji-btn d-inline-block" data-bs-toggle="tooltip"
data-bs-placement="top" title="Emoji" type="button"><i
class="ri-user-smile-line"></i></button>
</div>
<input type="text" class="form-control" placeholder="输入消息..." v-model="messageStr"
@keyup.enter="sendMsg">
<button type="button" class="send-btn d-inline-block" @click="sendMsg">发送</button>
</div>
</div>
</div>
</div>
</div>
</div>
<Footer/>
</template>
<script setup>
import {ref, onMounted} from "vue";
import router from '@/router/index.js'
import api from '@/utils/request.js';
import Top from "@/components/common/Top.vue";
import Footer from "@/components/common/Footer.vue";
import ChatUserSotre from "@/stores/ChatUserSotre.js";
let toUser = ChatUserSotre().user;
onMounted(() => {
})
</script>
<style scoped>
</style>
1.8.建立socket连接
<template>
<Top/>
<div class="container-fluid main-content-wrapper">
<div class="content-page-box-area">
<div class="all-messages-body">
<div class="all-messages-header d-flex justify-content-between align-items-center">
<h3>消息</h3>
</div>
<div class="messages-profile-box">
<a href="/ai">
<img :src="toUser.headPic" style="width: 100px;" class="rounded-circle" alt="image">
</a>
<h3><a href="#">{{toUser.nickname}}</a></h3>
</div>
<div class="messages-chat-container">
<div class="chat-content" id="chat-content"></div>
<div class="chat-list-footer">
<div class="d-flex align-items-center">
<div class="btn-box d-flex align-items-center me-3">
<button class="file-attachment-btn d-inline-block me-2" data-bs-toggle="tooltip"
data-bs-placement="top" title="File Attachment" type="button"><i
class="ri-attachment-2"></i></button>
<button class="emoji-btn d-inline-block" data-bs-toggle="tooltip"
data-bs-placement="top" title="Emoji" type="button"><i
class="ri-user-smile-line"></i></button>
</div>
<input type="text" class="form-control" placeholder="输入消息..." v-model="messageStr"
@keyup.enter="sendMessage">
<button type="button" class="send-btn d-inline-block" @click="sendMessage">发送</button>
</div>
</div>
</div>
</div>
</div>
</div>
<Footer/>
</template>
<script setup>
import {ref, onMounted} from "vue";
import router from '@/router/index.js'
import api from '@/utils/request.js';
import socket from "@/utils/socket.js";
import UserStore from "@/stores/UserStore.js";
import Top from "@/components/common/Top.vue";
import Footer from "@/components/common/Footer.vue";
import ChatUserSotre from "@/stores/ChatUserSotre.js";
let toUser = ChatUserSotre().user;
let loginUser = UserStore().userModel;
//获取当前用户,和对方的用户信息
let toUid = toUser.uid;
let myUid = loginUser.uid;
let messageStr = ref("");
let webSocket;
let initWebSocket=()=>{
//ws://192.168.0.151:8080/ai/textChat/{myuid}/{touid}
let url = "/ai/textChat/"+myUid+"/"+toUid;
//调用封装好的方法,连接socket
socket.initWebSocket(url);
webSocket = socket.getWebSocket();
//打印收到的消息
webSocket.onmessage=e=>printMessage(e.data);
}
let sendMessage = () => {
let param = {
"question": messageStr.value
}
webSocket.send(JSON.stringify(param));
//清空聊天框
messageStr.value = "";
}
let chatNum = 0;
let printMessage = (msg)=>{
let msgObj = JSON.parse(msg);
//协议号
let agreement = msgObj.agreement
let pic;
let chat_mine = "";
let html = "";
switch (agreement) {
case 3001:
//3001 是用户自己发出去的消息
let question = msgObj.answer;
//用户头像
pic = loginUser.userInfo.headPic
//默认不是我的
chat_mine = "chat-right";
html = '<div class="chat ' + chat_mine + '">\n' +
' <div class="chat-avatar">\n' +
' <a class="d-inline-block">\n' +
' <img src="' + pic + '" width="50" height="50"\n' +
' class="rounded-circle" alt="image">\n' +
' </a>\n' +
' </div>\n' +
' <div class="chat-body">\n' +
' <div class="chat-message">\n' +
' <p>' + question + '</p>\n' +
' </div>\n' +
' </div>\n' +
' </div>\n' +
' </div>'
document.getElementById("chat-content").insertAdjacentHTML("beforeend", html);
break;
case 3002:
//是ai发送来的,一定是在对面
let answer = msgObj.answer;
//用户头像
pic = toUser.headPic;
let status = msgObj.status;
switch (status){
case 0:
//开始回答问题,创建一个空的聊天框,没有聊天内容
html = '<div class="chat ' + chat_mine + '">\n' +
' <div class="chat-avatar">\n' +
' <a class="d-inline-block">\n' +
' <img src="' + pic + '" width="50" height="50"\n' +
' class="rounded-circle" alt="image">\n' +
' </a>\n' +
' </div>\n' +
' <div class="chat-body">\n' +
//记录 当前是页面里的第几个聊天框
' <div class="chat-message" id="chat-meesage-'+chatNum+'"></div>\n' +
' </div>\n' +
' </div>\n' +
' </div>';
document.getElementById("chat-content").insertAdjacentHTML("beforeend", html);
break;
case 1:
//回答问题的过程,是ai返回的内容,要追加到聊天框里
document.getElementById("chat-meesage-"+chatNum)
.insertAdjacentHTML("beforeend", answer);
break;
case 2:
//回答结束
chatNum++;
break;
}
break;
}
}
onMounted(() => {
initWebSocket()
console.log(toUid)
})
</script>
<style scoped>
</style>
1.9 解决md语法显示的问题
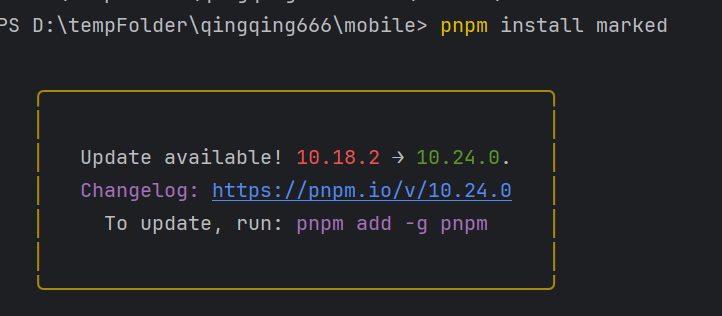
引入插件
pnpm install marked
-
页面引入插件
import {marked} from "marked";
-
调用
marked(msgContent)
1.10 添加聊天记录
<template>
  <Top/>
  <div class="container-fluid main-content-wrapper">
    <div class="content-page-box-area">
      <div class="all-messages-body">
        <div class="all-messages-header d-flex justify-content-between align-items-center">
          <h3>消息</h3>
        </div>
        <div class="messages-profile-box">
          <a href="/ai">
            <img :src="toUser.headPic" style="width: 100px;" class="rounded-circle" alt="image">
          </a>
          <h3><a href="#">{{toUser.nickname}}</a></h3>
        </div>
        <div class="messages-chat-container">
          <div class="chat-content" id="chat-content"></div>
          <div class="chat-list-footer">
            <div class="d-flex align-items-center">
              <div class="btn-box d-flex align-items-center me-3">
                <button class="file-attachment-btn d-inline-block me-2" data-bs-toggle="tooltip"
                        data-bs-placement="top" title="File Attachment" type="button"><i
                    class="ri-attachment-2"></i></button>
                <button class="emoji-btn d-inline-block" data-bs-toggle="tooltip"
                        data-bs-placement="top" title="Emoji" type="button"><i
                    class="ri-user-smile-line"></i></button>
              </div>
              <input type="text" class="form-control" placeholder="输入消息..." v-model="messageStr"
                     @keyup.enter="sendMessage">
              <button type="button" class="send-btn d-inline-block" @click="sendMessage">发送</button>
            </div>
          </div>
        </div>
      </div>
    </div>
  </div>
  <Footer/>
</template>

<script setup>
import {ref, onMounted} from "vue";
import router from '@/router/index.js'
import api from '@/utils/request.js';
import socket from "@/utils/socket.js";
import UserStore from "@/stores/UserStore.js";
import Top from "@/components/common/Top.vue";
import Footer from "@/components/common/Footer.vue";
import {marked} from "marked";


import ChatUserSotre from "@/stores/ChatUserSotre.js";
let toUser = ChatUserSotre().user;
let loginUser = UserStore().userModel;
//获取当前用户,和对方的用户信息
let toUid = toUser.uid;
let myUid = loginUser.uid;

let messageStr = ref("");

let webSocket;
let initWebSocket=()=>{
    //ws://192.168.0.151:8080/ai/textChat/{myuid}/{touid}
    let url = "/ai/textChat/"+myUid+"/"+toUid;
    //调用封装好的方法,连接socket
    socket.initWebSocket(url);
    webSocket = socket.getWebSocket();
    //打印收到的消息
    webSocket.onmessage=e=>printMessage(e.data);
}
let sendMessage = () => {
  let param = {
    "question": messageStr.value
  }

  webSocket.send(JSON.stringify(param));
  //清空聊天框
  messageStr.value = "";
}
let chatNum = 0;
let printMessage = (msg)=>{
  let msgObj = JSON.parse(msg);
  //协议号
  let agreement = msgObj.agreement
  let pic;
  let chat_mine = "";
  let html = "";
  switch (agreement) {
    case 3001:
      //3001 是用户自己发出去的消息
      let question = msgObj.answer;
      //用户头像
      pic = loginUser.userInfo.headPic
      //默认不是我的
      chat_mine = "chat-right";
      printChatHtml(chat_mine,pic,question)
      break;
    case 3002:
      //是ai发送来的,一定是在对面
      let answer = msgObj.answer;
      //用户头像
      pic = toUser.headPic;
      let status = msgObj.status;
      switch (status){
        case 0:
          allAnswer = "";
          //开始回答问题,创建一个空的聊天框,没有聊天内容
          html = '<div class="chat ' + chat_mine + '">\n' +
              '                <div class="chat-avatar">\n' +
              '                  <a class="d-inline-block">\n' +
              '                    <img src="' + pic + '" width="50" height="50"\n' +
              '                         class="rounded-circle" alt="image">\n' +
              '                  </a>\n' +
              '                </div>\n' +
              '                <div class="chat-body">\n' +
              //记录 当前是页面里的第几个聊天框
              '                  <div class="chat-message" id="chat-meesage-'+chatNum+'"></div>\n' +
              '                </div>\n' +
              '              </div>\n' +
              '            </div>';
          document.getElementById("chat-content").insertAdjacentHTML("beforeend", html);
          break;
        case 1:
          //回答问题的过程,是ai返回的内容,要追加到聊天框里
          document.getElementById("chat-meesage-"+chatNum)
              .insertAdjacentHTML("beforeend", answer);
          //每次的答案内容,都存储的同一个变量
          allAnswer += answer;
          break;
        case 2:
          //回答结束
            html = marked(allAnswer);
          document.getElementById("chat-meesage-"+chatNum).innerHTML = marked(allAnswer);
          allAnswer = "";
          chatNum++;
          break;
      }

      break;
    case 2001:
      //聊天记录
        let chatList = msgObj.list;
        chatList.forEach(chat=>{
          let msgUid = chat.uid;
          let msgContent = chat.message;
          let chat_mine = "";
          let chat_Pic = toUser.headPic;
          if (msgUid === myUid){
            chat_mine = "chat-right"
            chat_Pic = loginUser.userInfo.headPic;
          }
          printChatHtml(chat_mine,chat_Pic,marked(msgContent))
        })
      break;
  }

}

let allAnswer = "";

let printChatHtml = (chat_mine,pic,question)=>{
  let html = '<div class="chat ' + chat_mine + '">\n' +
      '                <div class="chat-avatar">\n' +
      '                  <a class="d-inline-block">\n' +
      '                    <img src="' + pic + '" width="50" height="50"\n' +
      '                         class="rounded-circle" alt="image">\n' +
      '                  </a>\n' +
      '                </div>\n' +
      '                <div class="chat-body">\n' +
      '                  <div class="chat-message">\n' +
      '                    <p>' + question + '</p>\n' +
      '                  </div>\n' +
      '                </div>\n' +
      '              </div>\n' +
      '            </div>'
  document.getElementById("chat-content").insertAdjacentHTML("beforeend", html);
}
onMounted(() => {
  initWebSocket()
  console.log(toUid)
})
</script>


<style scoped>

</style>
2、案例:图片生成图片
效果:用户在聊天的时候,如果上传了图片,会按照用户描述的内容加上图片的内容,给用户生成新的图片
生成的图片,返回到聊天对话框中
2.1 上传按钮 和 预览图片
<div class="row">
              <div class="col-md-12">
                <input type="file" accept="image/*" @change="onFileSelected">
              </div>

            </div>
            <div class="row">
              <div class="col-md-12">
                <img :src="previewImage" style="width: 100%"/>
              </div>
            </div>
//预览图的路径
let previewImage = ref("")
//当前正在选择的图片对象,点击发送按钮的时候使用
let consultFile = null;
//上传的方法
let onFileSelected=(event)=>{
    //获取文件
  const file = event.target.files[0];
  //如果传了文件
  if (file){
    //新建一个读取图片对象
    const reader = new FileReader();
    //当图片被加载的时候,执行的方法
    reader.onload=(e)=>{
      previewImage.value = e.target.result;
    }
    //读取图片
    reader.readAsDataURL(file)
    consultFile = file;
  }
}
2.2 发送图片
//发送图片到服务器
function sendImage(){
  //通过WebSocket发送,发送二进制数据,到服务器
  const reader = new FileReader();
  reader.onload=(e)=>{
    //获取图片的二进制数据
    let imgbytes = new Uint8Array(e.target.result);
    //构建图片的头信息--告诉服务器,来的二进制数据,类型是图片
    //发送二进制数据到服务端的时候,固定前6位,表示文件类型
    const header = new TextEncoder().encode("IMAGE:")
    //构建完整的数据
    const conbined = new Uint8Array(header.length +imgbytes.length);
    //从第0位开始,是header的信息
    conbined.set(header,0);
    //header结尾的位置开始,是图片的数据
    conbined.set(imgbytes,header.length);
    //数据准备完成,判断session是否存在
    if (webSocket.readyState === WebSocket.OPEN){
      //连接状态
      //发送二进制数据
      webSocket.send(conbined.buffer);
      console.log("图片上传完成")
    }else {
      console.error("WebSocket未连接,无法发送图片")
    }

  }

  //读取图片
  reader.readAsArrayBuffer(consultFile);
}
2.3 在js中的WebSocket,添加配置二进制数据
let webSocket;

export default {
    //初始化socket连接
    initWebSocket(url){
        let baseUrl = import.meta.env.VITE_APP_WebSocket_BASE_API;
        ///room/mws://127.0.0.1:8080ultiuser/{roomId}/{uid}

        if ('WebSocket' in  window){
            //判断当前浏览器是否支持WebSocket
            webSocket = new WebSocket(baseUrl + url);
            //设置二进制类型是arraybuffer
            webSocket.binaryType='arraybuffer';
        }
        //连接WebSocket,在客户端发生的事情
        webSocket.onopen = function (){
            console.log("连接成功!")
        }
        //当连接关闭的时候,执行的方法
        webSocket.onclose = function (){
            console.log("断开 连接")
        }
        window.onbeforeunload = function (){
            //当页面刷新的时候,主动关闭连接
            webSocket.close(3000,"关闭");
        }


    },
    getWebSocket(){
        return webSocket;
    }
}
2.4 发送消息
计划让文字消息,和图片消息,一起发送,通过参数来区分是图片消息还是文字消息
文本已经分为了两个类型 文字消息和文字+图片的消息
let sendMessage = () => {
  //type 1文字消息 2图片消息
  let type = 1;
  if (consultFile){
      //如果有图片,先把图片上传到服务器,等待文字消息上传
    sendImage();
    type = 2;
  }
  let param = {
    "question": messageStr.value,
    "type":type
  }


  webSocket.send(JSON.stringify(param));
  //清空聊天框
  messageStr.value = "";
}
2.5 修改WebSocket,允许上传二进制数据
现在需要接收二进制数据
必须在OnOpen的位置,设置好,二进制消息的缓冲区
如果这里忘记了设置,无法接收二进制消息
只要发送了二进制消息,就会自动断开连接
-
配置服务器端二进制
    @OnOpen
    public void startAi(@PathParam("myuid") Integer myuid,
                        @PathParam("touid") Integer touid,
                        Session session) throws IOException {
        //设置二进制缓冲区 100MB-- 缓冲区大小,不能超过jvm的内存空间
        session.setMaxBinaryMessageBufferSize(100 * 1024 * 1024);
    }
2.6 修改OnMessage
新增对图片的处理
    //处理二进制文件
    @OnMessage
    public void onMessage(@PathParam("myuid") Integer myuid,
                          @PathParam("touid") Integer touid,
                          Session session,byte[] bytes){
        //预先预定好,所有的文件上传,都要配置一个头信息,以此区分不同的文件类型
        //进入的二进制数据,必须长度 >6
        if (bytes == null || bytes.length < 6){
            return;
        }
        //解析头信息
        String header = new String(bytes,0,6, StandardCharsets.UTF_8);
        if ("IMAGE:".equals(header)){
            //是图片,根据图片的方案,继续处理
            byte[] imageData = Arrays.copyOfRange(bytes,6,bytes.length);

            image2image(myuid,touid,session,imageData);
        }
    }

    private void image2image(Integer myuid, Integer touid, Session session, byte[] imageData) {

    }
2.7 编写图片生成图片的方法
找到AI能够图片生成图片的模型
计划使用url地址,访问ai的接口,这样更具有通用性。
curl --location 'https://dashscope.aliyuncs.com/api/v1/services/aigc/multimodal-generation/generation' \
--header 'Content-Type: application/json' \
--header "Authorization: Bearer $DASHSCOPE_API_KEY" \
--data '{
    "model": "qwen-image-edit-plus",
    "input": {
        "messages": [
            {
                "role": "user",
                "content": [
                    {
                        "image": "https://help-static-aliyun-doc.aliyuncs.com/file-manage-files/zh-CN/20250925/fpakfo/image36.webp"
                    },
                    {
                        "text": "生成一张符合深度图的图像,遵循以下描述:一辆红色的破旧的自行车停在一条泥泞的小路上,背景是茂密的原始森林"
                    }
                ]
            }
        ]
    },
    "parameters": {
        "n": 2,
        "negative_prompt": " ",
        "prompt_extend": true,
        "watermark": false
    }
}'
2.8 参数Vo
/**
 * 图片到图片的请求VO类
 * 用于封装调用AI图像编辑接口所需的数据
 */
@Data
@NoArgsConstructor
public class Image2ImageVo {

    /**
     * 构造方法
     *
     * @param message 文本消息内容,将被设置为content.text
     * @param imgUrl 图片URL,将被设置为content.image
     * @param modelName 模型名称,将被设置为model属性
     */
    public Image2ImageVo(String message, String imgUrl, String modelName) {
        // 设置模型名称
        this.model = modelName;

        // 创建输入参数
        this.input = new Input();

        // 创建消息列表
        List<Message> messages = new ArrayList<>();
        Message msg = new Message();
        msg.role = "user"; // 默认角色设置为"user"

        // 创建内容列表
        List<Content> contents = new ArrayList<>();

        // 添加图片内容(如果提供了图片URL)
        if (imgUrl != null && !imgUrl.isEmpty()) {
            ImageContent imageContent = new ImageContent();
            imageContent.setImage(imgUrl);
            contents.add(imageContent);
        }

        // 添加文本内容(如果提供了文本消息)
        if (message != null && !message.isEmpty()) {
            TextContent textContent = new TextContent();
            textContent.setText(message);
            contents.add(textContent);
        }

        // 设置内容列表到消息中
        msg.content = contents;
        // 将消息添加到消息列表中
        messages.add(msg);
        // 设置消息列表到输入参数中
        this.input.messages = messages;

        // 创建默认参数配置
        this.parameters = new Parameters();
        this.parameters.n = 2; // 默认生成2张图片
        this.parameters.prompt_extend = true; // 默认启用提示词扩展
        this.parameters.watermark = false; // 默认不添加水印
        this.parameters.negative_prompt = ""; // 默认空的负面提示词
    }

    /**
     * 模型名称
     */
    private String model;

    /**
     * 输入参数
     */
    private Input input;

    /**
     * 其他参数配置
     */
    private Parameters parameters;

    /**
     * 输入参数内部类
     */
    @Data
    public static class Input {
        /**
         * 消息列表
         */
        private List<Message> messages;
    }

    /**
     * 参数配置内部类
     */
    @Data
    public static class Parameters {
        /**
         * 生成图片数量
         */
        private Integer n;

        /**
         * 负面提示词
         */
        private String negative_prompt;

        /**
         * 是否扩展提示词
         */
        private boolean prompt_extend;

        /**
         * 是否添加水印
         */
        private boolean watermark;
    }

    /**
     * 消息内部类
     */
    @Data
    public static class Message {
        /**
         * 角色
         */
        private String role;

        /**
         * 内容列表
         */
        private List<Content> content;
    }

    /**
     * 内容项基类
     * 根据JSON结构,实际使用时会创建其子类ImageContent或TextContent
     */
    @Data
    public static class Content {
        // 基类,不包含具体字段
    }

    /**
     * 图片内容项
     */
    @Data
    public static class ImageContent extends Content {
        /**
         * 图片URL
         */
        private String image;
    }

    /**
     * 文本内容项
     */
    @Data
    public static class TextContent extends Content {
        /**
         * 文本内容
         */
        private String text;
    }
}
2.9 结果VO
{
    "output": {
        "choices": [
            {
                "finish_reason": "stop",
                "message": {
                    "role": "assistant",
                    "content": [
                        {
                            "image": "https://dashscope-result-sz.oss-cn-shenzhen.aliyuncs.com/xxx.png?Expires=xxx"
                        },
                        {
                            "image": "https://dashscope-result-sz.oss-cn-shenzhen.aliyuncs.com/xxx.png?Expires=xxx"
                        }
                    ]
                }
            }
        ]
    },
    "usage": {
        "width": 1248,
        "image_count": 2,
        "height": 832
    },
    "request_id": "bf37ca26-0abe-98e4-8065-xxxxxx"
}
package com.javasm.qingqing.chat.client.vo;

import com.fasterxml.jackson.core.JsonParser;
import com.fasterxml.jackson.core.ObjectCodec;
import com.fasterxml.jackson.databind.*;
import com.fasterxml.jackson.databind.annotation.JsonDeserialize;
import com.fasterxml.jackson.databind.node.ObjectNode;
import lombok.Data;
import lombok.NoArgsConstructor;

import java.io.IOException;
import java.util.List;

/**
 * 图片到图片的响应结果类
 * 用于接收和解析AI图像编辑接口返回的数据
 */
@Data
@NoArgsConstructor
public class Image2ImageResult {

    /**
     * 输出结果
     */
    private Output output;

    /**
     * 使用情况统计
     */
    private Usage usage;

    /**
     * 请求ID
     */
    private String request_id;

    /**
     * 输出结果内部类
     */
    @Data
    public static class Output {
        /**
         * 选择结果列表
         */
        private List<Choice> choices;
    }

    /**
     * 选择结果内部类
     */
    @Data
    public static class Choice {
        /**
         * 结束原因
         */
        private String finish_reason;

        /**
         * 消息内容
         */
        private Message message;
    }

    /**
     * 消息内部类
     */
    @Data
    public static class Message {
        /**
         * 角色
         */
        private String role;

        /**
         * 内容列表
         */
        @JsonDeserialize(using = ContentDeserializer.class)
        private List<Content> content;
    }

    /**
     * 内容项基类
     */
    @Data
    public static class Content {
        // 基类,不包含具体字段
    }

    /**
     * 图片内容项
     */
    @Data
    public static class ImageContent extends Content {
        /**
         * 图片URL
         */
        private String image;
    }

    /**
     * 内容反序列化器
     */
    public static class ContentDeserializer extends JsonDeserializer<List<Content>> {
        @Override
        public List<Content> deserialize(JsonParser jsonParser, DeserializationContext deserializationContext) throws IOException {
            ObjectCodec codec = jsonParser.getCodec();
            JsonNode node = codec.readTree(jsonParser);

            if (node.isArray()) {
                List<Content> contentList = new java.util.ArrayList<>();
                for (JsonNode contentNode : node) {
                    if (contentNode.has("image")) {
                        ImageContent imageContent = new ImageContent();
                        imageContent.setImage(contentNode.get("image").asText());
                        contentList.add(imageContent);
                    } else {
                        contentList.add(new Content());
                    }
                }
                return contentList;
            }

            return new java.util.ArrayList<>();
        }
    }

    /**
     * 使用情况统计内部类
     */
    @Data
    public static class Usage {
        /**
         * 图片宽度
         */
        private Integer width;

        /**
         * 图片数量
         */
        private Integer image_count;

        /**
         * 图片高度
         */
        private Integer height;
    }
}
2.10 HttpClient
@Component
public class TongYiHttpClient {

    @Resource
    RestTemplate restTemplate;

    private static final String Image2ImageUrl =
            "https://dashscope.aliyuncs.com/api/v1/services/aigc/multimodal-generation/generation";

    private static final String TongYiKey = System.getenv("DASHSCOPE_API_KEY");

    //message生成图片的文字描述
    //imageUrl在线图片的地址
    //modelName 模型的名称
    public List<String> sendImage2Image(String message, String imgUrl, String modelName) {
        //Header
        HttpHeaders headers = new HttpHeaders();
        //--header 'Content-Type: application/json' \
        headers.setContentType(MediaType.APPLICATION_JSON);
        //--header "Authorization: Bearer $DASHSCOPE_API_KEY" \
        headers.set("Authorization", "Bearer " + TongYiKey);
        //配置参数
        Image2ImageVo vo = new Image2ImageVo(message, imgUrl, modelName);
        //创建request对象,发送数据
        HttpEntity<Image2ImageVo> request = new HttpEntity<>(vo, headers);
        //发送请求,生成图片,同步生成,代码到这里会等待
        Image2ImageResult image2ImageResult =
                restTemplate.postForObject(Image2ImageUrl, request, Image2ImageResult.class);
        //根据响应的地址,获取图片集合
        List<Image2ImageResult.Content> contentList = image2ImageResult.getOutput().getChoices().get(0).getMessage().getContent();
        //筛选出图片结果的url集合
        List<String> urlList = contentList.stream().map(content -> {
            Image2ImageResult.ImageContent img = (Image2ImageResult.ImageContent) content;
            return img.getImage();
        }).toList();
        return urlList;
    }
}
2.12 上传二进制数据,保存为在线图片
-
引入七牛云的依赖
        <dependency>
            <groupId>com.qiniu</groupId>
            <artifactId>qiniu-java-sdk</artifactId>
            <version>[7.7.0, 7.10.99]</version>
        </dependency>
-
新建配置类
package com.javasm.qingqing.common.utils;

import com.alibaba.fastjson2.JSON;

import com.qiniu.common.QiniuException;
import com.qiniu.http.Response;
import com.qiniu.storage.Configuration;
import com.qiniu.storage.Region;
import com.qiniu.storage.UploadManager;
import com.qiniu.storage.model.DefaultPutRet;
import com.qiniu.util.Auth;
import lombok.Getter;
import org.apache.logging.log4j.LogManager;
import org.apache.logging.log4j.Logger;
import org.springframework.web.multipart.MultipartFile;

import java.io.ByteArrayOutputStream;
import java.io.File;
import java.io.IOException;
import java.io.InputStream;
import java.net.HttpURLConnection;
import java.net.MalformedURLException;
import java.net.URL;
import java.util.Objects;
import java.util.concurrent.ThreadLocalRandom;

public class QiniuKodoUtil {

    private static Logger logger = LogManager.getLogger(QiniuKodoUtil.class);

    private static final String accessKey = "t0oUPjPwjqQiS2EM3vm5FIIGI8InWKOOXeNnFpZg";
    private static final String secretKey = "66Hd-TKVVbwRrHSTtiQqE8i8L-VOsUaJ1iWTO8rv";
    //空间名称
    private static final String bucketName = "javasmcd";
    //域名地址
    @Getter
    private static final String domain = "http://cd.ray-live.cn/";

    /**
     * 获取七牛token,返回给客户端
     *
     * @return
     */
    public static String getToken() {
        Auth auth = Auth.create(accessKey, secretKey);
        return auth.uploadToken(bucketName);
    }


    // 新增方法:下载图片字节流
    private static byte[] downloadImage(String imageUrl) throws IOException {
        URL url = new URL(imageUrl);
        HttpURLConnection connection = (HttpURLConnection) url.openConnection();
        connection.setRequestMethod("GET");
        connection.setConnectTimeout(5000);
        connection.setReadTimeout(10000);

        try (InputStream inputStream = connection.getInputStream();
             ByteArrayOutputStream outputStream = new ByteArrayOutputStream()) {

            byte[] buffer = new byte[4096];
            int bytesRead;
            while ((bytesRead = inputStream.read(buffer)) != -1) {
                outputStream.write(buffer, 0, bytesRead);
            }
            return outputStream.toByteArray();

        } finally {
            connection.disconnect();
        }
    }

    // 新增方法:获取文件扩展名
    private static String getFileExtension(String url) {
        try {
            String path = new URL(url).getPath();
            int dotIndex = path.lastIndexOf('.');
            return (dotIndex == -1) ? "" : path.substring(dotIndex);
        } catch (MalformedURLException e) {
            return "";
        }
    }

    public static String uploadBytes(byte[] data, String key) {
        Configuration cfg = new Configuration(Region.region2());
        cfg.resumableUploadAPIVersion = Configuration.ResumableUploadAPIVersion.V2;
        UploadManager uploadManager = new UploadManager(cfg);

        String upToken = getToken();
        try {
            Response response = uploadManager.put(data, key, upToken);
            DefaultPutRet putRet = JSON.parseObject(response.bodyString(), DefaultPutRet.class);
            logger.info("上传成功:{}", putRet.key);
            return domain + putRet.key; // 注意这里使用key而不是hash
        } catch (QiniuException ex) {
            logger.error("上传失败:{}", ex.response.toString());
            return null;
        }
    }

    public static String uploadAudio(byte[] audio) {
        if (audio == null) {
            return null;
        }
        String key = "audio/" + RandomUtil.getFileName("test.wav");
        return uploadBytes(audio, key);
    }


    public static String upload(String filePath) {
        return upload(new File(filePath));
    }

    public static String upload(File file) {
        //构造一个带指定 Region 对象的配置类
        /**
         * 华东	Region.region0(), Region.huadong()
         * 华北	Region.region1(), Region.huabei()
         * 华南	Region.region2(), Region.huanan()
         * 北美	Region.regionNa0(), Region.beimei()
         * 东南亚	Region.regionAs0(), Region.xinjiapo()
         */
        Configuration cfg = new Configuration(Region.region2());
        cfg.resumableUploadAPIVersion = Configuration.ResumableUploadAPIVersion.V2;// 指定分片上传版本
        //上传对象
        UploadManager uploadManager = new UploadManager(cfg);
        //默认不指定key的情况下,以文件内容的hash值作为文件名
        String key = null;//file.getName();//null;
        String upToken = getToken();
        try {
            Response response = uploadManager.put(file, key, upToken);
            //解析上传成功的结果
            DefaultPutRet putRet = JSON.parseObject(response.bodyString(), DefaultPutRet.class);
            logger.info(putRet.key);
            logger.info(domain + putRet.hash);
            return domain + putRet.hash;
        } catch (QiniuException ex) {
            Response r = ex.response;
            logger.error(r.toString());
            try {
                logger.error(r.bodyString());
            } catch (QiniuException ex2) {
                //ignore
            }
        }
        return null;
    }

    public static void main(String[] args) {

    }

    public static String uploadAdminHeader(MultipartFile file) {
        try {
            byte[] bytes = file.getBytes();
            String key = "admin_header/" + RandomUtil.getFileName(Objects.requireNonNull(file.getOriginalFilename()));
            return uploadBytes(bytes, key);
        } catch (IOException e) {
            throw new RuntimeException(e);
        }
    }

    public static String uploadAiQuestionChatImage(byte[] data){
        String key = "ai_question/"+RandomUtil.getFileName(".png");
        return uploadBytes(data,key);
    }
    public static String uploadAiAnswerChatImage(byte[] data){
        String key = "ai_answer/"+RandomUtil.getFileName(".png");
        return uploadBytes(data,key);
    }
    public static String uploadAiAnswerChatImage(String url){
        try {
            byte[] bytes = downloadImage(url);
            return uploadAiAnswerChatImage(bytes);
        } catch (IOException e) {
            e.printStackTrace();
        }
        return null;
    }


    public static String getRandomHeader() {
        int num = ThreadLocalRandom.current().nextInt(1,220);
        return String.format("http://cd.ray-live.cn/imgs/headpic/pic_%s.jpg", num);
    }

}
2.13 修改WebSocket流程,添加图片生成
package com.javasm.qingqing.chat.websocket;

/**
 * AI聊天WebSocket处理器
 * 处理用户与AI之间的实时聊天功能
 */

import com.alibaba.dashscope.aigc.generation.Generation;
import com.alibaba.dashscope.aigc.generation.GenerationParam;
import com.alibaba.dashscope.aigc.generation.GenerationResult;
import com.alibaba.dashscope.common.Message;
import com.alibaba.dashscope.common.Role;
import com.alibaba.dashscope.exception.InputRequiredException;
import com.alibaba.dashscope.exception.NoApiKeyException;
import com.alibaba.fastjson2.JSON;
import com.alibaba.fastjson2.JSONObject;
import com.javasm.qingqing.chat.client.TongYiHttpClient;
import com.javasm.qingqing.chat.entity.ChatHistoryInfo;
import com.javasm.qingqing.chat.service.ChatHistoryInfoService;
import com.javasm.qingqing.chat.service.ChatHistoryService;
import com.javasm.qingqing.chat.vo.AiMessage;
import com.javasm.qingqing.chat.vo.ChatHistoryMessage;
import com.javasm.qingqing.common.constans.WebSocketAgreement;
import com.javasm.qingqing.common.utils.QiniuKodoUtil;
import com.javasm.qingqing.common.utils.SpringContextUtil;
import com.javasm.qingqing.webuser.entity.WebUserAi;
import com.javasm.qingqing.webuser.entity.WebUserInfo;
import com.javasm.qingqing.webuser.service.WebUserAiService;
import com.javasm.qingqing.webuser.service.WebUserInfoService;
import io.reactivex.Flowable;
import jakarta.websocket.*;
import jakarta.websocket.server.PathParam;
import jakarta.websocket.server.ServerEndpoint;
import org.springframework.stereotype.Component;

import java.io.IOException;
import java.nio.charset.StandardCharsets;
import java.util.ArrayList;
import java.util.Arrays;
import java.util.List;

@Component
@ServerEndpoint("/ai/textChat/{myuid}/{touid}")
public class AiChatSocket {
    //查询出,和我聊天的人的信息
    WebUserAi userAi = new WebUserAi();
    //聊天这个ai的具体详情
    WebUserInfo userInfo = new WebUserInfo();
    //两个人聊天记录的id
    private Integer chatId = 0;
    List<Message> msgList = new ArrayList<>();

    /**
     * 获取聊天历史服务实例
     *
     * @return ChatHistoryService 聊天历史服务实例
     */
    public ChatHistoryService getChatHistoryService() {
        return SpringContextUtil.getBean(ChatHistoryService.class);
    }

    /**
     * 获取聊天历史信息服务实例
     *
     * @return ChatHistoryInfoService 聊天历史信息服务实例
     */
    public ChatHistoryInfoService getChatHistoryInfoService() {
        return SpringContextUtil.getBean(ChatHistoryInfoService.class);
    }

    /**
     * WebSocket连接打开时的处理方法
     * 初始化AI聊天环境,加载用户信息和聊天历史
     *
     * @param myuid   当前用户的ID
     * @param touid   对方用户(AI)的ID
     * @param session WebSocket会话对象
     * @throws IOException IO异常
     */
    @OnOpen
    public void startAi(@PathParam("myuid") Integer myuid,
                        @PathParam("touid") Integer touid,
                        Session session) throws IOException {
        //设置合理的二进制消息最大大小限制 (100MB)
        session.setMaxBinaryMessageBufferSize(100 * 1024 * 1024);
        //设置文本消息最大大小限制 (1MB)
        session.setMaxTextMessageBufferSize(1024 * 1024);
        //进入聊天界面的时候,第一个触发的方法
        //根据uid,查询出用户的信息,touid 和我聊天的这个人的用户信息
        WebUserAiService aiUserService = SpringContextUtil.getBean(WebUserAiService.class);
        userAi = aiUserService.getById(touid);
        //查询个人详情信息
        WebUserInfoService infoUserService = SpringContextUtil.getBean(WebUserInfoService.class);
        userInfo = infoUserService.getById(touid);
        //开启对话,配置聊天对象,ai的人设
        String aiProm = "You are a helpful assistant.";
        if (userAi != null && userAi.getCharacter() != null) {
            aiProm = userAi.getCharacter();
        }
        //构建ai的角色对象
        Message systemMsg = Message.builder()
                .role(Role.SYSTEM.getValue())
                .content(aiProm)
                .build();
        msgList.add(systemMsg);
        //查询两个人是否有聊天记录
        chatId = getChatHistoryService().queryIdByMyUidAndToUid(myuid, touid);
        if (chatId != null) {
            //根据聊天id 查询两人的具体聊天记录
            List<ChatHistoryInfo> historyInfoList =
                    getChatHistoryInfoService().queryListByChatId(chatId);
            if (!historyInfoList.isEmpty()) {
                //把聊天记录 发送给用户
                ChatHistoryMessage chatHistoryMessage =
                        new ChatHistoryMessage(WebSocketAgreement.Chat_History, historyInfoList);
                //json对象转换
                sendText(session, chatHistoryMessage);
            }
        }


    }

    /**
     * WebSocket连接关闭时的处理方法
     *
     * @param myuid   当前用户的ID
     * @param touid   对方用户(AI)的ID
     * @param session WebSocket会话对象
     */
    @OnClose
    public void endAi(@PathParam("myuid") Integer myuid,
                      @PathParam("touid") Integer touid,
                      Session session) {

    }

    /**
     * WebSocket发生错误时的处理方法
     *
     * @param throwable 异常对象
     */
    @OnError
    public void error(Throwable throwable) {
        throwable.printStackTrace();
    }

    //文本消息
    private static String question = "";
    /**
     * 接收并处理WebSocket文本消息
     * 处理用户提问,调用AI生成回答,并保存聊天记录
     *
     * @param myuid   当前用户的ID
     * @param touid   对方用户(AI)的ID
     * @param session WebSocket会话对象
     * @param json    前端发送的JSON格式消息
     * @throws NoApiKeyException      缺少API密钥异常
     * @throws InputRequiredException 输入必需异常
     */
    @OnMessage
    public void replyMessage(@PathParam("myuid") Integer myuid,
                             @PathParam("touid") Integer touid,
                             Session session, String json) throws NoApiKeyException, InputRequiredException {
        //把前端传入的json进行处理
        JSONObject jsonObject = JSONObject.parse(json);
        //问题
        Object questionObj = jsonObject.get("question");
        Object typeObj = jsonObject.get("type");
        if (questionObj != null && typeObj != null) {
            //转成问题字符串
            question = questionObj.toString();
            //当前的提问类型 1文字,2 图片
            if (typeObj.equals(1)){
                //文本聊天
                textChat(myuid,touid,session);
            }else if (typeObj.equals(2)){
                //图片生成,暂时不做处理
            }


        }
    }

    private void textChat(Integer myuid,Integer touid,Session session) throws NoApiKeyException, InputRequiredException {

        //服务端收到了客户端传入的问题
        //保存聊天记录
        getChatHistoryInfoService().saveHistory(chatId, myuid, question);
        //用户发送来的内容,只有在聊天记录中显示,才能让用户意识到已经发送成功了
        //把这个消息再返回给用户
        AiMessage myQuestion = new AiMessage(WebSocketAgreement.AI_Question, question, 2);
        sendText(session, myQuestion);
        //开始向AI提问  ↓
        Message userMsg = Message.builder()
                .role(Role.USER.getValue())
                .content(question)
                .build();
        msgList.add(userMsg);
        String modelName = "qwen3-max";
        if (userAi.getModel() != null) {
            modelName = userAi.getModel();
        }
        //组装完 用户的提问
        Generation gen = new Generation();
        GenerationParam param = GenerationParam.builder()
                .apiKey(System.getenv("DASHSCOPE_API_KEY"))
                .model(modelName)
                .messages(msgList)
                .resultFormat(GenerationParam.ResultFormat.MESSAGE)
                .incrementalOutput(true)
                .build();
        Flowable<GenerationResult> result = gen.streamCall(param);
        //代码运行到这里,ai思考结束,回答开始
        //通知客户端,ai开始回答问题
        AiMessage aiMessageAnswerStart = new AiMessage(WebSocketAgreement.AI_Answer, "回答开始", 0);
        sendText(session, aiMessageAnswerStart);
        //循环显示答案内容
        StringBuilder saveAnswer = new StringBuilder();
        result.blockingForEach(data -> {
            //data中有完整的答案,json字符串
            String content = data.getOutput().getChoices().get(0).getMessage().getContent();
            //发送答案给客户端
            AiMessage aiMessageAnswer = new AiMessage(WebSocketAgreement.AI_Answer, content, 1);
            sendText(session, aiMessageAnswer);
            saveAnswer.append(content);
        });
        //循环发送结束
        //告诉客户端,回答终止了
        AiMessage aiMessageAnswerEnd = new AiMessage(WebSocketAgreement.AI_Answer, "回答结束", 2);
        sendText(session, aiMessageAnswerEnd);
        //保存聊天记录
        getChatHistoryInfoService().saveHistory(chatId, touid, saveAnswer.toString());
    }
    /**
     * 向客户端发送文本消息
     * 将对象序列化为JSON字符串并通过WebSocket会话发送
     *
     * @param session WebSocket会话对象
     * @param object  需要发送的对象
     */
    private void sendText(Session session, Object object) {
        try {
            String msg = JSON.toJSONString(object);
            session.getBasicRemote().sendText(msg);
        } catch (IOException e) {
            e.printStackTrace();
        }
    }

    //处理二进制文件
    @OnMessage
    public void onMessage(@PathParam("myuid") Integer myuid,
                          @PathParam("touid") Integer touid,
                          Session session,byte[] bytes){
        //预先预定好,所有的文件上传,都要配置一个头信息,以此区分不同的文件类型
        //进入的二进制数据,必须长度 >6
        if (bytes == null || bytes.length < 6){
            return;
        }

        //检查消息大小,防止内存溢出
        if (bytes.length > 10 * 1024 * 1024) { // 限制为10MB
            try {
                session.getBasicRemote().sendText("{\"error\":\"File size too large, maximum 10MB allowed\"}");
            } catch (IOException e) {
                e.printStackTrace();
            }
            return;
        }

        //解析头信息
        String header = new String(bytes,0,6, StandardCharsets.UTF_8);
        if ("IMAGE:".equals(header)){
            //是图片,根据图片的方案,继续处理
            byte[] imageData = Arrays.copyOfRange(bytes,6,bytes.length);
            image2image(myuid,touid,session,imageData);
        }
    }

    public TongYiHttpClient getAiHttpClient(){
        return SpringContextUtil.getBean(TongYiHttpClient.class);
    }
    //图片生成图片的方法
    private void image2image(Integer myuid, Integer touid, Session session, byte[] imageData) {
        //获取客户端对象,RestTemplate
        //获取message,用户生成图片的文字描述
        //图片的在线地址,模型名称
        String modelName = "qwen-image-edit-plus";
        String questionUrl = QiniuKodoUtil.uploadAiQuestionChatImage(imageData);
        //保存聊天记录---我说的话
        getChatHistoryInfoService().saveHistory(chatId,myuid,question);
        AiMessage aiMessage = new AiMessage(WebSocketAgreement.AI_Question,question,2);
        sendText(session,aiMessage);
        //保存我发的图片
        getChatHistoryInfoService().saveHistory(chatId,myuid,questionUrl);
        //答案保存之后,把信息发送给用户
        AiMessage questionImg = new AiMessage(WebSocketAgreement.AI_Question_Image,questionUrl,2);
        sendText(session,questionImg);
        //告诉前端,开始生成生成图片
        AiMessage startAiImage = new AiMessage(WebSocketAgreement.AI_Answer_Image,"开始生成图片",0);
        sendText(session,startAiImage);
        //ai生成图片
        List<String> urlList = getAiHttpClient().sendImage2Image(question, questionUrl, modelName);
        //七牛云可以直接保存在线图片
        List<String> saveList = new ArrayList<>();
        urlList.forEach(url ->{
            String saveUrl = QiniuKodoUtil.uploadAiAnswerChatImage(url);
            saveList.add(saveUrl);
            //输出图片
            AiMessage imageUrlMessage = new AiMessage(WebSocketAgreement.AI_Answer_Image,url,1);
            sendText(session,imageUrlMessage);
        });
        //图片循环结束
        AiMessage endAiImage = new AiMessage(WebSocketAgreement.AI_Answer_Image,"图片生成结束",2);
        sendText(session,endAiImage);

        //把ai生成的图片答案,保存聊天记录
        getChatHistoryInfoService().saveHistory(chatId,touid,saveList);

    }
}
2.14 前端页面聊天记录显示
<template>
<Top/>
<div class="container-fluid main-content-wrapper">
<div class="content-page-box-area">
<div class="all-messages-body">
<div class="all-messages-header d-flex justify-content-between align-items-center">
<h3>消息</h3>
</div>
<div class="messages-profile-box">
<a href="/ai">
<img :src="toUser.headPic" style="width: 100px;" class="rounded-circle" alt="image">
</a>
<h3><a href="#">{{ toUser.nickname }}</a></h3>
</div>
<div class="messages-chat-container">
<div class="chat-content" >
<div id="chat-content"></div>
<div v-if="isLoading" class="img-loading">
<el-progress type="dashboard" :percentage="percentage2" :color="colors"/>
</div>
</div>
<div class="chat-list-footer">
<div class="d-flex align-items-center row">
<div class="col-md-10">
<input type="text" class="form-control" placeholder="输入消息..." v-model="messageStr"
@keyup.enter="sendMessage">
</div>
<div class="col-md-2">
<button type="button" class="btn btn-success" @click="sendMessage">
<i class="bi bi-send"></i> 发送
</button>
</div>
</div>
<div class="row">
<div class="col-md-12">
<input type="file" accept="image/*" @change="onFileSelected">
</div>
</div>
<div class="row">
<div class="col-md-12">
<img :src="previewImage" style="width: 100%"/>
</div>
</div>
</div>
</div>
</div>
</div>
</div>
<Footer/>
</template>
<script setup>
import {onMounted, ref} from "vue";
import socket from "@/utils/socket.js";
import UserStore from "@/stores/UserStore.js";
import Top from "@/components/common/Top.vue";
import Footer from "@/components/common/Footer.vue";
import {marked} from "marked";
import ChatUserSotre from "@/stores/ChatUserSotre.js";
let toUser = ChatUserSotre().user;
let loginUser = UserStore().userModel;
//获取当前用户,和对方的用户信息
let toUid = toUser.uid;
let myUid = loginUser.uid;
let messageStr = ref("");
let webSocket;
let initWebSocket = () => {
//ws://192.168.0.151:8080/ai/textChat/{myuid}/{touid}
let url = "/ai/textChat/" + myUid + "/" + toUid;
//调用封装好的方法,连接socket
socket.initWebSocket(url);
webSocket = socket.getWebSocket();
//打印收到的消息
webSocket.onmessage = e => printMessage(e.data);
}
let sendMessage = () => {
//type 1文字消息 2图片消息
let type = 1;
if (consultFile) {
sendImage();
type = 2;
}
let param = {
"question": messageStr.value,
"type": type
}
webSocket.send(JSON.stringify(param));
//清空聊天框
messageStr.value = "";
}
let chatNum = 0;
let printMessage = (msg) => {
let msgObj = JSON.parse(msg);
//协议号
let agreement = msgObj.agreement
let pic;
let chat_mine = "";
let html = "";
let status = 2;
switch (agreement) {
case 3001:
//3001 是用户自己发出去的消息
let question = msgObj.answer;
//用户头像
pic = loginUser.userInfo.headPic
//默认不是我的
chat_mine = "chat-right";
printChatHtml(chat_mine, pic, question)
break;
case 3002:
//是ai发送来的,一定是在对面
let answer = msgObj.answer;
//用户头像
pic = toUser.headPic;
status = msgObj.status;
switch (status) {
case 0:
allAnswer = "";
//开始回答问题,创建一个空的聊天框,没有聊天内容
html = '<div class="chat ' + chat_mine + '">\n' +
' <div class="chat-avatar">\n' +
' <a class="d-inline-block">\n' +
' <img src="' + pic + '" width="50" height="50"\n' +
' class="rounded-circle" alt="image">\n' +
' </a>\n' +
' </div>\n' +
' <div class="chat-body">\n' +
//记录 当前是页面里的第几个聊天框
' <div class="chat-message" id="chat-meesage-' + chatNum + '"></div>\n' +
' </div>\n' +
' </div>\n' +
' </div>';
document.getElementById("chat-content").insertAdjacentHTML("beforeend", html);
break;
case 1:
//回答问题的过程,是ai返回的内容,要追加到聊天框里
document.getElementById("chat-meesage-" + chatNum)
.insertAdjacentHTML("beforeend", answer);
//每次的答案内容,都存储的同一个变量
allAnswer += answer;
break;
case 2:
//回答结束
html = marked(allAnswer);
document.getElementById("chat-meesage-" + chatNum).innerHTML = marked(allAnswer);
allAnswer = "";
chatNum++;
break;
}
break;
case 2001:
//聊天记录
let chatList = msgObj.list;
chatList.forEach(chat => {
let msgUid = chat.uid;
let msgContent = chat.message;
let chat_mine = "";
let chat_Pic = toUser.headPic;
if (msgUid === myUid) {
chat_mine = "chat-right"
chat_Pic = loginUser.userInfo.headPic;
}
//应该在聊天记录的实体类中,增加一个是否为图片的字段,是否为音频的字段等标识信息
//做了简化处理,只是判断聊天内容的结尾是否以.png结束,可以优化
if (msgContent.lastIndexOf(".png") !== -1) {
printChatHtml(chat_mine, chat_Pic, "<img src='" + msgContent + "' style='width: 200px;height: 200px;'>")
} else {
printChatHtml(chat_mine, chat_Pic, marked(msgContent))
}
})
break;
case 3004:
console.log(msgObj)
//自己发送出去的图片
let questionUrl = msgObj.answer;
//用户头像
pic = loginUser.userInfo.headPic
//默认不是我的
chat_mine = "chat-right";
printChatHtml(chat_mine, pic, "<img src='" + questionUrl + "' style='width: 200px'>")
break;
case 3003:
console.log(msgObj)
//AI生成的图片
let answerUrl = msgObj.answer;
//用户头像
pic = toUser.headPic;
status = msgObj.status;
//默认不是我的
chat_mine = "";
//增加动画,获取图片之后,结束动画等
if (status === 0) {
//显示进度条
isLoading.value = true;
percentage2.value = 0;
setInterval(() => {
percentage2.value = (percentage2.value % 100) + 1
}, 1000)
} else if (status === 1) {
isLoading.value = false;
printChatHtml(chat_mine, pic, "<img src='" + answerUrl + "' style='width: 200px'>")
}
break;
}
}
let allAnswer = "";
let test1=()=>{
//显示进度条
isLoading.value = true;
percentage2.value = 0;
setInterval(() => {
percentage2.value = (percentage2.value % 100) + 1
}, 1000)
}
let printChatHtml = (chat_mine, pic, question) => {
let html = '<div class="chat ' + chat_mine + '">\n' +
' <div class="chat-avatar">\n' +
' <a class="d-inline-block">\n' +
' <img src="' + pic + '" width="50" height="50"\n' +
' class="rounded-circle" alt="image">\n' +
' </a>\n' +
' </div>\n' +
' <div class="chat-body">\n' +
' <div class="chat-message">\n' +
question
' </div>\n' +
' </div>\n' +
' </div>\n' +
' </div>'
document.getElementById("chat-content").insertAdjacentHTML("beforeend", html);
}
//预览图的路径
let previewImage = ref("")
//当前正在选择的图片对象
let consultFile = null;
//上传的方法
let onFileSelected = (event) => {
//获取文件
const file = event.target.files[0];
//如果传了文件
if (file) {
//新建一个读取图片对象
const reader = new FileReader();
//当图片被加载的时候,执行的方法
reader.onload = (e) => {
previewImage.value = e.target.result;
}
//读取图片
reader.readAsDataURL(file)
consultFile = file;
}
}
//发送图片到服务器
function sendImage() {
//通过WebSocket发送,发送二进制数据,到服务器
const reader = new FileReader();
reader.onload = (e) => {
//获取图片的二进制数据
let imgbytes = new Uint8Array(e.target.result);
//构建图片的头信息--告诉服务器,来的二进制数据,类型是图片
//发送二进制数据到服务端的时候,固定前6位,表示文件类型
const header = new TextEncoder().encode("IMAGE:")
//构建完整的数据
const conbined = new Uint8Array(header.length + imgbytes.length);
//从第0位开始,是header的信息
conbined.set(header, 0);
//header结尾的位置开始,是图片的数据
conbined.set(imgbytes, header.length);
//数据准备完成,判断session是否存在
if (webSocket.readyState === WebSocket.OPEN) {
//连接状态
//发送二进制数据
webSocket.send(conbined.buffer);
console.log("图片上传完成")
} else {
console.error("WebSocket未连接,无法发送图片")
}
}
//读取图片
reader.readAsArrayBuffer(consultFile);
}
//是否正在生成图片
let isLoading = ref(false);
const percentage2 = ref(0)
const colors = [
{color: '#f56c6c', percentage: 20},
{color: '#e6a23c', percentage: 40},
{color: '#5cb87a', percentage: 60},
{color: '#1989fa', percentage: 80},
{color: '#6f7ad3', percentage: 100},
]
onMounted(() => {
initWebSocket()
})
</script>
<style scoped>
.demo-progress .el-progress--line {
margin-bottom: 15px;
max-width: 600px;
}
.demo-progress .el-progress--circle {
margin-right: 15px;
}
.img-loading{
float: left;
margin-left: 72px;
}
</style>
四、WebSocket + 火山方舟
1、申请豆包API-Key
https://www.volcengine.com/product/ark

下载保存
2、官方案例
https://www.volcengine.com/docs/82379/1399008?lang=zh
-
配置环境变量
setx ARK_API_KEY=<ARK_API_KEY>

-
重启Idea
3、运行官方案例
-
引入依赖
<!--火山方舟-->
<dependency>
    <groupId>com.volcengine</groupId>
    <artifactId>volcengine-java-sdk-ark-runtime</artifactId>
    <version>LATEST</version>
</dependency>
3.2 运行
package com.javasm.qingqing.aitest;

import com.volcengine.ark.runtime.model.completion.chat.ChatCompletionRequest;
import com.volcengine.ark.runtime.model.completion.chat.ChatMessage;
import com.volcengine.ark.runtime.model.completion.chat.ChatMessageRole;
import com.volcengine.ark.runtime.service.ArkService;
import java.util.ArrayList;
import java.util.List;

/**
 * 这是一个示例类,展示了如何使用ArkService来完成聊天功能。
 */
public class ChatCompletionsExample {
    public static void main(String[] args) {
        // 从环境变量中获取API密钥
        String apiKey = System.getenv("ARK_API_KEY");
        // The base URL for model invocation
        ArkService arkService = ArkService
                .builder()
                .apiKey(apiKey)
                .baseUrl("https://ark.cn-beijing.volces.com/api/v3")
                .build();

        // 初始化消息列表
        List<ChatMessage> chatMessages = new ArrayList<>();

        // 创建用户消息
        ChatMessage userMessage = ChatMessage.builder()
                .role(ChatMessageRole.USER) // 设置消息角色为用户
                .content("简历中提到,你之前是在抖音平台做舞蹈类主播,请做个自我介绍,说一下上一工会的离职原因,和你对直播行业前景的分析。") // 设置消息内容
                .build();

        // 将用户消息添加到消息列表
        chatMessages.add(userMessage);

        // 创建聊天完成请求
        ChatCompletionRequest chatCompletionRequest = ChatCompletionRequest.builder()
                .model("doubao-seed-1-6-251015") // Replace with Model ID
                .messages(chatMessages) // 设置消息列表
                .build();

        // 发送聊天完成请求并打印响应
        try {
            // 获取响应并打印每个选择的消息内容
            arkService.createChatCompletion(chatCompletionRequest)
                    .getChoices()
                    .forEach(choice ->
                            System.out.println(choice.getMessage().getContent()));
        } catch (Exception e) {
            System.out.println("Error: " + e.getMessage());
        } finally {
            // 关闭服务执行器
            arkService.shutdownExecutor();
        }
    }
}
public class ImageGenerationsExample {
    public static void main(String[] args) {
        // Get API Key:https://console.volcengine.com/ark/region:ark+cn-beijing/apikey
        String apiKey = System.getenv("ARK_API_KEY");
        ConnectionPool connectionPool = new ConnectionPool(5, 1, TimeUnit.SECONDS);
        Dispatcher dispatcher = new Dispatcher();
        ArkService service = ArkService.builder()
                .baseUrl("https://ark.cn-beijing.volces.com/api/v3") // The base URL for model invocation
                .dispatcher(dispatcher)
                .connectionPool(connectionPool)
                .apiKey(apiKey)
                .build();

        GenerateImagesRequest generateRequest = GenerateImagesRequest.builder()
                .model("doubao-seedream-4-5-251128") // Replace with Model ID
                .prompt("一个正在送美团外卖的年轻人,身后背着一把屠龙宝刀,胯下一匹冒着火焰的骷髅马,骑着骷髅马,穿梭在城市的大楼之间,夜晚的路灯格外显眼")
                .size("2K")
                .sequentialImageGeneration("disabled")
                .responseFormat(ResponseFormat.Url)
                .stream(false)
                .watermark(false)
                .build();
        ImagesResponse imagesResponse = service.generateImages(generateRequest);
        System.out.println(imagesResponse.getData().get(0).getUrl());

        service.shutdownExecutor();
    }
}


 1190
1190

 被折叠的 条评论
为什么被折叠?
被折叠的 条评论
为什么被折叠?
 到【灌水乐园】发言


