


LangChain开发环境准备-AI大模型私有部署的技术指南
今天开始将开启系列AI应用开发课程,主要基于LangChain框架基于实战项目手把手教大家如何将AI这一新时代的基础设施应用到自己开发应用中来。欢迎大家持续关注

当下在AI应用开发领域,LangChain框架可以说是唯一选择。然而,上手学习的小伙伴们大多被拦在了第一步,没有可供使用的AI大模型底座,没有可供实验的环境进行实操。而各大厂商比如OpenAI提供的API需要付费不说,从注册、开通到使用都有诸多的不便和限制。
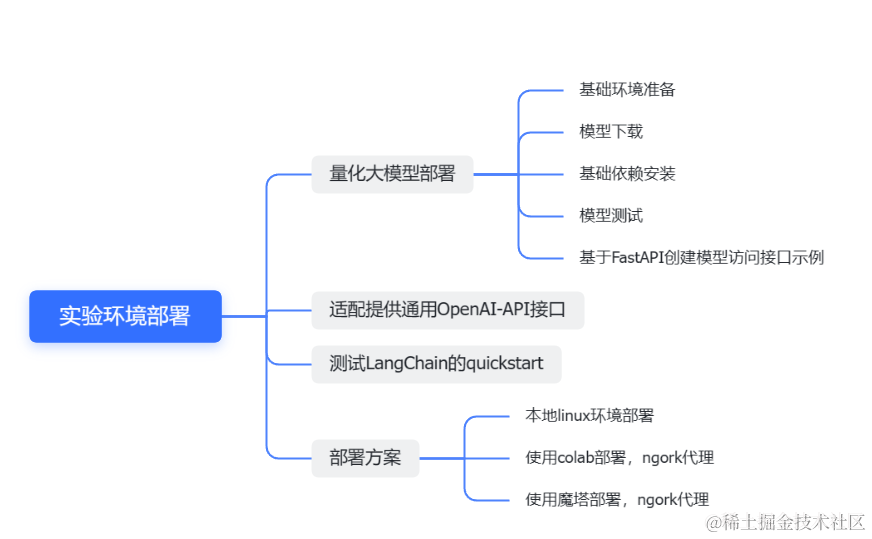
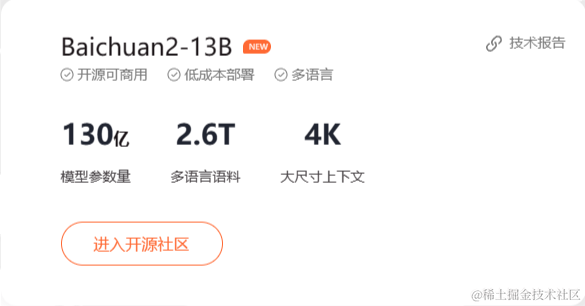
因此,如何在本地或者私有网络中部署和使用AI大模型,成为了一个亟待解决的挑战。本文将以Baichuan2-13B-Chat-4bits为例,介绍如何进行AI大模型私有部署,用于LangChain开发实验实操。本次课程提纲如下,今天主要降大模型部署的部分。
基础环境
环境配置与安装
1.python 3.8及以上版本,官网安装即可
  地址:https://www.python.org/
2.pytorch 1.12及以上版本,推荐2.0及以上版本,官网安装即可
  地址:https://pytorch.org/get-started/locally/
3.建议使用CUDA 11.4及以上,根据显卡匹配英伟达推荐驱动进行暗转
  地址:https://developer.nvidia.com/cuda-11-4-0-download-archive
4.建议使用linux环境安装,本文示例基于linux环境演示
5.假定以下动作执行的当前目录为/aidev
模型下载
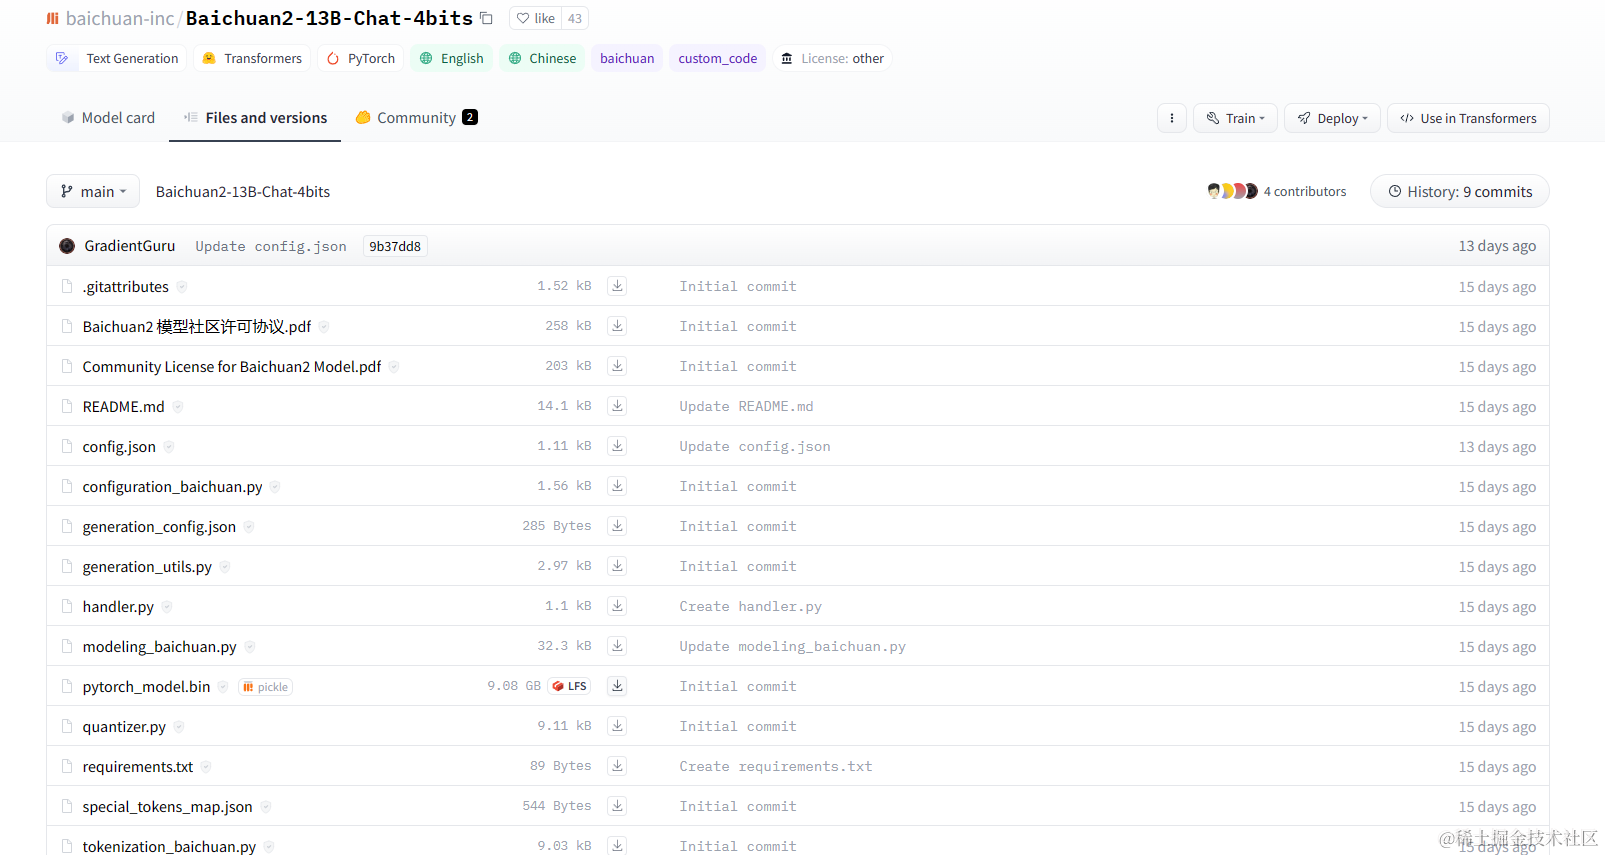
要在LangChain开发环境中部署AI大模型,首先需要下载模型文件和配置文件。Baichuan2-13B-Chat-4bits模型已经上传到了huggingface这个知名的AI模型库中,我们可以通过以下步骤来下载它:
从huggingface上下载模型及配置文件
- 模型下载链接如下
https://huggingface.co/baichuan-inc/Baichuan2-13B-Chat-4bits
- 在模型页面中,点击右上角的
Download按钮,选择Download files选项。
 3. linux系统可以直接通过以下脚本下载
apt-get -y install -qq aria2
aria2c --console-log-level=error -c -x 16 -s 16 -k 1M https://huggingface.co/baichuan-inc/Baichuan2-13B-Chat-4bits/raw/main/config.json -d /content/baichuan-inc/Baichuan2-13B-Chat-4bits -o config.json
aria2c --console-log-level=error -c -x 16 -s 16 -k 1M https://huggingface.co/baichuan-inc/Baichuan2-13B-Chat-4bits/raw/main/configuration_baichuan.py -d /content/baichuan-inc/Baichuan2-13B-Chat-4bits -o configuration_baichuan.py
aria2c --console-log-level=error -c -x 16 -s 16 -k 1M https://huggingface.co/baichuan-inc/Baichuan2-13B-Chat-4bits/raw/main/generation_config.json -d /content/baichuan-inc/Baichuan2-13B-Chat-4bits -o generation_config.json
aria2c --console-log-level=error -c -x 16 -s 16 -k 1M https://huggingface.co/baichuan-inc/Baichuan2-13B-Chat-4bits/raw/main/generation_utils.py -d /content/baichuan-inc/Baichuan2-13B-Chat-4bits -o generation_utils.py
aria2c --console-log-level=error -c -x 16 -s 16 -k 1M https://huggingface.co/baichuan-inc/Baichuan2-13B-Chat-4bits/raw/main/handler.py -d /content/baichuan-inc/Baichuan2-13B-Chat-4bits -o handler.py
aria2c --console-log-level=error -c -x 16 -s 16 -k 1M https://huggingface.co/baichuan-inc/Baichuan2-13B-Chat-4bits/raw/main/modeling_baichuan.py -d /content/baichuan-inc/Baichuan2-13B-Chat-4bits -o modeling_baichuan.py
aria2c --console-log-level=error -c -x 16 -s 16 -k 1M https://huggingface.co/baichuan-inc/Baichuan2-13B-Chat-4bits/resolve/main/pytorch_model.bin -d /content/baichuan-inc/Baichuan2-13B-Chat-4bits -o pytorch_model.bin
aria2c --console-log-level=error -c -x 16 -s 16 -k 1M https://huggingface.co/baichuan-inc/Baichuan2-13B-Chat-4bits/raw/main/quantizer.py -d /content/baichuan-inc/Baichuan2-13B-Chat-4bits -o quantizer.py
aria2c --console-log-level=error -c -x 16 -s 16 -k 1M https://huggingface.co/baichuan-inc/Baichuan2-13B-Chat-4bits/raw/main/requirements.txt -d /content/baichuan-inc/Baichuan2-13B-Chat-4bits -o requirements.txt
aria2c --console-log-level=error -c -x 16 -s 16 -k 1M https://huggingface.co/baichuan-inc/Baichuan2-13B-Chat-4bits/raw/main/special_tokens_map.json -d /content/baichuan-inc/Baichuan2-13B-Chat-4bits -o special_tokens_map.json
aria2c --console-log-level=error -c -x 16 -s 16 -k 1M https://huggingface.co/baichuan-inc/Baichuan2-13B-Chat-4bits/raw/main/tokenization_baichuan.py -d /content/baichuan-inc/Baichuan2-13B-Chat-4bits -o tokenization_baichuan.py
aria2c --console-log-level=error -c -x 16 -s 16 -k 1M https://huggingface.co/baichuan-inc/Baichuan2-13B-Chat-4bits/resolve/main/tokenizer.model -d /content/baichuan-inc/Baichuan2-13B-Chat-4bits -o tokenizer.model
aria2c --console-log-level=error -c -x 16 -s 16 -k 1M https://huggingface.co/baichuan-inc/Baichuan2-13B-Chat-4bits/raw/main/tokenizer_config.json -d /content/baichuan-inc/Baichuan2-13B-Chat-4bits -o tokenizer_config.json
基础依赖安装
下载好模型文件和配置文件后,主目录为/aidev,文件目录为baichuan-inc/Baichuan2-13B-Chat-4bits(备注后续启动模型会默认加载此目录,请按此命名) ,我们还需要安装一些基础的依赖库,以便于在LangChain开发环境中运行模型。我们可以通过以下步骤来安装:
#pip安装模型运行的依赖,requirment.txt文件
pip install -r baichuan-inc/Baichuan2-13B-Chat-4bits/requirements.txt
这样就完成了基础依赖库的安装。
模型测试
安装好基础依赖库后,我们可以先测试一下模型是否能够正常运行。我们可以通过以下步骤来测试:
基于官方示例,创建模型对象,并调用对话方法
- 在当前目录即/aidev中创建一个名为
app.py的文件,并输入以下内容:
import torch
from transformers import AutoModelForCausalLM, AutoTokenizer
from transformers.generation.utils import GenerationConfig
tokenizer = AutoTokenizer.from_pretrained("baichuan-inc/Baichuan2-13B-Chat-4bits", use_fast=False, trust_remote_code=True)
model = AutoModelForCausalLM.from_pretrained("baichuan-inc/Baichuan2-13B-Chat-4bits", device_map="auto", torch_dtype=torch.bfloat16, trust_remote_code=True)
model.generation_config = GenerationConfig.from_pretrained("baichuan-inc/Baichuan2-13B-Chat-4bits")
messages = []
messages.append({"role": "user", "content": "解释一下“温故而知新”"})
response = model.chat(tokenizer, messages)
print(response)
- 启用测试
python app.py
运行效果如下图所示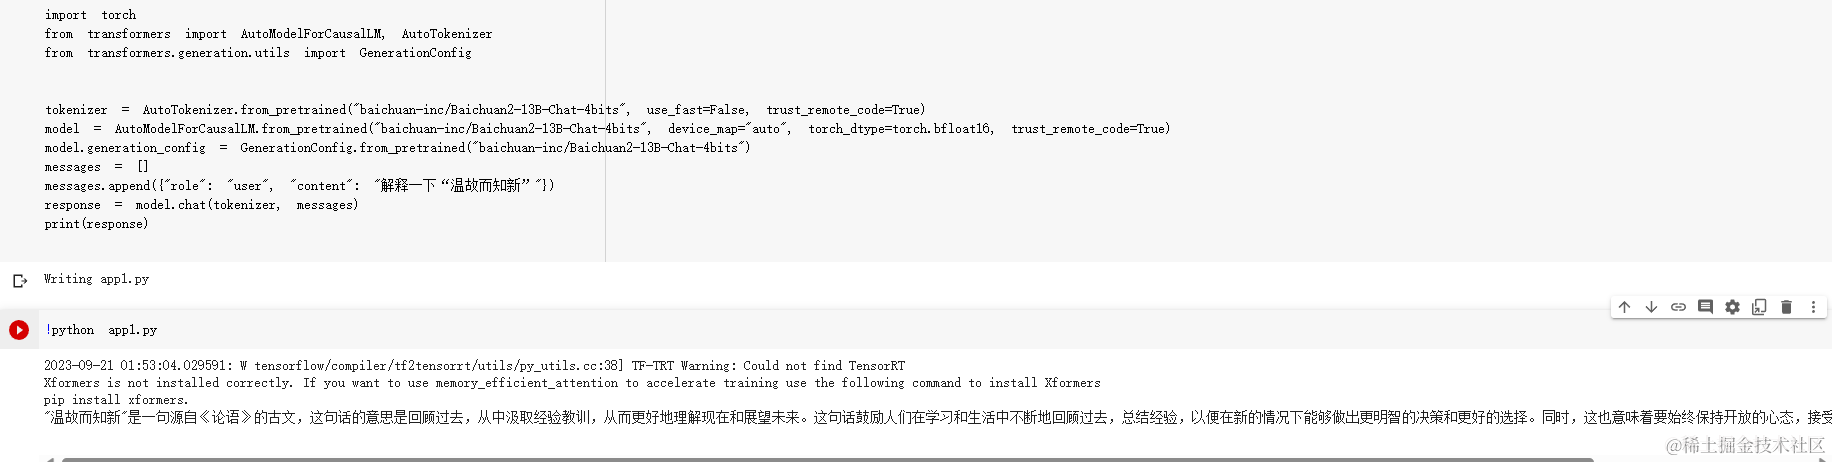
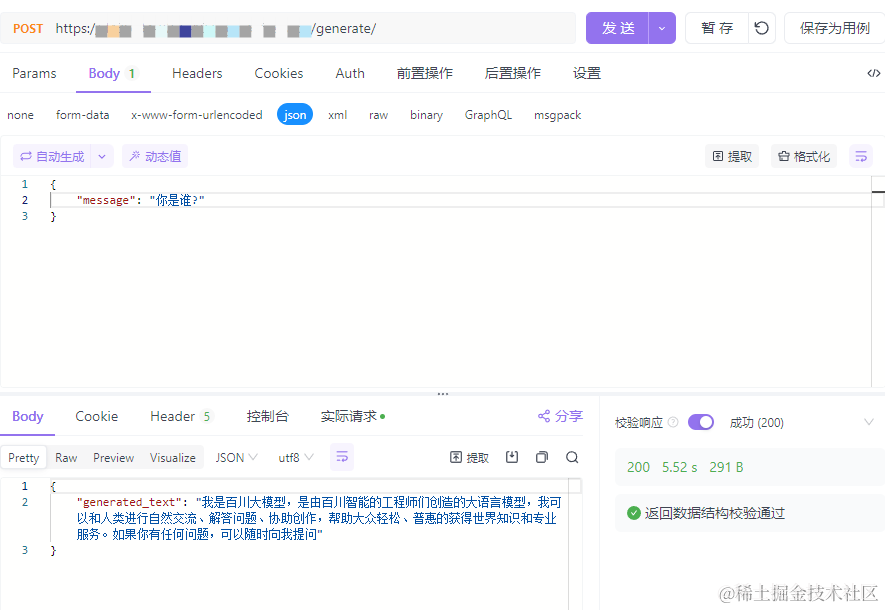
基于FastAPI创建模型访问接口示例
测试好模型后,我们已经掌握了与大模型对话的入口,可以进一步基于FastAPI创建一个模型访问接口,这样就可以让外部的应用或者用户通过网络来调用我们部署在LangChain开发环境中的AI大模型。我们可以通过以下步骤来创建:
- 安装uvicorn
pip install uvicorn
- 在当前目录即/aidev中创建一个名为
api.py的文件,并输入以下内容:
from fastapi import FastAPI
from fastapi import HTTPException
from pydantic import BaseModel
import torch
from transformers import AutoModelForCausalLM, AutoTokenizer
from transformers.generation.utils import GenerationConfig
tokenizer = AutoTokenizer.from_pretrained("baichuan-inc/Baichuan2-13B-Chat-4bits", use_fast=False, trust_remote_code=True)
model = AutoModelForCausalLM.from_pretrained("baichuan-inc/Baichuan2-13B-Chat-4bits", device_map="auto", torch_dtype=torch.bfloat16, trust_remote_code=True)
model.generation_config = GenerationConfig.from_pretrained("baichuan-inc/Baichuan2-13B-Chat-4bits")
app = FastAPI()
# This defines the data json format expected for the endpoint, change as needed
class RequestItem(BaseModel):
    message: str
@app.post("/generate/")
async def generate_text(request_item: RequestItem):
    try:
        # 在这里处理接收到的 JSON 请求
        reqStr = request_item.message
        messages = []
        messages.append({"role": "user", "content": reqStr})
        response = model.chat(tokenizer,messages)
        return {"generated_text": response}
    except Exception as e:
        raise HTTPException(status_code=500, detail=str(e))
- 启动接口
uvicorn app:app --host 0.0.0.0 --port 8000 > server.log 2>&1 &
- 使用测试如下图所示
总结
本文介绍了如何在LangChain开发环境中准备AI大模型私有部署的技术指南,以Baichuan2-13B-Chat-4bits为例,分别介绍了模型下载、基础依赖安装、模型测试和基于FastAPI创建模型访问接口的步骤和代码。当然只是简单的提供对话接口的话,还无法将大模型接入langchain的开发流程中。
如何系统的去学习大模型LLM ?
作为一名热心肠的互联网老兵,我意识到有很多经验和知识值得分享给大家,也可以通过我们的能力和经验解答大家在人工智能学习中的很多困惑,所以在工作繁忙的情况下还是坚持各种整理和分享。
但苦于知识传播途径有限,很多互联网行业朋友无法获得正确的资料得到学习提升,故此将并将重要的 AI大模型资料 包括AI大模型入门学习思维导图、精品AI大模型学习书籍手册、视频教程、实战学习等录播视频免费分享出来。
所有资料 ⚡️ ,朋友们如果有需要全套 《LLM大模型入门+进阶学习资源包》,扫码获取~

一、全套AGI大模型学习路线
AI大模型时代的学习之旅:从基础到前沿,掌握人工智能的核心技能!
二、640套AI大模型报告合集
这套包含640份报告的合集,涵盖了AI大模型的理论研究、技术实现、行业应用等多个方面。无论您是科研人员、工程师,还是对AI大模型感兴趣的爱好者,这套报告合集都将为您提供宝贵的信息和启示。
三、AI大模型经典PDF籍
随着人工智能技术的飞速发展,AI大模型已经成为了当今科技领域的一大热点。这些大型预训练模型,如GPT-3、BERT、XLNet等,以其强大的语言理解和生成能力,正在改变我们对人工智能的认识。 那以下这些PDF籍就是非常不错的学习资源。

四、AI大模型商业化落地方案
阶段1:AI大模型时代的基础理解
- 目标:了解AI大模型的基本概念、发展历程和核心原理。
- 内容:
- L1.1 人工智能简述与大模型起源
- L1.2 大模型与通用人工智能
- L1.3 GPT模型的发展历程
- L1.4 模型工程
- L1.4.1 知识大模型
- L1.4.2 生产大模型
- L1.4.3 模型工程方法论
- L1.4.4 模型工程实践 - L1.5 GPT应用案例
阶段2:AI大模型API应用开发工程
- 目标:掌握AI大模型API的使用和开发,以及相关的编程技能。
- 内容:
- L2.1 API接口
- L2.1.1 OpenAI API接口
- L2.1.2 Python接口接入
- L2.1.3 BOT工具类框架
- L2.1.4 代码示例 - L2.2 Prompt框架
- L2.2.1 什么是Prompt
- L2.2.2 Prompt框架应用现状
- L2.2.3 基于GPTAS的Prompt框架
- L2.2.4 Prompt框架与Thought
- L2.2.5 Prompt框架与提示词 - L2.3 流水线工程
- L2.3.1 流水线工程的概念
- L2.3.2 流水线工程的优点
- L2.3.3 流水线工程的应用 - L2.4 总结与展望
- L2.1 API接口
阶段3:AI大模型应用架构实践
- 目标:深入理解AI大模型的应用架构,并能够进行私有化部署。
- 内容:
- L3.1 Agent模型框架
- L3.1.1 Agent模型框架的设计理念
- L3.1.2 Agent模型框架的核心组件
- L3.1.3 Agent模型框架的实现细节 - L3.2 MetaGPT
- L3.2.1 MetaGPT的基本概念
- L3.2.2 MetaGPT的工作原理
- L3.2.3 MetaGPT的应用场景 - L3.3 ChatGLM
- L3.3.1 ChatGLM的特点
- L3.3.2 ChatGLM的开发环境
- L3.3.3 ChatGLM的使用示例 - L3.4 LLAMA
- L3.4.1 LLAMA的特点
- L3.4.2 LLAMA的开发环境
- L3.4.3 LLAMA的使用示例 - L3.5 其他大模型介绍
- L3.1 Agent模型框架
阶段4:AI大模型私有化部署
- 目标:掌握多种AI大模型的私有化部署,包括多模态和特定领域模型。
- 内容:
- L4.1 模型私有化部署概述
- L4.2 模型私有化部署的关键技术
- L4.3 模型私有化部署的实施步骤
- L4.4 模型私有化部署的应用场景
学习计划:
- 阶段1:1-2个月,建立AI大模型的基础知识体系。
- 阶段2:2-3个月,专注于API应用开发能力的提升。
- 阶段3:3-4个月,深入实践AI大模型的应用架构和私有化部署。
- 阶段4:4-5个月,专注于高级模型的应用和部署。
这份完整版的所有 ⚡️ 大模型 LLM 学习资料已经上传优快云,朋友们如果需要可以微信扫描下方优快云官方认证二维码免费领取【保证100%免费】
全套 《LLM大模型入门+进阶学习资源包》↓↓↓ 获取~


 1527
1527

 被折叠的 条评论
为什么被折叠?
被折叠的 条评论
为什么被折叠?
 到【灌水乐园】发言


