


 本文介绍了如何在Intellij IDEA中使用Maven和Cucumber进行测试。通过创建Cucumber启动器Class,配置@CucumberOptions以指定features目录、报告生成和glue路径。由于CucumberOptions的format已被弃用,转而使用plugin。同时,文章详细解释了Tag的用法,包括如何通过Tag来选择性地运行特定场景或功能,提高测试效率。
创建Cucumber启动器
创建一个Class用作Cucumber的启动器
描述如下
package com.steps;
import cucumber.api.CucumberOptions;
import cucumber.api.junit.Cucumber;
import org.junit.runner.RunWith;
/**
- @author rechin
-
- @RunWith(Cucumber.class) 这是一个运行器 ,指用Cucumber来运行测试
- @CucumberOptions中的features,用于指定我们项目中要运行的feature的目录
生成html,CucumberOptions中fomart格式已经被弃用,要使用plugin的格式,许多参考资料已失效。
@RunWith(Cucumber.class)
        @CucumberOptions(plugin = {"html:target/cucumber-html-reportzxx", "json:target/cucumber-json-reportzxx.json" },
        features = "src/main/resources", tags = "@ready" ,
                    monochrome = true)
* @CucumberOptions中的format,用于指定我们项目中要运行时生成的报告,并指定之后可以在target目录中找到对应的测试报告
- @CucumberOptions中的glue,用于指定项目运行时查找实现step定义文件的目录
- 在实际项目中,随着项目的进行,一个测试工程可能由多个feature文件组成,并且每个feature文件中可能也是由多个scenario组成。默认情况下,
- 每次运行是运行所有feature中的所有scenario。这样可能导致正常情况下运行一次测试脚本,需要非常长的时间来等待测试结果。
- 但是实际过程中,测试用例是有优先级等区分的。比如smokeTest、regressionTest等。或者有时候会有特别小部分的用例,比如等级是critical,
- 这些用例需要长时间运行来监测系统是否没有白页或者页面404等现象。
- 所以我们必须区分开所有的scenario,可以使我们在启动测试脚本时,可以根据我们需要来运行哪些模块的scenaro。这时我们可以使用Tags
- 在Cucumber里Tag是直接在Feature、Scenari或Scenario Outline关键字前给feature或scenario添加任意数量的前缀为@的tags,多个tag用空格来分隔
*/
@RunWith(Cucumber.class)
@CucumberOptions(
plugin={“json:target/cucumber/cucumber.json”, “html:target/cucumber”, “pretty”},
features={“src/test/resources/com/features/”},
tags = {"@login,@role"} ) //@~demo
public class CucumberStart {
}
1.这里指定执行src/main/resources下所有的Feature
2.Tags,当只有一个tag时,不用加{},不然会报错
执行Tag为ready的feature
import io.cucumber.junit.Cucumber;
import io.cucumber.junit.CucumberOptions;
import org.junit.runner.RunWith;

@RunWith(Cucumber.class)

@CucumberOptions( features = "src/main/resources", tags = "@ready" )

public class Cucumber_Runner {

}
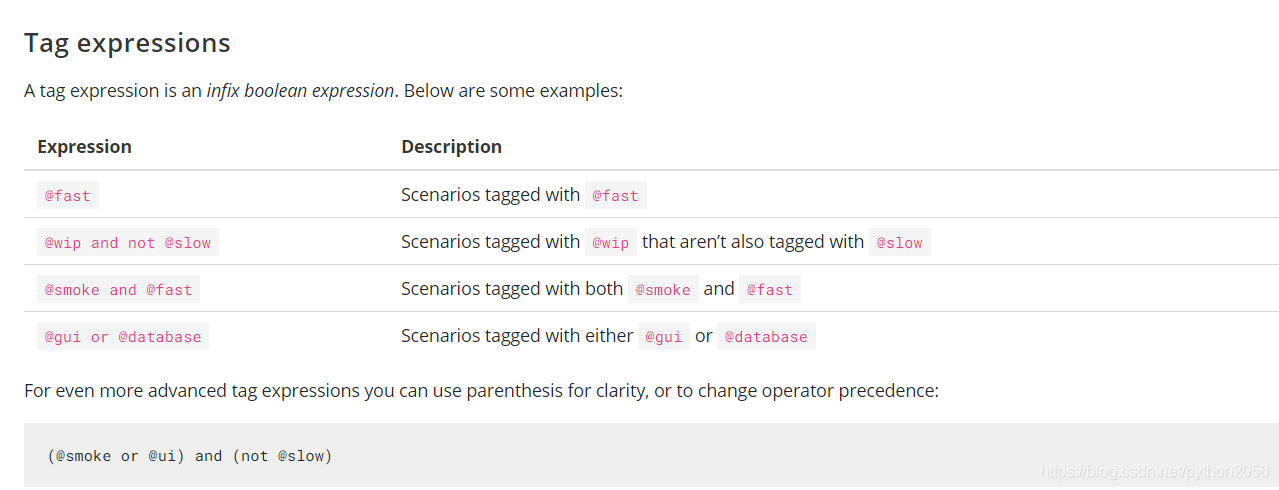
Tag的用法
和之前的参考资料不同,现在的tag使用说明如下:


 1204
1204

 被折叠的 条评论
为什么被折叠?
被折叠的 条评论
为什么被折叠?
 到【灌水乐园】发言


