


 本文通过逆向工程,研究了CryptoKitties游戏中新生猫咪基因的生成原理。作者利用Etherscan和Truffle等工具,深入分析了智能合约的字节码,揭示了影响基因生成的随机性因素。
or a quick tour through some neat Ethereum dev tools
[Edit: In an earlier version, we mentioned assert() should be used when checking input parameters, but as Nick Johnson and Yoichi Hirai have pointed out, the use of revert() is perfectly correct here. Our mistakes, apologies.]
Chapter Zero: Encountering of the Kitties
I just finished teaching (as a volunteer teacher during my down time) a full-stack Ethereum dApp development course, in Solidity, and Chinese :-), with the goal of boosting the awareness of blockchain and smart contract in Chinese developer community. 55 students graduated in my first class and I am lucky to become good friends with some of them, like Zhicheng and Fanglu.
After we emerged from this course stuff, we suddenly found ourselves surrounded by

Like many others, none of us can resist these cute crypto creatures and we all quickly get addicted to this game. We enjoy breeding new kitties and have upgraded our Rubber Duck Debugging routine to “Crypto Kitty Debugging”. Addiction to games, for me, is usually unhealthy. But I would say this time is an exception as this addiction to Crypto Kitty breeding game quickly draws three of us to this question:
How are baby crypto kitties genes determined?
We decide to spend a nice Saturday evening on this and we believe we have made some pretty good progress towards developing a “cracked software” that can help you determine the genetic mutation of your baby crypto kitties before they are born. In other word, this software can help you test and determine when is a good time to let your pregnant matron kitty give birth to the baby kitty so that you can see some nice mutations.
We are publishing this with the hope that just like Crypto Kitty acted as a entry drug towards blockchain world for many, this article can act as a brief introduction to some very handy ethereum developer tools that not a lot of developers use. Let’s get to the code.
Chapter One: The High-level Logic of Baby Kitty Generation
First question to answer: what is the process of Crypto Kitty being born?
To answer this, we use the awesome blockchain explorer Etherscan, where you can do much more than “exploring blocks”. We locate the deployed CryptoKittiesCore contract source code at:
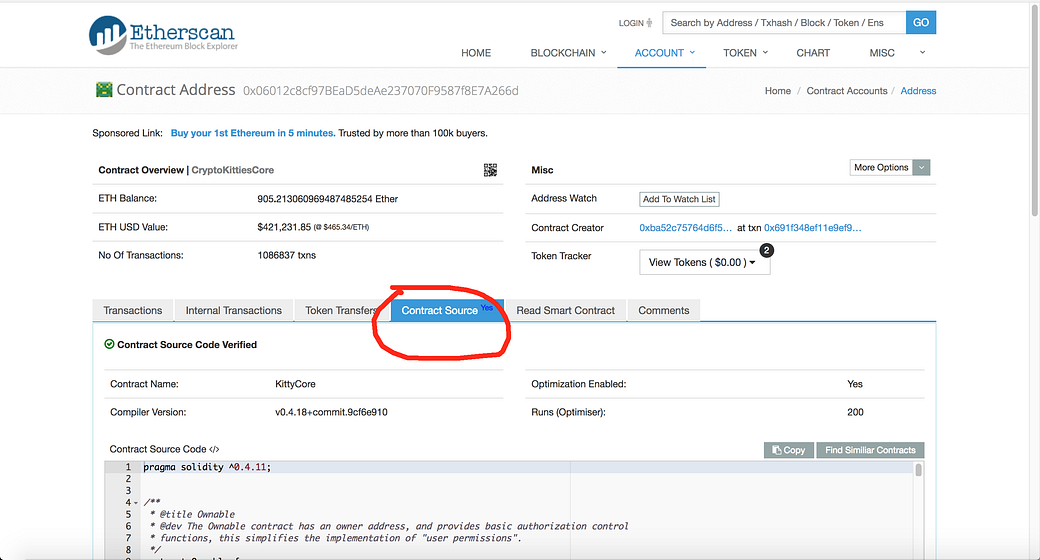
Note that the contract deployed is actually somewhat different from their bounty program contract. This code says that to get a baby kitty, there are two separate steps: 1. get a matron pregnant with a sirer; 2. later, call giveBirth function when the gestation period is done. The giveBirth function usually get called by some daemon process, but as you will see, you might want to control the birth block number of your baby kitty to see some nice mutation.
function giveBirth(uint256 _matronId)
        external
        whenNotPaused
        returns(uint256)
    {
        Kitty storage matron = kitties[_matronId];
// Check that the matron is a valid cat.
        require(matron.birthTime != 0);
// Check that the matron is pregnant, and that its time has come!
        require(_isReadyToGiveBirth(matron));
// Grab a reference to the sire in storage.
        uint256 sireId = matron.siringWithId;
        Kitty storage sire = kitties[sireId];
// Determine the higher generation number of the two parents
        uint16 parentGen = matron.generation;
        if (sire.generation > matron.generation) {
            parentGen = sire.generation;
        }
// Call the sooper-sekret gene mixing operation.
        uint256 childGenes = geneScience.mixGenes(matron.genes, sire.genes, matron.cooldownEndBlock - 1);
In the above code, you can clearly see the gene of your new kitty is determined right at the birth time, by calling an external smart contract geneScience’s function mixGenes. mixGenes takes three parameters: matron’s and sirer’s gene and the block number when matron is ready to give birth to the kitty.
You might wonder, why isn’t the gene determined when matron first gets pregnant like real-world kitty? As you will see in later part of this article, it’s actually a very cute anti-crack trick. This trick makes it impossible to deterministically know for 100% accuracy about the gene of baby kitties before the matron get really pregnant on the blockchain, even if the entire genetic mixing code was laid out in clear-text solidity.
Anyway, we didn’t know this back then and let’s continue. Now, the first thing we need to know is the address of this geneScience contract. We use MyEtherWallet for that:

The bytecode of that contract looks like this:
0x60606040526004361061006c5763ffffffff7c01000000000000000000000000000000000000000000000000000000006000350416630d9f5aed81146100715780631597ee441461009f57806354c15b82146100ee57806361a769001461011557806377a74a201461017e575b600080fd5b341561007c57600080fd5b61008d6004356024356044356101cd565b604051908152602001604051809........
Looks not as cute as kitties, but we got a pretty easy start with the contract address being public (i.e. we don’t need to dig through storage to find it). We honestly don’t think this contract address should be so easily accessible though. If dev team really want to make sure the correctness of the contract address, they could have used a function called checkScienceAddress. But hey, good for us.
Chapter Two: Failure of A Simple Hypothesis
Alright, so what is our goal here really? It is important to note that our goal is not to necessarily decompile this bytecode into human-readable solidity code. Our goal is to have a cheap (no real blockchain transaction)way to figure out, given two kitties, what’s their baby’s gene. Now we work towards that goal.
Let’s first use opcode-tool provided by Etherscan to take a first quick look. It looks like this:
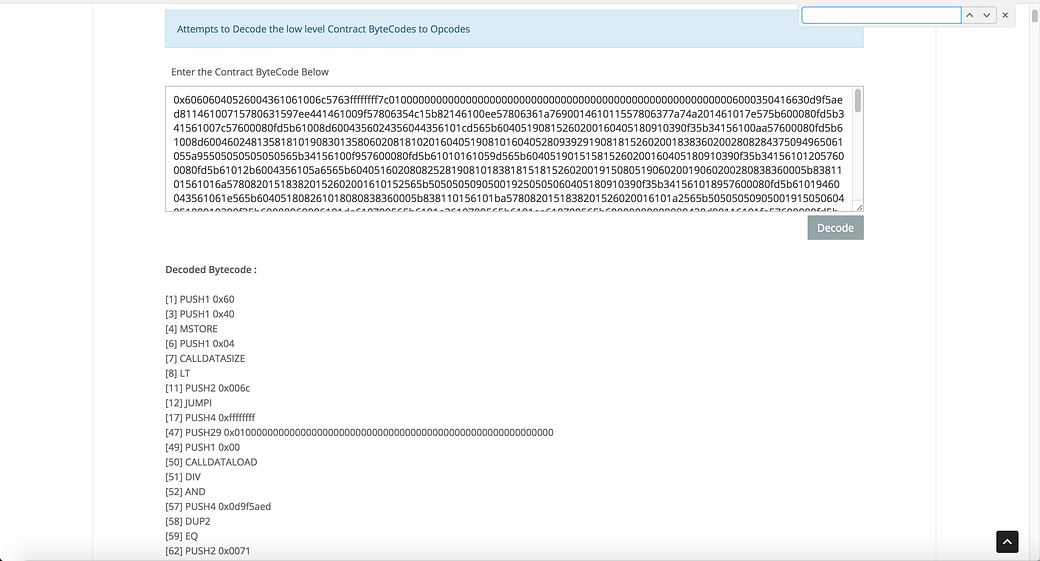
So this is much more readable.
We shall follow the golden principle of assembly hacking: start with bold and simple hypotheses about the program behavior and focusing on verifying the hypotheses instead of understanding the entire program. We quickly go through the bytecode to answer several questions:
- Does it use block timestamp? No, because there is no TIMESTAMP opcode. If there is any simple randomness, it surely comes from other kind of opcode.
- Does it use block hash? Yes, saw two BLOCKHASH. So if there is some randomness, it may come from here, but we are not quite sure at this point.
- Does it use some sort of hash? Yes, saw SHA3. Not sure what it does.
- Does it use msg.sender? No, because there is no CALLER opcode. So there is no access control towards this contract.
- Does it use any other external contract? No, there is no CALL opcode.
- Does it use COINBASE? No, so another possible seed of randomness is knocked out.
With these question answered, we propose and set out to test the simplest hypothesis here: the result of mixGene is determined by three and only three input parameters of this mixGene function. If this was the case, we could just deploy this contract locally and keep calling this function with parameters that we were interested in and we could get the baby kitty’s gene before a matron even got pregnant.
To test that hypothesis, we call mixGene function on mainnet with three random numbers we come up with: 1111115, 80, 40. We get a result, let’s call it X. Next, we deploy this byte code using truffle and testrpc. We are kind of lazy, so we are using truffle here in a hacky way.
contract GeneScienceSkeleton {
    function mixGenes(uint256 genes1, uint256 genes2, uint256 targetBlock) public returns (uint256) {}
}
We start from a skeleton contract here and put this into truffle’s framework folder structure and do a `truffle compile`. However, instead of directly migrating this empty contract to testrpc, we replace the contract bytecode in the `build` folder with the actual deployed bytecode and runtime bytecode of geneScience contract. This is a hacky but quick way if you want to deploy a contract with only bytecode and some limited public interface for local testing. After this, we directly try calling 1111115, 80, 40 and sadly, we saw an exception due to `revert`. Okay, let’s dig deeper. As we know the mixGene function signature is 0x0d9f5aed, so we follow the bytecode from the entry point of that function with a piece of paper to record the stack and storage. After a few JUMPs, we land here:
[497] DUP1
[498] NUMBER
[499] DUP14
[500] SWAP1
[501] GT
[504] PUSH2 0x01fe
[505] JUMPI
[507] PUSH1 0x00
[508] DUP1
[509] 'fd'(Unknown Opcode)
So what these lines saying is that if the current block number is smaller than the third parameter, then revert(). Alright, that actually makes a lot of sense: when the real function getting called in the game, it should never be called with a block larger than the current block.
This input check is easy to pass: we just mine a bunch of blocks on testrpc and call this function again. This time, the function successfully returns a value Y.
Sadly, X != Y
Sigh. So the function’s execution result does not only depends on the input parameters, but also depends on mainnet blockchain’s state, which is certainly different from the testrpc fake blockchain’s state.
Chapter Three: Digging into the Dirty Stack
Alright, alright, alright, we got to get our hands dirty now. As it is no longer fun to use the paper to record the stack as we go deeper, we first use a pretty good EVM disassembler called evmdis.
This is definitely a step up from paper and pen. So we keep going from where we left in the last chapter. The following is the relevant output from evmdis, very good looking:
.............
:label22
# Stack: [@0x70E @0x70E @0x70E 0x0 0x0 0x0 @0x88 @0x85 @0x82 :label3 @0x34]
0x1EB PUSH(0x0)
0x1ED DUP1
0x1EE DUP1
0x1EF DUP1
0x1F0 DUP1
0x1F1 DUP1
0x1F3 DUP13
0x1F9 JUMPI(:label23, NUMBER() > POP())
# Stack: [0x0 0x0 0x0 0x0 0x0 0x0 @0x70E @0x70E @0x70E 0x0 0x0 0x0 @0x88 @0x85 @0x82 :label3 @0x34]
0x1FA PUSH(0x0)
0x1FC DUP1
0x1FD REVERT()
:label23
# Stack: [0x0 0x0 0x0 0x0 0x0 0x0 @0x70E @0x70E @0x70E 0x0 0x0 0x0 @0x88 @0x85 @0x82 :label3 @0x34]
0x1FF DUP13
0x200 PUSH(BLOCKHASH(POP()))
0x201 SWAP11
0x202 POP()
0x203 DUP11
0x209 JUMPI(:label25, !!POP())
# Stack: [0x0 0x0 0x0 0x0 0x0 0x0 @0x70E @0x70E @0x70E 0x0 @0x200 0x0 @0x88 @0x85 @0x82 :label3 @0x34]
0x20C DUP13
0x213 PUSH((NUMBER() & ~0xFF) + (POP() & 0xFF))
0x214 SWAP13
0x215 POP()
0x217 DUP13
0x21E JUMPI(:label24, !!(POP() < NUMBER()))
# Stack: [0x0 0x0 0x0 0x0 0x0 0x0 @0x70E @0x70E @0x70E 0x0 @0x200 0x0 @0x213 @0x85 @0x82 :label3 @0x34]
0x222 DUP13
0x223 PUSH(POP() - 0x100)
0x224 SWAP13
0x225 POP()
:label24
# Stack: [0x0 0x0 0x0 0x0 0x0 0x0 @0x70E @0x70E @0x70E 0x0 @0x200 0x0 [@0x223 | @0x213] @0x85 @0x82 :label3 @0x34]
0x227 DUP13
0x228 PUSH(BLOCKHASH(POP()))
0x229 SWAP11
0x22A POP()
:label25
# Stack: [0x0 0x0 0x0 0x0 0x0 0x0 @0x70E @0x70E @0x70E 0x0 [@0x200 | @0x228] 0x0 [@0x88 | @0x223 | @0x213] @0x85 @0x82 :label3 @0x34]
0x22C DUP11
0x22D DUP16
0x22E DUP16
...........
The real good thing about evmdis is it helps us analyze JUMPDEST into nice `labels`, which is super helpful, but it is also sometimes trying to do to much of packing/unpacking opcode and that really mess up my mental model.
So after we pass the initial `require`, we land at `label 23`. We saw DUP13 and we know from the previous chapter, 13 on stack is our third parameter. So we are trying to get the BLOCKHASH of our third parameter. However, BLOCKHASH can only retrieve no further than 256 block’s blockhash. That’s why there is a JUMPI after this (it is an `if` construct). Manually converting the logic from opcodes to pseudo code you will get something like this:
func blockhash(p) {
    if (currentBlockNumber - p < 256)
        return hash(p);
    return 0;
}

var bhash = blockhash(thrid);
if (bhash == 0) {
    thirdProjection = (currentBlockNumber & ~0xff) + (thridParam & 0xff);
    if (thirdProjection > currentBlockNumber) {
        thirdProjection -= 256;
    }
    thirdParam = thirdProjection;
    bhash = blockhash(thirdProjection);
}
label 25 and beyond
..... some more stuff related to thirdParam and bhash
Now we believe we have found the reason why our execution yields different results from the mainnet. More importantly, we believe we have found the source of randomness, where a blockhash is computed on the third parameter or a projection of the third parameter. It is also critical to note that the third parameter on the stack is also replaced by this projected block number.
Obviously, during off-mainnet local execution, we have no easy way to force the return of BLOCKHASH to match whatever on the mainnet. However, as we know all the three parameters, we can easily observe the mainnet and get the block hash H of the third param or that of the projected block. Locally, we can then inject this block hash directly into the byte code and hopefully that’s all there is and we can get the accurate gene output!
However, there is a small wrinkle: DUP13 and BLOCKHASH are just two byte in the code, if we just replace them with a 33 byte PUSH32 0xHASH, the entire program counter will be totally messed up and we have to re-align every JUMP and JUMPI. Or we need to JUMP around to the end of the code and change deploy code copy instructions and blah blah. Hmm….
Well, since we have hacked so much, we might as well hack a bit more. As we are pushing a 32byte non-zero HASH in the `if` branch, the if condition will always be true and therefore, whatever in the `else` branch, can be simply nuked to make room for our fat 32byte HASH. And that’s exactly what we did


 3397
3397

 被折叠的 条评论
为什么被折叠?
被折叠的 条评论
为什么被折叠?
 到【灌水乐园】发言


