


 本文详细介绍了如何在Redis中搭建主从复制和哨兵模式,包括集群准备、哨兵节点部署、故障模拟及故障转移。通过配置主从节点,哨兵节点监控主节点状态,并在主节点故障时自动进行故障转移,确保高可用性。
| 192.168.80.51 | 主 db01 |
|---|---|
| 192.168.80.11 | 从 web04 |
| 192.168.80.9 | 从 web03 |
1. 集群的准备
实现主从请先备份数据

首先一个单节点的redis已经安装好了
单节点的安装
https://blog.youkuaiyun.com/ncnhhm/article/details/121443981
主节点的配置文件
daemonize yes
bind  192.168.80.51
port 6379
pidfile /opt/redis_cluster/redis_6379/pid/redis_6379.pid
logfile /opt/redis_cluster/redis_6379/logs/redis_6379.log
save 900 1
save 300 10
save 60 10000
dbfilename redis.rdb
dir /data/redis_6379/

压缩目录进行scp解压安装即可
cd /opt
tar cf   redis.tar.gz /opt/redis_cluster
scp redis.tar.gz 192.168.80.11:/opt
解压安装
tar xf redis.tar.gz
cd redis_cluster/redis-5.0.7
make install
web04修改配置文件
daemonize yes
bind  192.168.80.11
port 6379
pidfile /opt/redis_cluster/redis_6379/pid/redis_6379.pid
logfile /opt/redis_cluster/redis_6379/logs/redis_6379.log
save 900 1
save 300 10
save 60 10000
dbfilename redis.rdb
dir /data/redis_6379/
slaveof 192.168.80.51 6379
web03修改配置文件
daemonize yes
bind  192.168.80.9
port 6379
pidfile /opt/redis_cluster/redis_6379/pid/redis_6379.pid
logfile /opt/redis_cluster/redis_6379/logs/redis_6379.log
save 900 1
save 300 10
save 60 10000
dbfilename redis.rdb
dir /data/redis_6379/
slaveof 192.168.80.51 6379
只有从节点的配置文件配置slaveof 192.168.80.51 6379
修改ip和添加主从配置就行了
创建数据目录
mkdir -p /data/redis_6379/
启动
redis-server /opt/redis_cluster/redis_6379/conf/redis_6379.conf
手动的配置主从
登录到从节点
输入一下的命令
slaveof 192.168.80.51 6379
断开主从(配置文件里边没有配置slaveof重启就不会有主从关系)
停止从库
shutdown

pkill redis

登录到数据库,执行下边命令
slaveof  no one
主从复制流程
tail -f /opt/redis_cluster/redis_6379/logs/redis_6379.log
主库:db01
37139:M 29 Nov 2021 16:10:47.117 * Background saving terminated with success
37139:M 29 Nov 2021 16:10:47.118 * Synchronization with replica 192.168.80.11:6379 succeeded
37139:M 29 Nov 2021 16:10:55.052 * Replica 192.168.80.9:6379 asks for synchronization
37139:M 29 Nov 2021 16:10:55.052 * Full resync requested by replica 192.168.80.9:6379
37139:M 29 Nov 2021 16:10:55.052 * Starting BGSAVE for SYNC with target: disk
37139:M 29 Nov 2021 16:10:55.052 * Background saving started by pid 50724
50724:C 29 Nov 2021 16:10:55.056 * DB saved on disk
50724:C 29 Nov 2021 16:10:55.057 * RDB: 0 MB of memory used by copy-on-write
37139:M 29 Nov 2021 16:10:55.093 * Background saving terminated with success
37139:M 29 Nov 2021 16:10:55.094 * Synchronization with replica 192.168.80.9:6379 succeeded
从库:web03
8274:S 29 Nov 2021 16:10:55.024 * Connecting to MASTER 192.168.80.51:6379
8274:S 29 Nov 2021 16:10:55.025 * MASTER <-> REPLICA sync started
8274:S 29 Nov 2021 16:10:55.026 * Non blocking connect for SYNC fired the event.
8274:S 29 Nov 2021 16:10:55.028 * Master replied to PING, replication can continue...
8274:S 29 Nov 2021 16:10:55.029 * Partial resynchronization not possible (no cached master)
8274:S 29 Nov 2021 16:10:55.030 * Full resync from master: feef8abd4a1ed9e739b552f569f7b00c054c21c4:18564
8274:S 29 Nov 2021 16:10:55.072 * MASTER <-> REPLICA sync: receiving 1266 bytes from master
8274:S 29 Nov 2021 16:10:55.072 * MASTER <-> REPLICA sync: Flushing old data
8274:S 29 Nov 2021 16:10:55.072 * MASTER <-> REPLICA sync: Loading DB in memory
8274:S 29 Nov 2021 16:10:55.072 * MASTER <-> REPLICA sync: Finished with success
过程
1.从节点发送同步的请求到主节点
2.主节点接成功请求之后
   2.1 立即执行bgsave将缓存中的数据持久化到磁盘
   2.2 将持久化rdb文件的厨具进行发送给从节点
3. 从节点接收到文件之后
   3.1 清空自己的数据
   3.2 导入主节点的rdb数据到自己的内存
4.接着就是实时数据的同步
1.从节点只读不可写
2.从节点不会自动故障转移,它会一直同步主节点
3.主从复制故障转移需要人工介入
4.从节点会清空自己原有的数据,如果同步的对象写错了,就会导致数据丢失
5.从库和主库后续的同步依靠的是redis的SYNC协议,而不是RDB文件,RDB文件只是第一次建立同步时使用。
6.从库也可以正常的持久化文件
2. 哨兵模式的搭建(sentinel)
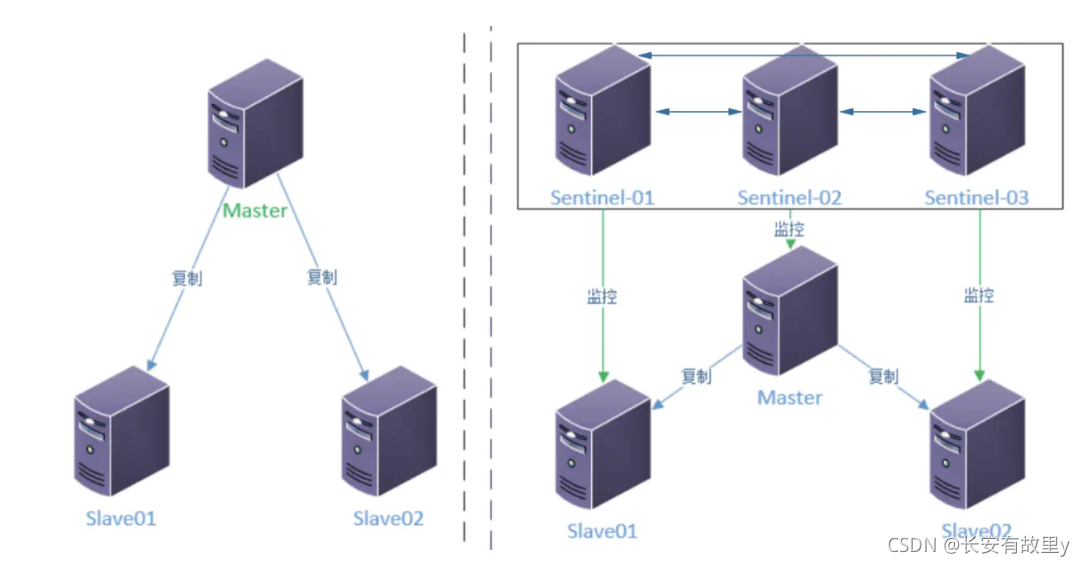
哨兵模式的搭建是建立在主从搭建好的基础之上
作用:
1.解决人为干预
2.实现高可用
端口号
普通集群端口号 6379
哨兵的端口号  26379
2.1 部署哨兵节点
三台都做
mkdir -p /data/redis_26379
mkdir -p /opt/redis_cluster/redis_26379/{conf,pid,logs}

cat >/opt/redis_cluster/redis_26379/conf/redis_26379.conf << EOF
bind $(ifconfig eth0|awk 'NR==2{print $2}')
port 26379
daemonize yes
logfile /opt/redis_cluster/redis_26379/logs/redis_26379.log
dir /data/redis_26379
sentinel monitor myredis 192.168.80.51 6379 2
sentinel down-after-milliseconds myredis 3000
sentinel parallel-syncs myredis 1
sentinel failover-timeout myredis 18000
EOF
解释
sentinel monitor mymaster 192.168.80.51 6379 2
mymaster 主节点别名 主节点 ip 和端口, 判断主节点失败, 两个 sentinel 节点同意

sentinel down-after-milliseconds mymaster 3000
选项指定了 Sentinel 认为服务器已经断线所需的毫秒数。

sentinel parallel-syncs mymaster 1
向新的主节点发起复制操作的从节点个数, 1 轮询发起复制

sentinel failover-timeout mymaster 180000
故障转移超时时间
启动集群
redis-server /opt/redis_cluster/redis_6379/conf/redis_6379.conf
启动哨兵
redis-sentinel /opt/redis_cluster/redis_26379/conf/redis_26379.conf
验证
redis-cli -h 192.168.80.51 -p 26379 Sentinel get-master-addr-by-name myredis
redis-cli -h 192.168.80.11 -p 26379 Sentinel get-master-addr-by-name myredis
redis-cli -h 192.168.80.9 -p 26379 Sentinel get-master-addr-by-name myredis
[root@db01 conf]# redis-cli -h 192.168.80.51 -p 26379 Sentinel get-master-addr-by-name myredis
1) "192.168.80.51"
2) "6379"

[root@web03 /]# redis-cli -h 192.168.80.9 -p 26379 Sentinel get-master-addr-by-name myredis
1) "192.168.80.51"
2) "6379"
配置文件的改变26379
bind 192.168.80.51
port 26379
daemonize yes
logfile "/opt/redis_cluster/redis_26379/logs/redis_26379.log"
dir "/data/redis_26379"
sentinel myid c108932796b940f546d2ac25648eecd41e80146d
sentinel deny-scripts-reconfig yes
sentinel monitor myredis 192.168.80.51 6379 2
sentinel down-after-milliseconds myredis 3000
# Generated by CONFIG REWRITE
protected-mode no
sentinel failover-timeout myredis 18000
sentinel config-epoch myredis 0
sentinel leader-epoch myredis 0
sentinel known-replica myredis 192.168.80.11 6379
sentinel known-replica myredis 192.168.80.9 6379
sentinel known-sentinel myredis 192.168.80.9 26379 e765086886822b35ca79c5559d80367f62562967
sentinel known-sentinel myredis 192.168.80.11 26379 d07a13189c81c052cac647b274b28073dbb83acd
sentinel current-epoch 0
会自动的添加
2.2 故障模拟(停掉主节点)
pkill redis
配置文件改变
tail -f /opt/redis_cluster/redis_26379/logs/redis_26379.log
10201:X 29 Nov 2021 16:58:24.083 # +sdown sentinel c108932796b940f546d2ac25648eecd41e80146d 192.168.80.51 26379 @ myredis 192.168.80.51 6379
10201:X 29 Nov 2021 16:58:24.155 # +sdown master myredis 192.168.80.51 6379
10201:X 29 Nov 2021 16:58:24.298 # +new-epoch 1
10201:X 29 Nov 2021 16:58:24.299 # +vote-for-leader d07a13189c81c052cac647b274b28073dbb83acd 1
10201:X 29 Nov 2021 16:58:25.301 # +odown master myredis 192.168.80.51 6379 #quorum 2/2
10201:X 29 Nov 2021 16:58:25.301 # Next failover delay: I will not start a failover before Mon Nov 29 16:59:00 2021
10201:X 29 Nov 2021 16:58:25.390 # +config-update-from sentinel d07a13189c81c052cac647b274b28073dbb83acd 192.168.80.11 26379 @ myredis 192.168.80.51 6379
10201:X 29 Nov 2021 16:58:25.390 # +switch-master myredis 192.168.80.51 6379 192.168.80.9 6379
10201:X 29 Nov 2021 16:58:25.392 * +slave slave 192.168.80.11:6379 192.168.80.11 6379 @ myredis 192.168.80.9 6379
10201:X 29 Nov 2021 16:58:25.392 * +slave slave 192.168.80.51:6379 192.168.80.51 6379 @ myredis 192.168.80.9 6379
10201:X 29 Nov 2021 16:58:28.408 # +sdown slave 192.168.80.51:6379 192.168.80.51 6379 @ myredis 192.168.80.9 6379
可以看到主节点变成了192.168.80.9
[root@web03 /]# redis-cli -h 192.168.80.9 -p 26379 Sentinel get-master-addr-by-name myredis
1) "192.168.80.9"
2) "6379"
开启主节点
redis-server /opt/redis_cluster/redis_6379/conf/redis_6379.conf
redis-sentinel /opt/redis_cluster/redis_26379/conf/redis_26379.conf
这个时候会自动的添加到集群里边
53853:X 29 Nov 2021 17:01:15.168 # +config-update-from sentinel d07a13189c81c052cac647b274b28073dbb83acd 192.168.80.11 26379 @ myredis 192.168.80.51 6379
53853:X 29 Nov 2021 17:01:15.169 # +switch-master myredis 192.168.80.51 6379 192.168.80.9 6379
53853:X 29 Nov 2021 17:01:15.171 * +slave slave 192.168.80.11:6379 192.168.80.11 6379 @ myredis 192.168.80.9 6379
53853:X 29 Nov 2021 17:01:15.171 * +slave slave 192.168.80.51:6379 192.168.80.51 6379 @ myredis 192.168.80.9 6379
问题:这个时候不再是db01是主服务器,而是web03,怎么解决,进行主从的切换
查询命令:CONFIG GET slave-priority
设置命令:CONFIG SET slave-priority 0
主动切换:sentinel failover myredis
权重,默认的是100,这个时候我们把另外的两台设置为0
再主从切换,在要进行设置为主机的那一台上边切换
切换完记得恢复权重,以便下一次有机器损坏的选主
权重的查看
redis-cli -h 192.168.80.9 -p 6379 CONFIG GET slave-priority
redis-cli -h 192.168.80.11 -p 6379 CONFIG GET  slave-priority
redis-cli -h 192.168.80.51  -p 6379 CONFIG GET  slave-priority
具体的操作
redis-cli -h 192.168.80.9 -p 6379 CONFIG SET slave-priority 0
redis-cli -h 192.168.80.11 -p 6379 CONFIG SET slave-priority 0
redis-cli -h 192.168.80.51 -p 26379 sentinel failover myredis
验证是否恢复为原来的主节点
redis-cli -h 192.168.80.51 -p 26379 Sentinel get-master-addr-by-name myredis
配置文件
bind 192.168.80.51
port 26379
daemonize yes
logfile "/opt/redis_cluster/redis_26379/logs/redis_26379.log"
dir "/data/redis_26379"
sentinel myid c108932796b940f546d2ac25648eecd41e80146d
sentinel deny-scripts-reconfig yes
sentinel monitor myredis 192.168.80.51 6379 2
sentinel down-after-milliseconds myredis 3000
# Generated by CONFIG REWRITE
protected-mode no
sentinel failover-timeout myredis 18000
sentinel config-epoch myredis 2
sentinel leader-epoch myredis 2
sentinel known-replica myredis 192.168.80.9 6379
sentinel known-replica myredis 192.168.80.11 6379
sentinel known-sentinel myredis 192.168.80.11 26379 d07a13189c81c052cac647b274b28073dbb83acd
sentinel known-sentinel myredis 192.168.80.9 26379 e765086886822b35ca79c5559d80367f62562967
sentinel current-epoch 2
恢复权重
redis-cli -h 192.168.80.9 -p 6379 CONFIG SET slave-priority 100
redis-cli -h 192.168.80.11 -p 6379 CONFIG SET slave-priority 100


 2126
2126

 被折叠的 条评论
为什么被折叠?
被折叠的 条评论
为什么被折叠?
 到【灌水乐园】发言


