


 本文详细介绍使用TensorFlow进行图像预处理及数据读取的方法,包括构建训练集、图像缩放、颜色域转换、图像块提取及数据增强等关键步骤。通过实际代码演示,展示如何利用tf.image模块和tf.data.Dataset实现高效图像处理与批量生成。
Tensorflow图像处理以及数据读取
本人研究的方向是图像处理,这个领域几乎被深度学习的方法给统治了,例如图像去燥、图像超分辨、图像增强等等。在模拟实现相关论文的方法时,我发现最难的部分并不是深度学习的网络,而是如何构建你的训练集。通常,为了构建一个可训练的数据库我需要做:
- 上网找到论文提到的图像数据库,或者自己收集图像
对图像进行处理,构建训练所需的数据库,处理的方式各种各样,包括
- 图像颜色域的变化,例如RGB转HSV,RGB转Gray等等
- 图像大小的缩放,例如将不同大小的图像缩放为大小一致的图像
- 提前图像块(image patch),就是从整张图像中,扣下小块(例如32*32)的小图像,这么做主要是因为可以增加训练数据的量,另外小块的图像训练起来速度更快,image patch的合理性是基于卷积神经网络的感受野(Receptive field)通常不会太大
- 数据增强(Data augmentation),例如将图像上下翻转,左右翻转,裁剪,旋转等等。这里有一篇Keras-5 基于 ImageDataGenerator 的 Data Augmentation实现可以让大家大致明白什么是Data augmentation
为了训练,给深度网络喂数据,我还需要写batch generator,就是用来生成一个batch的东西
一般,我们对整个训练过程有两种方案
1. 构建数据库的部分是独立,也就是说我们对找到的图像做预处理,将预处理的结果保存起来,这就算构建好训练的数据库了,然后训练时从这数据库里直接拿数据进行训练
2. 训练时实时地预处理一个batch的图像,将处理的结果作为训练的输入第一种方法将训练集的构建和网络的训练分开,并且将预处理结果存在电脑中,这样做训练的代码会比较简单,且直接读入处理好的数据能让训练速度更快,当然,不足的地方就是不够灵活,如果预处理的方式改变了(例如,原本是RGB转HSV,现在我要RGB转Gray),那么需要重新构建一个数据库,造成硬盘空间的浪费
第二种方法虽然训练速度不如第一种,但是足够灵活,我们主要关注第二种方法。
在TensorFlow中,图像处理主要由
tf.image模块支持,batch generator主要用tf.data.Dataset实现,下面我们来看看整个流程的具体实现1 获取所有图片的路径
很明显,如果训练集很大,图片很多,我们无法一次读取所有图片进行训练,因此我们先找到所有图片的路径,在需要读取图片时再根据路径读取图片
import glob # images_dir 下存放着需要预处理的图像 images_dir = '/home/public/butterfly/dataset_detection/JPEGImages/' # 查找图片文件, 根据具体数据集自由添加各种图片格式(jpg, jpeg, png, bmp等等) images_paths = glob.glob(images_dir+'*.jpg') images_paths += glob.glob(images_dir+'*.jpeg') images_paths += glob.glob(images_dir+'*.png') print('Find {} images, the first 10 image paths are:'.format(len(images_paths))) for path in images_paths[:10]: print(path)- 1
- 2
- 3
- 4
- 5
- 6
- 7
- 8
- 9
- 10
- 11
Find 717 images, the first 10 image paths are: /home/public/butterfly/dataset_detection/JPEGImages/IMG_001000.jpg /home/public/butterfly/dataset_detection/JPEGImages/IMG_000969.jpg /home/public/butterfly/dataset_detection/JPEGImages/IMG_000805.jpg /home/public/butterfly/dataset_detection/JPEGImages/IMG_000158.jpg /home/public/butterfly/dataset_detection/JPEGImages/IMG_001017.jpg /home/public/butterfly/dataset_detection/JPEGImages/IMG_001155.jpg /home/public/butterfly/dataset_detection/JPEGImages/IMG_001404.jpg /home/public/butterfly/dataset_detection/JPEGImages/IMG_000202.jpg /home/public/butterfly/dataset_detection/JPEGImages/IMG_000568.jpg /home/public/butterfly/dataset_detection/JPEGImages/IMG_000022.jpg- 1
- 2
- 3
- 4
- 5
- 6
- 7
- 8
- 9
- 10
- 11
import numpy as np # split training set and test data test_split_factor = 0.2 n_test_path = int(len(images_paths)*test_split_factor) # 转出numpy数据,方便使用 train_image_paths = np.asarray(images_paths[:-n_test_path]) test_image_paths = np.asarray(images_paths[-n_test_path:]) print('Number of train set is {}'.format(train_image_paths.shape[0])) print('Number of test set is {}'.format(test_image_paths.shape[0]))- 1
- 2
- 3
- 4
- 5
- 6
- 7
- 8
- 9
Number of train set is 574 Number of test set is 143- 1
- 2
2. Batch Generator
我们将使用
tf.data.Dataset来实现batch generator,这里借鉴了一篇博客 TensorFlow全新的数据读取方式:Dataset API入门教程。我们直接上代码,具体解释请看注释def gaussian_noise_layer(input_image, std): noise = tf.random_normal(shape=tf.shape(input_image), mean=0.0, stddev=std, dtype=tf.float32) noise_image = tf.cast(input_image, tf.float32) + noise noise_image = tf.clip_by_value(noise_image, 0, 1.0) return noise_image def parse_data(filename): ''' 导入数据,进行预处理,输出两张图像, 分别是输入图像和目标图像(例如,在图像去噪中,输入的是一张带噪声图像,目标图像是无噪声图像) Args: filaneme, 图片的路径 Returns: 输入图像,目标图像 ''' # 读取图像 image = tf.read_file(filename) # 解码图片 image = tf.image.decode_image(image) # 数据预处理,或者数据增强,这一步根据需要自由发挥 # 随机提取patch image = tf.random_crop(image, size=(100,100, 3)) # 数据增强,随机水平翻转图像 image = tf.image.random_flip_left_right(image) # 图像归一化 image = tf.cast(image, tf.float32) / 255.0 # 加噪声 n_image =gaussian_noise_layer(image, 0.5) return n_image, image- 1
- 2
- 3
- 4
- 5
- 6
- 7
- 8
- 9
- 10
- 11
- 12
- 13
- 14
- 15
- 16
- 17
- 18
- 19
- 20
- 21
- 22
- 23
- 24
- 25
- 26
- 27
- 28
- 29
- 30
- 31
- 32
def train_generator(batchsize, shuffle=True): ''' 生成器,用于生产训练数据 Args: batchsize,训练的batch size shuffle, 是否随机打乱batch Returns: 训练需要的数据 ''' with tf.Session() as sess: # 创建数据库 train_dataset = tf.data.Dataset().from_tensor_slices((train_image_paths)) # 预处理数据 train_dataset = train_dataset.map(parse_data) # 设置 batch size train_dataset = train_dataset.batch(batchsize) # 无限重复数据 train_dataset = train_dataset.repeat() # 洗牌,打乱 if shuffle: train_dataset = train_dataset.shuffle(buffer_size=4) # 创建迭代器 train_iterator = train_dataset.make_initializable_iterator() sess.run(train_iterator.initializer) train_batch = train_iterator.get_next() # 开始生成数据 while True: try: x_batch, y_batch = sess.run(train_batch) yield (x_batch, y_batch) except: # 如果没有 train_dataset = train_dataset.repeat() # 数据遍历完就到end了,就会抛出异常 train_iterator = train_dataset.make_initializable_iterator() sess.run(train_iterator.initializer) train_batch = train_iterator.get_next() x_batch, y_batch = sess.run(train_batch) yield (x_batch, y_batch)- 1
- 2
- 3
- 4
- 5
- 6
- 7
- 8
- 9
- 10
- 11
- 12
- 13
- 14
- 15
- 16
- 17
- 18
- 19
- 20
- 21
- 22
- 23
- 24
- 25
- 26
- 27
- 28
- 29
- 30
- 31
- 32
- 33
- 34
- 35
- 36
- 37
- 38
- 39
- 40
- 41
- 42
import matplotlib.pyplot as plt %matplotlib inline #%config InlineBackend.figure_format='retina' # 显示图像 def view_samples(samples, nrows, ncols, figsize=(5,5)): fig, axes = plt.subplots(nrows=nrows, ncols=ncols, figsize=figsize, sharey=True, sharex=True) for ax, img in zip(axes.flatten(), samples): ax.axis('off') ax.set_adjustable('box-forced') im = ax.imshow(img, aspect='equal') plt.subplots_adjust(wspace=0, hspace=0) plt.show() return fig, axes- 1
- 2
- 3
- 4
- 5
- 6
- 7
- 8
- 9
- 10
- 11
- 12
- 13
- 14
- 15
- 16
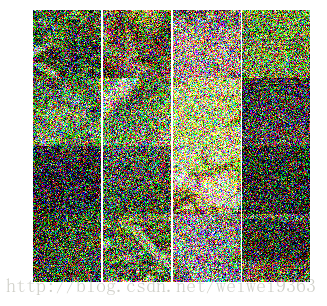
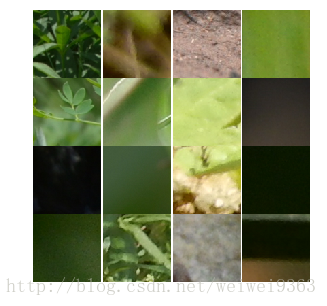
# 测试一下我们的代码 train_gen = train_generator(16) iteration = 5 for i in range(iteration): noise_x, x = next(train_gen) _ = view_samples(noise_x, 4,4) _ = view_samples(x, 4, 4)- 1
- 2
- 3
- 4
- 5
- 6
- 7
- 8
总结
TensorFlow提供了一整套图像预处理以及数据生成的机制,我们实现了一个简单的常用的数据处理框架,总结为三步
1. 获取所有图片的路径
2. 写好预处理的代码(parse_data)
3. 定义好数据生成器
基于以上的流程,稍微加以修改就能够应对大部分训练要求


 2万+
2万+

 被折叠的 条评论
为什么被折叠?
被折叠的 条评论
为什么被折叠?
 到【灌水乐园】发言


