


最近在做流程图功能 发现vueflow蛮好用,网上找了一圈 居然都要钱 好好 这么玩 来来 免费的教程 拿走
一,安装
1.npm install @vueflow/core 安装核心组件
2.npm install @vueflow/background 安装背景组件
3.npm install @vueflow/controls 安装控件(放大,缩小等)组件
4.npm install @vueflow/minimap 安装缩略图组件
二,使用
引入插件
import { VueFlow, Position, Panel, useVueFlow, MarkerType } from '@vue-flow/core'
import { Background } from '@vue-flow/background'
import { Controls } from '@vue-flow/controls'
import { MiniMap } from '@vue-flow/minimap'
引入样式
import "@vue-flow/core/dist/style.css";
import "@vue-flow/core/dist/theme-default.css";
import '@vue-flow/controls/dist/style.css';
import '@vue-flow/minimap/dist/style.css';
三,使用

@node-click="handleNodeClick" 节点被选中
@node-types="nodeTypes" 插入自定义节点内容
@onNodeDragStop="onNodeDragStart" 拖动结束触发
@onConnect="onConnect" 连线完成回调
@onEdgeClick="onEdgeClick" 点击线条触发
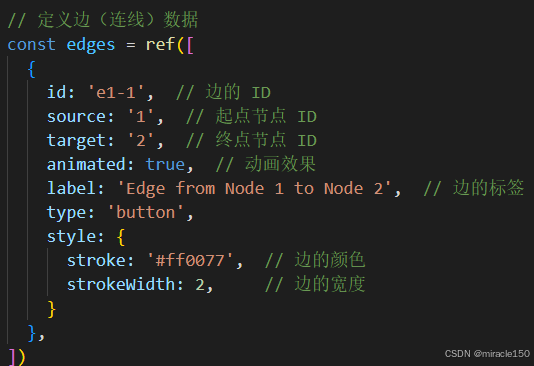
定义连线
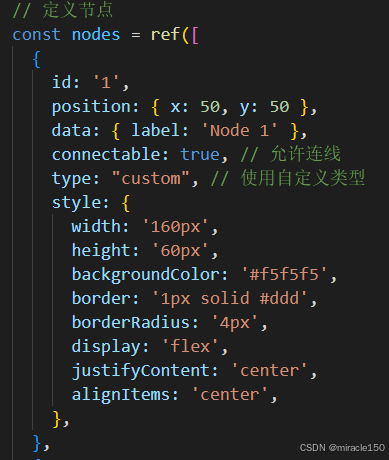
定义节点
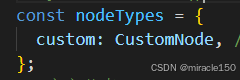
自定义节点组件
import CustomNode from "./customNode.vue"
新建customNode文件 里面可以自定义节点里面的标签
customNode.vue
<script setup>
import { Position, Handle } from '@vue-flow/core'
// props were passed from the slot using `v-bind="customNodeProps"`
const props = defineProps(['customNodeProps'])
console.log(props)
</script>
<template>
<div class="custom-node">
<Handle type="target" :position="Position.Top" />
<div>
<p>{{ props.customNodeProps.data.label }}</p>
</div>
<Handle type="source" :position="Position.Bottom" />
</div>
</template>
<style scoped lang="scss">
.custom-node {
width: 150px;
text-align: center;
background-color: #571e1e;
font-size: 14px;
color: rgb(117, 88, 88);
}
</style>
一定记得引入Position, Handle
引入
![]()
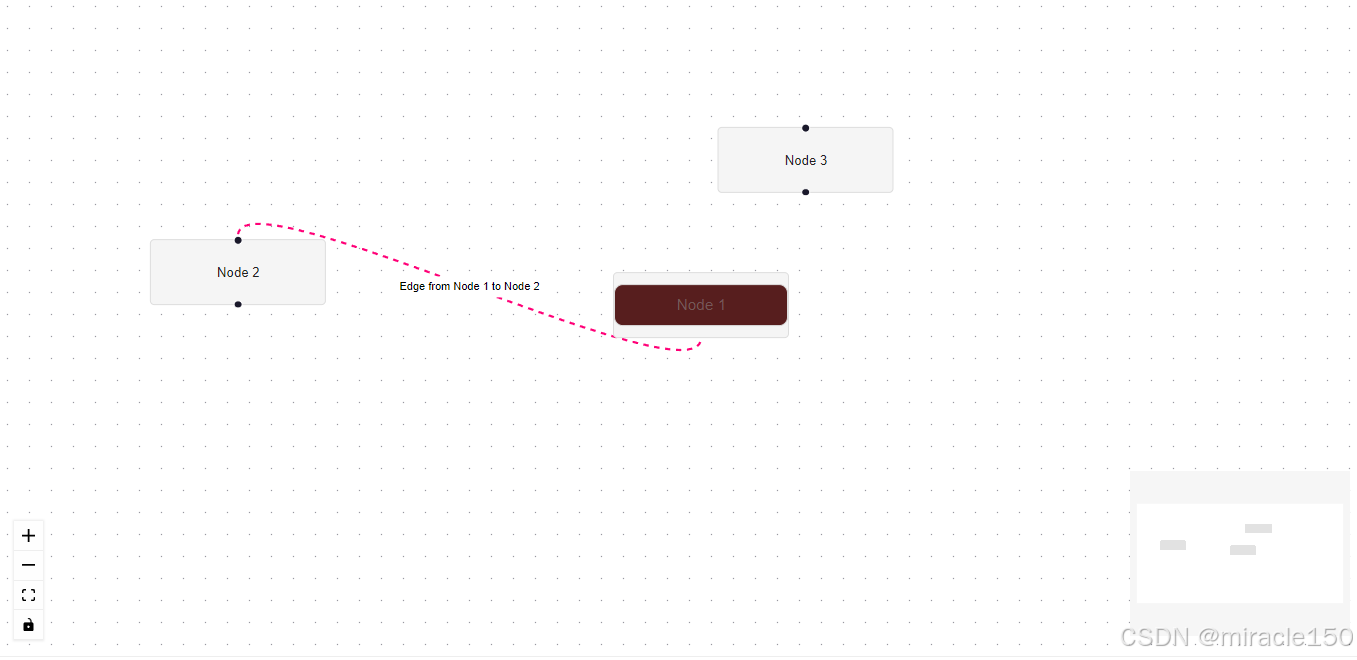
大功告成
完整代码
<script setup>
import { ref, markRaw } from 'vue'
import { VueFlow } from '@vue-flow/core'
import { Background } from '@vue-flow/background'
import { Controls } from '@vue-flow/controls'
import { MiniMap } from '@vue-flow/minimap'
import { ElMessage, ElMessageBox } from 'element-plus'
import CustomNode from "./customNode.vue"
import "@vue-flow/core/dist/style.css";
import "@vue-flow/core/dist/theme-default.css";
import '@vue-flow/controls/dist/style.css';
import '@vue-flow/minimap/dist/style.css';
// const {
// onEdgeClick,
// onEdgeDoubleClick,
// onEdgeContextMenu,
// onEdgeMouseEnter,
// onEdgeMouseLeave,
// onEdgeMouseMove,
// onEdgeUpdateStart,
// onEdgeUpdate,
// onEdgeUpdateEnd,
// } = useVueFlow()
const nodeTypes = {
custom: markRaw(CustomNode), // 绑定类型到自定义节点组件
};
// 定义节点
const nodes = ref([
{
id: '1',
position: { x: 50, y: 50 },
data: { label: 'Node 1', id: '1', connectable: true },
connectable: true, // 允许连线
type: "custom", // 使用自定义类型
style: {
width: '160px',
height: '60px',
backgroundColor: '#f5f5f5',
border: '1px solid #ddd',
borderRadius: '4px',
display: 'flex',
justifyContent: 'center',
alignItems: 'center',
},
},
{
id: '2',
position: { x: 50, y: 150 },
data: { label: 'Node 2', id: '2', connectable: true },
connectable: true, // 允许连线
type: "custom", // 使用自定义类型
style: {
width: '160px',
height: '60px',
backgroundColor: '#f5f5f5',
border: '1px solid #ddd',
borderRadius: '4px',
display: 'flex',
justifyContent: 'center',
alignItems: 'center',
},
},
{
id: '3',
position: { x: 250, y: 150 },
data: { label: 'Node 3' },
connectable: true, // 允许连线
style: {
width: '160px',
height: '60px',
backgroundColor: '#f5f5f5',
border: '1px solid #ddd',
borderRadius: '4px',
display: 'flex',
justifyContent: 'center',
alignItems: 'center',
},
}
])
// 定义边(连线)数据
const edges = ref([
{
id: 'e1-1', // 边的 ID
source: '1', // 起点节点 ID
target: '2', // 终点节点 ID
animated: true, // 动画效果
label: 'Edge from Node 1 to Node 2', // 边的标签
type: 'button',
style: {
stroke: '#ff0077', // 边的颜色
strokeWidth: 2, // 边的宽度
}
},
])
// 绑定事件处理程序
const onEdgeClick = (res, dsa) => {//删除连线
ElMessageBox.confirm(
"确定删除节点" + res.edge.source + "至节点" + res.edge.target + "的连线",
'删除连线',
{
confirmButtonText: 'OK',
cancelButtonText: '取消',
type: 'warning',
}
)
.then(() => {
edges.value = edges.value.filter(item => item.id !== res.edge.id);
})
.catch(() => {
// ElMessage({
// type: 'info',
// message: 'Delete canceled',
// })
})
}
const generateUniqueId = () => {
let q = edges.value.length + 1;
let id = "e1-" + q; // 初始ID
const existingIds = new Set(edges.value); // 使用 Set 来快速检查已存在的 ID
// 检查 ID 是否已经存在,直到找到一个唯一的 ID
while (existingIds.has(id)) {
q++; // 如果存在,q 加 1
id = "e1-" + q; // 重新生成 ID
}
return id; // 返回生成的唯一 ID
}
const onConnect = (params) => {
// 连线时触发的回调
console.log('Connected:', params);
edges.value.push({
id: generateUniqueId(), // 边的 ID
source: params.source, // 起点节点 ID
target: params.target, // 终点节点 ID
animated: true, // 动画效果
label: 'Edge from Node' + params.source + 'to Node ' + params.target, // 边的标签
type: 'button',
style: {
stroke: '#ff0077', // 边的颜色
strokeWidth: 2, // 边的宽度
}
})
console.log(edges.value)
}
//节点被选中
const handleNodeClick = (event) => {
const nodeId = event.node.id;
nodes.value = nodes.value.map((n) => {
if (n.id === nodeId) {
return {
...n,
style: {
...n.style,
border: '2px solid #00FF00',
borderRadius: '10px' // 可以设置其他样式
}
};
} else {
return {
...n,
style: {
...n.style,
border: '1px solid #ddd',
borderRadius: '4px',
}
};
}
return n;
});
}
//拖动触发
const onNodeDragStart = (event) => {
const nodeId = event.node.id;
nodes.value.map((n, index) => {
if (n.id === nodeId) {
nodes.value[index].position = event.node.position;
}
});
}
// ... and so on
</script>
<template>
<!-- 渲染 VueFlow 图形组件 -->
<VueFlow :nodes="nodes" :edges="edges" :node-types="nodeTypes" :onConnect="onConnect" :onEdgeClick="onEdgeClick"
@node-click="handleNodeClick" :onNodeDragStop="onNodeDragStart">
<Background />
<Controls />
<MiniMap />
<template #node-custom="customNodeProps">
<CustomNode :customNodeProps="customNodeProps" />
</template>
</VueFlow>
</template>
<style lang="scss" scoped></style>


 720
720

 被折叠的 条评论
为什么被折叠?
被折叠的 条评论
为什么被折叠?
 到【灌水乐园】发言


