


 本文详细介绍了AJAX的基础知识,包括如何使用XMLHttpRequest对象发送GET和POST请求,以及设置请求参数和请求头。通过实例展示了在前端页面和服务器端的交互过程,帮助理解AJAX在数据传输中的应用。
案例准备
前端页面准备:GET.html
<!DOCTYPE html>
<html lang="en">
<head>
    <meta charset="UTF-8">
    <meta http-equiv="X-UA-Compatible" content="IE=edge">
    <meta name="viewport" content="width=device-width, initial-scale=1.0">
    <title>Document</title>
    <style>
        #result{
            width: 200px;
            height: 100px;
            border: solid 1px #90b;
        }
    </style>
</head>
<body>
    <button>点击发送请求</button>
    <div id="result"></div>

</body>
</html>
服务器页面准备:GET.js
// 1.引入express
const express = require('express');
// 2.创建应用对象
const app = express();
// 3.创建路由规则
// 如果请求行的路径是/server就会执行回调韩式里面的内容
app.get('/server', (request, response) => {
    // 设置响应头 设置允许跨越
    response.setHeader('Access-Control-Allow-Origin', '*');

    // 设置响应体
    response.send('HELLO AJAX')
})
// 4.监听端口启动服务
app.listen(8000, () => {
    console.log('服务已经启动,8000端口监听中……')
})
启动GET.js
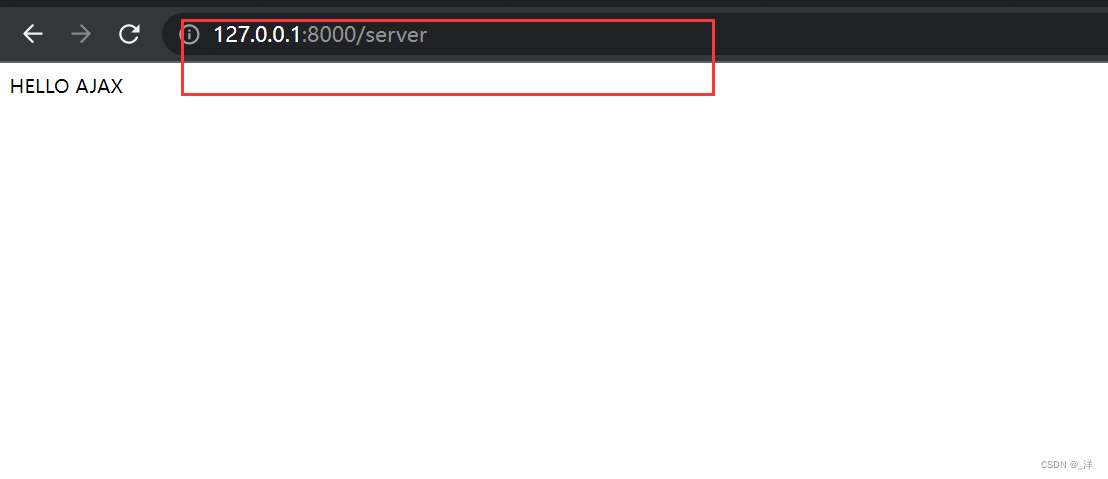
AJAX发送get请求
- 创建AJAX对象:
const xhr = new XMLHttpRequest(); - 初始化 设置请求方法和url(向谁发送请求):
xhr.open('GET','http://127.0.0.1:8000/server')
——请求行 - 发送请求:
xhr.send() - 事件绑定,处理服务端返回的结果:
 xhr.onreadystatechange = function (){
 }
- on:当…的时候
- readystate是xhr对象中的属性,表示状态:
0(未初始化)
1(open方法调用完毕)
2(send方法调用完毕)
3(服务端返回了部分结果)
4(服务端返回了所有结果) - change 改变
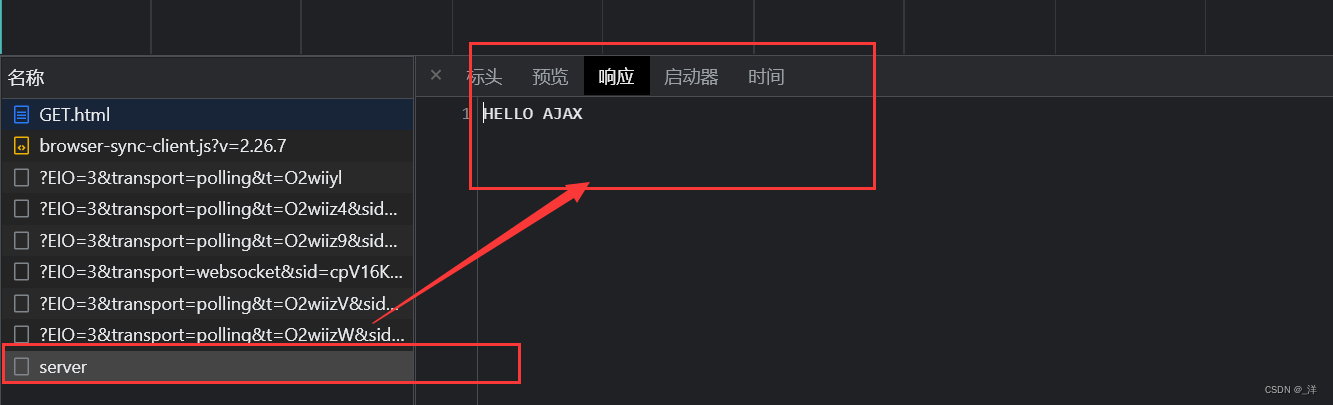
处理结果:行 头 空行 体:
// 1.响应行
 console.log(xhr.status);//状态码
 console.log(xhr.statusText)//状态字符串
 //2.响应头
 console.log(xhr.getAllResponseHeaders)
 // 3.响应体
 console.log(xhr.response)
eg:实际应用:
<!DOCTYPE html>
<html lang="en">
<head>
    <meta charset="UTF-8">
    <meta http-equiv="X-UA-Compatible" content="IE=edge">
    <meta name="viewport" content="width=device-width, initial-scale=1.0">
    <title>Document</title>
    <style>
        #result{
            width: 200px;
            height: 100px;
            border: solid 1px #90b;
        }
    </style>
</head>
<body>
    <button>点击发送请求</button>
    <div id="result"></div>

    <script>
        // 获取button
        const btn=document.getElementsByTagName('button')[0];
        btn.onclick = function (){
        //    创建对象
        const xhr = new XMLHttpRequest()
        // 初始化 设置请求方法和url(向谁发送请求)
        xhr.open('GET','http://127.0.0.1:8000/server')
        // 发送请求
        xhr.send()
        // 事件绑定,处理服务端返回的结果
        // on:当...的时候
        // readystate是xhr对象中的属性
        // 表示状态:0(未初始化) 1(open方法调用完毕) 2(send方法调用完毕) 3(服务端返回了部分结果) 4(服务端返回了所有结果)
        // change 改变
        xhr.onreadystatechange = function (){
           if(xhr.readyState === 4){
            //    判断响应状态码 200(成功) 404 403 401 500
            //  2开头的都是成功
            if(xhr.status >=200 && xhr.status<300){
                // 处理结果:行 头 空行 体
                // 1.响应行
                console.log(xhr.status);//状态码
                console.log(xhr.statusText)//状态字符串
                //2.响应头
                console.log(xhr.getAllResponseHeaders)
                // 3.响应体
                console.log(xhr.response)

                // 将相应结果放到页面上
                const result = document.getElementById('result')
                result.innerHTML = xhr.response
            }else{

            }
           }
        }
        }
    </script>

</body>
</html>
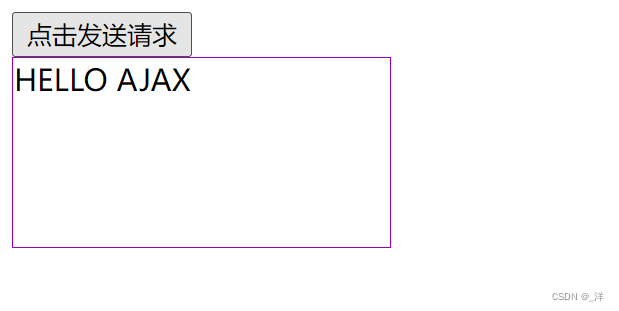
运行结果:
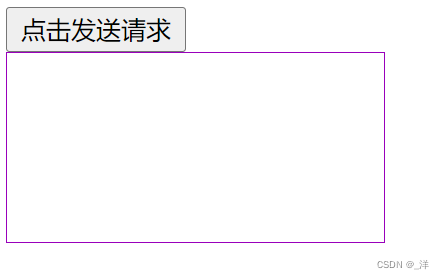
点击后:
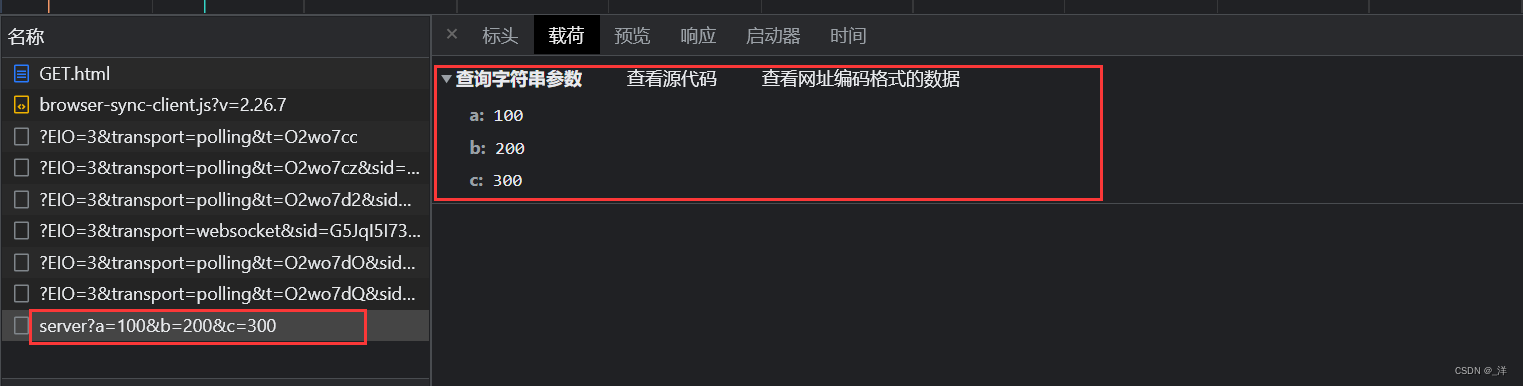
AJAX的get请求设置参数——(请求体)
ajax传递参数值需要在url后面添加参数即可。
格式 :url?参数名 = 参数值&参数名 = 参数值
url和参数之间使用?分隔,多个参数之间使用&分隔。
eg:
xhr.open('GET','http://127.0.0.1:8000/server?a=100&b=200&c=300')
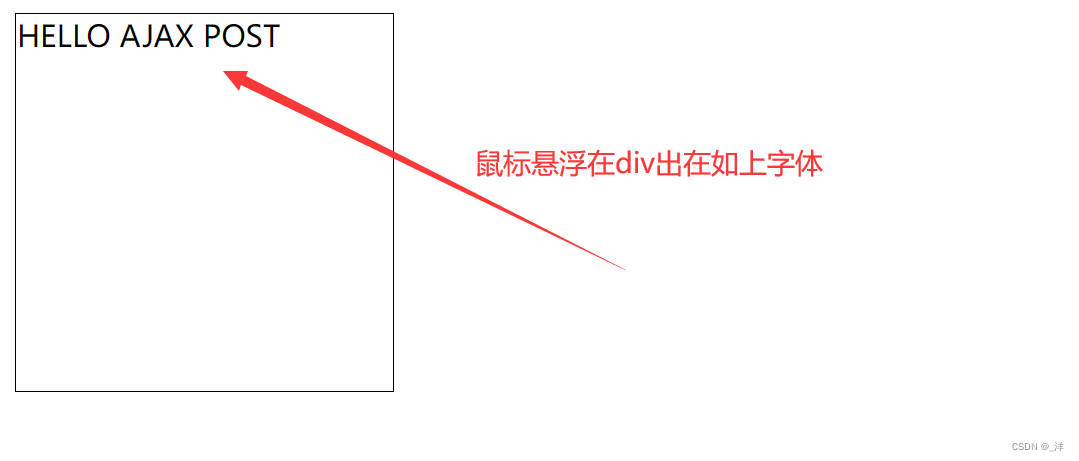
AJAX发送post请求
和发送get请求类似,将get换成post
post.html
<!DOCTYPE html>
<html lang="en">
<head>
    <meta charset="UTF-8">
    <meta http-equiv="X-UA-Compatible" content="IE=edge">
    <meta name="viewport" content="width=device-width, initial-scale=1.0">
    <title>Document</title>
    <style>
        #result{
            width: 200px;
            height: 200px;
            border: solid 1px;
        }
    </style>
</head>
<body>
    <div id = 'result'></div>
    <script>
        // 获取元素
        const result = document.getElementById('result')
        // 绑定事件
        result.addEventListener('mouseover',function  (){
        //    1.创建对象
        const xhr = new XMLHttpRequest();
        // 2. 初始化类型与URL
        xhr.open('POST','http://127.0.0.1:8000/server')
        // 3.发送
        xhr.send()
        // 4.事件绑定
        xhr.onreadystatechange = function (){
           if(xhr.readyState === 4){
               if(xhr.status >=200 && xhr.status<300){
                //    处理返回结果
                result.innerHTML = xhr.response
               }
           }
        }

        })
    </script>
</body>
</html>
server.js
// 1.引入express
const express = require('express');
// 2.创建应用对象
const app = express();
// 3.创建路由规则
// 如果请求行的路径是/server的GET请求就会执行回调函数里面的内容
app.get('/server', (request, response) => {
// 设置响应头 设置允许跨越
response.setHeader('Access-Control-Allow-Origin', '*');
// 设置响应体
response.send('HELLO AJAX GET')
})
// 如果请求行的路径是/server的POST请求就会执行回调函数里面的内容
app.post('/server', (request, response) => {
// 设置响应头 设置允许跨越
response.setHeader('Access-Control-Allow-Origin', '*');
// 设置响应体
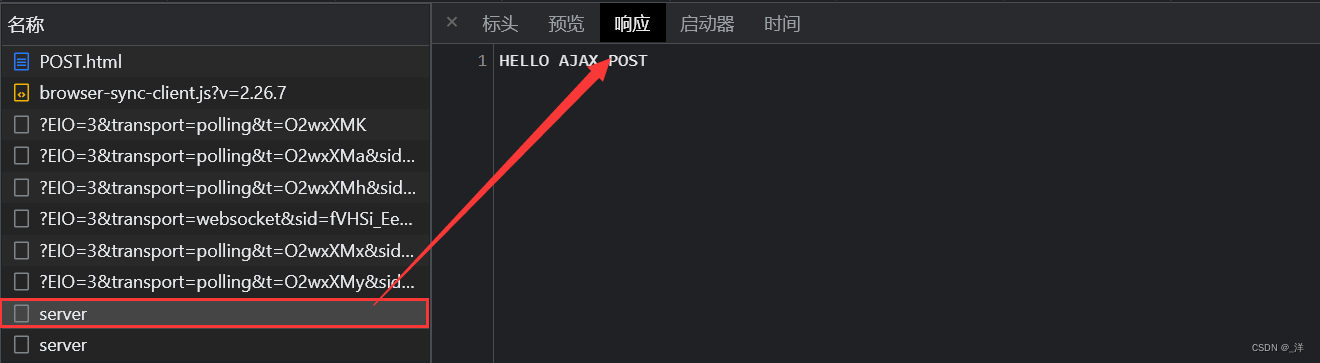
response.send('HELLO AJAX POST')
})
// 4.监听端口启动服务
app.listen(8000, () => {
console.log('服务已经启动,8000端口监听中……')
})
输出:
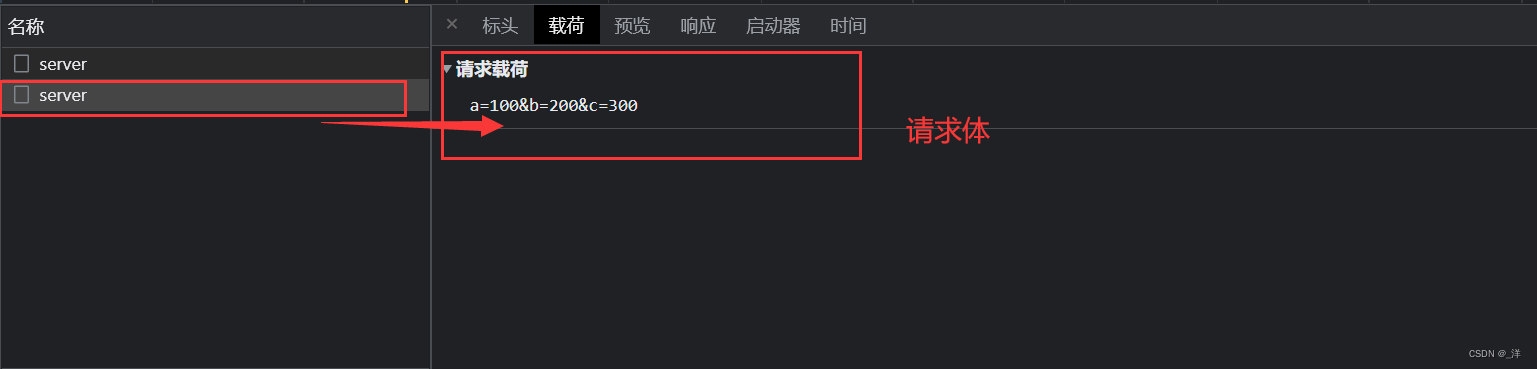
AJAX的post请求设置参数
post请求是在send中1进行设置的
格式:xhr.send('参数名=参数值&参数名=参数值')
或者xhr.send('参数名:参数值&参数名:参数值')
eg:
xhr.send('a=100&b=200&c=300')
AJAX请求头的设置
在open后面设置请求头。
设置请求头格式:setRequestHeader('头的名字','头的值')
我们一般把身份校验的信息放到头信息中,传递到后端进行验证
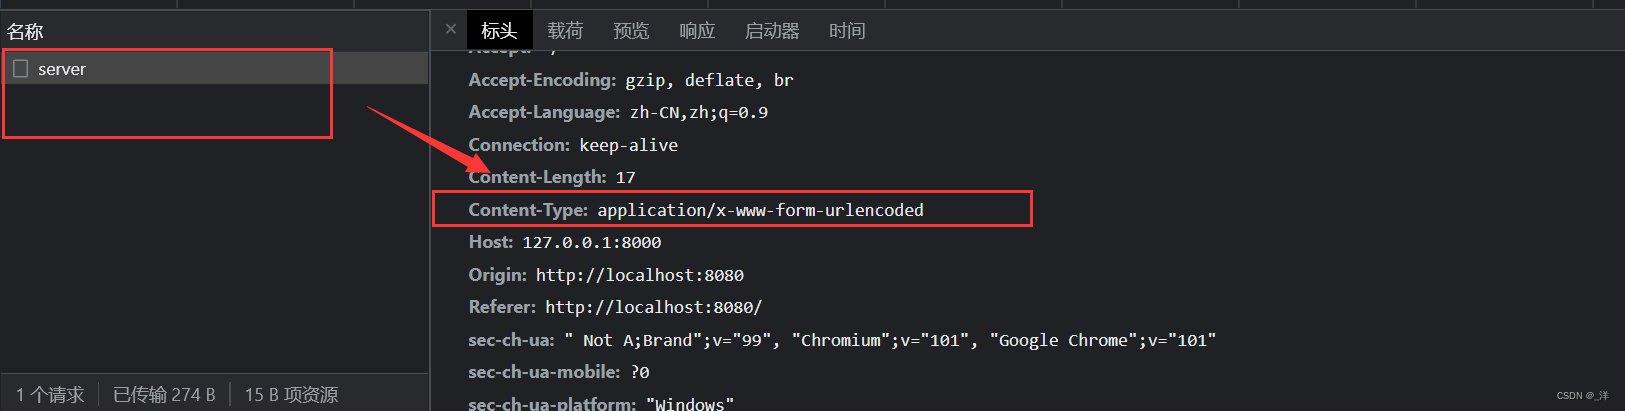
eg:预定义的响应头
// 设置请求头(setRequestHeader('头的名字','头的值'))
// Content-Type请求体类型
xhr.setRequestHeader('Content-Type','application/x-www-form-urlencoded')
POST.HTML
<!DOCTYPE html>
<html lang="en">
<head>
    <meta charset="UTF-8">
    <meta http-equiv="X-UA-Compatible" content="IE=edge">
    <meta name="viewport" content="width=device-width, initial-scale=1.0">
    <title>Document</title>
    <style>
        #result{
            width: 200px;
            height: 200px;
            border: solid 1px;
        }
    </style>
</head>
<body>
    <div id = 'result'></div>
    <script>
        // 获取元素
        const result = document.getElementById('result')
        // 绑定事件
        result.addEventListener('mouseover',function  (){
        //    1.创建对象
        const xhr = new XMLHttpRequest();
        // 2. 初始化类型与URL
        xhr.open('POST','http://127.0.0.1:8000/server')
        // 设置请求头(setRequestHeader('头的名字','头的值'))
        // Content-Type请求体类型
        xhr.setRequestHeader('Content-Type','application/x-www-form-urlencoded')
        // 3.发送
        xhr.send('a=100&b=200&c=300')
        // 4.事件绑定
        xhr.onreadystatechange = function (){
           if(xhr.readyState === 4){
               if(xhr.status >=200 && xhr.status<300){
                //    处理返回结果
                result.innerHTML = xhr.response
               }
           }
        }

        })
    </script>
</body>
</html>
eg:自定义的响应头
自定义的响应头浏览器的安全检验机制会检验出来,所以需要对server.js的post请求做如下修改(修改成all,表示接受所有请求)
// 如果请求行的路径是/server的POST请求就会执行回调函数里面的内容
app.all('/server', (request, response) => {
    // 设置响应头 设置允许跨越
    response.setHeader('Access-Control-Allow-Origin', '*');
    // 响应头(接受所有响应头信息)
    response.setHeader('Access-Control-Allow-Headers','*')
    // 设置响应体
    response.send('HELLO AJAX POST')
})
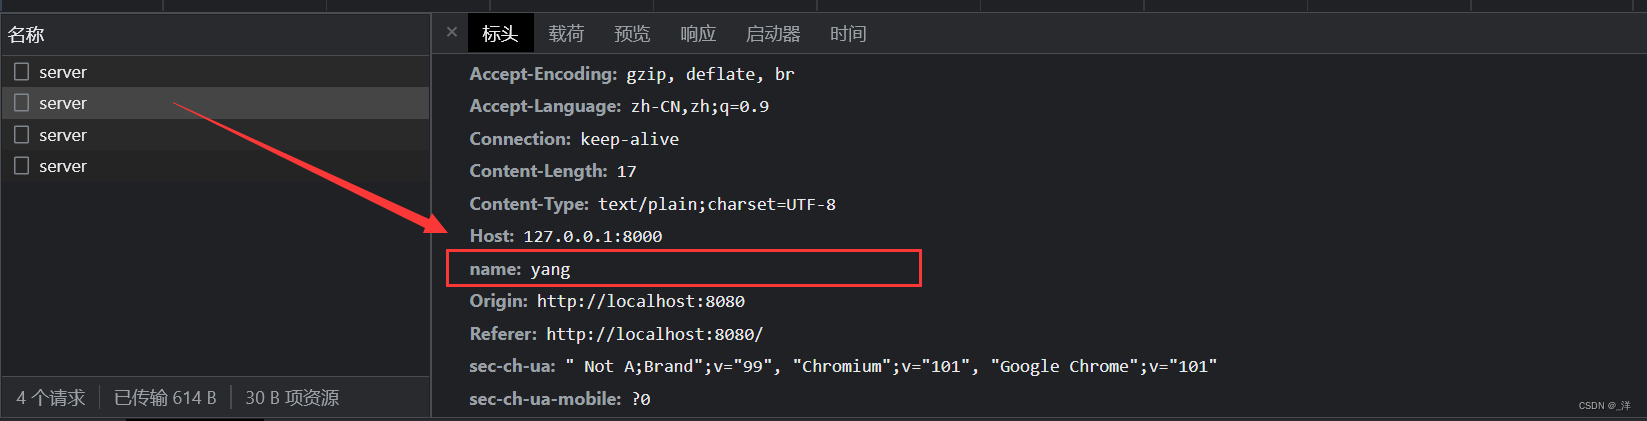
前端设置响应头
xhr.setRequestHeader('name','yang')
重新启动server.js
浏览器显示如下:
完整代码:
post.html
<!DOCTYPE html>
<html lang="en">
<head>
    <meta charset="UTF-8">
    <meta http-equiv="X-UA-Compatible" content="IE=edge">
    <meta name="viewport" content="width=device-width, initial-scale=1.0">
    <title>Document</title>
    <style>
        #result{
            width: 200px;
            height: 200px;
            border: solid 1px;
        }
    </style>
</head>
<body>
    <div id = 'result'></div>
    <script>
        // 获取元素
        const result = document.getElementById('result')
        // 绑定事件
        result.addEventListener('mouseover',function  (){
        //    1.创建对象
        const xhr = new XMLHttpRequest();
        // 2. 初始化类型与URL
        xhr.open('POST','http://127.0.0.1:8000/server')
        // 设置请求头(setRequestHeader('头的名字','头的值'))
        // Content-Type请求体类型
        // xhr.setRequestHeader('Content-Type','application/x-www-form-urlencoded')
        xhr.setRequestHeader('name','yang')

        // 3.发送
        xhr.send('a=100&b=100&c=100')
        // 4.事件绑定
        xhr.onreadystatechange = function (){
           if(xhr.readyState === 4){
               if(xhr.status >=200 && xhr.status<300){
                //    处理返回结果
                result.innerHTML = xhr.response
               }
           }
        }

        })
    </script>
</body>
</html>
server.js
// 1.引入express
const express = require('express');
// 2.创建应用对象
const app = express();
// 3.创建路由规则
// 如果请求行的路径是/server的GET请求就会执行回调函数里面的内容
app.get('/server', (request, response) => {
    // 设置响应头 设置允许跨越
    response.setHeader('Access-Control-Allow-Origin', '*');
    // 设置响应体
    response.send('HELLO AJAX GET')
})
// 如果请求行的路径是/server的POST请求就会执行回调函数里面的内容
app.all('/server', (request, response) => {
    // 设置响应头 设置允许跨越
    response.setHeader('Access-Control-Allow-Origin', '*');
    // 响应头(接受所有响应头信息)
    response.setHeader('Access-Control-Allow-Headers','*')
    // 设置响应体
    response.send('HELLO AJAX POST')
})
// 4.监听端口启动服务
app.listen(8000, () => {
    console.log('服务已经启动,8000端口监听中……')
})


 3189
3189

 被折叠的 条评论
为什么被折叠?
被折叠的 条评论
为什么被折叠?
 到【灌水乐园】发言


