


文章目录
- 效果展示
- demo下载
- 代码详解
- 安装依赖库
- run.py
- view.py
- model.py
- 设置快捷方式启动
效果展示
- 我的本地LLM是通义千问,其它的模型也可以使用这个demo
- 可以在桌面设置快捷方式图标双击运行
- gradio搭建简单的项目还是很方便的,但是想设计复杂的页面就不行了
本来还想设置历史记录的,但是gradio不支持动态添加、删除组件,就放弃了😓

demo下载
百度网盘 提取码:tn4u
蓝奏云 密码:7j8x
代码详解
安装依赖库
- 玩大模型的应该都安装了torch、transformers吧,没安装的自行安装 👀
- 安装gradio库 👇
pip install gradio -i https://pypi.tuna.tsinghua.edu.cn/simple
run.py
作用:
- 启动LLM模型
- 开启Web服务
- 防止重复启动LLM模型和重复开启Web服务
自定义:
- 可以在这里设置Web服务端口
// run.py

from socket import socket, AF_INET, SOCK_STREAM

import http.server
import socketserver
import webbrowser
import threading
import sys
import os

PORT = 7860

"""
防止pythonw.exe运行闪退
重定向输出到 os.devnull,会导致输出不会显示在控制台
调试时请注释掉下面两行
"""
sys.stdout = open(os.devnull, "w")
sys.stderr = open(os.devnull, "w")


def is_port_in_use():
    with socket(AF_INET, SOCK_STREAM) as s:
        s.settimeout(1)
        return s.connect_ex(("127.0.0.1", PORT)) == 0


def start_server():
    handler = http.server.SimpleHTTPRequestHandler
    with socketserver.TCPServer(("", PORT), handler) as httpd:
        httpd.serve_forever()


if __name__ == "__main__":
    if is_port_in_use():
        print("The program is already running.")
        webbrowser.open(f"http://127.0.0.1:{PORT}")
    else:
        print("The program is starting...")
        server_thread = threading.Thread(target=start_server)
        server_thread.daemon = True
        server_thread.start()

        from view import run_web

        run_web(PORT)
view.py
作用:
- 开启Web服务
自定义:
- 你可以修改Gradio代码得到自己想要的效果
- 需要更换页面里的标题和图标,可以修改
run_web函数的with gr.Blocks(title="通义千问 2.5", css=css) as demo:
以及with open("./static/tyqw.svg", "r", encoding="utf-8") as svg_file: - 需要更换网站标签页的图标,可以修改
demo.launch这一行代码的favicon_path="./static/tyqw.ico"
注:若修改后没有效果,请按Ctrl + F5刷新浏览器页面并清除缓存
// view.py

from model import Qwen

import gradio as gr
import webbrowser
import threading


local_model = Qwen()

default_system = "你是通义千问,由阿里云创造。你是一个万能小助手。"

latex_delimiters = [
    {"left": "\$", "right": "\$", "display": True},
    {"left": "\\begin\{equation\}", "right": "\\end\{equation\}", "display": True},
    {"left": "\\begin\{align\}", "right": "\\end\{align\}", "display": True},
    {"left": "\\begin\{alignat\}", "right": "\\end\{alignat\}", "display": True},
    {"left": "\\begin\{gather\}", "right": "\\end\{gather\}", "display": True},
    {"left": "\\begin\{CD\}", "right": "\\end\{CD\}", "display": True},
    {"left": "\$", "right": "\$", "display": True},
]


def modify_system_chat(system):
    if system is None or len(system) == 0:
        system = default_system
    return system, system, []


def model_chat(query, chat_list, system):
    if query is None:
        query = ""
    if chat_list is None:
        chat_list = []

    messages = [{"role": "system", "content": system}]

    for chat in chat_list:
        messages.append({"role": "user", "content": chat[0]})
        messages.append({"role": "assistant", "content": chat[1]})

    messages.append({"role": "user", "content": query})

    response = local_model.generate_response(messages)

    messages.append({"role": "assistant", "content": response})

    system = messages[0]["content"]
    chat_list = []
    for q, r in zip(messages[1::2], messages[2::2]):
        chat_list.append([q["content"], r["content"]])

    return "", chat_list, system


css = """
    footer {display: none !important;}
    .box {
        border: 1px solid #e4e4e7;
        border-radius: 5px;
    }
    .box-padding {
        padding: 10px;
    }
    .box-padding-big {
        padding: 20px;
    }
    .tab-button {
        position: fixed;
        top: 0;
        right: 0;
        width: 100px;
        height: 40px;
        border-radius: 0 0 0 20px;
        justify-content: flex-end;
        padding: 5px 10px 5px 0;
    }
"""


def run_web(port):
    with gr.Blocks(title="通义千问 2.5", css=css) as demo:
        with open("./static/tyqw.svg", "r", encoding="utf-8") as svg_file:
            svg_content = svg_file.read()

        html_head = f"""
            <div style="display: flex; align-items: center; justify-content: center;">
                <span style="font-size: 3em;">通 义 千 问 2.5</span>
                <span style="margin-left: 10px;">
                    {svg_content}
                </span>
            </div>
        """

        title = gr.HTML(html_head)

        tab = gr.Button("🐳 精简版", elem_classes="tab-button")

        with gr.Column(elem_classes="box box-padding-big"):
            chat_tip = gr.Markdown("""<center><font size=5>开始聊天吧 👾</center>""")

            with gr.Column(scale=7):
                with gr.Row(equal_height=True):
                    with gr.Column(scale=3):
                        system_input = gr.Textbox(
                            value=default_system, lines=1, label="系统提示"
                        )
                    with gr.Column(scale=1):
                        modify_system = gr.Button("🛠️ 设置 AI 提示并重新对话")
                    system_state = gr.Textbox(value=default_system, visible=False)
                chatbot = gr.Chatbot(
                    label="对话框", latex_delimiters=latex_delimiters, height=320
                )
                textbox = gr.Textbox(lines=1, label="输入框")

            with gr.Row():
                new_chat = gr.Button("💬 新建对话")
                submit = gr.Button("🚀 发送")

        textbox.submit(
            model_chat,
            inputs=[textbox, chatbot, system_state],
            outputs=[textbox, chatbot, system_input],
        )

        submit.click(
            model_chat,
            inputs=[textbox, chatbot, system_state],
            outputs=[textbox, chatbot, system_input],
        )

        new_chat.click(lambda: ("", []), outputs=[textbox, chatbot])

        modify_system.click(
            fn=modify_system_chat,
            inputs=[system_input],
            outputs=[system_state, system_input, chatbot],
        )

        def switch_mode(tab):
            if tab == "🐳 精简版":
                tab = "👑 完整版"
                show = gr.update(visible=False)
                chatbot_height = gr.update(height=460)
            else:
                tab = "🐳 精简版"
                show = gr.update(visible=True)
                chatbot_height = gr.update(height=320)
            return tab, show, show, chatbot_height

        tab.click(switch_mode, inputs=[tab], outputs=[tab, title, chat_tip, chatbot])

    def open_browser(port):
        import time

        time.sleep(1)
        webbrowser.open(f"http://127.0.0.1:{port}")

    threading.Thread(target=open_browser, args=(port,)).start()

    demo.queue(api_open=False)
    demo.launch(server_port=port, favicon_path="./static/tyqw.ico")
model.py
作用:
- 启动LLM模型
- 进行LLM模型推理
自定义:
- 请修改此代码,让你的本地模型运行
- 我这里测试使用的是Qwen2.5-0.5B大模型,如果是Qwen2.5的模型,可以直接修改模型路径进行使用
//model.py

from transformers import AutoModelForCausalLM, AutoTokenizer

import torch

MaxNewTokens = 1024

model_path = "../Qwen2.5-0.5B-Instruct-GPTQ-Int4"

class Qwen:
    def __init__(self):
        // 检测CUDA
        self.device = torch.device("cuda" if torch.cuda.is_available() else "cpu")

        print(f"Using {self.device} for generation.")

        self.model = AutoModelForCausalLM.from_pretrained(
            model_path, torch_dtype=torch.float16, device_map="auto"
        ).to(self.device)
        self.tokenizer = AutoTokenizer.from_pretrained(model_path)

    def generate_response(self, messages):
        text = self.tokenizer.apply_chat_template(
            messages, tokenize=False, add_generation_prompt=True
        )

        model_inputs = self.tokenizer([text], return_tensors="pt").to(self.device)

        generated_ids = self.model.generate(**model_inputs, max_new_tokens=MaxNewTokens)
        generated_ids = [
            output_ids[len(input_ids) :]
            for input_ids, output_ids in zip(model_inputs.input_ids, generated_ids)
        ]

        response = self.tokenizer.batch_decode(generated_ids, skip_special_tokens=True)[0]
        return response
建议使用CUDA进行推理
设置快捷方式启动
-
首先,在桌面上创建快捷方式(win11可能在显示更多选项里)

-
设置启动命令
比如我的是D:\python\pythonw.exe D:\model\Qwen\run.py
前面部分使用你电脑上pythonw.exe的路径(在python安装目录下)
后面部分使用demo的run.py的路径
注意:
-
使用
pythonw.exe是为了隐藏控制台,静默使用,使用pythonw.exe不能将输出打印到控制台,需要重定向输出,不然程序会运行出错闪退,可以看run.py文件解决 -
如果路径包含空格等特殊字符,请用英文的双引号包起路径
例:"D:\python\pythonw.exe" "D:\model\Qwen\run.py"

设置快捷键的名称并保存

- 设置快捷键图标
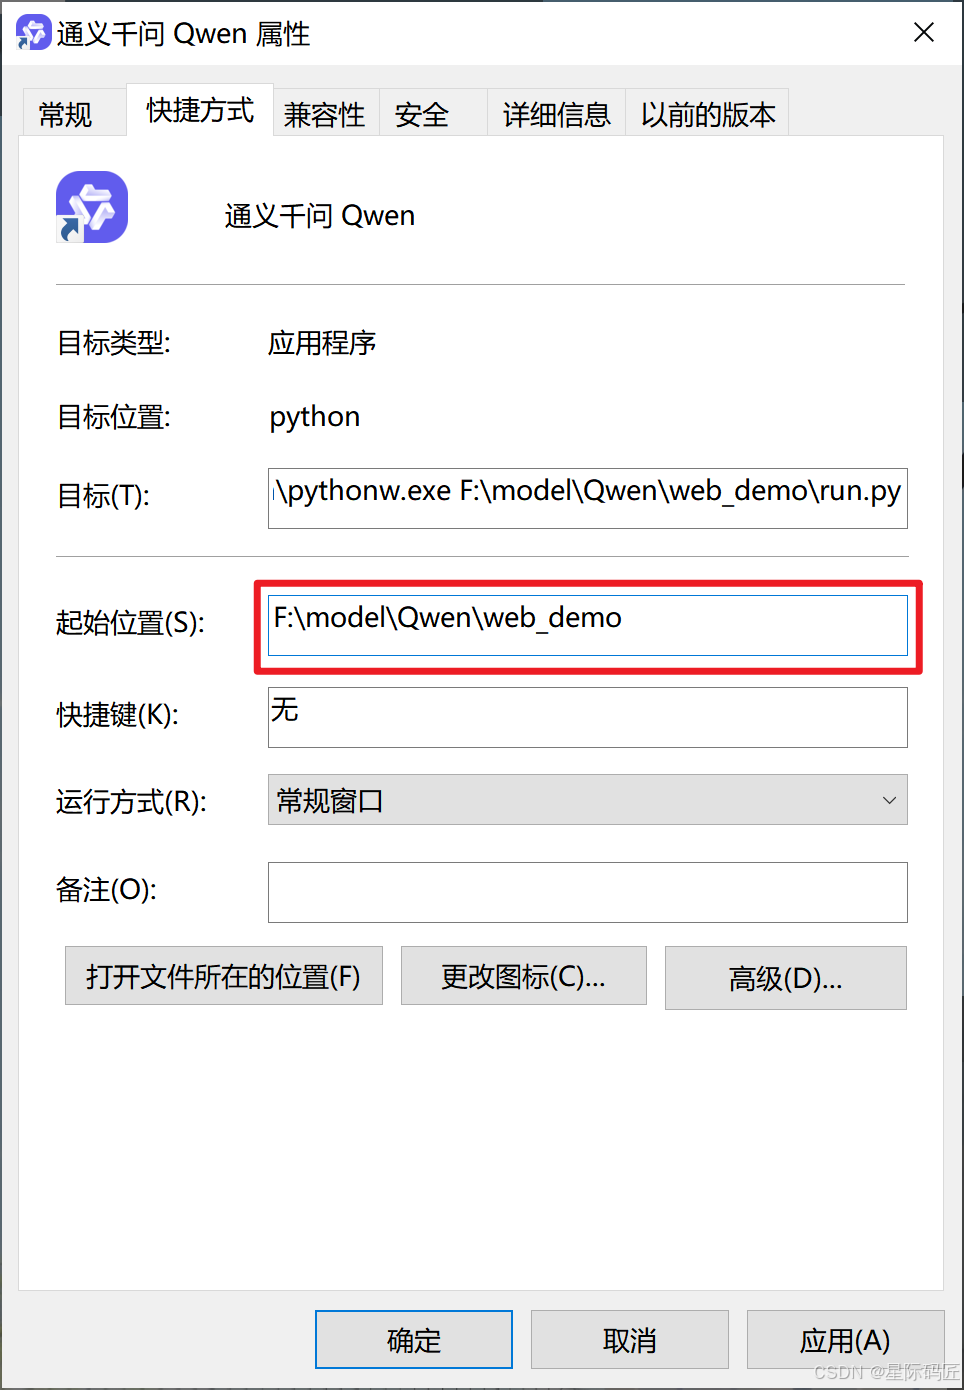
右键点击图标,再点击属性

点击更改图标

选择图标,类型可以是ico、icl、exe、dll

再选择刚刚的图标,并点击确定

修改起始位置到你的demo路径,并点击确定,就成功了
最终效果


 397
397

 被折叠的 条评论
为什么被折叠?
被折叠的 条评论
为什么被折叠?
 到【灌水乐园】发言


