python-医学图像分割指标Dice代码实现

这篇博客介绍了如何使用Python计算二值图像的Dice相似系数,并批量处理100张图片,输出每张图片及平均Dice值,同时绘制Dice分布图。代码包括单张图片Dice值计算及批量计算,适用于医学图像分析或图像分割评估。

摘要生成于 C知道 ,由 DeepSeek-R1 满血版支持, 前往体验 >

1.代码效果

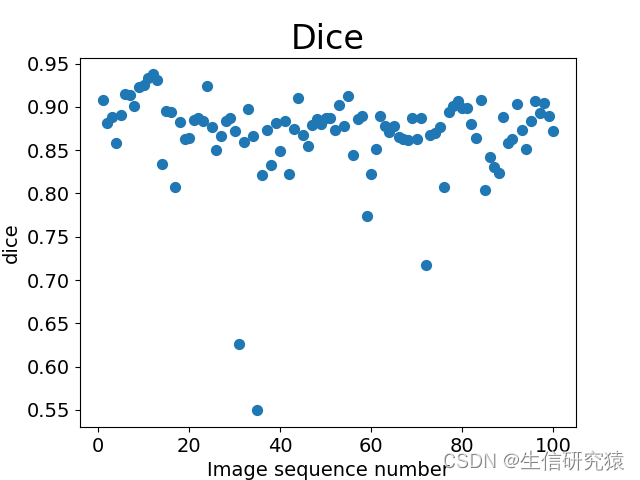
输出每张图片的Dice值及所有图片的Dice平均值,且最后生成一张Dice分布图:

以100张图片为例,横坐标是图片序号,纵坐标是每张图片的Dice值。

2.图片格式要求

1.模型生成的标记图片和正确的标记图片要求是严格的二值图片。如下图:

2.图片名称按序为:1.png 2.png 3.png...(图片格式可以在代码里改,如png,jpg等)


3.代码(计算单张图片的Dice值)

代码中white1,black1分别代表正确标记图片的白色像素点数和黑色像素点数,white2,black2分别代表模型生成结果的标记图片的白色像素点数和黑色像素点数。

size是两张图片的交集的像素点数,即重合部分区域。

# This is a sample Python script.

# Press Shift+F10 to execute it or replace it with your code.
# Press Double Shift to search everywhere for classes, files, tool windows, actions, and settings.
#from filecmp import cmp

import cv2
import operator


def print_hi(name):
    # Use a breakpoint in the code line below to debug your script.
    print(f'Hi, {name}')  # Press Ctrl+F8 to toggle the breakpoint.


def img_input(img_path, label_path):
    img = cv2.imread(img_path)  # 使用 cv2 来打开图片
    label = cv2.imread(label_path)  # 使用 cv2 来打开图片
    return (img, label)


def img_size(img):
    white = 0
    black = 0
    list1 = [255, 255, 255]
    list2 = [0,0,0]
    for x in img:
        for y in x:
            if operator.eq(y.tolist(), list1)==True:#y.tolist():numpy类型转list类型,由[a b c]变成[a,b,c](多了逗号)
                white = white + 1
            elif operator.eq(y.tolist(), list2)==True:#在Python3中我们可以使用operator方法来比较两个list是否相等
                black = black + 1
    return (white,black)

def size_same(img,label):
    size = 0
    list = [255,255,255]
    for x1,x2 in zip(img,label):
        for y1,y2 in zip(x1,x2):
            if operator.eq(y1.tolist(), y2.tolist()) & operator.eq(y1.tolist(), list):
                size = size +1
    return size

# Press the green button in the gutter to run the script.
if __name__ == '__main__':
    # print_hi('PyCharm')
    img_path = "D:/myMark/2.png"
    label_path = "D:/result/2.png"
    img, label = img_input(img_path, label_path)
    #print("img:", img, "label:", label)
    #cv2.imshow("img", img)
    #cv2.waitKey(0)
    white1,black1 = img_size(img)
    white2, black2 = img_size(label)
    size = size_same(img,label)
    dice = 2*size/(white1+white2)
    print("white1:", white1, "black1:", black1)
    print("white2:", white2, "black2:", black2)
    print("same size:", size)
    print("dice:", dice)

4.代码(批量计算图片的Dice值) 

注:本代码默认是100张图片,1.png-100.png,可以在代码中修改图片数量

# This is a sample Python script.

# Press Shift+F10 to execute it or replace it with your code.
# Press Double Shift to search everywhere for classes, files, tool windows, actions, and settings.
#from filecmp import cmp

import cv2
import operator
import matplotlib.pyplot as plt

def img_input(myMark_path, result_path):
    myMark = cv2.imread(myMark_path)  # 使用 cv2 来打开图片
    result = cv2.imread(result_path)  # 使用 cv2 来打开图片
    return (myMark, result)


def img_size(img):
    white = 0
    black = 0
    list1 = [255, 255, 255]
    list2 = [0,0,0]
    count = 0
    c=0
    for x in img:
        for y in x:
            count = count + 1
            if operator.eq(y.tolist(), list1)==True:
                white = white + 1
            elif operator.eq(y.tolist(), list2)==True:
                black = black + 1
            else:
                c=c+1
    return (c,count, white,black)

def size_same(img1,img2):
    size = 0
    list = [255,255,255]
    for x1,x2 in zip(img1,img2):
        for y1,y2 in zip(x1,x2):
            if operator.eq(y1.tolist(), y2.tolist()) & operator.eq(y1.tolist(), list):
                size = size +1
    return size

# Press the green button in the gutter to run the script.
if __name__ == '__main__':
    # print_hi('PyCharm')
    myMark_path1 = "D:/myMark/"
    result_path1 = "D:/result/"
    i= 501
    j=1
    dicelist = []
    for j in range(1, 101):
        myMark_path = myMark_path1 + str(i) + ".png"
        result_path = result_path1 + str(i)  + ".png"
        #print("------",myMark_path)
        #print("------", result_path)
        myMark, result = img_input(myMark_path, result_path)
        # print("img:", img, "label:", label)
        # cv2.imshow("img", img)
        # cv2.waitKey(0)
        c1,count1, white1, black1 = img_size(myMark)
        c2,count2, white2, black2 = img_size(result)
        size = size_same(myMark, result)
        dice = 2 * size / (white1 + white2)
        dicelist.append(dice)
        #print("grey1:",c1,"conut1:",count1,"white1:", white1, "black1:", black1)
        #print("grey2:",c2,"conut2:",count2,"white2:", white2, "black2:", black2)
        #print("same size:", size)
        #print("dice:", dice)
        print(dice)
        #print("dicelist:", dicelist)

        i= i+1

    x_values = range(1, 101)
    y_values = dicelist
    '''
    scatter() 
    x:横坐标 y:纵坐标 s:点的尺寸
    '''
    plt.scatter(x_values, y_values, s=50)

    # 设置图表标题并给坐标轴加上标签
    plt.title('Dice', fontsize=24)
    plt.xlabel('Image sequence number', fontsize=14)
    plt.ylabel('dice', fontsize=14)

    # 设置刻度标记的大小
    plt.tick_params(axis='both', which='major', labelsize=14)
    plt.show()

    dicesum = 0
    num = 0
    for num in range(0, 100):
        dicesum = dicesum + dicelist[num]
    print("dicesum:",dicesum,"num:",num)
    avg = dicesum/100
    print("avg:",avg)

### 关于U-net在乳腺医学图像分割上的Python代码实现 以下是基于PyTorch框架的一个简单版本的U-net实现,适用于乳腺医学图像分割任务。此代码实现了基本的U-net架构,并结合了引用中提到的关键技术点。 #### 基本U-net架构实现 ```python import torch import torch.nn as nn class DoubleConv(nn.Module): """(convolution => [BN] => ReLU) * 2""" def __init__(self, in_channels, out_channels): super().__init__() self.double_conv = nn.Sequential( nn.Conv2d(in_channels, out_channels, kernel_size=3, padding=1), nn.BatchNorm2d(out_channels), nn.ReLU(inplace=True), nn.Conv2d(out_channels, out_channels, kernel_size=3, padding=1), nn.BatchNorm2d(out_channels), nn.ReLU(inplace=True) ) def forward(self, x): return self.double_conv(x) class UNet(nn.Module): def __init__(self, n_channels=1, n_classes=1): super(UNet, self).__init__() self.inc = DoubleConv(n_channels, 64) self.down1 = Down(64, 128) self.down2 = Down(128, 256) self.down3 = Down(256, 512) self.down4 = Down(512, 1024 // 2) self.up1 = Up(1024, 512) self.up2 = Up(512, 256) self.up3 = Up(256, 128) self.up4 = Up(128, 64) self.outc = OutConv(64, n_classes) def forward(self, x): x1 = self.inc(x) x2 = self.down1(x1) x3 = self.down2(x2) x4 = self.down3(x3) x5 = self.down4(x4) x = self.up1(x5, x4) x = self.up2(x, x3) x = self.up3(x, x2) x = self.up4(x, x1) logits = self.outc(x) return logits class Down(nn.Module): """Downscaling with maxpool then double conv""" def __init__(self, in_channels, out_channels): super().__init__() self.maxpool_conv = nn.Sequential( nn.MaxPool2d(2), DoubleConv(in_channels, out_channels) ) def forward(self, x): return self.maxpool_conv(x) class Up(nn.Module): """Upscaling then double conv""" def __init__(self, in_channels, out_channels, bilinear=True): super().__init__() # if bilinear, use the normal convolutions to reduce the number of channels if bilinear: self.up = nn.Upsample(scale_factor=2, mode='bilinear', align_corners=True) else: self.up = nn.ConvTranspose2d(in_channels // 2, in_channels // 2, kernel_size=2, stride=2) self.conv = DoubleConv(in_channels, out_channels) def forward(self, x1, x2): x1 = self.up(x1) diffY = x2.size()[2] - x1.size()[2] diffX = x2.size()[3] - x1.size()[3] x1 = nn.functional.pad(x1, [diffX // 2, diffX - diffX // 2, diffY // 2, diffY - diffY // 2]) x = torch.cat([x2, x1], dim=1) return self.conv(x) class OutConv(nn.Module): def __init__(self, in_channels, out_channels): super(OutConv, self).__init__() self.conv = nn.Conv2d(in_channels, out_channels, kernel_size=1) def forward(self, x): return self.conv(x) ``` 以上代码是一个基础版的U-net实现[^3]。如果希望进一步提升性能,可以考虑加入自适应注意力机制(如HAAM模块)来增强特征表达能力[^1]。 --- #### 如何集成HAAM模块? 为了提高模型对复杂乳腺病变的分割效果,可以在`DoubleConv`层中替换传统卷积操作为混合自适应注意模块(HAAM)。以下是一个简单的HAAM实现: ```python class HAAModule(nn.Module): """Hybrid Adaptive Attention Module (HAAM)""" def __init__(self, in_channels, out_channels): super(HAAModule, self).__init__() self.channel_attention = ChannelAttentionBlock(in_channels) self.spatial_attention = SpatialAttentionBlock(in_channels) self.final_conv = nn.Conv2d(in_channels, out_channels, kernel_size=1) def forward(self, x): channel_out = self.channel_attention(x) spatial_out = self.spatial_attention(channel_out) combined = channel_out + spatial_out output = self.final_conv(combined) return output class ChannelAttentionBlock(nn.Module): def __init__(self, in_channels, ratio=16): super(ChannelAttentionBlock, self).__init__() self.avg_pool = nn.AdaptiveAvgPool2d(1) self.fc = nn.Sequential( nn.Linear(in_channels, in_channels // ratio, bias=False), nn.ReLU(), nn.Linear(in_channels // ratio, in_channels, bias=False), nn.Sigmoid() ) def forward(self, x): b, c, _, _ = x.size() avg_out = self.fc(self.avg_pool(x).view(b, c)).view(b, c, 1, 1) return x * avg_out class SpatialAttentionBlock(nn.Module): def __init__(self, in_channels): super(SpatialAttentionBlock, self).__init__() self.conv = nn.Conv2d(2, 1, kernel_size=7, padding=3, bias=False) self.sigmoid = nn.Sigmoid() def forward(self, x): avg_out = torch.mean(x, dim=1, keepdim=True) max_out, _ = torch.max(x, dim=1, keepdim=True) attention_map = self.conv(torch.cat([avg_out, max_out], dim=1)) return x * self.sigmoid(attention_map) ``` 通过将上述HAAM模块嵌入到U-net的编码器或解码器部分,能够显著改善模型对乳腺病变边界的捕捉能力[^1]。 --- ### 训练流程示例 训练过程通常包括以下几个环节: - **数据准备**:加载并预处理乳腺超声图像及其对应的标注掩膜。 - **损失函数定义**:推荐使用Dice Loss或BCEWithLogitsLoss作为目标函数。 - **优化器配置**:Adam optimizer 是常用的选择。 - **评估指标**:计算IoU、Precision 和 Recall 来衡量模型表现。 完整的训练脚本可能较长,在实际项目中可以根据需求调整参数设置。 ---
评论 8
添加红包

请填写红包祝福语或标题

红包个数最小为10个

红包金额最低5元

当前余额3.43前往充值 >
需支付:10.00
成就一亿技术人!
领取后你会自动成为博主和红包主的粉丝 规则
hope_wisdom
发出的红包
实付
使用余额支付
点击重新获取
扫码支付
钱包余额 0

抵扣说明:

1.余额是钱包充值的虚拟货币,按照1:1的比例进行支付金额的抵扣。
2.余额无法直接购买下载,可以购买VIP、付费专栏及课程。

余额充值