


1. MyBatis简介
Mybatis是一款持久层框架,用于简化JDBC开发
javaEE三层架构:表现层,业务层,持久层
持久层是负责将数据保存到数据库的那一层代码
框架就是一件半成品软件
MyBatis简化:
1.硬编码 =>配置文件
- 注册驱动,获取链接
- sql语句
2.操作繁琐 =>自动完成
- 手动设置参数
- 手动封装结果集
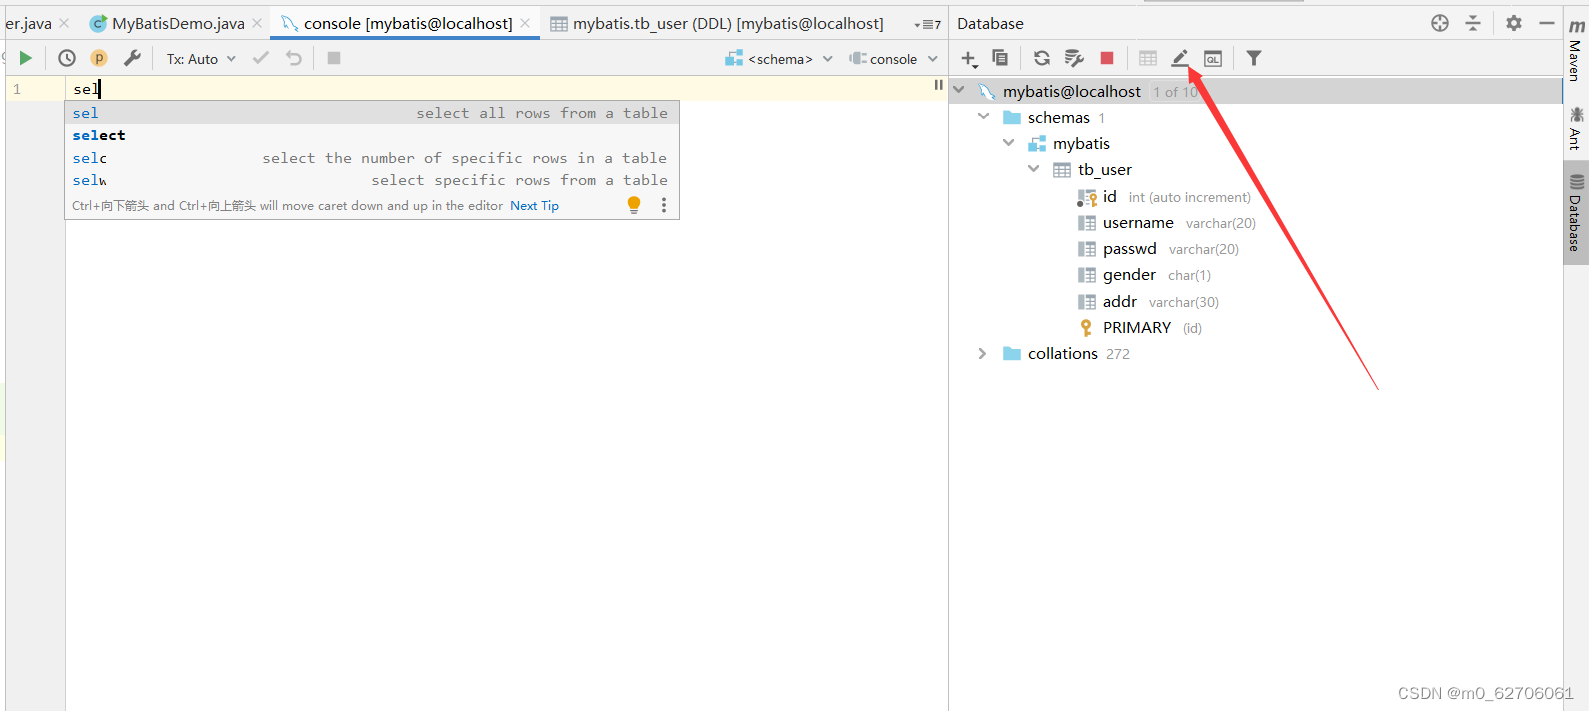
2.快速入门
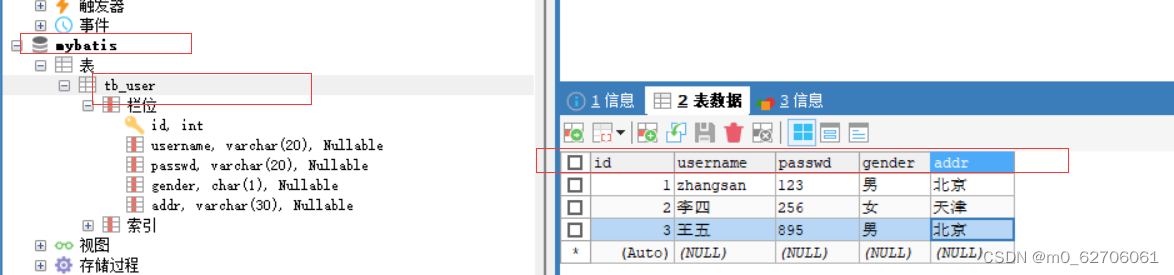
查询user表中所有数据
- 创建user表,添加数据
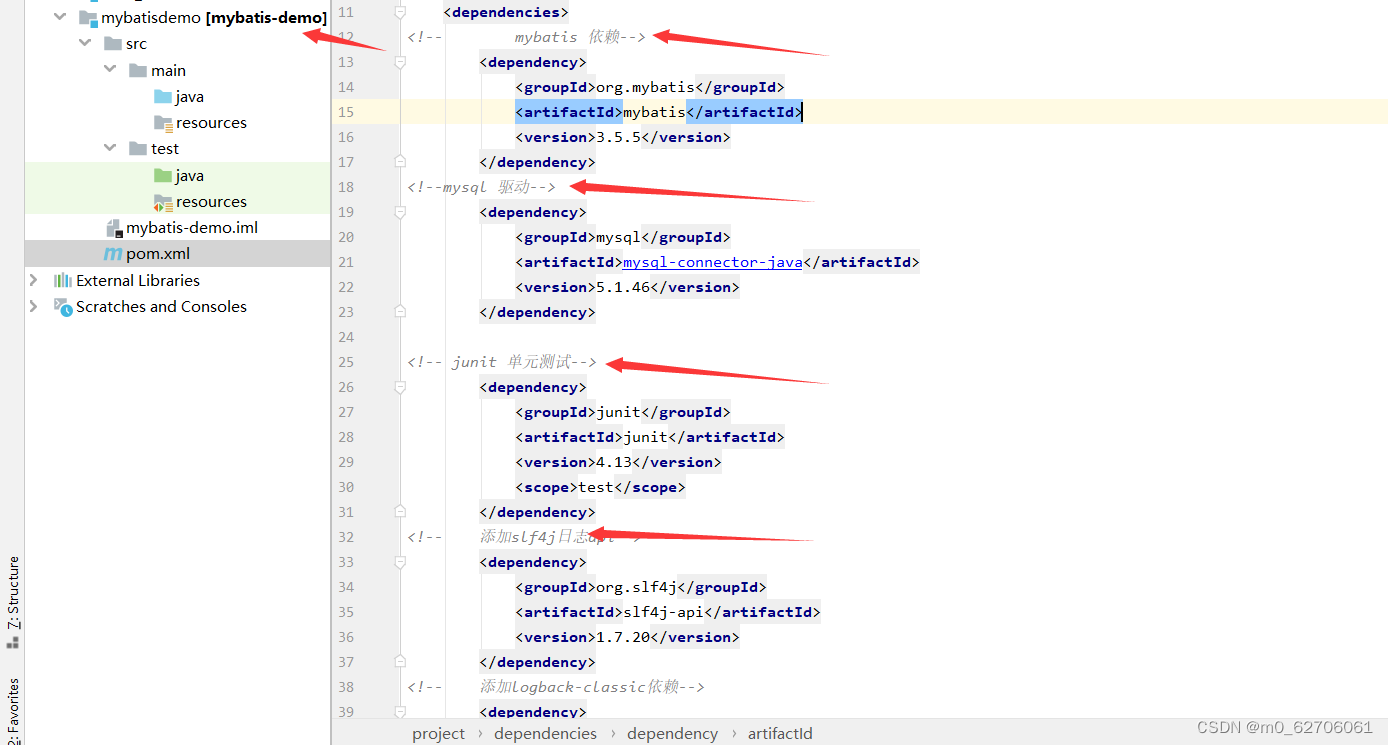
- 创建模块,导入坐标
- 编写MyBatis核心配置文件–>替换连接信息,解决硬编码问题
- 编写SQL映射文件–>统一管理sql语句,解决硬编码问题
- 编码
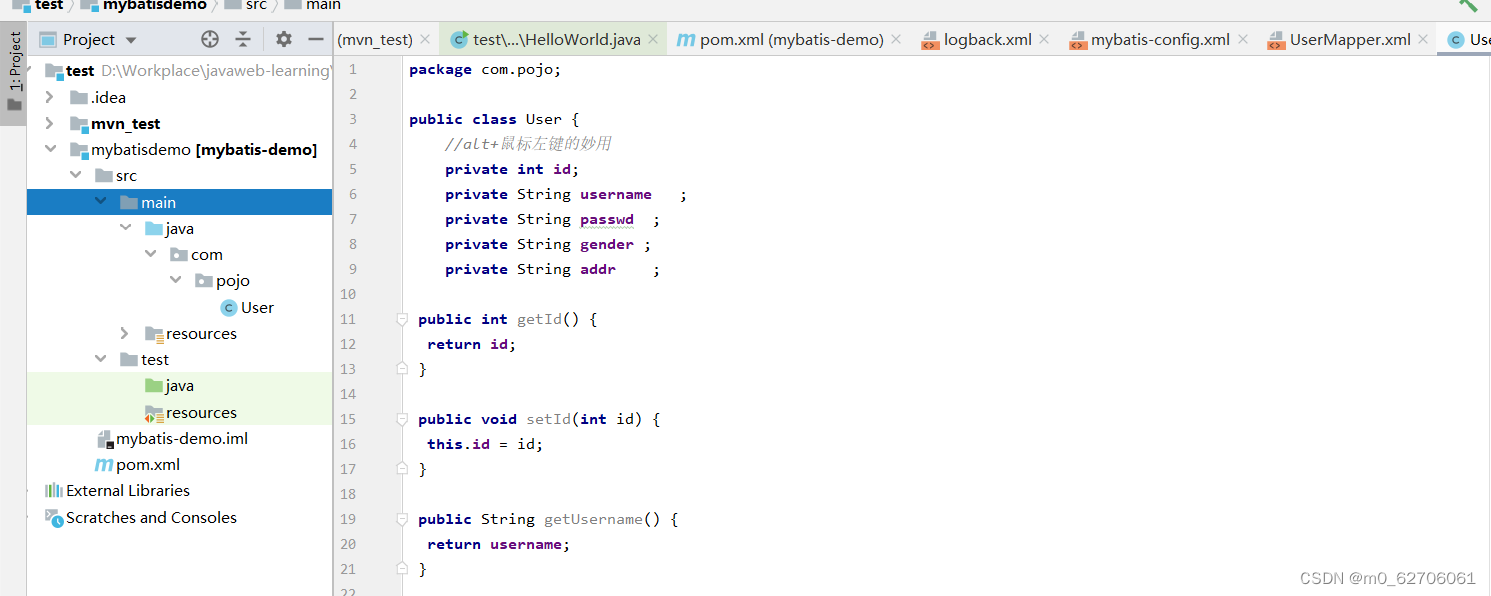
1.定义POJO类
2.加载核心配置文件,获取SqlSessionFactory对象
3.获取SqlSession对象,执行SQL语句
4.释放资源
<dependency>
  <groupId>org.mybatis</groupId>
  <artifactId>mybatis</artifactId>
  <version>3.5.5</version>
</dependency>
<!--mysql 驱动-->
        <dependency>
            <groupId>mysql</groupId>
            <artifactId>mysql-connector-java</artifactId>
            <version>5.1.46</version>
        </dependency>

<!-- junit 单元测试-->
        <dependency>
            <groupId>junit</groupId>
            <artifactId>junit</artifactId>
            <version>4.13</version>
            <scope>test</scope>
        </dependency>
<!--    添加slf4j日志api-->
        <dependency>
            <groupId>org.slf4j</groupId>
            <artifactId>slf4j-api</artifactId>
            <version>1.7.20</version>
        </dependency>
<!--    添加logback-classic依赖-->
        <dependency>
            <groupId>ch.qos.logback</groupId>
            <artifactId>logback-classic</artifactId>
            <version>1.2.3</version>
        </dependency>
<!--    添加logbak-core依赖-->
        <dependency>
            <groupId>ch.qos.logback</groupId>
            <artifactId>logback-core</artifactId>
            <version>1.2.3</version>
需注意:logback日志啥的 还需加个logback.xml
<?xml version="1.0" encoding="UTF-8"?>
<!DOCTYPE configuration>
<configuration>

    <appender name="stdout" class="ch.qos.logback.core.ConsoleAppender">
        <encoder>
            <pattern>%5level [%thread] - %msg%n</pattern>
        </encoder>
    </appender>

    <logger name="org.mybatis.example.BlogMapper">
        <level value="trace"/>
    </logger>
    <root>
        <appender-ref ref="stdout"/>
    </root>

</configuration>
然后是mybatis-config.xml
<?xml version="1.0" encoding="UTF-8" ?>
<!DOCTYPE configuration
  PUBLIC "-//mybatis.org//DTD Config 3.0//EN"
  "https://mybatis.org/dtd/mybatis-3-config.dtd">
<configuration>
  <environments default="development">
    <environment id="development">
      <transactionManager type="JDBC"/>
      <dataSource type="POOLED">
        <property name="driver" value="${driver}"/>
        <property name="url" value="${url}"/>
        <property name="username" value="${username}"/>
        <property name="password" value="${password}"/>
      </dataSource>
    </environment>
  </environments>
  <mappers>
    <mapper resource="org/mybatis/example/BlogMapper.xml"/>
  </mappers>
</configuration>
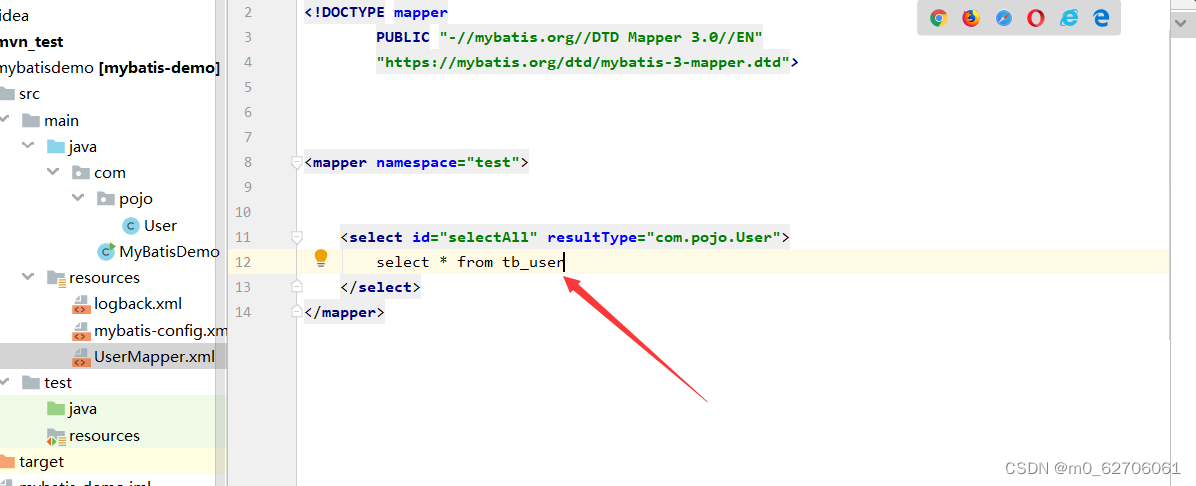
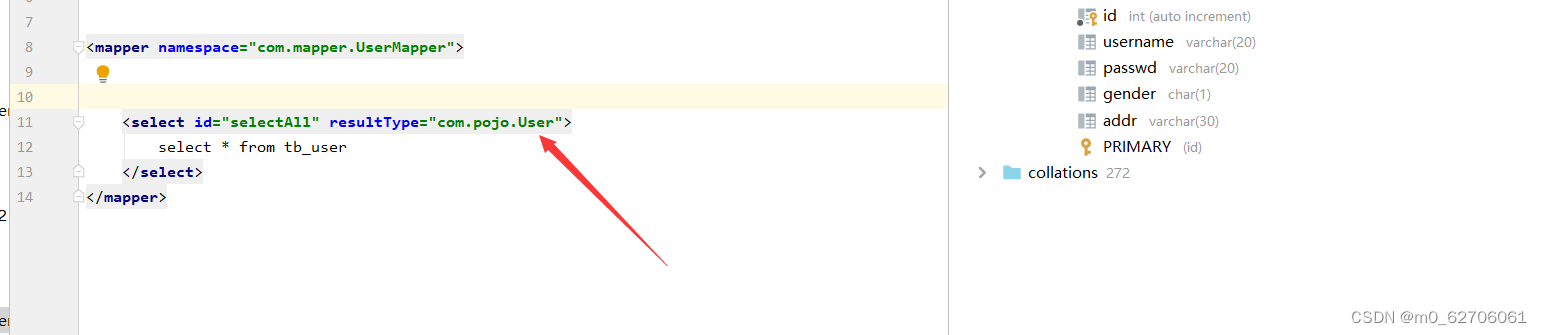
上述文件中mapper sql映射文件写法
UserMapper.xml
<?xml version="1.0" encoding="UTF-8" ?>
<!DOCTYPE mapper
        PUBLIC "-//mybatis.org//DTD Mapper 3.0//EN"
        "https://mybatis.org/dtd/mybatis-3-mapper.dtd">

<mapper namespace="test">
    <select id="selectAll" resultType="com.pojo.User">
        select * from tb_user
    </select>
</mapper>
最终mybatis-config.xml 改为
<?xml version="1.0" encoding="UTF-8" ?>
<!DOCTYPE configuration
        PUBLIC "-//mybatis.org//DTD Config 3.0//EN"
        "https://mybatis.org/dtd/mybatis-3-config.dtd">
<configuration>
    <environments default="development">
        <environment id="development">
            <transactionManager type="JDBC"/>
            <dataSource type="POOLED">
<!--                数据库连接信息-->
                <property name="driver" value="com.mysql.jdbc.Driver"/>
                <property name="url" value="jdbc:mysql:///mybatis?useSSL=false"/>
                <property name="username" value="root"/>
                <property name="password" value="123456"/>
            </dataSource>
        </environment>
    </environments>
    <mappers>
<!--        加载sql映射文件-->
        <mapper resource="UserMapper.xml"/>
    </mappers>
</configuration>
接着把User类整完整
get set方法 toString方法
然后编写测试类进行测试
//加载核心配置文件
String resource = "mybatis-config.xml";
InputStream inputStream = Resources.getResourceAsStream(resource);
SqlSessionFactory sqlSessionFactory = new SqlSessionFactoryBuilder().build(inputStream);
public class MyBatisDemo {
public static void main(String[] args) throws IOException {
//1.加载mybatis核心配置文件 获取sqlSessionFactory
String resource = "mybatis-config.xml";
InputStream inputStream = Resources.getResourceAsStream(resource);
SqlSessionFactory sqlSessionFactory = new SqlSessionFactoryBuilder().build(inputStream);
//2.获取SqlSession
SqlSession sqlSession = sqlSessionFactory.openSession();
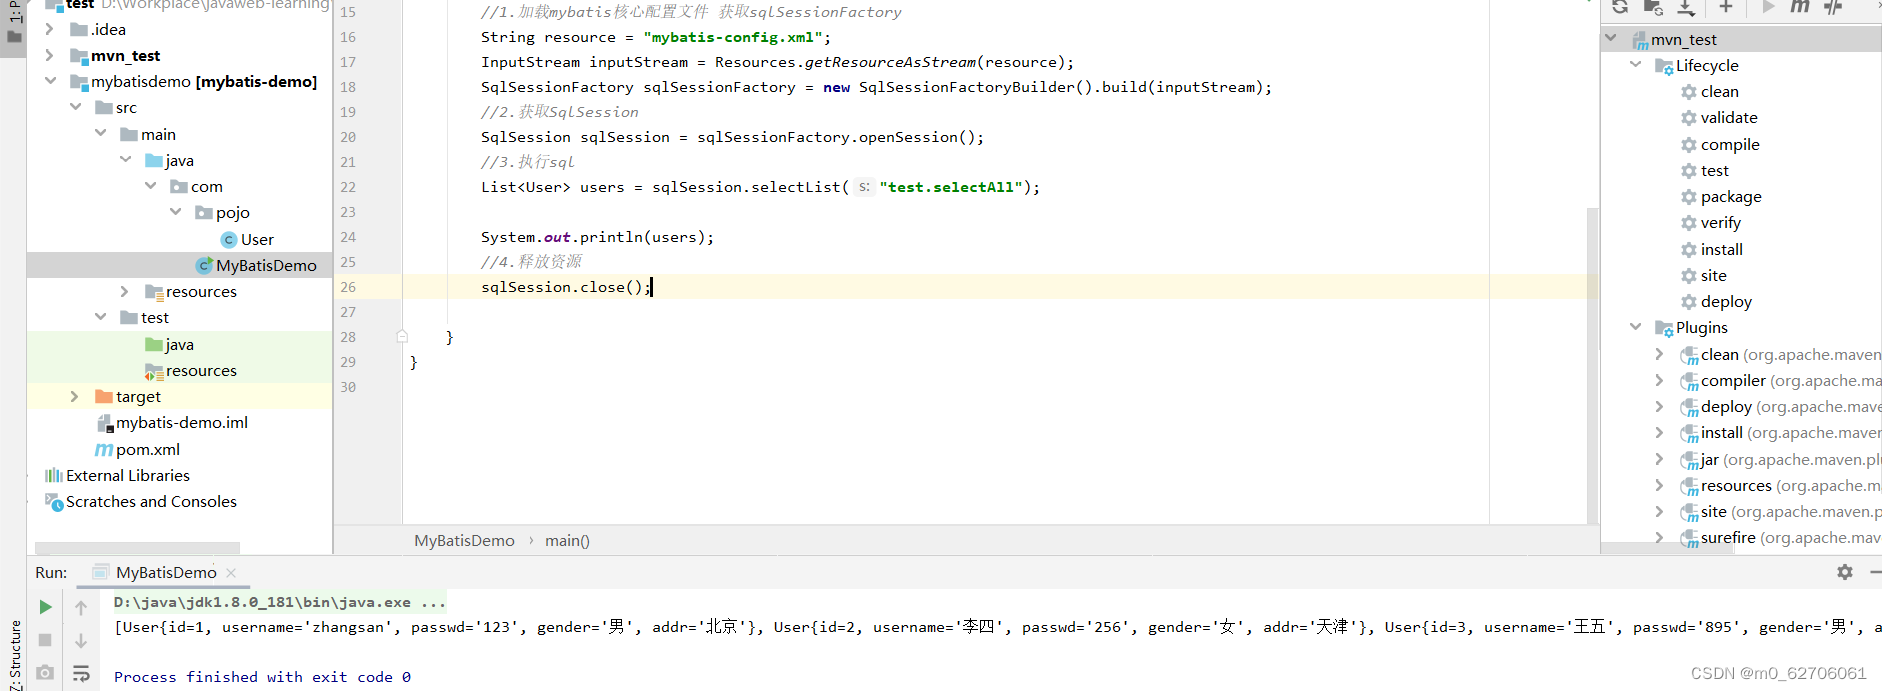
//3.执行sql
List<User> users = sqlSession.selectList("test.selectAll");
System.out.println(users);
//4.释放资源
sqlSession.close();
}
}
查询成功:
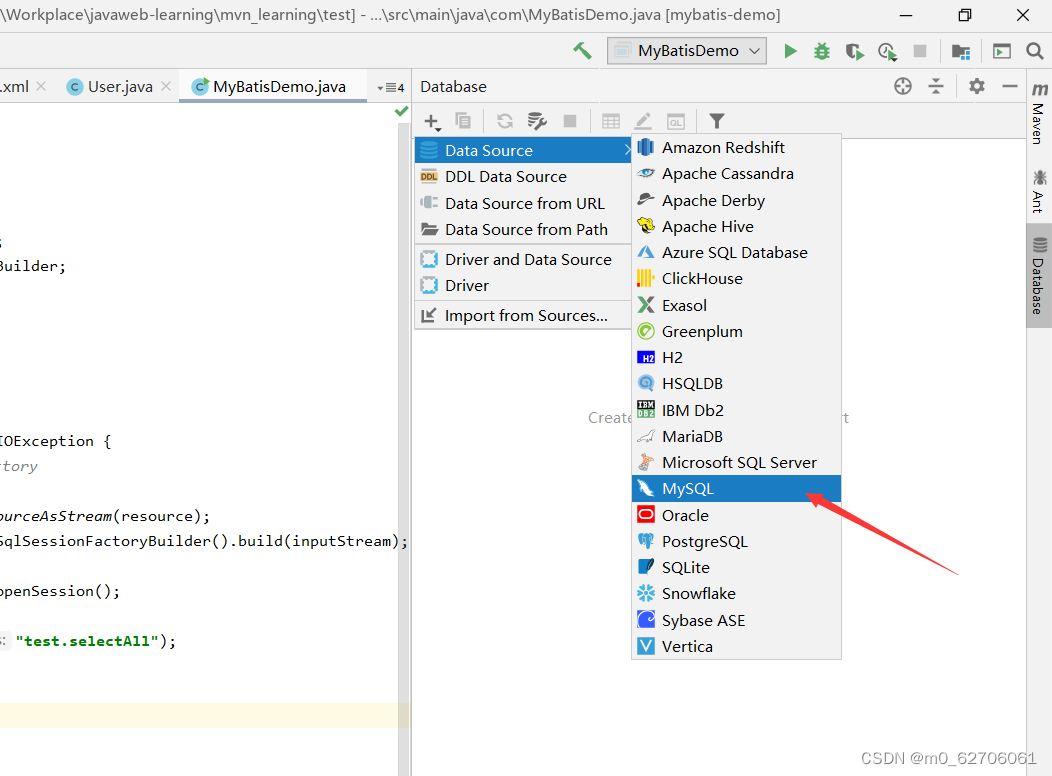
解决SQL映射文件警告信息
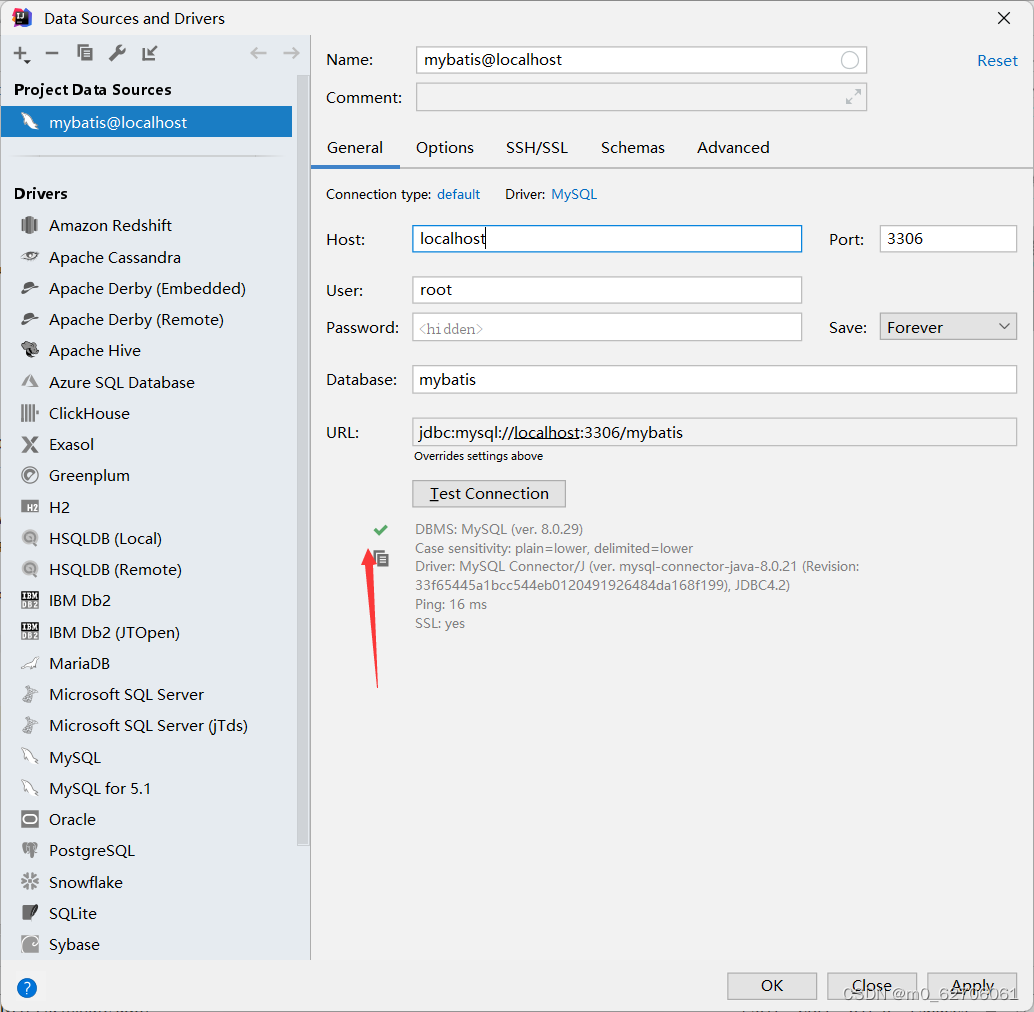
原因:Idea和数据库没有建立连接
idea配置MYSQL数据库连接

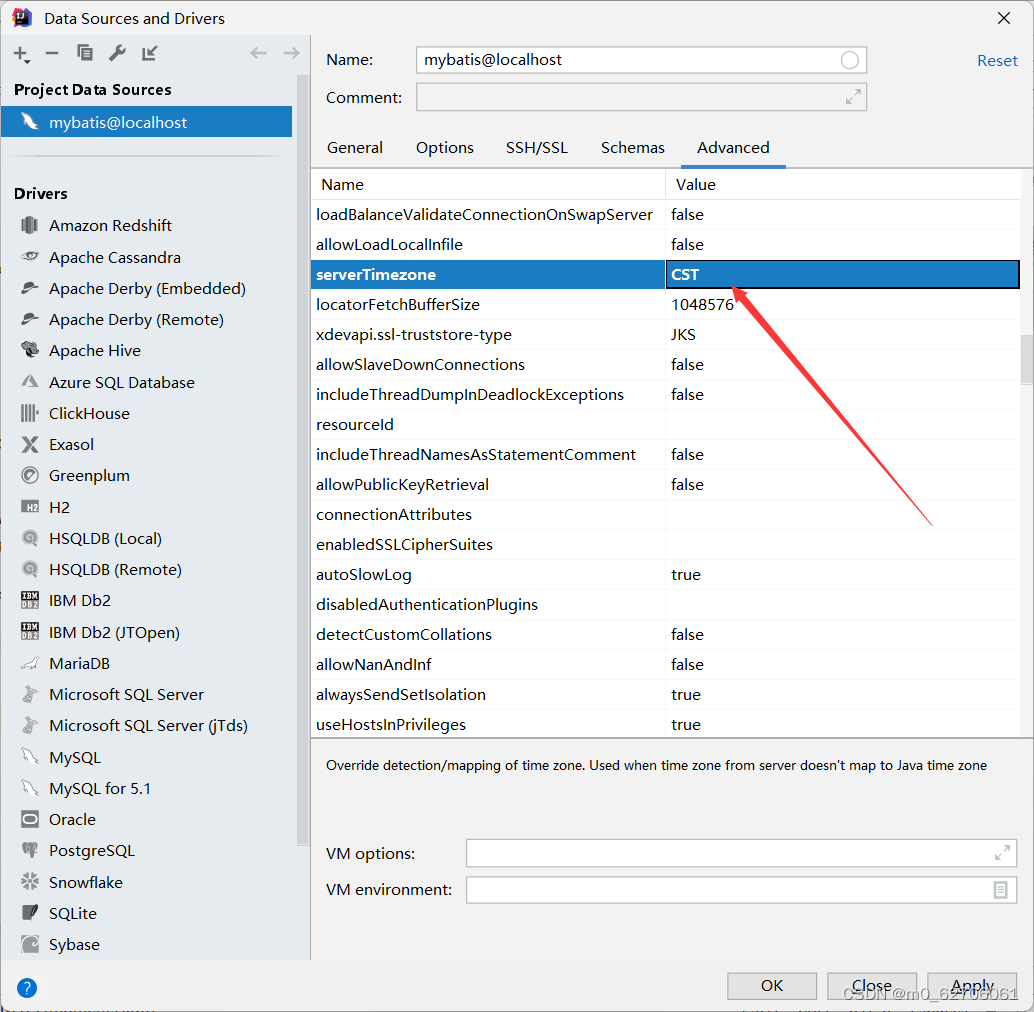
CST可视为美国、澳大利亚、古巴或中国的标准时间。
CST可以为如下4个不同的时区的缩写:
美国中部时间:Central Standard Time (USA) UT-6:00
澳大利亚中部时间:Central Standard Time (Australia) UT+9:30
中国标准时间:China Standard Time UT+8:00
古巴标准时间:Cuba Standard Time UT-4:00
idea强大的提示功能
UserMapper.xml配置文件也不再报红
3.使用Mapper代理开发
  //3.执行sql
  List<User> users = sqlSession.selectList("test.selectAll");
上述“test.selectAll”其实也属于硬编码
到时候我们不仅要去UserMapper.xml中一个个查id
而且也不安全
因此引入了Mapper代理开发的理念
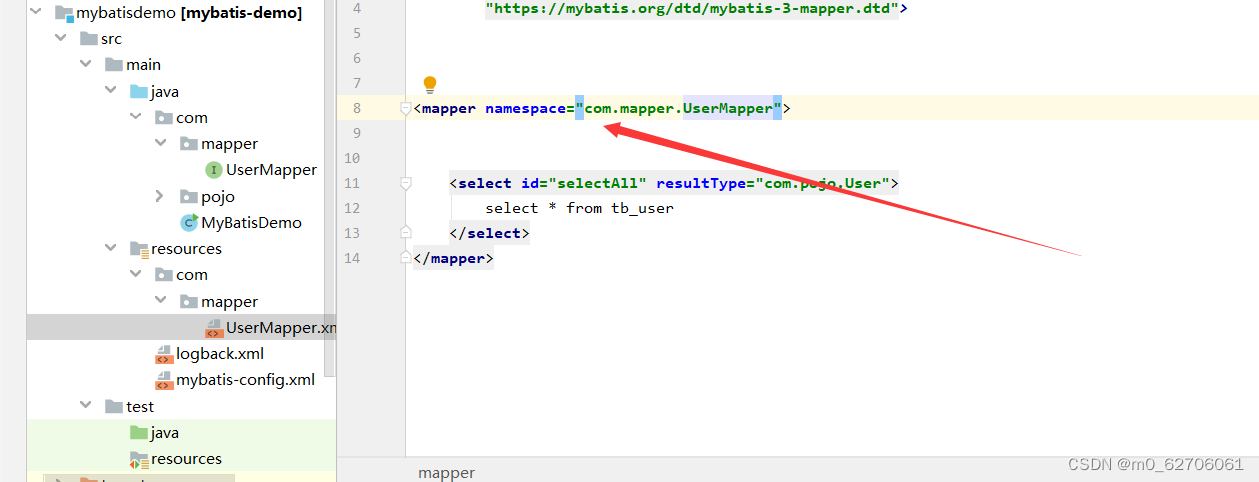
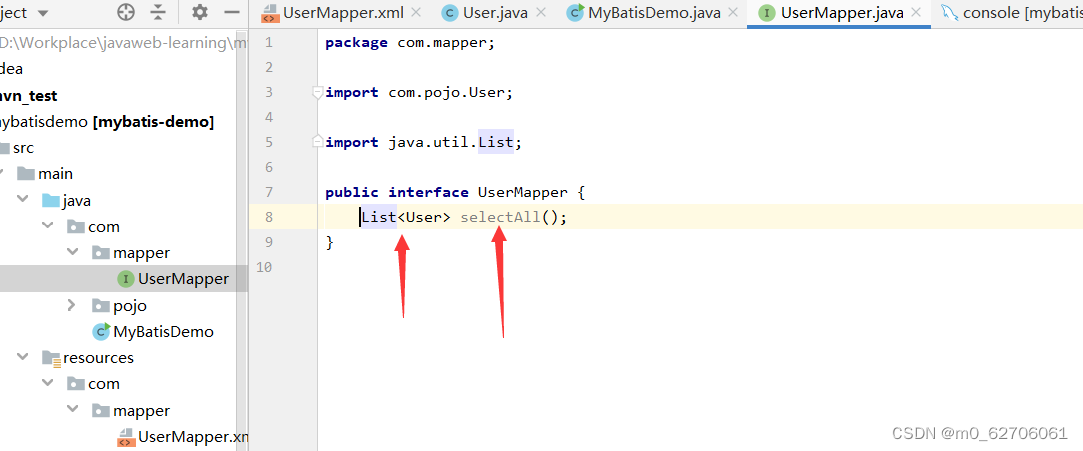
1.定义与SQL映射文件同名的Mapper接口,并且将Mapper接口和SQL映射文件放在统一目录下
2.设置SQL映射文件的namespace属性为Mapper接口全限定名
3.在Mapper接口中定义方法,方法名就是SQL映射文件中sql语句的id,并且保持参数类型和返回值类型一致
4.代码:
1)通过SqlSession的getMapper()方法获取Mapper接口的代理对象
2)调用对应方法完成sql的执行
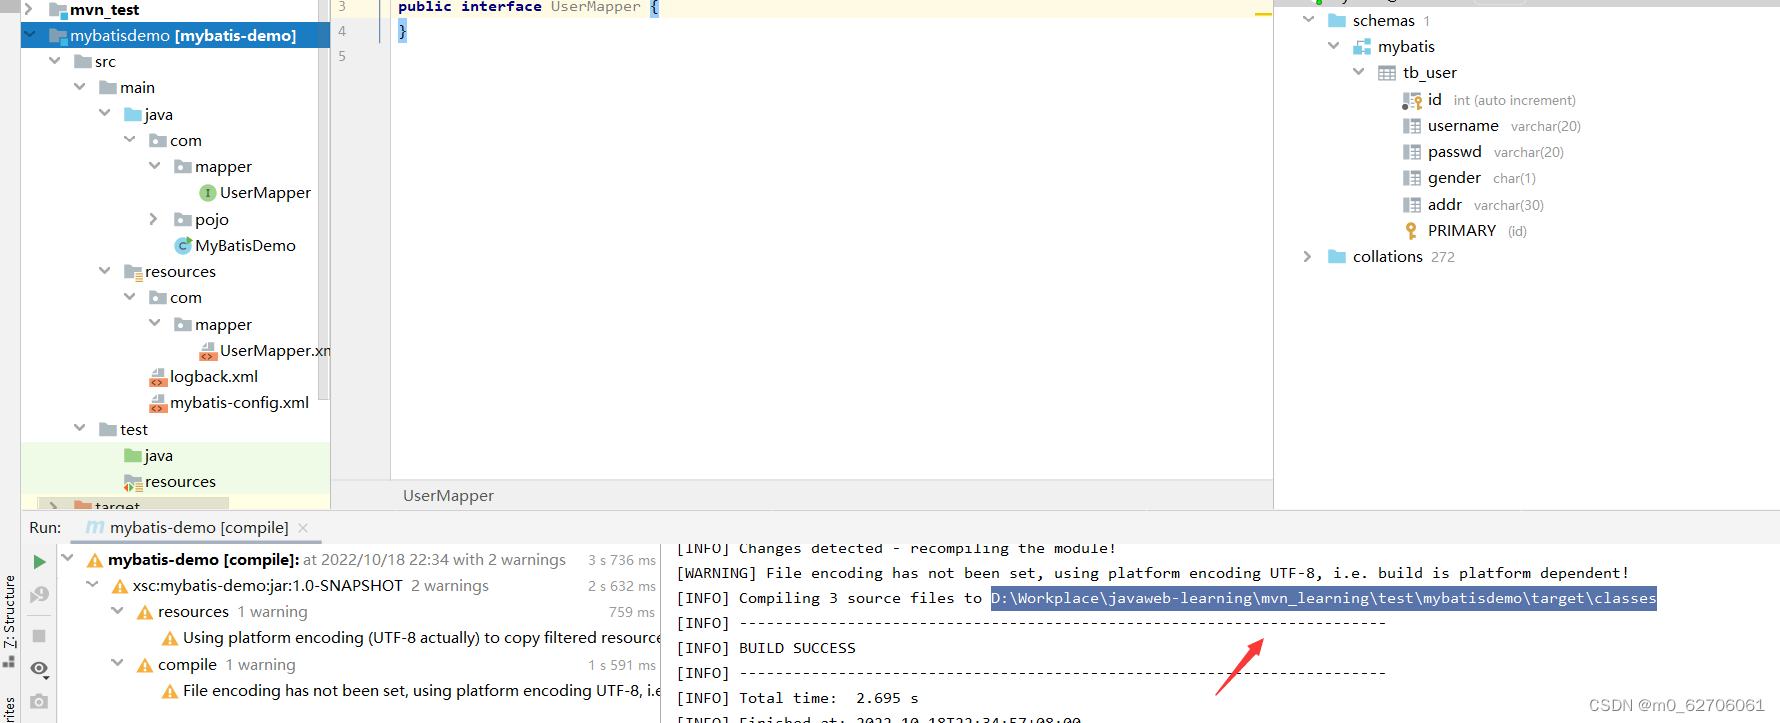
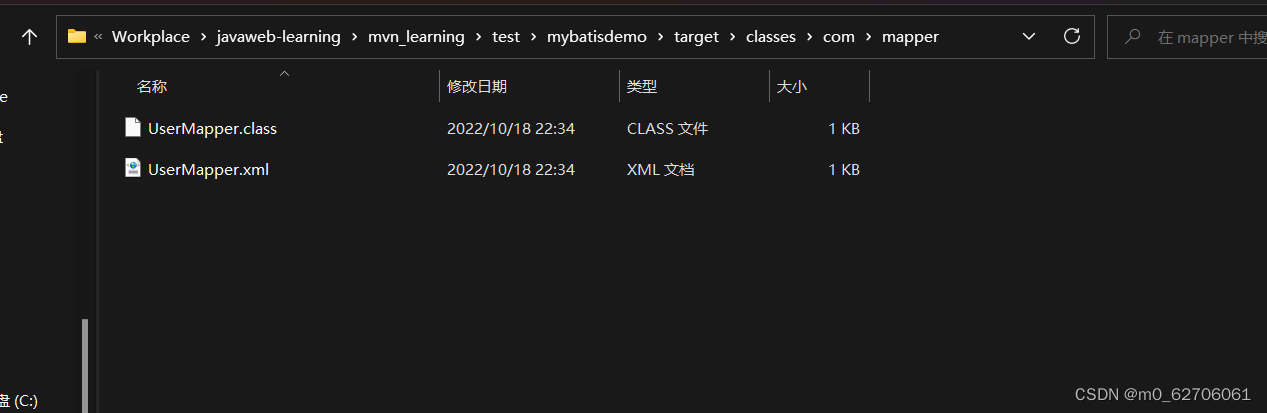
1.显然我们需将xml文件整到resources中的
所以怎么做呢?
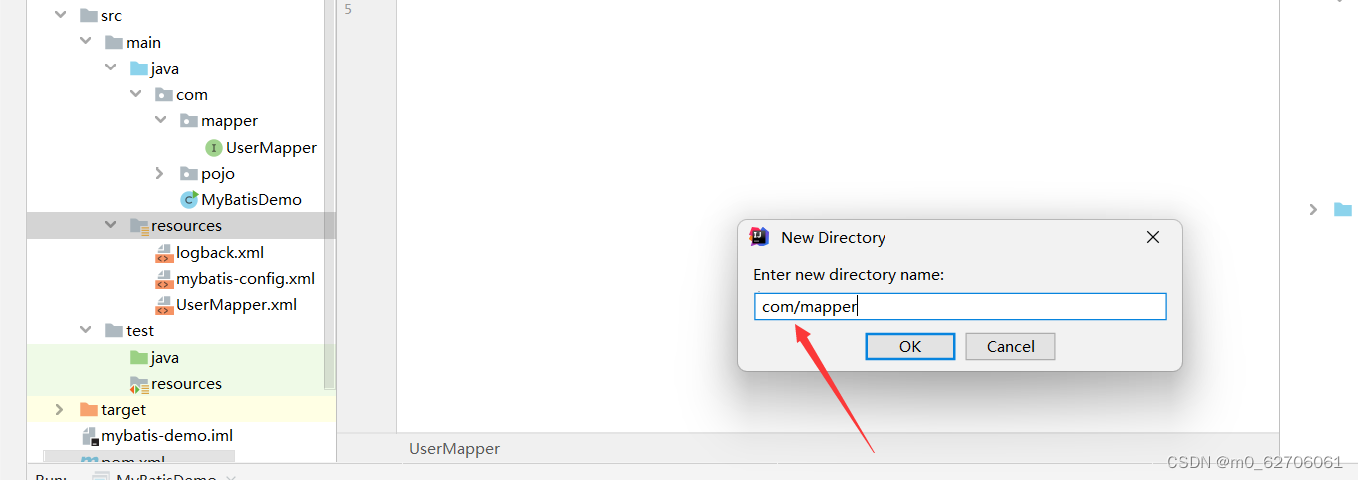
此处需尤其注意用/而不是.(尽管在左侧显示的仍是.)
只有/才能在用maven compile后使UserMapper字节码文件与UserMapper.xml文件位于同一目录下
2.
3.
注意在mybatis-config,xml重新加载sql映射文件

4.
public class MyBatisDemo2 {
    public static void main(String[] args) throws IOException {
        //1.加载mybatis核心配置文件 获取sqlSessionFactory
        String resource = "mybatis-config.xml";
        InputStream inputStream = Resources.getResourceAsStream(resource);
        SqlSessionFactory sqlSessionFactory = new SqlSessionFactoryBuilder().build(inputStream);
        //2.获取SqlSession
        SqlSession sqlSession = sqlSessionFactory.openSession();
//        //3.执行sql
//        List<User> users = sqlSession.selectList("test.selectAll");
        //3.mapper代理开发
        UserMapper userMapper = sqlSession.getMapper(UserMapper.class);
        List<User> users = userMapper.selectAll();

        System.out.println(users);
        //4.释放资源
        sqlSession.close();

    }
}
最后还有个小细节:
对于mybatis-config.xml中加载sql映射文件的简化
如果Mapper接口名称和SQL映射文件名称相同,并在同一目录下,则可以使用包扫描的方式简化SQL映射文件的加载(即Mapper代理一定能用包扫描的方式简化)
这样子:以后当需要执行的SQL语句变多,.xml文件变多时,加载sql映射文件就变得简单很多
    <mappers>
<!--        加载sql映射文件-->
<!--        <mapper resource="com/mapper/UserMapper.xml"/>-->
<!--        Mapper代理方式-->
        <package name="com.mapper"/>
    </mappers>
4.MyBatis核心配置文件
mybatis官网
注意:必须按顺序
MyBatis 的配置文件包含了会深深影响 MyBatis 行为的设置和属性信息。 配置文档的顶层结构如下:
configuration(配置)
properties(属性)
settings(设置)
typeAliases(类型别名)
typeHandlers(类型处理器)
objectFactory(对象工厂)
plugins(插件)
environments(环境配置)
environment(环境变量)
transactionManager(事务管理器)
dataSource(数据源)
databaseIdProvider(数据库厂商标识)
mappers(映射器)
我们在这里首先仅注意两个点即可
- environment
MyBatis 可以配置成适应多种环境,这种机制有助于将 SQL 映射应用于多种数据库之中, 现实情况下有多种理由需要这么做。例如,开发、测试和生产环境需要有不同的配置;
具体使用看官方文档
- tyoeAliases(类型别名)

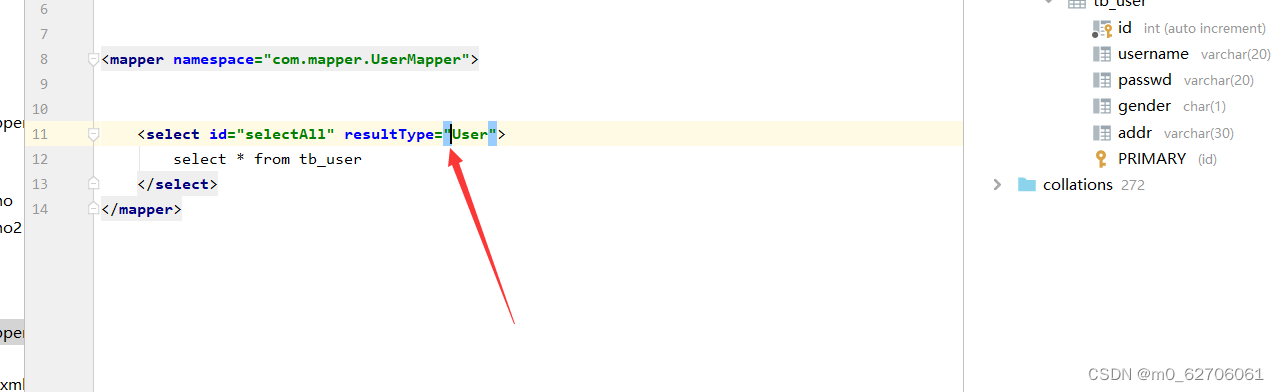
然后大写User和小写的user都行了
以上配置无需太过纠结
此后,我们想做一个表得相关sql
仅需:
1.创建对应的Mapper接口 (UserMapper)
2.在其中编写相关方法,然后创建新的表的Mapper.xml文件
使用MybatisX插件跳转到方法对应id ,然后写sql
3.就可以进行测试调用了
sql查询时一些注意点:
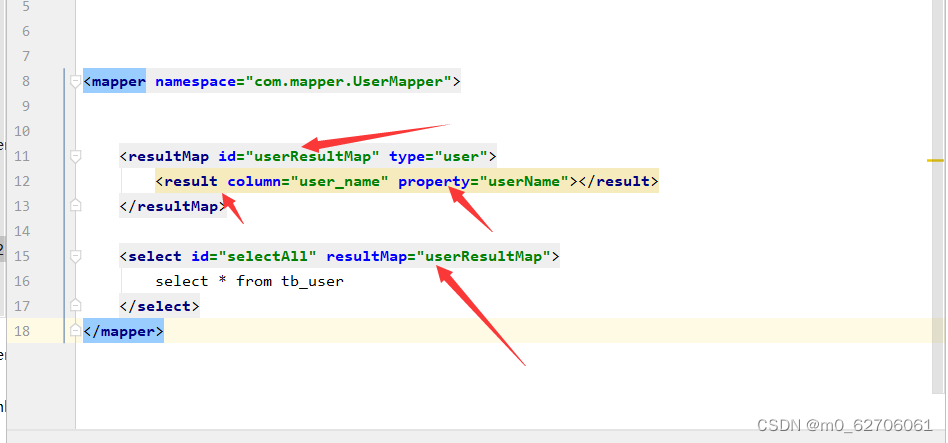
1.resultMap标签替换resultType标签
由于当sql表中为user_name而User类中为userName时
mybatis无法自动封装结果集,
我们当然可以起别名,或者select as
但最好的是resultMap方法
2.对于参数得设定
有两种方式
#{}和${}
然而后者就是简单得拼接sql,会存在sql注入问题
前者相当于preparedstatement什么得,是?的形式,然后会一个一个set
目前先做这样的大致理解.
所以推荐:
 <select id="selectById"  resultMap="userResultMap">
        select * from tb_user where id = #{id}
 </select>
5.开始使用-配置文件完成增删改查
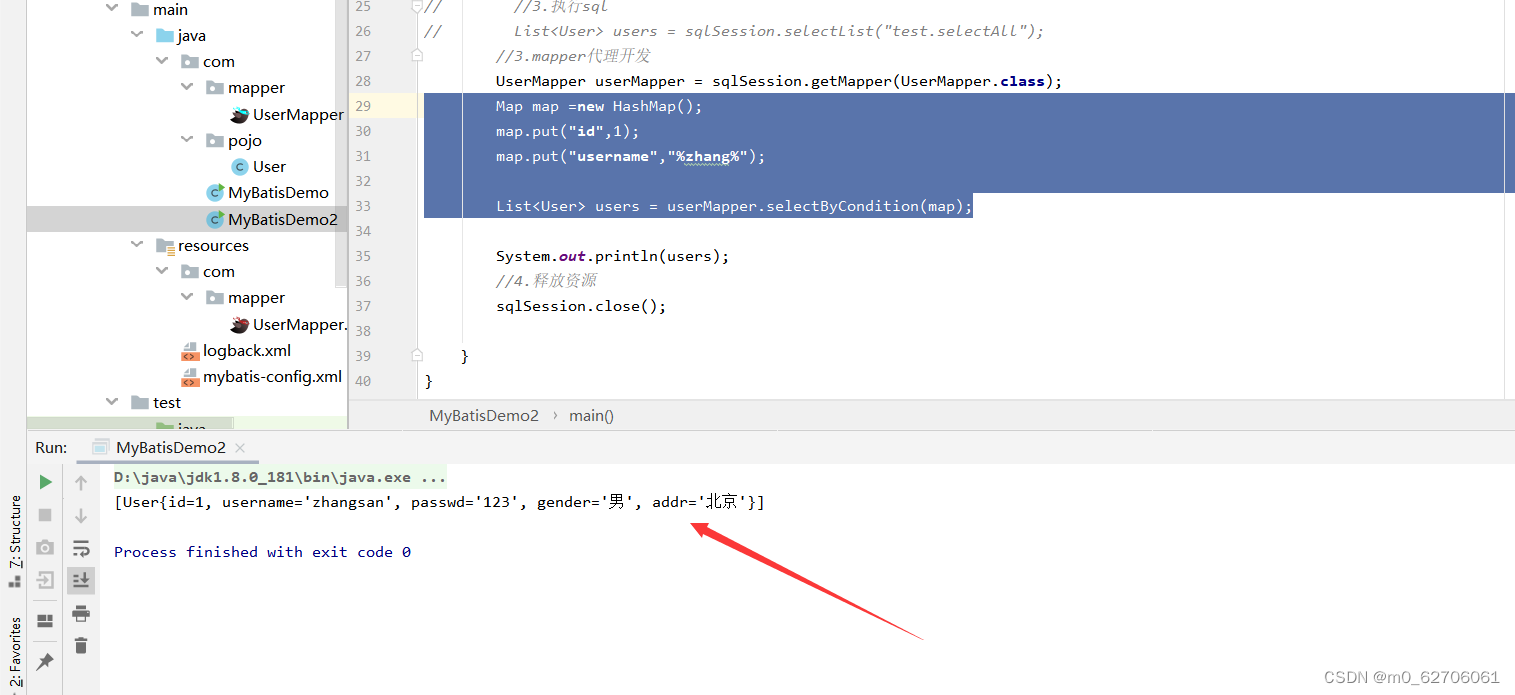
1.动态条件查询
多条件查询
   <select id="selectByCondition"  resultMap="userResultMap">
        select *
        from tb_user
        where
        <if test="id !=null">
            id=#{id}
        </if>
        <if test="username != null and username != '' ">
            and username like #{username}
        </if>
        <if test="passwd !=null and passwd!= '' ">
            and passwd like #{passwd}
        </if>

    </select>
    //List<User> selectByCondition(@Param("id")int id,@Param("username")String username,@Param("passwd")String passwd);
      List<User> selectByCondition(Map map);

    //List<User> users = userMapper.selectByCondition(1,"zhangsan","123");
        Map map =new HashMap();
        map.put("id",1);
        map.put("username","%zhang%");
        List<User> users = userMapper.selectByCondition(map);
成功执行
但是当我们不传id却传之后得参数时会产生and过余导致了报错
所以解决方案:
1.多加一个恒等式
    <select id="selectByCondition"  resultMap="userResultMap">
        select *
        from tb_user
        where 1=1
        <if test="id !=null">
            id=#{id}
        </if>
        <if test="username != null and username != '' ">
            and username like #{username}
        </if>
        <if test="passwd !=null and passwd!= '' ">
            and passwd like #{passwd}
        </if>

    </select>
2.用mybatis提供得where标签来替代where
    <select id="selectByCondition"  resultMap="userResultMap">
        select *
        from tb_user
<!--        where 1=1-->
        <where>
            <if test="id !=null">
                id=#{id}
            </if>
            <if test="username != null and username != '' ">
                and username like #{username}
            </if>
            <if test="passwd !=null and passwd!= '' ">
                and passwd like #{passwd}
            </if>
        </where>
    </select>
单条件查询
<!--    单条件查询-->
    <select id="selectByConditionSingle"  resultMap="userResultMap">
        select *
        from tb_user
        <!--        where 1=1-->
        <where>
            <choose> <!-- 相当于switch -->
                <when test="id !=null"> <!-- 相当于case-->
                    id=#{id}
                </when>
                <when test="username != null and username != ''"> <!-- 相当于case-->
                    username like #{username}
                </when>
                <when test="passwd !=null and passwd!= ''"> <!-- 相当于case-->
                    passwd like #{passwd}
                </when>
                <otherwise>
                    1=1
                </otherwise>
            </choose>

        </where>
    </select>
2.插入数据
    <insert id="add">
        insert into tb_user(username,passwd,gender,addr)
        values(#{username},#{passwd},#{gender},#{addr})
    </insert>
然而需注意,mysql事务
MyBatis事务
openSession():
默认开启事务,进行增删改操作后需要手动提交事务:
sqlSession.commit()
而openSession(true):可以设置为自动提交事务
其次,值得注意的是:主键返回
在数据添加成功后获取插入数据得数据库主键的id
仅仅是两个标签的使用罢了
< useGeneratedKeys >
< keyProperty >
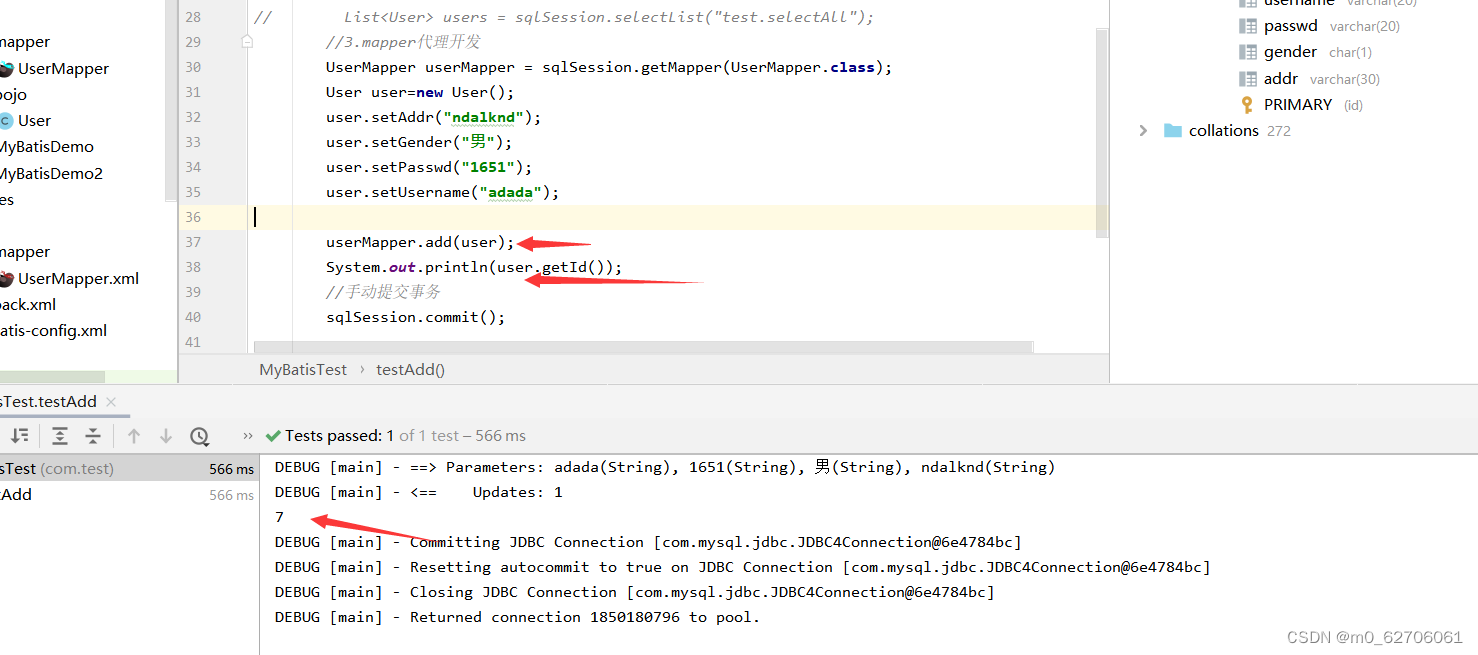
    <insert id="add" useGeneratedKeys="true" keyProperty="id">
        insert into tb_user(username,passwd,gender,addr)
        values(#{username},#{passwd},#{gender},#{addr})
    </insert>
     userMapper.add(user);
     System.out.println(user.getId());
3.修改字段
    <update id="update">
        update tb_user
        set
            username=#{username},
            passwd=#{passwd},
            gender=#{gender},
            addr=#{addr}
        where id=#{id}
    </update>
UserMapper userMapper = sqlSession.getMapper(UserMapper.class);
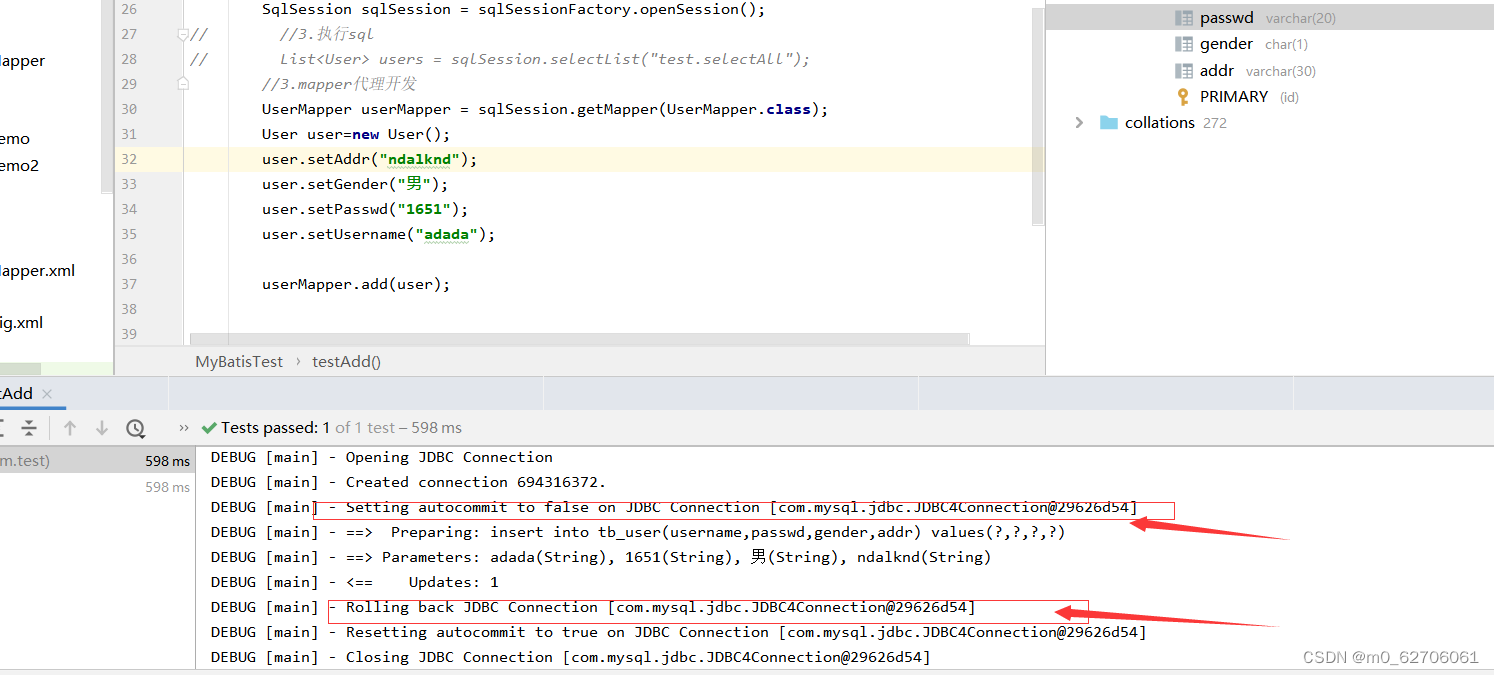
User user=new User();
user.setAddr("ndalknd");
user.setGender("男");
user.setPasswd("1651");
user.setUsername("adada");
user.setId(3);
userMapper.update(user);
//手动提交事务
sqlSession.commit();
动态修改字段
也就是set标签和if标签的使用呗
    <update id="update">
        update tb_user
        <set>
            <if test="username!=null and username!=''">
                username=#{username},
            </if>
            <if test="username != null and username != '' ">
                passwd=#{passwd},
            </if>
            <if test="passwd !=null and passwd!= '' ">
                gender=#{gender},
            </if>
            <if test="addr!=null and addr!=''">
                addr=#{addr}
            </if>
        </set>
        where id=#{id}
    </update>
4.删除功能
单个删除
    <delete id="deleteById">
        delete from tb_user
        where id =#{id}
    </delete>
批量删除
    void deleteByIds(@Param("ids")int[]ids);
    //此处的注解是为了下面的collection不是等于array
    //而是ids
    <!--        mybatis会将数组参数封装成一个Map集合
                默认:array => 数组
                可以使用注解改变map集合的默认键的名称为ids-->
    <delete id="deleteByIds">
        delete from tb_user
        where id in(
        <foreach collection="ids" item="id" separator=",">
            #{id}
        </foreach>
        );
    </delete>
6.MyBatis参数传递
User select(@Param("username")String username,String passwd);
<select id="select" resultType="user">
	select * from tb_user
	where
		username=#{usename}
	and passwd=#{param2}
<select>
正是因为有了注解username
下面才能使用 参数占位符username 而不是param1或arg0
MyBatis提供了ParamNameResolver类进行参数封装
-
单个参数
-
POJO类型:直接使用,实体类属性和参数占位符名称一致
-
Map集合:直接使用,键名与参数占位符名称一致
-
Collection集合:封装为Map集合
map.put(“collection”,collection集合)
map.put(“arg0”,collection集合)
@Param注解替换Map集合中默认的arg键名- List集合:封装为Map集合
map.put(“collection”,list集合)
map.put(“list”,list集合)
map.put(“arg0”,list集合)
@Param注解替换Map集合中默认的arg键名- Array:封装为Map集合
map.put(“array”,数组)
map.put(“arg0”,数组)
@Param注解替换Map集合中默认的arg键名- 其他类型: 直接使用
-
-
多个参数:封装为Map集合
map.put(“arg0”,参数值1)
map.put(“arg1”,参数值2)
map.put(“param1”,参数值1)
map.put(“param2”,参数值2)
@Param注解替换Map集合中默认的arg键名------------------------------@Param(“username”)
map.put(“username”,参数值1)
map.put(“arg1”,参数值2)
map.put(“param1”,参数值1)
map.put(“param2”,参数值2)

7.注解完成增删改查
使用注解开发会比配置文件写sql语句更加方便
但是建议:
注解完成简单功能
配置文件完成复杂功能
    @Select("select * from tb_user where id = #{id}")
    public abstract User selectById(int id);
- 查询 @Select
- 添加 @Insert
- 修改 @Update
- 删除 @Delete


 807
807

 被折叠的 条评论
为什么被折叠?
被折叠的 条评论
为什么被折叠?
 到【灌水乐园】发言


