


 本文详细介绍了Android GUI设计,包括LinearLayout线性布局和RelativeLayout相对布局的常用属性,如layout_width、layout_height、layout_weight等。还讨论了各种布局如TableLayout、AbsoluteLayout、FrameLayout和GridLayout。此外,提到了常见的Android控件如TextView、Button、EditText、CheckBox,以及事件监听器和回调方法的概念。
AndroidGUI设计
用户人机界面可分为:
视图View:文本视图,单选按钮,复选框
视图容器View Group
布局
应用程序布局
LinearLayout线性布局
常用属性:android:layout_width=“wrap_content”
android:layout_height=“wrap_content”
android:orientation="horizontal“
layout_weight 用于定义一个线性布局中某组件的重要程度。若赋值为大于 0 的值,则将可用的空间分割,分割的大小取决于当前的 layout_weight 数值与其他空间的 layout_weight 值的比率。
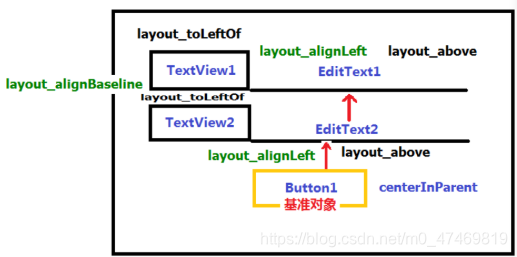
RelativeLayout相对布局
RelativeLayout中子控件常用属性:
android:layout_above="@id/xxx"
将控件置于给定 ID 控件之上
android:layout_below="@id/xxx"
将控件置于给定 ID 控件之下
android:layout_toLeftOf="@id/xxx"
将控件的右边缘和给定 ID 控件的左边缘对齐
android:layout_toRightOf="@id/xxx"
将控件的左边缘和给定 ID 控件的右边缘对齐
android:layout_alignBaseline="@id/xxx"
将控件的 baseline 与给定 ID 的 baseline 对齐
android:layout_alignTop="@id/xxx"
将控件的上边缘和给定 ID 控件的上边缘对齐
android:layout_alignBottom="@id/xxx"
将控件的底边缘和给定 ID 控件的底边缘对齐
android:layout_alignLeft="@id/xxx"
将控件的左边缘和给定 ID 控件的左边缘对齐
android:layout_alignRight="@id/xxx"
将控件的右边缘和给定 ID 控件的右边缘对齐
android:layout_alignParentLeft=“true”
将控件的左边缘和父控件的左边缘对齐
android:layout_alignParentTop=“true”
将控件的上边缘和父控件的上边缘对齐
android:layout_alignParentRight=“true”
将控件的右边缘和父控件的右边缘对齐
android:layout_alignParentBottom=“true”
将控件的底边缘和父控件的底边缘对齐
android:layout_centerInParent=“true”
将控件置于父控件的中心位置
android:layout_centerHorizontal=“true”
将控件置于水平方向的中心位置
android:layout_centerVertical=“true”
将控件置于垂直方向的中心位置
TableLayout
AbsoluteLayout
FrameLayout
GridLayout
Android常用控件
-
文本框视图TextView
myTextView=(TextView) this.findViewById(R.id.myTextViewID);
myTextView.setText(“jnj”); -
按钮Button
android:onClick:在本视图的上下文视图被点击时调用的方法的名称
为 Button添加事件监听器和相应的单击事件
Button btn = (Button) this.findViewById(R.id.button1);
btn.setOnClickListener(new View.OnClickListener() {@Override
public void onClick(View v) {
 //TODO Auto-generated method stub
setTitle("button1 被用户点击了");
}});
通过 findViewById(R.id.button1) 方法获得 Button1 的对象,通过 setOnClickListener() 方法为 Button1 设置监听器。新建了一个实现 OnClickListener 接口的匿名类作为监听器,并实现了 onClick() 方法。当 Button1 被点击时,当前应用程序的标题被设置成“button1 被用户点击了”
- 编辑框EditText
android:hint:设置显示在空间上的提示信息
android:textAlign=“center”:设置文本对齐方式
android:inputType:可以指定输入文本、电话号码等输入格式
android:password=“true”:设置只能输入密码 - 多项选择框CheckBox
为了确定用户选择的是哪几项,需要对每个多项选择按钮进行监听。CompoundButton.OnCheckedChangedListener 接口可用于对 CheckBox 的状态进行监听。当 CheckBox 的状态在未被选中和被选中之间变化时,该接口的 onCheckedChanged() 方法会被系统调用。CheckBox 通过 setOnCheckedChangeListener() 方法将该接口对象设置为自己的监听器。
public class MainActivity extends AppCompatActivity implements CompoundButton.OnCheckedChangeListener {
    private CheckBox musicCkb;
    private CheckBox tripCkb;
    private TextView result_tv;
    private Button endBtn;
    //爱好数组
    ArrayList<String> hobbies=new ArrayList<String>();
    @Override
    protected void onCreate(Bundle savedInstanceState) {
        super.onCreate(savedInstanceState);
        setContentView(R.layout.activity_main);
        //初始化控件
        musicCkb = (CheckBox) findViewById(R.id.chb_music);
        tripCkb = (CheckBox) findViewById(R.id.chb_trip);
        result_tv = (TextView) findViewById(R.id.result_tv);
        endBtn= (Button) findViewById(R.id.end);
        //设置监听器
        musicCkb.setOnCheckedChangeListener(this);
        tripCkb.setOnCheckedChangeListener(this);
        //为button设置监听器
        endBtn.setOnClickListener(new View.OnClickListener() {
            @Override
            public void onClick(View v) {
                StringBuilder sb=new StringBuilder();
              for (int i =0;i<hobbies.size();i++) {
                  //把选择的爱好添加到string尾部
                  if(i==(hobbies.size()-1))
                  {
                      sb.append(hobbies.get(i));
                  }else {
                      sb.append(hobbies.get(i)+",");
                  }
              }
                //显示选择结果
                result_tv.setText("你选择了:"+sb); }  }); }
    @Override
    public void onCheckedChanged(CompoundButton buttonView, boolean isChecked) {
        if (isChecked){
            //添加到爱好数组
            hobbies.add(buttonView.getText().toString().trim());
        }else {
            //从数组中移除
            hobbies.remove(buttonView.getText().toString().trim());
        }   }}
当 CheckBox 的状态发生改变时,通过 Checkbox.isChecked() 方法可以获取当前 CheckBox 按钮的选中状态,进而进行处理
- 单项选择RadioGroup
其事件监听接口使用的是 RadioGroup.OnCheckedChangeListener(),使用 setOnCheckedChangeListener() 方法将监听器设置到单选按钮上。 - 下拉列表Spinner
Spinner提供了下拉列表功能,其功能类似于RadioGroup。Spinner同RadioGroup一样,多个item子元素组合成一个Spinner。
单击 Button 并启动 SpinnerActivity 的代码
Button spinnerbtn = (Button) this.findViewById(R.id.button4);
spinnerbtn.setOnClickListener(new View.OnClickListener() {
    @Override
    public void onClick(View v) {
        Intent intent = new Intent(MainActivity.this, SpinnerActivity.class);
        startActivity(intent);    }});
同时在 AndroidManifest.xml 文件中声明该 Activity
<activity android:name=".SpinnerActivity "></activity>
public class SpinnerActivity extends Activity {
    private List<String> list = new ArrayList<String>();
    private TextView textview;
    private Spinner spinnertext;
    private ArrayAdapter<String> adapter;
    public void onCreate(Bundle savedlnstanceState) {
        super.onCreate(savedlnstanceState);
        setContentView(R.layout.spiner);
        //第一步:定义下拉列表内容
        list.add("A型");
        list.add("B型");
        textview = (TextView) findViewByld(R.id.textViewl);
        spinnertext = (Spinner) findViewByld(R.id.spinnerl);
        //第二步:为下拉列表定义一个适配器
        adapter = new ArrayAdapter<String>(this, android.R.layout.simple_spinner_item, list);
        //第三步:设置下拉列表下拉时的菜单样式
adapter.setDropDownViewResource(android.R.layout.simple_spinner_dropdown_item);
        //第四步:将适配器添加到下拉列表上
        spinnertext.setAdapter(adapter);
        //第五步:添加监听器,为下拉列表设置事件的响应
        spinnertext.setOnltemSelectedListener(new Spinner.OnltemSelectedListener() {
            public void onltemSelected(AdapterView<?> argO, View argl, int arg2, long arg3) {
                // TODO Auto-generated method stub
                /* 将所选spinnertext的值带入myTextView中*/
                textview.setText("你的血型是:" + adapter.getItem(arg2));
                /* 将 spinnertext 显示^*/
                argO.setVisibility(View.VISIBLE);
            }
 public void onNothingSelected(AdapterView<?> argO) {
                // TODO Auto-generated method stub
                textview.setText("NONE");
                argO.setVisibility(View.VISIBLE);
            }
        });
        //将spinnertext添加到OnTouchListener对内容选项触屏事件处理
        spinnertext.setOnTouchListener(new Spinner.OnTouchListener() {
            @Override
            public boolean onTouch(View v, MotionEvent event) {
                // TODO Auto-generated method stub
                // 将mySpinner隐藏
                v.setVisibility(View.INVISIBLE);
                Log.i("spinner", "Spinner Touch事件被触发!");
                return false;
            }
        });
        //焦点改变事件处理
        spinnertext.setOnFocusChangeListener(new Spinner.OnFocusChangeListener() {
            public void onFocusChange(View v, boolean hasFocus) {
                // TODO Auto-generated method stub
                v.setVisibility(View.VISIBLE);
                Log.i("spinner", "Spinner FocusChange事件被触发!"); }  }); }}
SpinnerActivity 通过 5 个步骤将 Spinner 初始化并进行事件处理,分别为:
定义下拉列表的列表项内容 List< String>。
为下拉列表 Spinner 定义一个适配器 ArrayAdapter< String> ,并与列表项内容相关联。
使用 ArrayAdapter.setDropDownViewResource() 设置 Spinner 下拉列表在打开时的下拉菜单样式。
使用 Spinner. setAdapter() 将适配器数据与 Spinner 关联起来。
为 Spinner 添加事件监听器,进行事件处理。
- 自动完成文本AutoCompleteTextView
是一个文本框组件,它提供了自动完成文本功能。使用AutoCompleteTextView时,必须提供MultiAutoCompleteTextView.Tokenizer对象以用来区分不同的子串。
操作步骤:
通过findViewByID方法建立对象
提供数据:数据源可以是数组、XML文件、List< String>集合;
提供布局;
建立适配器ArrayAdapter
关联适配器
使用数组提供数据源
public class MainActivity extends Activity {
    private AutoCompleteTextView textView;
    private static final String[] autotext = new String[]{"a","b","c"};
    @Override
    public void onCreate(Bundle savedInstanceState){
        super.onCreate(savedInstanceState);      setContentView(R.layout.autocompletetextview);
        textView = (AutoCompleteTextView)findViewById(R.id.autoCompleteTextView1);
        /*new ArrayAdapterd 对象将 autotext字符串数组传入*/
        ArrayAdapter<String> adapter = new ArrayAdapter<String>(this,android.R.layout.simple_dropdown_item_1line,autotext);
        /*将ArrayAdapter添加到AutoCompleteTextView中*/
        textView.setAdapter(adapter);   }}
AutoCompleteTextViewActivity 中为可自动补全的内容建立对应字符串数组 autotext,将该数组关联到 ArrayAdapter 中,然后将 ArrayAdapter 与 AutoCompleteTextView 相关联,进而实现自动完成文本功能。
使用XML文件提供数据源
Strings.xml文件
< String-array name="colors" >
< item> black </ item>
< item>red</ item>
< /string-array>
使用List< String>集合提供数据源
List< String> colors=new ArrayList();
colors.add("black");
- 网格视图GirdView
一个网格视图通常需要一个ListAdapter,这个适配器包含网格视图的子元素组件 - 列表视图ListView
实现一个列表视图必须具备ListView、适配器以及子元素3个条件,其中适配器用于存储列表视图的子元素。
提供列表项的常用的两个Adapter:
ArrayAdapter:通常用于将数组或List集合作为列表项数据源
SimpleAdapter
SimpleAdapter(Context context, List< ? extends Map< String, ?>> data,int resource,String[] from,int[] to) - Toast对话框
Toast.makeText(this, “提示信息", Toast.LENGTH_SHORT).show();
toast.setGravity(Gravity.CENTER, 0, 0); - AlertDialog对话框
AlertDialog的构造方法全部是Protected的,所以不能直接通过new一个AlertDialog来创建出一个AlertDialog。要创建一个AlertDialog,就要用到AlertDialog.Builder中的create()方法。
使用AlertDialog.Builder创建对话框需要掌握的几个方法:
setTitle :为对话框设置标题
setIcon :为对话框设置图标
setMessage:为对话框设置内容
setView : 给对话框设置自定义样式
setItems :设置对话框要显示的一个list,一般用于显示几个命令时
setMultiChoiceItems :用来设置对话框显示一系列的复选框
setNeutralButton :普通按钮
setPositiveButton :给对话框添加"Yes"按钮
setNegativeButton :对话框添加"No"按钮
create : 创建对话框
show :显示对话框
简单的AlertDialog
Dialog alertDialog = new AlertDialog.Builder(this).setTitle("对话框的标题").setMessage("对话框的内容").setIcon(R.drawable.ic_launcher).create();
 alertDialog.show();
带按钮的AlertDialog
Dialog alertDialog = new AlertDialog.Builder(this).setTitle("确定删除?").setMessage("您确定删除该条信息吗?").setIcon(R.drawable.ic_launcher).setPositiveButton("确定", new DialogInterface.OnClickListener() {
 public void onClick(DialogInterface dialog, int which) {  }   }).setNegativeButton("取消", new DialogInterface.OnClickListener() {
 public void onClick(DialogInterface dialog, int which) {  }}).setNeutralButton("查看详情", new DialogInterface.OnClickListener() {
 public void onClick(DialogInterface dialog, int which) {
 }    }).create();
        alertDialog.show();
类似RadioButton的AlertDialog
 final String[] arrayFruit = new String[] { "苹果", "橘子", "草莓", "香蕉" };
        Dialog alertDialog = new AlertDialog.Builder(this).
                setTitle("你喜欢吃哪种水果?").
                setIcon(R.drawable.ic_launcher)
                .setSingleChoiceItems(arrayFruit, 0, new DialogInterface.OnClickListener() {
                 public void onClick(DialogInterface dialog, int which) {
                        selectedFruitIndex = which;
                    }   }).
                setPositiveButton("确认", new DialogInterface.OnClickListener() {
                 public void onClick(DialogInterface dialog, int which) {                          Toast.makeText(Dialog_AlertDialogDemoActivity.this, arrayFruit[selectedFruitIndex], Toast.LENGTH_SHORT).show();
                    }   }). setNegativeButton("取消", new DialogInterface.OnClickListener() {
                public void onClick(DialogInterface dialog, int which) {
  }   }).create();
        alertDialog.show();
自定义View的AlertDialog
LayoutInflater layoutInflater = LayoutInflater.from(this);
 View myLoginView = layoutInflater.inflate(R.layout.login, null);
        Dialog alertDialog = new AlertDialog.Builder(this).
                setTitle("用户登录").
                setIcon(R.drawable.ic_launcher).
                setView(myLoginView).    // myLoginView为自定义的登录窗口View
                setPositiveButton("登录", new DialogInterface.OnClickListener() {
                 public void onClick(DialogInterface dialog, int which) {
                        // 点击登录的处理事件
                    }   }).
                setNegativeButton("取消", new DialogInterface.OnClickListener() {
                 public void onClick(DialogInterface dialog, int which) {
                        // 点击取消按钮的处理事件
                    }
                }).
                create();
        alertDialog.show();
ProgressDialog 是一个带有进度条的对话框
为 main.xml 布局中的 ProgressDialog 按钮添加事件处理代码:
Button progressbtn = (Button)findViewById(R.id.button2);
progressbtn.setOnClickListener(new View.OnClickListener() {
    @Override
    public void onClick(View view) {
        showDialog(PROGRESS_DLG);
    }
});
单击 ProgressDialog 按钮,调用 showDialog(PROGRESS_DLG) ,系统回调 onCreateDialog(int id) 方法,创建并弹出 ProgressDialog 对话框
case PROGRESS_DLG:
    final ProgressDialog progressDialog;
    progressDialog = new ProgressDialog(this);
    //设置水平进度条
    progressDialog.setProgressStyle(progressDialog.STYLE_HORIZONTAL);
    //设置进度条最大值为100
    progressDialog.setMax(100);
    //设置进度条当前值为0
    progressDialog.setProgress(0);
    dialog = progressDialog;
    new Thread(new Runnable() {
        int count = 0;

        @Override
        public void run() {
            // TODO Auto-generated method stub
            while (progressDialog.getProgress() < 100) {
                count += 3;
                progressDialog.setProgress(count);
                    try {
                        Thread.sleep(1000);
                    } catch (InterruptedException e) {
                        // TODO Auto-generated catch block
                        e.printStackTrace();
                    }
                }
        }
    }).start();
    break;
Android事件监听器和回调方法
用于对特定事件进行监听,一旦监听到特定事件,则由监听器截获该事件,并回调自身的特定方法对事件进行处理。
根据用户输入方式的不同,View 组件将截获的事件分为 6 种,对应以下 6 种事件监听器接口
1) OnClickListener 接口
此接口处理的是单击事件,例如,在 View 上进行单击动作,在 View 获得焦点的情况下单击“确定”按钮或者单击轨迹球都会触发该事件。
当单击事件发生时,OnClickListener 接口会回调 public void onClick(View v) 方法对事件进行处理。其中参数 v 指的是发生单击事件的 View 组件。
2) OnLongClickListener 接口
此接口处理的是长按事件,当长时间按住某个 View 组件时触发该事件。
其对应的回调方法为 public boolean onLongClick(View v),当返回 true 时,表示已经处理完此事件,若事件未处理完,则返回 false,该事件还可以继续被其他监听器捕获并处理。
3) OnFocusChangeListener 接口
此接口用于处理 View 组件焦点改变事件。当 View 组件失去或获得焦点时会触发该事件。
其对应的回调方法为 public void onFocusChange(View v, Boolean hasFocus),其中参数 v 表示产生事件的事件源,hasFocus 表示事件源的状态,即是否获得焦点。
4) OnKeyListener 接口
此接口用于对手机键盘事件进行监听,当View获得焦点并且键盘被敲击时会触发该事件。
其对应的回调方法为 public boolean onKey(View v, int keyCode, KeyEvent event)。
方法参数说明:
keyCode 为键盘码。
event 为键盘事件封装类的对象。
5) OnTouchListener 接口
此接口用来处理手机屏幕事件,当在 View 的范围内有触摸、按下、抬起、滑动等动作时都会触发该事件,并触发该接口中的回调方法。
其对应的回调方法为 public boolean onTouch(View v, MotionEvent event),对应的参数同上。
6) OnCreateContextMenuListener 接口
此接口用于处理上下文菜单被创建的事件。
其对应的回调方法为 public void onCreateContextMenu(ContextMenu menu, View v, ContextMenuInfo info),其中参数 menu 为事件的上下文菜单,参数 info 是该对象中封装了有关上下文菜单的其他信息。


 2万+
2万+

 被折叠的 条评论
为什么被折叠?
被折叠的 条评论
为什么被折叠?
 到【灌水乐园】发言


