


本文展示了如何使用预先训练过的SSD模型,只需几行代码。
首先,让我们导入一些必要的库:
from gluoncv import model_zoo, data, utils
from matplotlib import pyplot as plt
加载训练好的模型
让我们在Pascal VOC数据集上使用512x512个图像训练SSD模型,并以ResNet-50v1作为基本模型。通过指定pretrained=True,它将在必要时自动从Model Zoo下载模型。欲了解更多的预训练模型,请参考Model Zoo。
net = model_zoo.get_model('ssd_512_resnet50_v1_voc', pretrained=True)

Out:
/var/lib/jenkins/miniconda3/envs/gluon_vision_docs/lib/python3.7/site-packages/mxnet/gluon/block.py:1328: UserWarning: Cannot decide type for the following arguments. Consider providing them as input:
        data: None
  input_sym_arg_type = in_param.infer_type()[0]
预处理图像
接下来我们下载一个图像,并使用预设的数据转换进行预处理。这里我们指定将图像的短边调整为512像素。但是你可以输入任意大小的图像。
如果要同时加载多个图像,可以提供图像文件名列表,例如[im_fname1,im_fname2,…]到gluoncv.data.transforms.presets.ssd.load_test()。
此函数返回两个结果。第一个是带形状的NDArray(batch_size(批处理大小)、RGB_channels(RGB_通道)、height、width)。它可以直接输入到模型中。第二个包含了numpy格式的图像以便于绘制。因为我们只加载了一个图像,所以x的第一维是1。
im_fname = utils.download('https://github.com/dmlc/web-data/blob/master/' +
                          'gluoncv/detection/street_small.jpg?raw=true',
                          path='street_small.jpg')
x, img = data.transforms.presets.ssd.load_test(im_fname, short=512)
print('Shape of pre-processed image:', x.shape)
Out:
Downloading street_small.jpg from https://github.com/dmlc/web-data/blob/master/gluoncv/detection/street_small.jpg?raw=true... 0%| | 0/116 [00:00<?, ?KB/s] 117KB [00:00, 5087.75KB/s] Shape of pre-processed image: (1, 3, 512, 512)
推理结果与展示
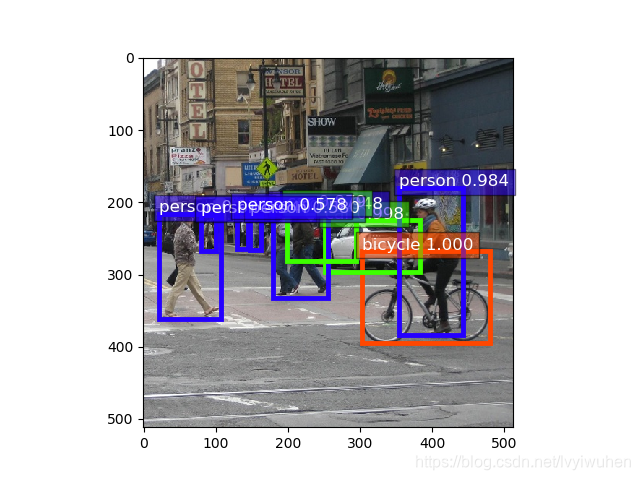
forward函数将返回所有检测到的边界框,以及相应的预测类id和置信度得分。它们的形状分别为(batch_size, num_bboxes, 1), (batch_size, num_bboxes, 1), and (batch_size, num_bboxes, 4)。
我们可以使用gluoncv.utils.viz.plot_bbox()可视化结果。我们对第一幅图像的结果进行切片,并将其输入到plot-bbox:
class_IDs, scores, bounding_boxes = net(x)

ax = utils.viz.plot_bbox(img, bounding_boxes[0], scores[0],
                         class_IDs[0], class_names=net.classes)
plt.show()
脚本的总运行时间:(0分2.081秒)
下载Python源码:demo_ssd.py
下载Jupyter notebook :demo_ssd.ipynb


 5万+
5万+

 被折叠的 条评论
为什么被折叠?
被折叠的 条评论
为什么被折叠?
 到【灌水乐园】发言


