神经网络的搭建流程
- 定义一个类,继承nn.Module
- 在_init_方法中,搭建神经网络
- 在forward方法中,完成前向传播
深度学习的四个步骤
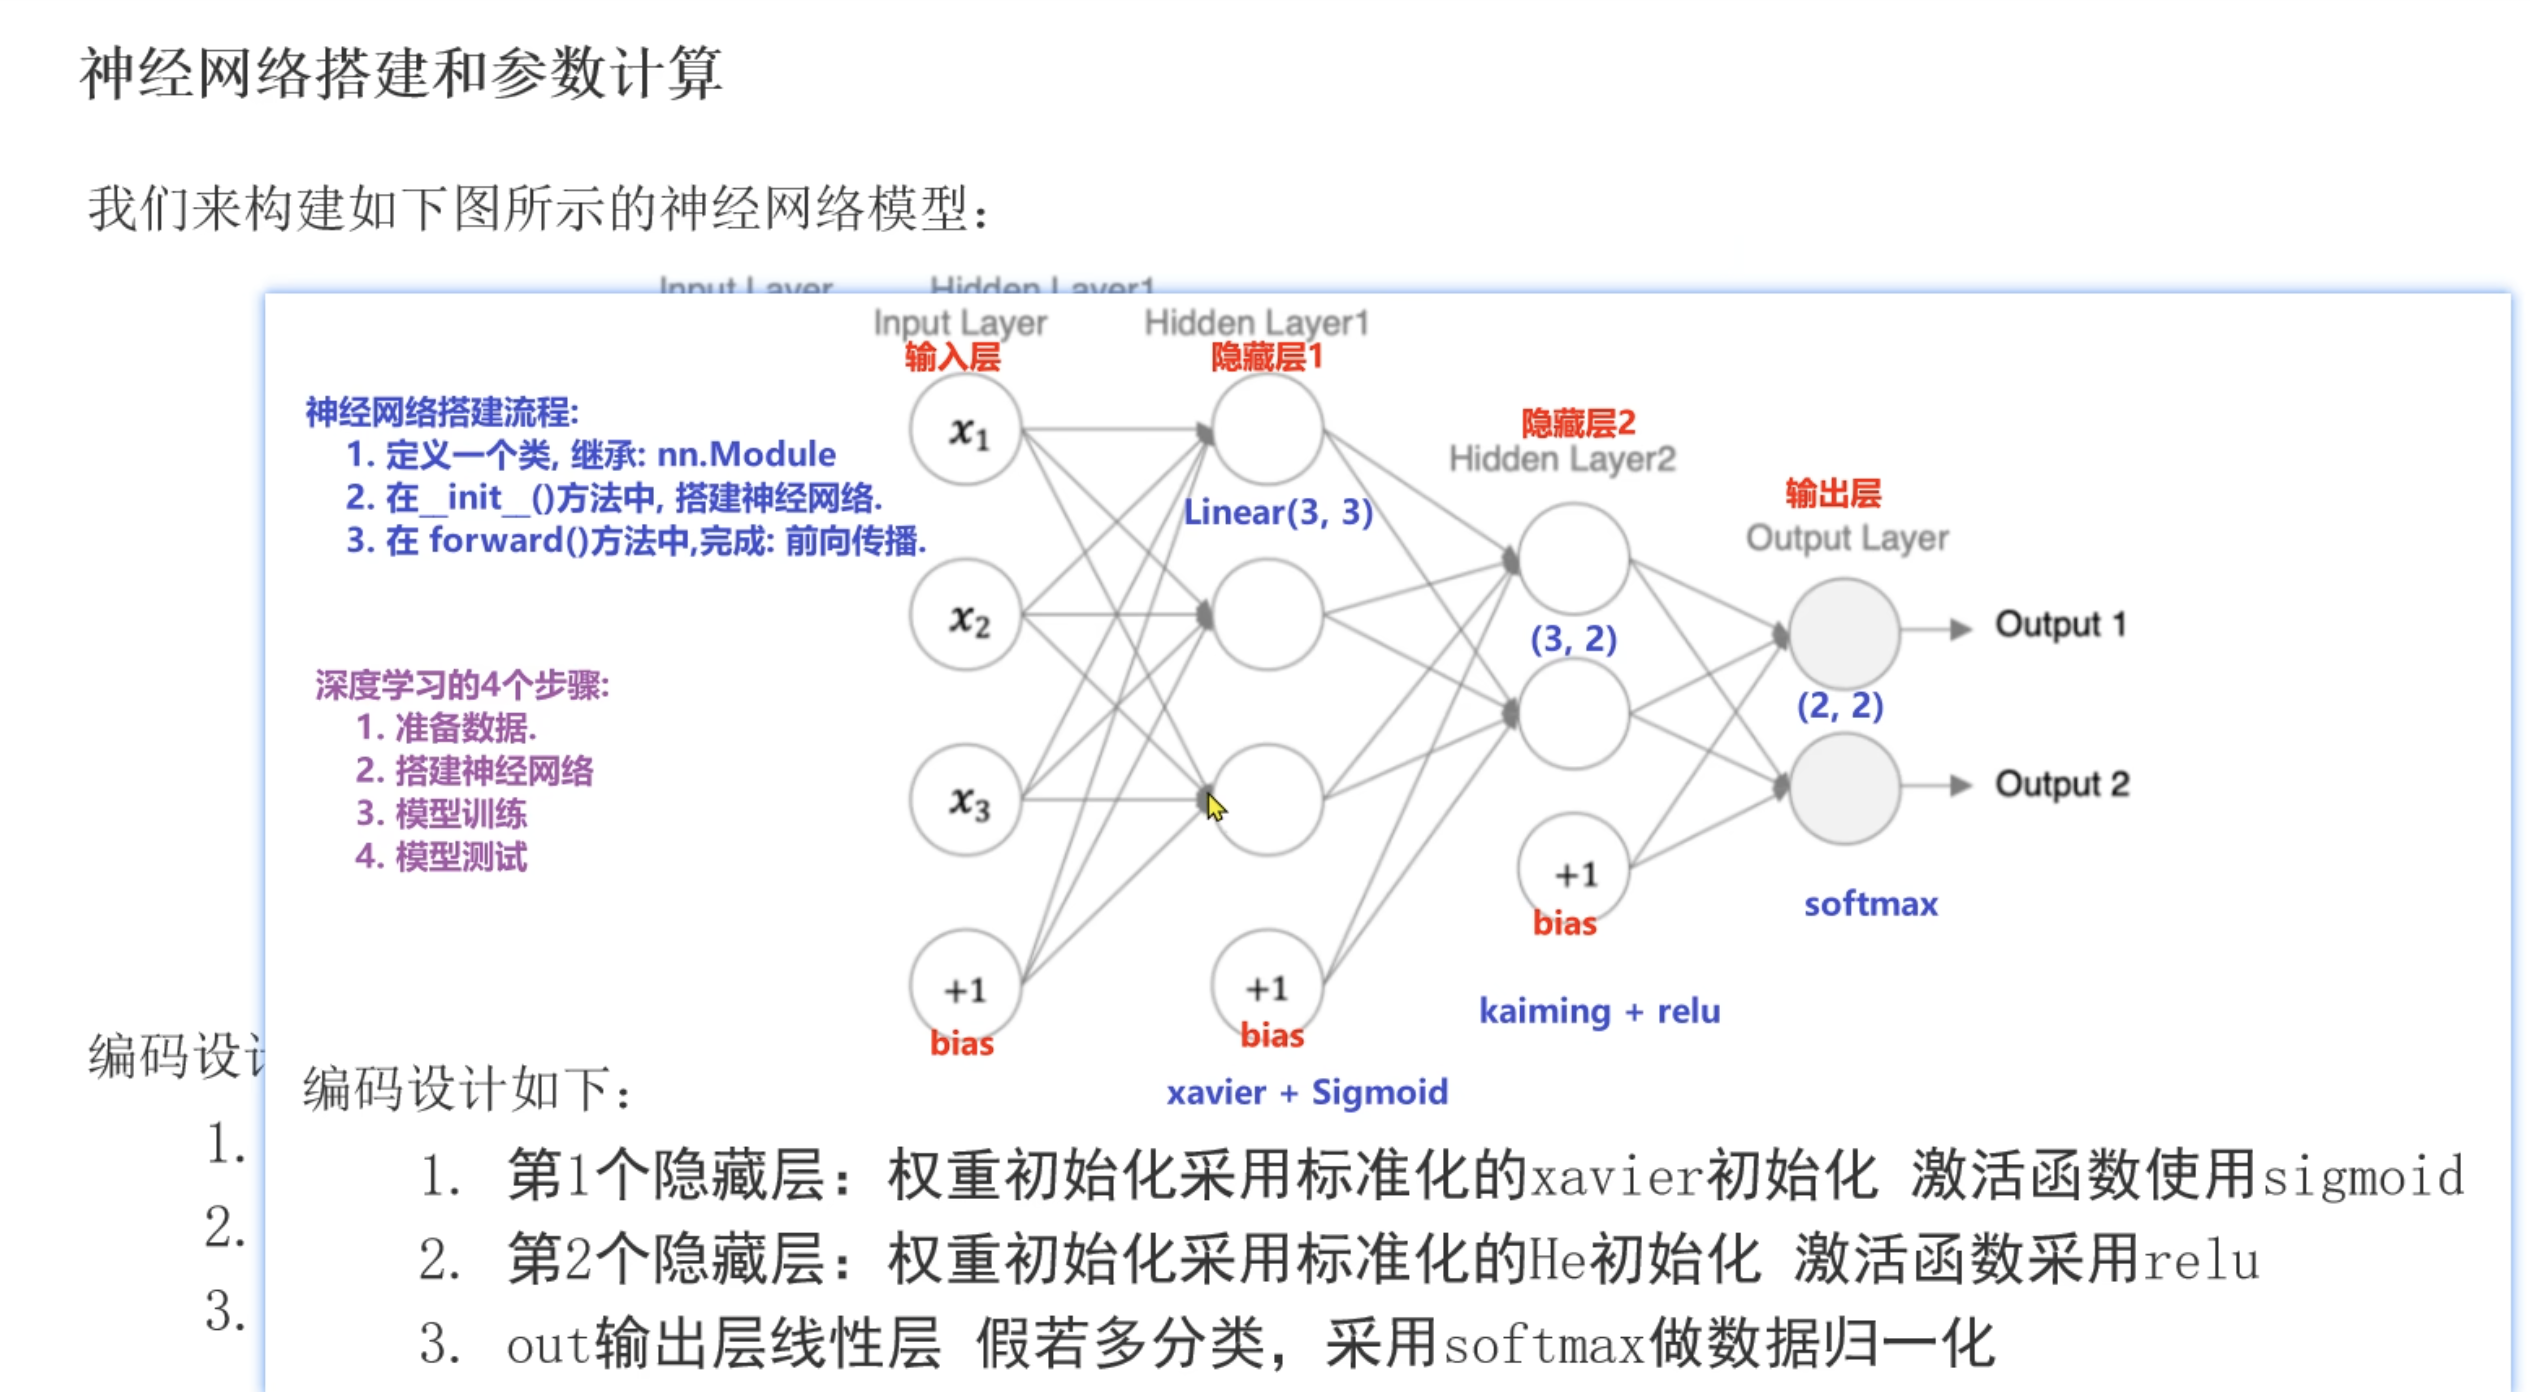
详细流程
- 定义类,继承nn.Module
- 实现方法__init__(self)
- 实现方法forward(self, x)
实现方法__init__(self)3步
- 定义隐藏层1,2
- 定义输出层
- 初始化隐藏层1和2的权重w和偏执b
实现方法forward(self, x)
- 输出层 -> 隐藏层,激活函数
- 隐藏层-> 输出层,激活函数(例如多分类问题)
import torch
import torch.nn as nn
from torchsummary import summary

class ModelDemo(nn.Module):
    def __init__(self):
        # 1.初始化分类
        super().__init__()

        # 2.搭建神经网络(隐藏层 + 输出层)
        self.linear1 = nn.Linear(3,3)
        self.linear2 = nn.Linear(3,2)
        self.output = nn.Linear(2,2)

        # 3.对隐藏层进行初始化
        # 隐藏层1
        nn.init.xavier_normal_(self.linear1.weight)
        nn.init.zeros_(self.linear1.bias)

        # 隐藏层2
        nn.init.kaiming_normal_(self.linear2.weight)
        nn.init.zeros_(self.linear2.bias)

    # 前向传播: 输入层->隐藏层->输出层
    def forward(self,x):

        # 输出层-> 隐藏层1
        x = torch.sigmoid(self.linear1(x))
        # 隐藏层1-> 隐藏层2
        x = torch.relu(self.linear2(x))
        # 隐藏层2-> 输出层(多分类,-1表示所有层)
        torch.softmax(self.output(x), dim=-1)

        # 返回预测值
        return x
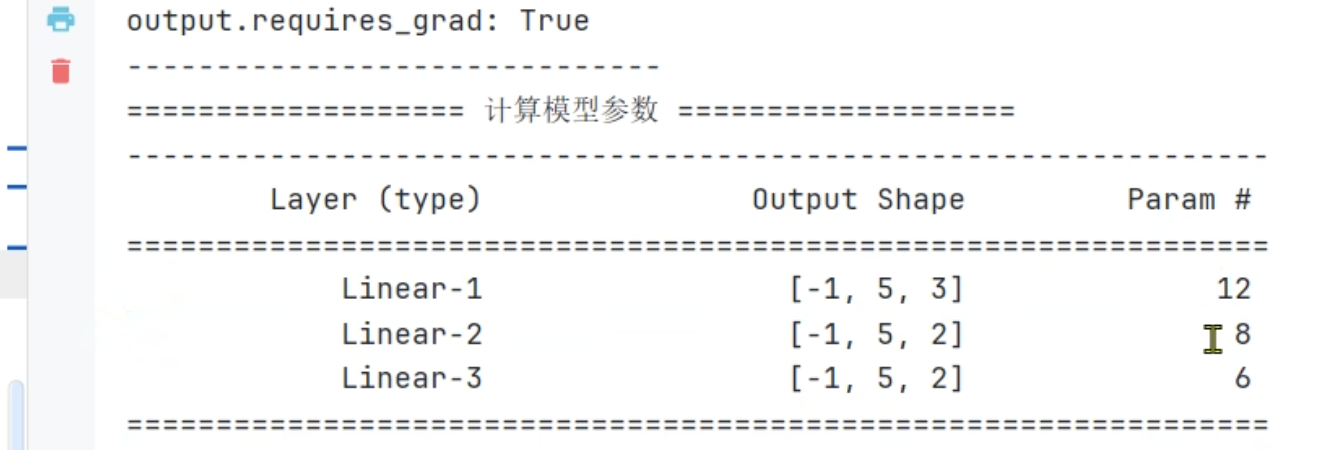
测试代码
- -1表示维度步确定,就是不知道多少行
- 12 这种就是参数个数,第一次就是3个x输入 + b,就是4,然后*3就是12
import torch
import torch.nn as nn
from torchsummary import summary

torch.manual_seed(3)

class ModelDemo(nn.Module):
    def __init__(self):
        # 1.初始化分类
        super().__init__()

        # 2.搭建神经网络(隐藏层 + 输出层)
        self.linear1 = nn.Linear(3,3)
        self.linear2 = nn.Linear(3,2)
        self.output = nn.Linear(2,2)

        # 3.对隐藏层进行初始化
        # 隐藏层1
        nn.init.xavier_normal_(self.linear1.weight)
        nn.init.zeros_(self.linear1.bias)

        # 隐藏层2
        nn.init.kaiming_normal_(self.linear2.weight)
        nn.init.zeros_(self.linear2.bias)

    # 前向传播: 输入层->隐藏层->输出层
    def forward(self,x):

        # 输出层-> 隐藏层1
        x = torch.sigmoid(self.linear1(x))
        # 隐藏层1-> 隐藏层2
        x = torch.relu(self.linear2(x))
        # 隐藏层2-> 输出层(多分类,-1表示所有层)
        torch.softmax(self.output(x), dim=-1)

        # 返回预测值
        return x


def train():
    # 1.准备数据
    data = torch.randn((5, 3))

    # 2.实例化模型
    model = ModelDemo()

    print(f'data: \n {data}')
    print(f'data.shape: {data.shape}')
    print(f'data.requires_grad: {data.requires_grad}')
    print('_' * 30)

    # 模型训练
    output = model(data)
    print(f'output: \n {output}')
    print(f'output.shape: {output.shape}')
    print(f'output.requires_grad: {output.requires_grad}')
    print('_' * 30)

    # 计算模型参数
    summary(model, input_size=(5,3))

    # 查看模型参数
    for name,params in model.named_parameters():
        print(f'name: {name}')
        print(f'params: {params} \n')


if __name__ == '__main__':
    train()
测试结果
D:\software\python.exe -X pycache_prefix=C:\Users\HONOR\AppData\Local\JetBrains\PyCharm2025.2\cpython-cache "D:/software/PyCharm 2025.2.4/plugins/python-ce/helpers/pydev/pydevd.py" --multiprocess --qt-support=auto --client 127.0.0.1 --port 64993 --file C:\Users\HONOR\Desktop\python\test19_ann.py
Connected to: <socket.socket fd=732, family=2, type=1, proto=0, laddr=('127.0.0.1', 64994), raddr=('127.0.0.1', 64993)>.
Connected to pydev debugger (build 252.27397.106)
data:
 tensor([[-0.5476, -0.4316, -1.8606],
        [ 0.0891,  0.0239,  0.4344],
        [ 0.3065,  0.4097, -0.4925],
        [-1.1113,  0.3011,  1.0780],
        [-0.6688, -0.7703,  0.6403]])
data.shape: torch.Size([5, 3])
data.requires_grad: False
______________________________
output:
 tensor([[0.2926, 0.1855],
        [0.3592, 0.1156],
        [0.4751, 0.0000],
        [0.2121, 0.4242],
        [0.1505, 0.3645]], grad_fn=<ReluBackward0>)
output.shape: torch.Size([5, 2])
output.requires_grad: True
______________________________
----------------------------------------------------------------
        Layer (type)               Output Shape         Param #
================================================================
            Linear-1                 [-1, 5, 3]              12
            Linear-2                 [-1, 5, 2]               8
            Linear-3                 [-1, 5, 2]               6
================================================================
Total params: 26
Trainable params: 26
Non-trainable params: 0
----------------------------------------------------------------
Input size (MB): 0.00
Forward/backward pass size (MB): 0.00
Params size (MB): 0.00
Estimated Total Size (MB): 0.00
----------------------------------------------------------------
name: linear1.weight
params: Parameter containing:
tensor([[-0.8352,  1.2810,  0.2436],
        [ 0.1483, -1.3781, -0.2914],
        [ 0.5906,  0.6076, -0.1757]], requires_grad=True)

name: linear1.bias
params: Parameter containing:
tensor([0., 0., 0.], requires_grad=True)

name: linear2.weight
params: Parameter containing:
tensor([[-0.0747, -0.0836,  0.8769],
        [ 0.7491,  0.4407, -0.9541]], requires_grad=True)

name: linear2.bias
params: Parameter containing:
tensor([0., 0.], requires_grad=True)

name: output.weight
params: Parameter containing:
tensor([[ 0.2097, -0.4034],
        [ 0.6354, -0.6900]], requires_grad=True)

name: output.bias
params: Parameter containing:
tensor([-0.4513, -0.4416], requires_grad=True)


Process finished with exit code 0
 神经网络搭建四步法


 1254
1254

 被折叠的 条评论
为什么被折叠?
被折叠的 条评论
为什么被折叠?
 到【灌水乐园】发言


