


引用于:https://blog.youkuaiyun.com/blog_jihq/article/details/50615284
简介
在iOS的应用程序中经常可以看到绚丽的动画效果,实现这些动画的过程并不复杂,本文中就从一下几个方面了解IOS动画的细节,分别是如何通过核心动画创建基础动画、关键帧动画、动画组、转场动画,以及如何通过UIView的封装方法对这些动画操作进行简化等。本文的主要内容包括有:
- CAlayer
1. CALayer的简介
2. CALayer的常用属性
3. CALayer绘图的两种方式 - Core Animation(核心动画)
1. 基础动画(平移、缩放、旋转)
2. 关键帧动画
3. 组动画
4. 转场动画 - UIView动画的封装
1. 基础动画
2. 关键帧动画
3. 转场动画
CALayer
CALayer简介
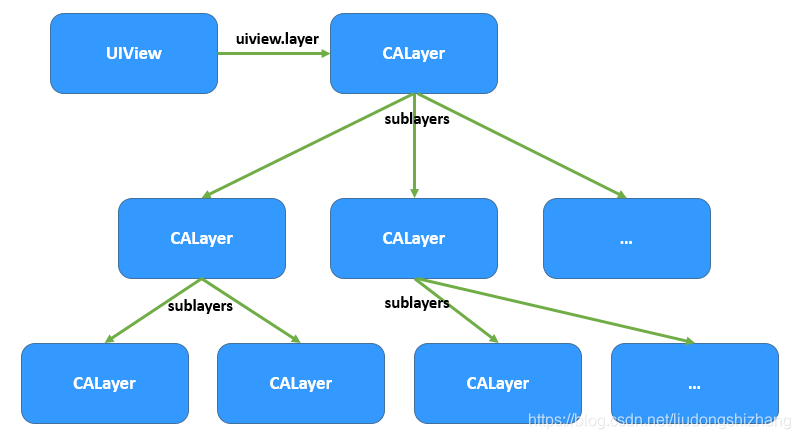
在介绍动画操作之前我们必须先来了解一个动画中常用的对象CALayer。CALayer包含在QuartzCore框架中,这是一个跨平台的框架,既可以用在iOS中又可以用在Mac OS X中。在使用Core Animation开发动画的本质就是将CALayer中的内容转化为位图从而供硬件操作,所以要熟练掌握动画操作必须先来熟悉CALayer。下图描绘了CALayer和UIView的关系,在UIView中有一个layer属性作为根图层,根图层上可以放其他子图层,在UIView中所有能够看到的内容都包含在layer中:
CALayer的常用属性
在iOS中CALayer的设计主要是了为了内容展示和动画操作,CALayer本身并不包含在UIKit中,它不能响应事件。由于CALayer在设计之初就考虑它的动画操作功能,CALayer很多属性在修改时都能形成动画效果,这种属性称为“隐式动画属性”。但是对于UIView的根图层而言属性的修改并不形成动画效果,因为很多情况下根图层更多的充当容器的做用,如果它的属性变动形成动画效果会直接影响子图层。另外,UIView的根图层创建工作完全由iOS负责完成,无法重新创建,但是可以往根图层中添加子图层或移除子图层。下表中列出了CALayer的常用属性:
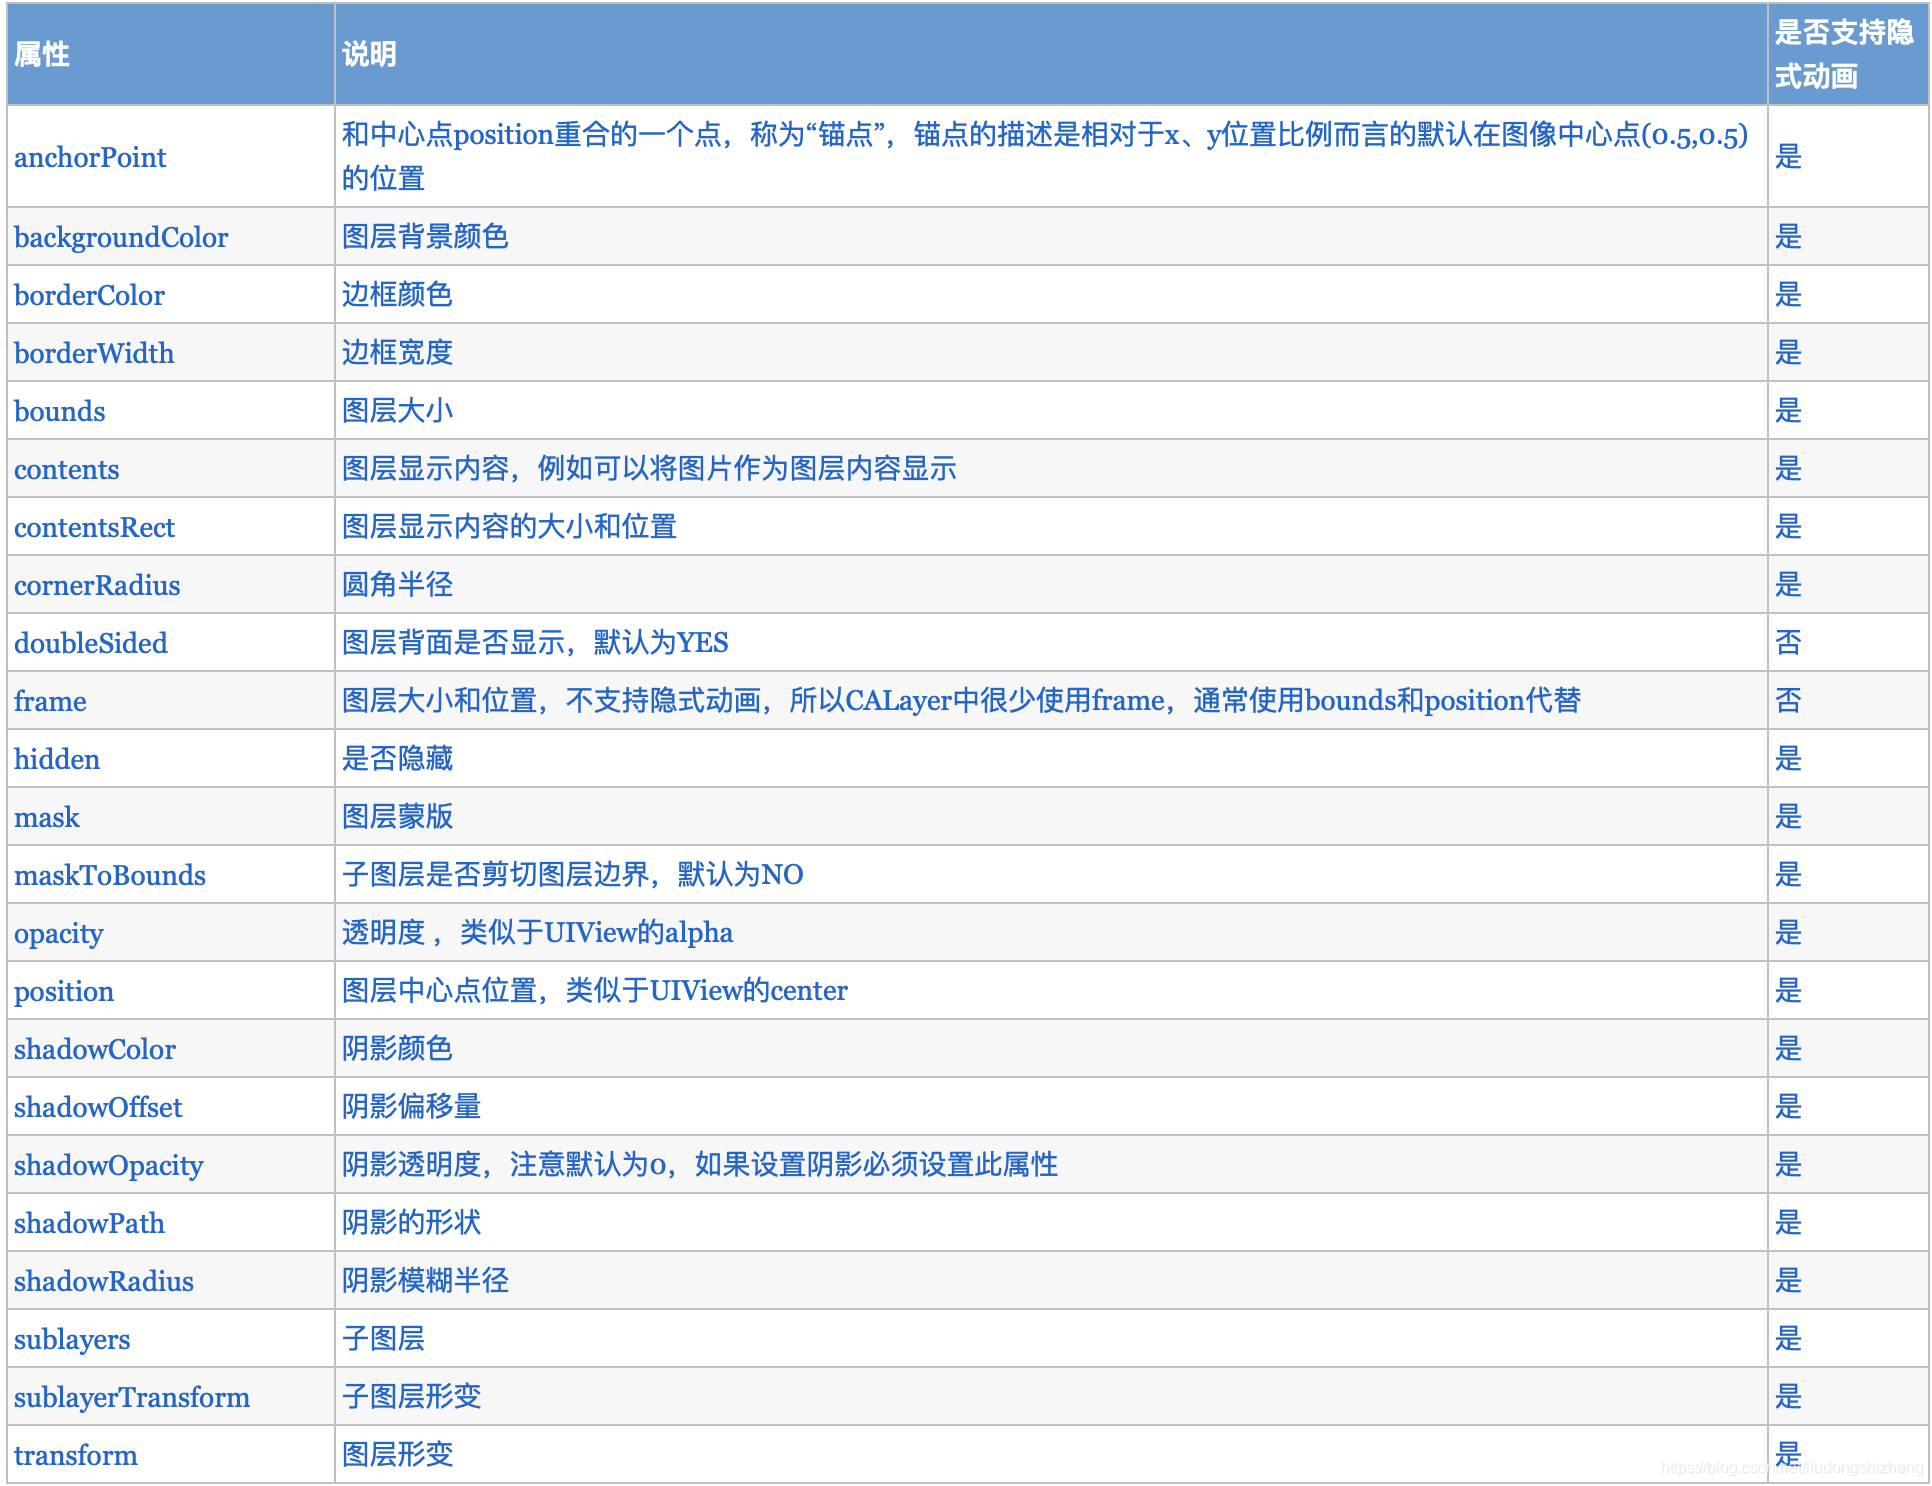
需要注意地是:
- 隐式属性动画的本质是这些属性的变动默认隐含了CABasicAnimation动画实现,详情大家可以参照Xcode帮助文档中“Animatable Properties”一节。
- 在CALayer中很少使用frame属性,因为frame本身不支持动画效果,通常使用bounds和position代替。
- CALayer中透明度使用opacity表示而不是alpha;中心点使用position表示而不是center。
- anchorPoint属性是图层的锚点,范围在(0~1, 0 ~ 1)表示在x、y轴的比例,这个点永远可以同position(中心点)重合,当图层中心点固定后,调整anchorPoint即可达到调整图层显示位置的作用(因为它永远和position重合)。默认锚点为(0.5,0.5)。
为了进一步说明anchorPoint的作用,假设有一个层大小100*100,现在中心点位置(50,50),由此可以得出frame(0,0,100,100)。上面说过anchorPoint默认为(0.5,0.5),同中心点position重合,此时使用图形描述如图1;当修改anchorPoint为(0,0),此时锚点处于图层左上角,但是中心点poition并不会改变,因此图层会向右下角移动,如图2;然后修改anchorPoint为(1,1,),position还是保持位置不变,锚点处于图层右下角,此时图层如图3。 下面通过一个简单的例子演示一下上面几个属性,程序初始化阶段我们定义一个正方形,但是圆角路径调整为正方形边长的一般,使其看起来是一个圆形,在点击屏幕的时候修改图层的属性形成动画效果(注意在程序中没有直接修改UIView的layer属性,因为根图层无法形成动画效果):
自定义一个View
   //
//  CALayerView.m
//  IOS隐式动画
//
//  Created by liuwenbo on 2021/5/17.
//

#import "CALayerView.h"
#import "KCLayer.h"
#define WIDTH 100

@implementation CALayerView

- (instancetype)initWithFrame:(CGRect)frame {
    if (self = [super initWithFrame:frame]) {
        [self drawMylayer];
    }
    return self;
}

#pragma mark 改变属性时形成动画效果
- (void)drawMylayer {
//    CGSize screenSize = [UIScreen mainScreen].bounds.size;
    CGSize screenSize  = self.frame.size;
    // 获得跟图层
    CALayer *layer = [[CALayer alloc] init];
    // 设置背景颜色 由于QuartzCore是跨平台框架,无法直接使用UIColor
    layer.backgroundColor = [UIColor colorWithRed:0 green:146/255.0 blue:1.0 alpha:1.0].CGColor;
    // 设置中心点
    layer.position = CGPointMake(screenSize.width / 2, screenSize.height / 2);
    // 设置大小
    layer.bounds = CGRectMake(0, 0, WIDTH, WIDTH);
    // 设置圆角大小
    layer.cornerRadius = WIDTH / 2;
    // 设置阴影
    layer.shadowColor = [UIColor grayColor].CGColor; //阴影颜色
    layer.shadowOffset=CGSizeMake(2, 2); //阴影偏移量
    layer.shadowOpacity = 0.9; //阴影透明度
    // 设置锚点 锚点始终与view的position保持一致 默认为(0.5,0.5)
    // layer.anchorPoint = CGPointMake(0, 0);
    [self.layer addSublayer:layer];
}
// 点击放大
- (void)touchesBegan:(NSSet<UITouch *> *)touches withEvent:(UIEvent *)event {
    UITouch *touch = [touches anyObject];
    CALayer *layer = self.layer.sublayers[0];
    CGFloat width = layer.bounds.size.width;
    if (width == WIDTH) {
        width = WIDTH * 4;
    }else {
        width = WIDTH;
    }
    layer.bounds = CGRectMake(0, 0, width, width);
    layer.position = [touch locationInView:self];
    layer.cornerRadius = width/2;
}
CALayer绘图的两种方式
图层绘图有两种方法,不管使用哪种方法绘制完必须调用图层的setNeedDisplay方法(注意是图层的方法,不是UIView的方法,前面我们介绍过UIView也有此方法)
- 通过图层代理drawLayer: inContext:方法绘制
- 通过自定义图层drawInContext:方法绘制
使用代理方法绘图
通过代理方法进行图层绘图只要指定图层的代理,然后在代理对象中重写-(void)drawLayer:(CALayer *)layer inContext:(CGContextRef)ctx方法即可。需要注意这个方法虽然是代理方法但是不用手动实现CALayerDelegate,因为CALayer定义中给NSObject做了分类扩展,所有的NSObject都包含这个方法。另外设置完代理后必须要调用图层的setNeedDisplay方法,否则绘制的内容无法显示。
下面的代码演示了在一个自定义图层绘制一张图像并将图像设置成圆形:
#pragma mark 使用代理方法绘图
- (void)useDelegateDrawLayer {
    // 自定义图层
    CALayer *layer = [[CALayer alloc] init];
    layer.bounds = CGRectMake(0, 0, PHOTO_HEIGHT, PHOTO_HEIGHT);
    layer.position = CGPointMake(160, 200);
    layer.backgroundColor = [UIColor redColor].CGColor;
    layer.cornerRadius = PHOTO_HEIGHT / 2;
    // 注意仅仅设置圆角,对于图形而言可以正常显示,但是对于图层中绘制的图片无法正确显示
    // 如果想要正确显示则必须设置masksToBounds=YES,剪切子图层
    layer.masksToBounds = YES;
    // 阴影效果无法和masksToBounds同时使用,因为masksToBounds的目的就是剪切外边框,而阴影效果刚好在外边框
    // layer.shadowColor=[UIColor grayColor].CGColor;
    // layer.shadowOffset=CGSizeMake(2, 2);
    // layer.shadowOpacity=1;
    // 设置边框
    layer.borderColor = [UIColor redColor].CGColor;
    layer.borderWidth = 2;

    // 设置图层代理
    layer.delegate = self;
    // 添加图层到跟图层
    [self.view.layer addSublayer:layer];
    // 调用图层setNeedDisplay,否则代理方法不会被调用
    [layer setNeedsDisplay];
}
// 绘制图层、图像到图层,注意参数中的ctx是图层的图形上下文,其中绘图位置也是相对图层而言的
- (void)drawLayer:(CALayer *)layer inContext:(CGContextRef)ctx {
    CGContextSaveGState(ctx);
    // 图形上下文形变,解决图片倒立的问题 方法1
    // CGContextScaleCTM(ctx, 1, -1);
    // CGContextTranslateCTM(ctx, 0, -PHOTO_HEIGHT);
    // 方法2 利用图层形变解决图像倒立问题 图层绕 x 轴旋转 M_PI
     layer.transform = CATransform3DMakeRotation(M_PI, 1, 0, 0);
    UIImage *image = [UIImage imageNamed:@"photo.jpg"];
    // 注意这个位置是相对于图层而言的不是屏幕
    CGContextDrawImage(ctx, CGRectMake(0, 0, PHOTO_HEIGHT, PHOTO_HEIGHT), image.CGImage);
    CGContextRestoreGState(ctx);
}
效果如下:
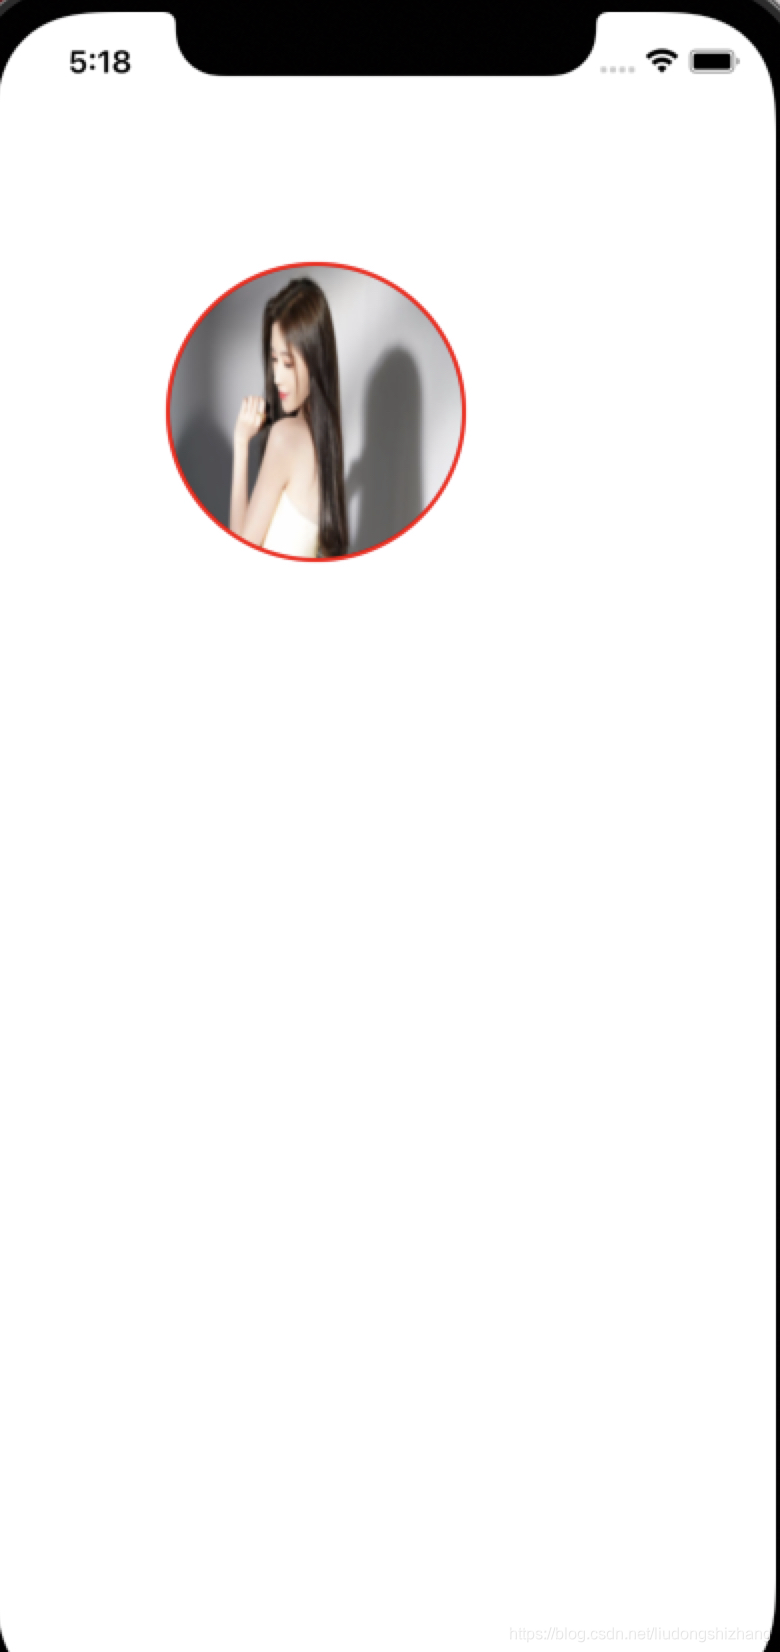
使用代理方法绘制图形、图像时在**drawLayer:inContext:**方法中可以通过事件参数获得绘制的图层和图形上下文。在这个方法中绘图时所有的位置都是相对于图层而言的,图形上下文指的也是当前图层的图形上下文。
需要注意的是上面代码中绘制图片圆形裁切效果时如果不设置masksToBounds是无法显示圆形,但是对于其他图形却没有这个限制。原因就是当绘制一张图片到图层上的时候会重新创建一个图层添加到当前图层,这样一来如果设置了圆角之后虽然底图层有圆角效果,但是子图层还是矩形,只有设置了masksToBounds为YES让子图层按底图层剪切才能显示圆角效果。同样的,有些朋友经常在网上提问说为什么使用UIImageView的layer设置圆角后图片无法显示圆角,只有设置masksToBounds才能出现效果,也是类似的问题。
使用自定义图层绘图
在自定义图层中绘图时只要自己编写一个类继承于CALayer然后在drawInContext:中绘图即可。同前面在代理方法绘图一样,要显示图层中绘制的内容也要调用图层的setNeedDisplay方法,否则drawInContext方法将不会调用。
前面的文章中曾经说过,在使用Quartz 2D在UIView中绘制图形的本质也是绘制到图层中,为了说明这个问题下面演示自定义图层绘图时没有直接在视图控制器中调用自定义图层,而是在一个UIView将自定义图层添加到UIView的根图层中(例子中的UIView跟自定义图层绘图没有直接关系)。从下面的代码中可以看到:UIView在显示时其根图层会自动创建一个CGContextRef(CALayer本质使用的是位图上下文),同时调用图层代理(UIView创建图层会自动设置图层代理为其自身)的draw: inContext:方法并将图形上下文作为参数传递给这个方法。而在UIView的draw:inContext:方法中会调用其drawRect:方法,在drawRect:方法中使用UIGraphicsGetCurrentContext()方法得到的上下文正是前面创建的上下文。
自定义Layer:
//
//  KCLayer.m
//  IOS隐式动画
//
//  Created by liuwenbo on 2021/5/17.
//

#import "KCLayer.h"

@implementation KCLayer
- (void)drawInContext:(CGContextRef)ctx {
    NSLog(@"3-drawInContext:");
    NSLog(@"CGContext:%@",ctx);
//    CGContextRotateCTM(ctx, M_PI_4);
    CGContextSetRGBFillColor(ctx, 135.0/255.0, 232.0/255.0, 84.0/255.0, 1);
    CGContextSetRGBStrokeColor(ctx, 135.0/255.0, 232.0/255.0, 84.0/255.0, 1);
//    CGContextFillRect(ctx, CGRectMake(0, 0, 100, 100));
//    CGContextFillEllipseInRect(ctx, CGRectMake(50, 50, 100, 100));
    CGContextMoveToPoint(ctx, 94.5, 33.5);

//     Star Drawing
    CGContextAddLineToPoint(ctx,104.02, 47.39);
    CGContextAddLineToPoint(ctx,120.18, 52.16);
    CGContextAddLineToPoint(ctx,109.91, 65.51);
    CGContextAddLineToPoint(ctx,110.37, 82.34);
    CGContextAddLineToPoint(ctx,94.5, 76.7);
    CGContextAddLineToPoint(ctx,78.63, 82.34);
    CGContextAddLineToPoint(ctx,79.09, 65.51);
    CGContextAddLineToPoint(ctx,68.82, 52.16);
    CGContextAddLineToPoint(ctx,84.98, 47.39);
    CGContextClosePath(ctx);


    CGContextDrawPath(ctx, kCGPathFillStroke);
}
@end
在View中创建layer并添加到子layer中:
- (instancetype)initWithFrame:(CGRect)frame {
    if (self = [super initWithFrame:frame]) {
        [self draw];
    }
    return self;
}

#pragma mark 自定义图层绘图
- (void)draw {
    KCLayer *layer=[[KCLayer alloc]init];
    layer.bounds=CGRectMake(0, 0, 185, 185);
    layer.position=CGPointMake(160,284);
    layer.backgroundColor=[UIColor colorWithRed:0 green:146/255.0 blue:1.0 alpha:1.0].CGColor;
    //显示图层
    [layer setNeedsDisplay];
    [self.layer addSublayer:layer];
}
效果如下:

Core Animation
大家都知道在iOS中实现一个动画相当简单,只要调用UIView的块代码即可实现一个动画效果,这在其他系统开发中基本不可能实现。下面通过一个简单的UIView进行一个图片放大动画效果演示:
//
//  KCMainViewController.m
//  Animation
//
//  Created by Kenshin Cui on 14-3-22.
//  Copyright (c) 2014年 Kenshin Cui. All rights reserved.
//

#import "KCMainViewController.h"

@interface KCMainViewController ()

@end

@implementation KCMainViewController

- (void)viewDidLoad {
    [super viewDidLoad];

    UIImage *image=[UIImage imageNamed:@"open2.png"];
    UIImageView *imageView=[[UIImageView alloc]init];
    imageView.image=image;
    imageView.frame=CGRectMake(120, 140, 80, 80);
    [self.view addSubview:imageView];

    //两秒后开始一个持续一分钟的动画
    [UIView animateWithDuration:1 delay:2 options:UIViewAnimationOptionBeginFromCurrentState animations:^{
        imageView.frame=CGRectMake(80, 100, 160, 160);
    } completion:nil];
}
@end
使用上面UIView封装的方法进行动画设置固然十分方便,但是具体动画如何实现我们是不清楚的,而且上面的代码还有一些问题是无法解决的,例如:如何控制动画的暂停?如何进行动画的组合?。。。
这里就需要了解iOS的核心动画Core Animation(包含在Quartz Core框架中)。在iOS中核心动画分为几类:基础动画、关键帧动画、动画组、转场动画。各个类的关系大致如下:
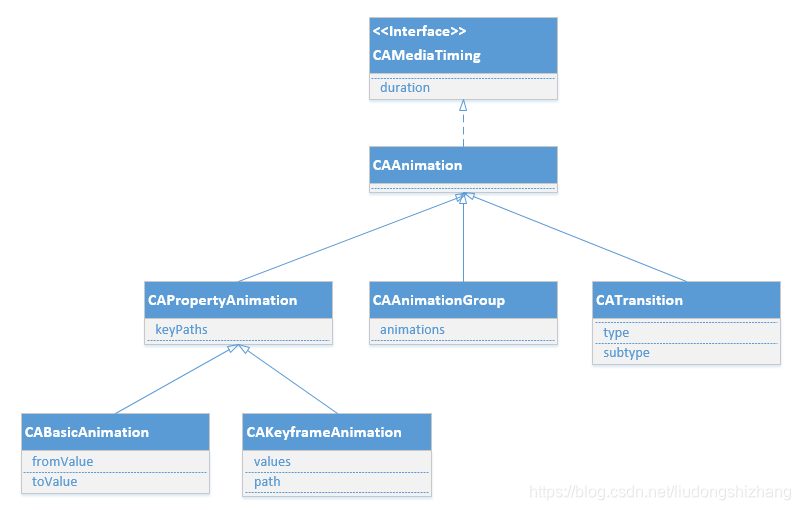
CAAnimation:核心动画的基础类,不能直接使用,负责动画运行时间、速度的控制,本身实现了CAMediaTiming协议。
CAPropertyAnimation:属性动画的基类(通过属性进行动画设置,注意是可动画属性),不能直接使用。
CAAnimationGroup:动画组,动画组是一种组合模式设计,可以通过动画组来进行所有动画行为的统一控制,组中所有动画效果可以并发执行。
CATransition:转场动画,主要通过滤镜进行动画效果设置。
CABasicAnimation:基础动画,通过属性修改进行动画参数控制,只有初始状态和结束状态。
CAKeyframeAnimation:关键帧动画,同样是通过属性进行动画参数控制,但是同基础动画不同的是它可以有多个状态控制。
基础动画、关键帧动画都属于属性动画,就是通过修改属性值产生动画效果,开发人员只需要设置初始值和结束值,中间的过程动画(又叫“补间动画”)由系统自动计算产生。和基础动画不同的是关键帧动画可以设置多个属性值,每两个属性中间的补间动画由系统自动完成,因此从这个角度而言基础动画又可以看成是有两个关键帧的关键帧动画。
基础动画
在开发过程中很多情况下通过基础动画就可以满足开发需求,前面例子中使用的UIView代码块进行图像放大缩小的演示动画也是基础动画(在iOS7中UIView也对关键帧动画进行了封装),只是UIView装饰方法隐藏了更多的细节。如果不使用UIView封装的方法,动画创建一般分为以下几步:
- 初始化动画并设置动画属性
- 设置动画属性初始值(可以省略)、结束值以及其他动画属性
- 给图层添加动画
基础动画的keyPath:
transform.rotation.x 围绕x轴翻转 参数:角度 angle2Radian(4)
transform.rotation.y 围绕y轴翻转 参数:同上
transform.rotation.z 围绕z轴翻转 参数:同上
transform.rotation 默认围绕z轴
transform.scale.x x方向缩放 参数:缩放比例 1.5
transform.scale.y y方向缩放 参数:同上
transform.scale.z z方向缩放 参数:同上
transform.scale 所有方向缩放 参数:同上
transform.translation.x x方向移动 参数:x轴上的坐标 100
transform.translation.y x方向移动 参数:y轴上的坐标
transform.translation.z x方向移动 参数:z轴上的坐标
transform.translation 移动 参数:移动到的点 (100,100)
opacity 透明度 参数:透明度 0.5
backgroundColor 背景颜色 参数:颜色 (id)[[UIColor redColor] CGColor]
cornerRadius 圆角 参数:圆角半径 5
borderWidth 边框宽度 参数:边框宽度 5
bounds 大小 参数:CGRect
contents 内容 参数:CGImage
contentsRect 可视内容 参数:CGRect 值是0~1之间的小数
hidden 是否隐藏
position
shadowColor
shadowOffset
shadowOpacity
shadowRadius
//
//  CALayerView.m
//  IOS隐式动画
//
//  Created by liuwenbo on 2021/5/17.
//

#import "CALayerView.h"
#import "KCLayer.h"
#define WIDTH 100
#define PHOTO_HEIGHT 150
#define DURATIONTIME 5
@interface CALayerView () <CAAnimationDelegate>
@property(nonatomic, strong) CALayer *mylayer;
@property(nonatomic, assign) CGPoint prePoint;
@property(nonatomic, assign) CGFloat scale;

@end

@implementation CALayerView

- (instancetype)initWithFrame:(CGRect)frame {
    if (self = [super initWithFrame:frame]) {
        [self basicAnimation];
    }
    return self;
}

- (CALayer *)mylayer {
    if (!_mylayer) {
        CALayer *layer = [CALayer layer];
        layer.bounds = CGRectMake(0, 0, 50, 50);
        layer.backgroundColor = [UIColor yellowColor].CGColor;
        layer.position = CGPointMake(50, 50);
        layer.cornerRadius = 20;
        _mylayer = layer;
    }
    return _mylayer;
}

#pragma mark 核心动画之基础动画
- (void)basicAnimation {
    self.scale = 2;
    [self.layer addSublayer:self.mylayer];
}

#pragma mark 动画暂停
-(void)animationPause{
    //取得指定图层动画的媒体时间,后面参数用于指定子图层,这里不需要
    CFTimeInterval interval=[_mylayer convertTime:CACurrentMediaTime() fromLayer:nil];
    //设置时间偏移量,保证暂停时停留在旋转的位置
    [_mylayer setTimeOffset:interval];
    //速度设置为0,暂停动画
    _mylayer.speed = 0;
}

#pragma mark 动画恢复
-(void)animationResume{
    //获得暂停的时间
    CFTimeInterval beginTime= CACurrentMediaTime()- _mylayer.timeOffset;
    //设置偏移量
    _mylayer.timeOffset = 0;
    //设置开始时间
    _mylayer.beginTime = beginTime;
    //设置动画速度,开始运动
    _mylayer.speed = 1.0;
}

- (void)touchesBegan:(NSSet<UITouch *> *)touches withEvent:(UIEvent *)event {
    UITouch *touch = [touches anyObject];
    CGPoint point = [touch locationInView:self];
    //判断是否已经常见过动画,如果已经创建则不再创建动画
    CAAnimation *animation= [_mylayer animationForKey:@"KCBasicAnimation_Translation"];
    if(animation){
        if (_mylayer.speed == 0) {
            [self animationResume];
        }else{
            [self animationPause];
        }
    }else{
        //创建并开始动画
        [self translationAnimation:point];
        [self rotationAnimation];
        [self scaleAnimation];
    }

//    [self setUserInteractionEnabled:NO];
//    [self translationAnimation:point];
//    [self rotationAnimation];
//    [self scaleAnimation];
    // 与[self setUserInteractionEnabled:NO];配合使用目的是一秒钟只能点击屏幕一次
//    dispatch_after(dispatch_time(DISPATCH_TIME_NOW, (int64_t)(1.0 * NSEC_PER_SEC)), dispatch_get_main_queue(), ^{
//        [self setUserInteractionEnabled:YES];
//    });
}

// 基本动画 移动动画
 - (void)translationAnimation:(CGPoint)point {
    // 创建核心动画
    CABasicAnimation *basicAnima = [CABasicAnimation animation];
    // 执行动画的方式
    basicAnima.keyPath = @"position"; // 表示位置的变化
    // basicAnima.fromValue = [NSValue valueWithCGPoint:self.prePoint];
    basicAnima.toValue = [NSValue valueWithCGPoint:point];
    // 设置动画的执行时间
    basicAnima.duration = DURATIONTIME;
    // 设置动画执行完毕之后不删除动画
    basicAnima.removedOnCompletion = NO;
    // 设置保存动画的最新状态
    basicAnima.fillMode = kCAFillModeForwards;
    // 设置动画的代理
    basicAnima.delegate = self;
    //存储当前位置在动画结束后使用
    [basicAnima setValue:[NSValue valueWithCGPoint:point] forKey:@"KCBasicAnimationLocation"];
    // 添加核心动画到layer
    [self.mylayer addAnimation:basicAnima forKey:@"KCBasicAnimation_Translation"];
}
// 基本动画 旋转动画
 - (void)rotationAnimation {
    CABasicAnimation *basicAnima = [CABasicAnimation animation];
    basicAnima.keyPath = @"transform.rotation.z"; //在z轴上旋转
    basicAnima.duration = DURATIONTIME;
    basicAnima.toValue = [NSNumber numberWithFloat:M_PI_2 * 3];
    // 设置动画执行完毕之后不删除动画
    basicAnima.removedOnCompletion = NO;
    // 设置保存动画的最新状态
    basicAnima.fillMode = kCAFillModeForwards;
//    basicAnima.autoreverses=true;//旋转后在旋转到原来的位置
//    basicAnima.repeatCount=HUGE_VALF;//设置无限循环

    [self.mylayer addAnimation:basicAnima forKey:@"KCBasicAnimation_Rotation"];
}
// 基本动画 缩放动画
 - (void)scaleAnimation {
    CABasicAnimation *basicAnima = [CABasicAnimation animation];
    basicAnima.keyPath = @"transform.scale";
    basicAnima.duration = DURATIONTIME;
    basicAnima.toValue = [NSNumber numberWithFloat:self.scale];
    basicAnima.fillMode = kCAFillModeForwards;
    [self.mylayer addAnimation:basicAnima forKey:@"KCBasicAnimation_Scale"];
}
// 利用代理监听动画的执行 动画开始
 - (void)animationDidStart:(CAAnimation *)anim {
    NSLog(@"开始执行动画");
}
// 监听动画结束
 - (void)animationDidStop:(CAAnimation *)anim finished:(BOOL)flag {
    // 开启事物
    [CATransaction begin];
    // 禁用隐式动画
    [CATransaction setDisableActions:YES];
    _mylayer.position = [[anim valueForKey:@"KCBasicAnimationLocation"] CGPointValue];
    _mylayer.bounds = CGRectMake(0, 0, _mylayer.bounds.size.width * _scale, _mylayer.bounds.size.height * _scale);
    _scale = (_scale == 0.5 ? 2 : 0.5);
    _mylayer.transform = CATransform3DMakeRotation(M_PI_2 * 3, 0, 0, 1);
    [CATransaction commit];
    [_mylayer removeAnimationForKey:@"KCBasicAnimation_Translation"];
}
@end
注意:
- 动画暂停针对的是图层而不是图层中的某个动画。
- 要做无限循环的动画,动画的removedOnCompletion属性必须设置为NO,否则运行一次动画就会销毁。
由于旋转动画会无限循环执行(上面设置了重复次数无穷大),并且两个动画的执行时间没有必然的关系,这样一来移动停止后可能还在旋转,为了让移动动画停止后旋转动画停止就需要使用到动画的暂停和恢复方法。
核心动画的运行有一个媒体时间的概念,假设将一个旋转动画设置旋转一周用时60秒的话,那么当动画旋转90度后媒体时间就是15秒。如果此时要将动画暂停只需要让媒体时间偏移量设置为15秒即可,并把动画运行速度设置为0使其停止运动。类似的,如果又过了60秒后需要恢复动画(此时媒体时间为75秒),这时只要将动画开始开始时间设置为当前媒体时间75秒减去暂停时的时间(也就是之前定格动画时的偏移量)15秒(开始时间=75-15=60秒),那么动画就会重新计算60秒后的状态再开始运行,与此同时将偏移量重新设置为0并且把运行速度设置1。这个过程中真正起到暂停动画和恢复动画的其实是动画速度的调整,媒体时间偏移量以及恢复时的开始时间设置主要为了让动画更加连贯。
关键帧动画
关键帧动画就是在动画控制过程中开发者指定主要的动画状态,至于各个状态间动画如何进行则由系统自动运算补充(每两个关键帧之间系统形成的动画称为“补间动画”),这种动画的好处就是开发者不用逐个控制每个动画帧,而只要关心几个关键帧的状态即可。
关键帧动画开发分为两种形式:一种是通过设置不同的属性值进行关键帧控制,另一种是通过绘制路径进行关键帧控制。后者优先级高于前者,如果设置了路径则属性值就不再起作用。
//
//  KeyFrameAnimationLayerView.m
//  IOS隐式动画
//
//  Created by liuwenbo on 2021/5/17.
//

#import "KeyFrameAnimationLayerView.h"
#define DURATION 4.0

@interface KeyFrameAnimationLayerView () <CAAnimationDelegate>

@property(nonatomic, strong)CAKeyframeAnimation *keyAnima;
@property(nonatomic, strong)CALayer *myLayer;
@property(nonatomic, strong)NSArray *keyAnimaArray;

@end

@implementation KeyFrameAnimationLayerView

- (instancetype)initWithFrame:(CGRect)frame {
    if (self = [super initWithFrame:frame]) {
        [self.layer addSublayer:self.myLayer];
    }
    return self;
}

#pragma mark 懒加载
// 关键帧的位置节点
- (NSArray *)keyAnimaArray {
    if (!_keyAnimaArray) {
        // 关键帧
        NSValue *value1 = [NSValue valueWithCGPoint:CGPointMake(100, 100)];
        NSValue *value2 = [NSValue valueWithCGPoint:CGPointMake(350, 100)];
        NSValue *value3 = [NSValue valueWithCGPoint:CGPointMake(350, 350)];
        NSValue *value4 = [NSValue valueWithCGPoint:CGPointMake(100, 350)];
        NSValue *value5 = [NSValue valueWithCGPoint:CGPointMake(100, 100)];
        NSArray *array = [[NSArray alloc] initWithObjects:value1,value2,value3,value4,value5, nil];
        _keyAnimaArray = array;
    }
    return _keyAnimaArray;
}
// 子layer的懒加载
- (CALayer *)myLayer {
    if (!_myLayer) {
        CALayer *layer = [CALayer layer];
        layer.backgroundColor = [UIColor redColor].CGColor;
        layer.position = CGPointMake(100, 100);
        layer.bounds = CGRectMake(0, 0, 100, 100);
        layer.cornerRadius = 20;
        _myLayer = layer;
    }
    return _myLayer;
}
// 创建动画对象
- (CAKeyframeAnimation *)keyAnima {
    if (!_keyAnima) {
        // 创建核心动画
        CAKeyframeAnimation *anima = [[CAKeyframeAnimation alloc] init];
        anima.keyPath = @"position"; //平移关键帧
        // 设置动画执行完毕,不删除动画
        anima.removedOnCompletion = NO;
        // 设置保存动画的最新状态
        anima.fillMode = kCAFillModeForwards;
        // 设置动画执行的时间
        anima.duration = DURATION;
        // anima.repeatCount = 1;
        anima.timingFunction = [CAMediaTimingFunction functionWithName:kCAMediaTimingFunctionEaseInEaseOut];
        // 设置动画执行的位置节点
        // anima.values = self.keyAnimaArray;
        _keyAnima = anima;

    }
    return _keyAnima;
}

#pragma mark 关键帧动画的实现方式
// 关键帧动画 方式1:通过设置位置信息数组实现
- (void)keyValuesFrameAnimation {
    CAAnimation *animation = [_myLayer animationForKey:@"keyFrameAnimationLocation"];
    if (animation) {
        if (_myLayer.speed == 0) {
            [self animationResume];
        }else {
            [self animationPause];
        }
    }else {
        // 设置动画执行的位置节点
        self.keyAnima.values = self.keyAnimaArray;
        self.keyAnima.delegate = self;
        [self.myLayer addAnimation:self.keyAnima forKey:@"keyFrameAnimationLocation"];
    }
}

// 关键帧动画 方式2:通过设置path(贝塞尔曲线) 让layer在指定路径上移动
- (void)keyPathAnimation {
    CAAnimation *animation = [_myLayer animationForKey:@"keyFrameAnimationLocation"];
    if (animation) {
        if (_myLayer.speed == 0) {
            [self animationResume];
        }else {
            [self animationPause];
        }
    }else {
        CGMutablePathRef path=CGPathCreateMutable();
        // 绘制贝塞尔曲线
        CGPathMoveToPoint(path, NULL, _myLayer.position.x, _myLayer.position.y);//移动到起始点
        CGPathAddCurveToPoint(path, NULL, 500, 680, -30, 300, 55, 400);//绘制二次贝塞尔曲线
        self.keyAnima.path=path;
        //有create就一定要有release
        CGPathRelease(path);
        self.keyAnima.delegate = self;
        [self.myLayer addAnimation:self.keyAnima forKey:@"keyFrameAnimationLocation"];
    }
}
- (void)touchesBegan:(NSSet<UITouch *> *)touches withEvent:(UIEvent *)event {
//    [self keyValuesFrameAnimation];
    [self keyPathAnimation];
}

#pragma mark 动画暂停
-(void)animationPause {
    // 取得指定图层动画的媒体时间,后面参数用于指定子图层,这里不需要
    CFTimeInterval interval = [_myLayer convertTime:CACurrentMediaTime() fromLayer:nil];
    // 设置时间偏移量,保证暂停时停留在旋转的位置
    [_myLayer setTimeOffset:interval];
    // 速度设置为0,暂停动画
    _myLayer.speed = 0;
}

#pragma mark 动画恢复
-(void)animationResume {
    // 获得暂停的时间
    CFTimeInterval beginTime = CACurrentMediaTime() - _myLayer.timeOffset;
    // 设置偏移量
    _myLayer.timeOffset = 0;
    // 设置开始时间
    _myLayer.beginTime = beginTime;
    // 设置动画速度,开始运动
    _myLayer.speed = 1.0;
}

#pragma mark 监听动画运行的代理方法
- (void)animationDidStart:(CAAnimation *)anim {
    NSLog(@"动画开始");
}
- (void)animationDidStop:(CAAnimation *)anim finished:(BOOL)flag {
    // 开启事物
    [CATransaction begin];
    // 禁用隐式动画
    [CATransaction setDisableActions:YES];
//    NSValue *value = [self.keyAnimaArray lastObject];
//    self.myLayer.position = value.CGPointValue;
    [CATransaction commit];
    [self.myLayer removeAnimationForKey:@"keyFrameAnimationLocation"];
    NSLog(@"动画结束");
}

@end
补充–其他属性
在关键帧动画中还有一些动画属性初学者往往比较容易混淆,这里专门针对这些属性做一下介绍。
keyTimes:各个关键帧的时间控制。前面使用values设置了四个关键帧,默认情况下每两帧之间的间隔为:8/(4-1)秒。如果想要控制动画从第一帧到第二针占用时间4秒,从第二帧到第三帧时间为2秒,而从第三帧到第四帧时间2秒的话,就可以通过keyTimes进行设置。keyTimes中存储的是时间占用比例点,此时可以设置keyTimes的值为0.0,0.5,0.75,1.0(当然必须转换为NSNumber),也就是说1到2帧运行到总时间的50%,2到3帧运行到总时间的75%,3到4帧运行到8秒结束。
caculationMode:动画计算模式。还拿上面keyValues动画举例,之所以1到2帧能形成连贯性动画而不是直接从第1帧经过8/3秒到第2帧是因为动画模式是连续的(值为kCAAnimationLinear,这是计算模式的默认值);而如果指定了动画模式为kCAAnimationDiscrete离散的那么你会看到动画从第1帧经过8/3秒直接到第2帧,中间没有任何过渡。其他动画模式还有:kCAAnimationPaced(均匀执行,会忽略keyTimes)、kCAAnimationCubic(平滑执行,对于位置变动关键帧动画运行轨迹更平滑)、kCAAnimationCubicPaced(平滑均匀执行)。
组动画
实际开发中一个物体的运动往往是复合运动,单一属性的运动情况比较少,但恰恰属性动画每次进行动画设置时一次只能设置一个属性进行动画控制(不管是基础动画还是关键帧动画都是如此),这样一来要做一个复合运动的动画就必须创建多个属性动画进行组合。对于一两种动画的组合或许处理起来还比较容易,但是对于更多动画的组合控制往往会变得很麻烦,动画组的产生就是基于这样一种情况而产生的。动画组是一系列动画的组合,凡是添加到动画组中的动画都受控于动画组,这样一来各类动画公共的行为就可以统一进行控制而不必单独设置,而且放到动画组中的各个动画可以并发执行,共同构建出复杂的动画效果。
动画组使用起来并不复杂,首先单独创建单个动画(可以是基础动画也可以是关键帧动画),然后将基础动画添加到动画组,最后将动画组添加到图层即可。
//
//  GroupAnimationLayerView.m
//  IOS隐式动画
//
//  Created by liuwenbo on 2021/5/18.
//

#import "GroupAnimationLayerView.h"

@interface GroupAnimationLayerView () <CAAnimationDelegate>
@property(nonatomic, strong)CALayer *myLayer;
@end

@implementation GroupAnimationLayerView

- (instancetype)initWithFrame:(CGRect)frame {
    if (self = [super initWithFrame:frame]) {
        [self.layer addSublayer:self.myLayer];
    }
    return self;
}
// 子layer的懒加载
- (CALayer *)myLayer {
    if (!_myLayer) {
        CALayer *layer = [CALayer layer];
        layer.backgroundColor = [UIColor redColor].CGColor;
//        layer.position = CGPointMake(100, 100);
        layer.bounds = CGRectMake(0, 0, 100, 100);
        layer.cornerRadius = 20;
        _myLayer = layer;
    }
    return _myLayer;
}

- (void)touchesBegan:(NSSet<UITouch *> *)touches withEvent:(UIEvent *)event {
    UITouch *touch = [touches anyObject];
    CGPoint point = [touch locationInView:self];
    // 平移动画
    CABasicAnimation *a1 = [CABasicAnimation animationWithKeyPath:@"position"];
    a1.toValue = [NSValue valueWithCGPoint:point];
    // 缩放动画
    CABasicAnimation *a2 = [CABasicAnimation animationWithKeyPath:@"transform.scale"];
    a2.toValue = @(2.0);
    // 旋转动画
    CABasicAnimation *a3 = [CABasicAnimation animationWithKeyPath:@"transform.rotation.z"];
    a3.toValue = @(M_PI_2 * 3);
    // 组动画
    CAAnimationGroup *groupAnimation = [CAAnimationGroup animation];
    groupAnimation.animations = @[a1,a2,a3];
    // 设置组动画的时间
    groupAnimation.duration = 4.0;
    // 设置动画结束后保持最新状态
    groupAnimation.fillMode = kCAFillModeForwards;
    // 设置运行一次后是否移除动画
    groupAnimation.removedOnCompletion = NO;
    groupAnimation.delegate = self;
    [self.myLayer addAnimation:groupAnimation forKey:nil];
}

#pragma mark 监听动画运行的代理方法
- (void)animationDidStart:(CAAnimation *)anim {
    NSLog(@"动画开始");
}
- (void)animationDidStop:(CAAnimation *)anim finished:(BOOL)flag {
    // 开启事物
    [CATransaction begin];
    // 禁用隐式动画
    [CATransaction setDisableActions:YES];
    [CATransaction commit];
    NSLog(@"动画结束");
}

@end
转场动画
转场动画就是从一个场景以动画的形式过渡到另一个场景。转场动画的使用一般分为以下几个步骤:
- 创建转场动画
- 设置转场类型、子类型(可选)及其他属性
- 设置转场后的新视图并添加动画到图层
下表列出了常用的转场类型:

另外对于支持方向设置的动画类型还包含子类型:

这里使用转场动画利用一个UIImageView实现一个漂亮的无限循环图片浏览器。
//
//  TransitionAnimationLayerView.m
//  IOS隐式动画
//
//  Created by liuwenbo on 2021/5/18.
//

#import "TransitionAnimationLayerView.h"
#define MAXINDEX 5

@interface TransitionAnimationLayerView ()
@property (nonatomic, strong) UIImageView *imageView;
@property (nonatomic, assign) int curIndex;
@end

@implementation TransitionAnimationLayerView

- (instancetype)initWithFrame:(CGRect)frame {
    if (self = [super initWithFrame:frame]) {
        [self addSubview:self.imageView];
        [self addSwapGesture];
        self.curIndex = 1;
    }
    return self;
}
// 添加横扫手势
- (void)addSwapGesture {
    UISwipeGestureRecognizer *leftSwipgeture = [[UISwipeGestureRecognizer alloc] initWithTarget:self action:@selector(swipGesture:)];
    // 设置轻扫的方向
    leftSwipgeture.direction = UISwipeGestureRecognizerDirectionLeft;
    [self addGestureRecognizer:leftSwipgeture];
    UISwipeGestureRecognizer *rightSwipgeture = [[UISwipeGestureRecognizer alloc] initWithTarget:self action:@selector(swipGesture:)];
    // 设置轻扫的方向
    rightSwipgeture.direction = UISwipeGestureRecognizerDirectionRight;
    [self addGestureRecognizer:rightSwipgeture];
}

- (void)swipGesture:(UISwipeGestureRecognizer *)sender {
    if (sender.direction == UISwipeGestureRecognizerDirectionLeft) {
        [self transitionAnimation:YES];
    }
    else {
        [self transitionAnimation:NO];
    }
}

- (void)transitionAnimation:(BOOL)isNext {
    // 创建转场动画
    CATransition *transition = [[CATransition alloc] init];
    transition.type = @"cube";
    transition.duration = 1.0;
    if (isNext) {
        self.curIndex = (self.curIndex == MAXINDEX) ? 1 : (self.curIndex + 1);
        transition.subtype = kCATransitionFromRight;
    }
    else {
        self.curIndex = (self.curIndex == 1)  ? MAXINDEX : (self.curIndex - 1);
        transition.subtype = kCATransitionFromLeft;
    }
    self.imageView.image = [UIImage imageNamed:[NSString stringWithFormat:@"%d.jpg", self.curIndex]];
    [self.imageView.layer addAnimation:transition forKey:@"KCTransitionAnimation"];
}

- (UIImageView *)imageView {
    if (!_imageView) {
        UIImageView *view = [[UIImageView alloc] initWithFrame:self.frame];
        view.contentMode = UIViewContentModeScaleAspectFit;
        view.backgroundColor = [UIColor grayColor];
        view.image=[UIImage imageNamed:@"1.jpg"];//默认图片
        _imageView = view;
    }
    return _imageView;
}

@end
UIVIew动画封装
有了前面核心动画的知识,相信大家开发出一般的动画效果应该不在话下。在核心动画开篇也给大家说过,其实UIView本身对于基本动画和关键帧动画、转场动画都有相应的封装,在对动画细节没有特殊要求的情况下使用起来也要简单的多。可以说在日常开发中90%以上的情况使用UIView的动画封装方法都可以搞定,因此在熟悉了核心动画的原理之后还是有必要给大家简单介绍一下UIView中各类动画使用方法的。由于前面核心动画内容已经进行过详细介绍,学习UIView的封装方法根本是小菜一碟,这里对于一些细节就不再赘述了。
基础动画
基础动画部分和前面的基础动画演示相对应,演示点击屏幕落叶飘落到鼠标点击位置的过程。注意根据前面介绍的隐式动画知识其实非根图层直接设置终点位置不需要使用UIView的动画方法也可以实现动画效果,因此这里落花不再放到图层中而是放到了一个UIImageView中。
下面的代码演示了通过block和静态方法实现动画控制的过程:
#import "KCMainViewController.h"

@interface KCMainViewController (){
    UIImageView *_imageView;
}

@end

@implementation KCMainViewController

- (void)viewDidLoad {
    [super viewDidLoad];

    //设置背景
    UIImage *backgroundImage=[UIImage imageNamed:@"background.jpg"];
    self.view.backgroundColor=[UIColor colorWithPatternImage:backgroundImage];

    //创建图像显示控件
    _imageView=[[UIImageView alloc]initWithImage:[UIImage imageNamed:@"petal.png"]];
    _imageView.center=CGPointMake(50, 150);
    [self.view addSubview:_imageView];
}

#pragma mark 点击事件
-(void)touchesBegan:(NSSet *)touches withEvent:(UIEvent *)event{
    UITouch *touch=touches.anyObject;
    CGPoint location= [touch locationInView:self.view];
    //方法1:block方式
    /*开始动画,UIView的动画方法执行完后动画会停留在重点位置,而不需要进行任何特殊处理
     duration:执行时间
     delay:延迟时间
     options:动画设置,例如自动恢复、匀速运动等
     completion:动画完成回调方法
     */
//    [UIView animateWithDuration:5.0 delay:0 options:UIViewAnimationOptionCurveLinear animations:^{
//        _imageView.center=location;
//    } completion:^(BOOL finished) {
//        NSLog(@"Animation end.");
//    }];

    //方法2:静态方法
    //开始动画
    [UIView beginAnimations:@"KCBasicAnimation" context:nil];
    [UIView setAnimationDuration:5.0];
    //[UIView setAnimationDelay:1.0];//设置延迟
    //[UIView setAnimationRepeatAutoreverses:NO];//是否回复
    //[UIView setAnimationRepeatCount:10];//重复次数
    //[UIView setAnimationStartDate:(NSDate *)];//设置动画开始运行的时间
    //[UIView setAnimationDelegate:self];//设置代理
    //[UIView setAnimationWillStartSelector:(SEL)];//设置动画开始运动的执行方法
    //[UIView setAnimationDidStopSelector:(SEL)];//设置动画运行结束后的执行方法

    _imageView.center=location;


    //开始动画
    [UIView commitAnimations];
}
@end
补充–动画设置参数
在动画方法中有一个option参数,UIViewAnimationOptions类型,它是一个枚举类型,动画参数分为三类,可以组合使用:
1.常规动画属性设置(可以同时选择多个进行设置)
UIViewAnimationOptionLayoutSubviews:动画过程中保证子视图跟随运动。
UIViewAnimationOptionAllowUserInteraction:动画过程中允许用户交互。
UIViewAnimationOptionBeginFromCurrentState:所有视图从当前状态开始运行。
UIViewAnimationOptionRepeat:重复运行动画。
UIViewAnimationOptionAutoreverse :动画运行到结束点后仍然以动画方式回到初始点。
UIViewAnimationOptionOverrideInheritedDuration:忽略嵌套动画时间设置。
UIViewAnimationOptionOverrideInheritedCurve:忽略嵌套动画速度设置。
UIViewAnimationOptionAllowAnimatedContent:动画过程中重绘视图(注意仅仅适用于转场动画)。
UIViewAnimationOptionShowHideTransitionViews:视图切换时直接隐藏旧视图、显示新视图,而不是将旧视图从父视图移除(仅仅适用于转场动画)
UIViewAnimationOptionOverrideInheritedOptions :不继承父动画设置或动画类型。
2.动画速度控制(可从其中选择一个设置)
UIViewAnimationOptionCurveEaseInOut:动画先缓慢,然后逐渐加速。
UIViewAnimationOptionCurveEaseIn :动画逐渐变慢。
UIViewAnimationOptionCurveEaseOut:动画逐渐加速。
UIViewAnimationOptionCurveLinear :动画匀速执行,默认值。
3.转场类型(仅适用于转场动画设置,可以从中选择一个进行设置,基本动画、关键帧动画不需要设置)
UIViewAnimationOptionTransitionNone:没有转场动画效果。
UIViewAnimationOptionTransitionFlipFromLeft :从左侧翻转效果。
UIViewAnimationOptionTransitionFlipFromRight:从右侧翻转效果。
UIViewAnimationOptionTransitionCurlUp:向后翻页的动画过渡效果。
UIViewAnimationOptionTransitionCurlDown :向前翻页的动画过渡效果。
UIViewAnimationOptionTransitionCrossDissolve:旧视图溶解消失显示下一个新视图的效果。
UIViewAnimationOptionTransitionFlipFromTop :从上方翻转效果。
UIViewAnimationOptionTransitionFlipFromBottom:从底部翻转效果。
关键帧动画
从iOS7开始UIView动画中封装了关键帧动画,下面就来看一下如何使用UIView封装方法进行关键帧动画控制,这里实现前面关键帧动画部分对于落花的控制。
#import "KCMainViewController.h"

@interface KCMainViewController (){
    UIImageView *_imageView;
}

@end

@implementation KCMainViewController

- (void)viewDidLoad {
    [super viewDidLoad];

    //设置背景
    UIImage *backgroundImage=[UIImage imageNamed:@"background.jpg"];
    self.view.backgroundColor=[UIColor colorWithPatternImage:backgroundImage];

    //创建图像显示控件
    _imageView=[[UIImageView alloc]initWithImage:[UIImage imageNamed:@"petal.png"]];
    _imageView.center=CGPointMake(50, 150);
    [self.view addSubview:_imageView];
}

-(void)touchesBegan:(NSSet *)touches withEvent:(UIEvent *)event{
    //UITouch *touch=touches.anyObject;
    //CGPoint location= [touch locationInView:self.view];

    /*关键帧动画
     options:
     */
    [UIView animateKeyframesWithDuration:5.0 delay:0 options: UIViewAnimationOptionCurveLinear| UIViewAnimationOptionCurveLinear animations:^{
        //第二个关键帧(准确的说第一个关键帧是开始位置):从0秒开始持续50%的时间,也就是5.0*0.5=2.5秒
        [UIView addKeyframeWithRelativeStartTime:0.0 relativeDuration:0.5 animations:^{
            _imageView.center=CGPointMake(80.0, 220.0);
        }];
        //第三个关键帧,从0.5*5.0秒开始,持续5.0*0.25=1.25秒
        [UIView addKeyframeWithRelativeStartTime:0.5 relativeDuration:0.25 animations:^{
            _imageView.center=CGPointMake(45.0, 300.0);
        }];
        //第四个关键帧:从0.75*5.0秒开始,持所需5.0*0.25=1.25秒
        [UIView addKeyframeWithRelativeStartTime:0.75 relativeDuration:0.25 animations:^{
            _imageView.center=CGPointMake(55.0, 400.0);
        }];

    } completion:^(BOOL finished) {
        NSLog(@"Animation end.");
    }];
}
@end
补充–动画设置参数
对于关键帧动画也有一些动画参数设置options,UIViewKeyframeAnimationOptions类型,和上面基本动画参数设置有些差别,关键帧动画设置参数分为两类,可以组合使用:
1.常规动画属性设置(可以同时选择多个进行设置)
UIViewAnimationOptionLayoutSubviews:动画过程中保证子视图跟随运动。
UIViewAnimationOptionAllowUserInteraction:动画过程中允许用户交互。
UIViewAnimationOptionBeginFromCurrentState:所有视图从当前状态开始运行。
UIViewAnimationOptionRepeat:重复运行动画。
UIViewAnimationOptionAutoreverse :动画运行到结束点后仍然以动画方式回到初始点。
UIViewAnimationOptionOverrideInheritedDuration:忽略嵌套动画时间设置。
UIViewAnimationOptionOverrideInheritedOptions :不继承父动画设置或动画类型。
2.动画模式设置(同前面关键帧动画动画模式一一对应,可以从其中选择一个进行设置)
UIViewKeyframeAnimationOptionCalculationModeLinear:连续运算模式。
UIViewKeyframeAnimationOptionCalculationModeDiscrete :离散运算模式。
UIViewKeyframeAnimationOptionCalculationModePaced:均匀执行运算模式。
UIViewKeyframeAnimationOptionCalculationModeCubic:平滑运算模式。
UIViewKeyframeAnimationOptionCalculationModeCubicPaced:平滑均匀运算模式。
注意:前面说过关键帧动画有两种形式,上面演示的是属性值关键帧动画,路径关键帧动画目前UIView还不支持。
转场动画
从iOS4.0开始,UIView直接封装了转场动画,使用起来同样很简单。
#import "KCMainViewController.h"
#define IMAGE_COUNT 5

@interface KCMainViewController (){
    UIImageView *_imageView;
    int _currentIndex;
}

@end

@implementation KCMainViewController

- (void)viewDidLoad {
    [super viewDidLoad];

    //定义图片控件
    _imageView=[[UIImageView alloc]init];
    _imageView.frame=[UIScreen mainScreen].applicationFrame;
    _imageView.contentMode=UIViewContentModeScaleAspectFit;
    _imageView.image=[UIImage imageNamed:@"0.jpg"];//默认图片
    [self.view addSubview:_imageView];
    //添加手势
    UISwipeGestureRecognizer *leftSwipeGesture=[[UISwipeGestureRecognizer alloc]initWithTarget:self action:@selector(leftSwipe:)];
    leftSwipeGesture.direction=UISwipeGestureRecognizerDirectionLeft;
    [self.view addGestureRecognizer:leftSwipeGesture];

    UISwipeGestureRecognizer *rightSwipeGesture=[[UISwipeGestureRecognizer alloc]initWithTarget:self action:@selector(rightSwipe:)];
    rightSwipeGesture.direction=UISwipeGestureRecognizerDirectionRight;
    [self.view addGestureRecognizer:rightSwipeGesture];
}

#pragma mark 向左滑动浏览下一张图片
-(void)leftSwipe:(UISwipeGestureRecognizer *)gesture{
    [self transitionAnimation:YES];
}

#pragma mark 向右滑动浏览上一张图片
-(void)rightSwipe:(UISwipeGestureRecognizer *)gesture{
    [self transitionAnimation:NO];
}


#pragma mark 转场动画
-(void)transitionAnimation:(BOOL)isNext{
    UIViewAnimationOptions option;
    if (isNext) {
        option=UIViewAnimationOptionCurveLinear|UIViewAnimationOptionTransitionFlipFromRight;
    }else{
        option=UIViewAnimationOptionCurveLinear|UIViewAnimationOptionTransitionFlipFromLeft;
    }

    [UIView transitionWithView:_imageView duration:1.0 options:option animations:^{
        _imageView.image=[self getImage:isNext];
    } completion:nil];
}

#pragma mark 取得当前图片
-(UIImage *)getImage:(BOOL)isNext{
    if (isNext) {
        _currentIndex=(_currentIndex+1)%IMAGE_COUNT;
    }else{
        _currentIndex=(_currentIndex-1+IMAGE_COUNT)%IMAGE_COUNT;
    }
    NSString *imageName=[NSString stringWithFormat:@"%i.jpg",_currentIndex];
    return [UIImage imageNamed:imageName];
}
@end
上面的转场动画演示中,其实仅仅有一个视图UIImageView做转场动画,每次转场通过切换UIImageView的内容而已。如果有两个完全不同的视图,并且每个视图布局都很复杂,此时要在这两个视图之间进行转场可以使用+ (void)transitionFromView:(UIView *)fromView toView:(UIView *)toView duration:(NSTimeInterval)duration options:(UIViewAnimationOptions)options completion:(void (^)(BOOL finished))completion NS_AVAILABLE_IOS(4_0)方法进行两个视图间的转场,需要注意的是默认情况下转出的视图会从父视图移除,转入后重新添加,可以通过UIViewAnimationOptionShowHideTransitionViews参数设置,设置此参数后转出的视图会隐藏(不会移除)转入后再显示。
注意:转场动画设置参数完全同基本动画参数设置;同直接使用转场动画不同的是使用UIView的装饰方法进行转场动画其动画效果较少,因为这里无法直接使用私有API。


 1218
1218

 被折叠的 条评论
为什么被折叠?
被折叠的 条评论
为什么被折叠?
 到【灌水乐园】发言


