


之所以想写这一系列,是因为之前工作过程中使用Spring Security OAuth2搭建了网关和授权服务器,但当时基于spring-boot 2.3.x,其默认的Spring Security是5.3.x。之后新项目升级到了spring-boot 3.3.0,结果一看Spring Security也升级为6.3.0。无论是Spring Security的风格和以及OAuth2都做了较大改动,里面甚至将授权服务器模块都移除了,导致在配置同样功能时,花费了些时间研究新版本的底层原理,这里将一些学习经验分享给大家。
注意:由于框架不同版本改造会有些使用的不同,因此本次系列中使用基本框架是 spring-boo-3.3.0(默认引入的Spring Security是6.3.0),JDK版本使用的是19,本系列OAuth2的代码采用Spring Security6.3.0框架,所有代码都在oauth2-study项目上:https://github.com/forever1986/oauth2-study.git
目录
上一章,我们讲解了设备授权码模式,对于OAuth2.1的重要新特性,我们就已经讲完了。本章主要讲解一种基于OAuth2基础之上的OIDC1.0协议以及Spring Security如何实现。
1 OIDC1.0协议
1.1 ODIC1.0是什么
我们在使用OAuth2返回的access_token作为授权使用,其中并不包括用户身份信息,同时如果要获取用户信息,可能需要在资源服务器中设置对应接口进行提供。是的,OAuth2.0本身是没有身份认证和个人信息获取的,你可以自己规定一下实现返回用户信息,同时在资源服务器实现获取用户信息功能,这样你就实现ODIC1.0的效果。
ODIC1.0协议RFC6749全称是OpenId Connect Core,在2014年发布的,由OpenID Foundation推动。是一个基于OAuth2.0协议的身份认证标准协议(OAuth2.0的超集)。OAuth2.0更关注授权,OIDC1.0使用OAuth2的授权服务器来为第三方客户端提供用户的身份认证,并把对应的身份认证信息ID Token传递给客户端,且提供获取用户信息的接口(UserInfo Endpoint),适用于各种类型的客户端(比如服务端Server应用,移动端APP,JS应用(SPA)等)。
也就是说,如果你实现了ODIC1.0,也就是实现了OAuth2,或者说ODIC1.0是OAuth2的扩展,增加身份认证以及用户信息获取。
1.2 为什么要使用ODIC1.0
那么为什么要使用ODIC1.0?或者换句话说,身份认证和获取用户信息在什么场景下需要?
- SSO:Single Sign-On单点登录,即同时访问多个应用仅需要登录一次。在同一个公司下的不同业务系统,实现单点登录时非常有必要的,因此身份认证的功能就很有必要
- 安全和隐私:虽然可以在access_token返回用户信息,但是OAuth2本身并没有这方面规定,因此ID Tokens 和数字签名技术来确保身份信息的安全传输和验证
- 新型客户端要求:随着IoT、SPA的兴起,在这些现代应用架构中需要一种高效工作的身份验证方法,支持这些应用的身份验证需求,允许令牌和用户信息的安全传输
1.3 ODIC1.0的关键流程和角色
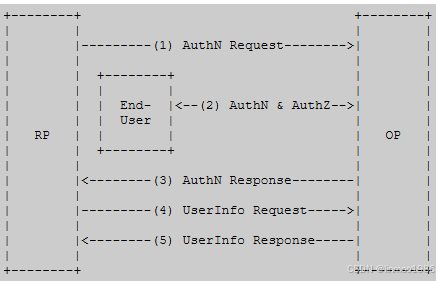
上图是协议官方图,看起来很多概念,其实就是在OAuth2的流程几乎一样
- 步骤1:RP(客户端)向 OP(授权服务器)发送请求
- 步骤2: OP(授权服务器)对EU(用户)进行身份验证并获取授权
- 步骤3: OP(授权服务器)返回ID Token 和Access Token
- 步骤4: RP(客户端)可以使用 Access Token 向 UserInfo Endpoint 发送请求
- 步骤5: UserInfo Endpoint 返回有关最终用户的声明
我们需要对照一下角色概念,就会发现没什么不一样。
| OIDC1.0 | OAuth2.0 | 说明 |
|---|---|---|
| EU | User Resource Owner | 用户 |
| RP | Client | 客户端 |
| OP | Auhtorization Server | 授权服务器 |
| Resource Server | Resource Server | 资源服务器 |
1.4 ODIC1.0的不同Flow(不同模式)
在了解ODIC1.0不同模式之前,我们可以回顾一下OAuth2的四种模式。而ODIC1.0采用的就是OAuth2的其中两种:授权码模式(Authorization Code Grant)和简化模式(Implicit Grant)。我们知道,这两种模式几乎一样,唯一不同的就是简化模式删除了授权码code的步骤,直接返回access_token。
而ODIC1.0由于可以返回Id Token和Access Token,因此可以组合成不同的方式,由response_type来决定,比如response_type=code就是授权码模式,response_type=id_token token就是简化模式,response_type=id_token则只会返回id_token。同理,其对照表如下:
| response_type | Flow |
|---|---|
| code | Authorization Code Flow |
| id_token | Implicit Flow |
| id_token token | Implicit Flow |
| code id_token | Hybrid Flow |
| code token | Hybrid Flow |
| code id_token token | Hybrid Flow |
注意:为何只支持授权码模式(Authorization Code Grant)和简化模式(Implicit Grant),另外两种模式密码模式(Resource Owner Password Credentials Grant)和客户端模式(Client Credentials Grant)为何不支持?
- 密码模式(Resource Owner Password Credentials Grant):之所以不支持是因为本身需要提供给客户端用户名和密码,因此客户端已经无需要对用户身份进行验证了
- 客户端模式(Client Credentials Grant):之所以不支持是因为该过程不需要用户参与,因此也是默认用户身份合法,所以也无需进行用户身份验证了
1.5 id_token的内容
| 字段 | 是否必须 | 说明 |
|---|---|---|
| iss (Issuer Identifier) | 必须 | 提供认证信息者的唯一标识。一般是一个https的URL |
| sub (Subject Identifier) | 必须 | iss提供用户标识,它会被授权服务器用来标识唯一的用户。长度不能超过255个ASCII个字符 |
| aud (Audience) | 必须 | 标识 id_token 的受众。必须包含OAuth2的client_id |
| exp (Expiration time) | 必须 | 过期时间,超过此时间的id_token会作废不再被验证通过 |
| iat (Issued At Time) | 必须 | token使用JWT发布的时间 |
| auth_time (AuthenticationTime) | 可选 | 用户完成认证的时间。如果客户端发送AuthN请求的时候携带max_age的参数,则此Claim是必须的 |
| nonce | 可选 | 客户端发送请求的时候提供的随机字符串,用来减缓重放攻击,也可以来关联id_token 和授权服务器本身的Session信息 |
| acr (Authentication Context Class Reference) | 可选 | 身份验证上下文类参考 |
| amr (Authentication Methods References) | 可选 | 身份验证上下文类参考 |
| azp (Authorized party) | 可选 | 被授权方 - 向其颁发 id_token 的一方 |
2 代码演示
从上面已经大概了解了OIDC是做什么用的,那么接下来我们看看Spring Security是如何实现OIDC的。
代码参考lesson12
1)新建lesson12子模块,其pom引入如下:
<dependencies>
    <dependency>
        <groupId>org.springframework.boot</groupId>
        <artifactId>spring-boot-starter-web</artifactId>
    </dependency>
    <dependency>
        <groupId>org.springframework.security</groupId>
        <artifactId>spring-security-oauth2-authorization-server</artifactId>
    </dependency>
</dependencies>
2)在resources目录下,配置yaml文件,配置端口和Spring Security的账号密码
server:
  port: 9000

logging:
  level:
    org.springframework.security: trace


spring:
  security:
    # 使用security配置授权服务器的登录用户和密码
    user:
      name: user
      password: 1234
3)在config包下面,配置SecurityConfig
@Configuration
public class SecurityConfig {

    // 自定义授权服务器的Filter链
    @Bean
    @Order(Ordered.HIGHEST_PRECEDENCE)
    SecurityFilterChain authorizationServerSecurityFilterChain(HttpSecurity http) throws Exception {
        OAuth2AuthorizationServerConfiguration.applyDefaultSecurity(http);
        http.getConfigurer(OAuth2AuthorizationServerConfigurer.class)
                // oidc配置
                .oidc(withDefaults());
        // 同时作为资源服务器,使用/userinfo接口
        http.oauth2ResourceServer((resourceServer) -> resourceServer.jwt(withDefaults()));
        // 异常处理
        http.exceptionHandling((exceptions) -> exceptions.authenticationEntryPoint(
                new LoginUrlAuthenticationEntryPoint("/login")));
        return http.build();
    }

    // 自定义Spring Security的链路。如果自定义授权服务器的Filter链,则原先自动化配置将会失效,因此也要配置Spring Security
    @Bean
    @Order(SecurityProperties.BASIC_AUTH_ORDER)
    SecurityFilterChain defaultSecurityFilterChain(HttpSecurity http) throws Exception {
        http.authorizeHttpRequests((authorize) -> authorize
                .anyRequest().authenticated()).formLogin(withDefaults());
        return http.build();
    }

    @Bean
    public RegisteredClientRepository registeredClientRepository() {
        RegisteredClient registeredClient3 = RegisteredClient.withId(UUID.randomUUID().toString())
                // 客户端id
                .clientId("oidc-client")
                // 客户端密码
                .clientSecret("{noop}secret")
                // 客户端认证方式
                .clientAuthenticationMethods(methods ->{
                    methods.add(ClientAuthenticationMethod.CLIENT_SECRET_BASIC);
                })
                // 配置授权码模式
                .authorizationGrantTypes(grantTypes -> {
                    grantTypes.add(AuthorizationGrantType.AUTHORIZATION_CODE);
                })
                // 需要授权确认
                .clientSettings(ClientSettings.builder().requireAuthorizationConsent(true).build())
                // 回调地址
                .redirectUri("http://localhost:8080/login/oauth2/code/oidc-client")
                .postLogoutRedirectUri("http://localhost:8080/")
                // 授权范围
                .scopes(scopes->{
                    scopes.add(OidcScopes.OPENID);
                    scopes.add(OidcScopes.PROFILE);
                })
                .build();

        return new InMemoryRegisteredClientRepository(registeredClient3 );
    }

}
4)启动类Oauth2Lesson12ServerApplication,并启动项目
@SpringBootApplication
public class Oauth2Lesson12ServerApplication {

    public static void main(String[] args) {
        SpringApplication.run(Oauth2Lesson12ServerApplication.class, args);
    }

}
5)测试
请求授权码code
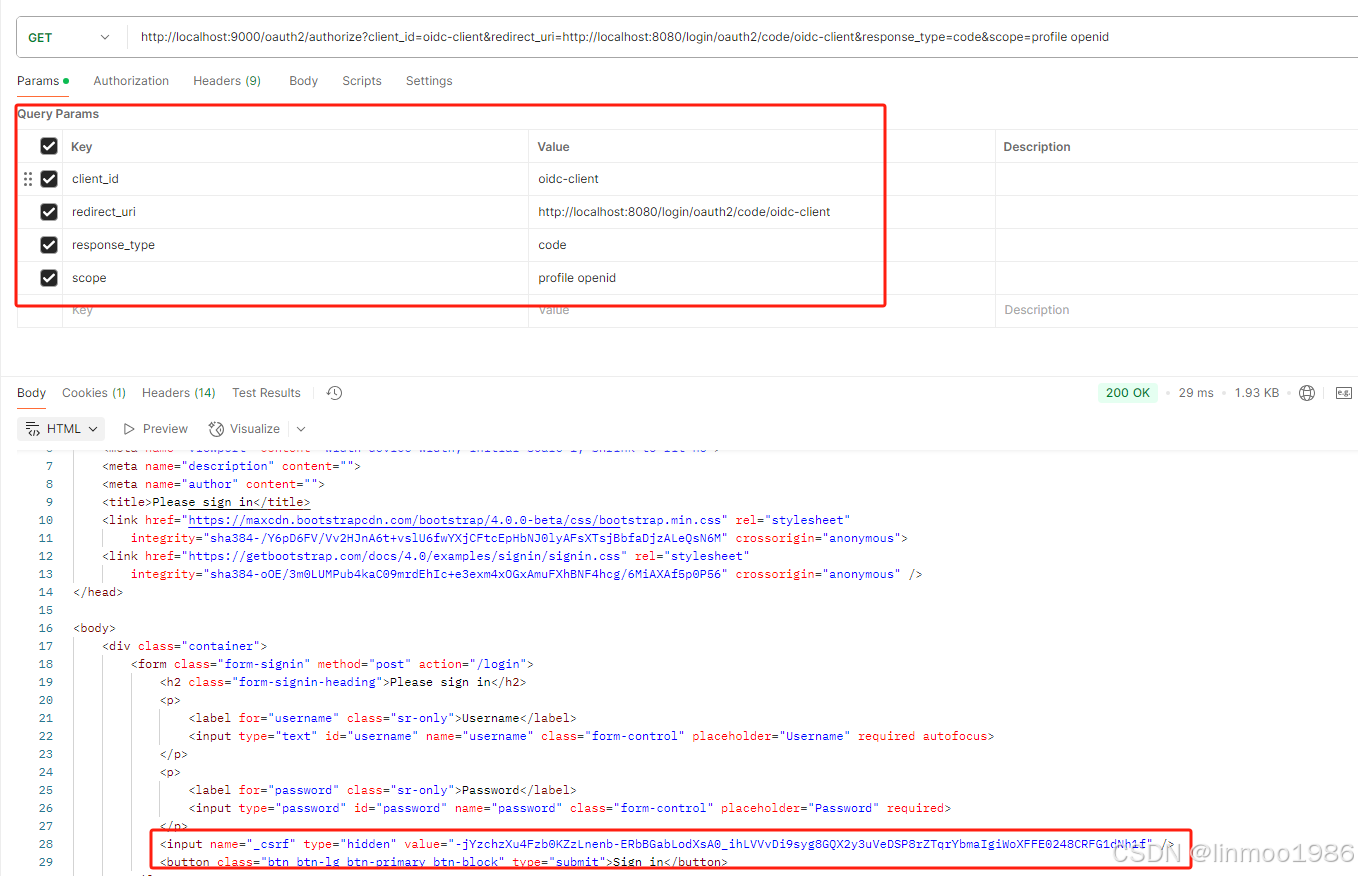
登录
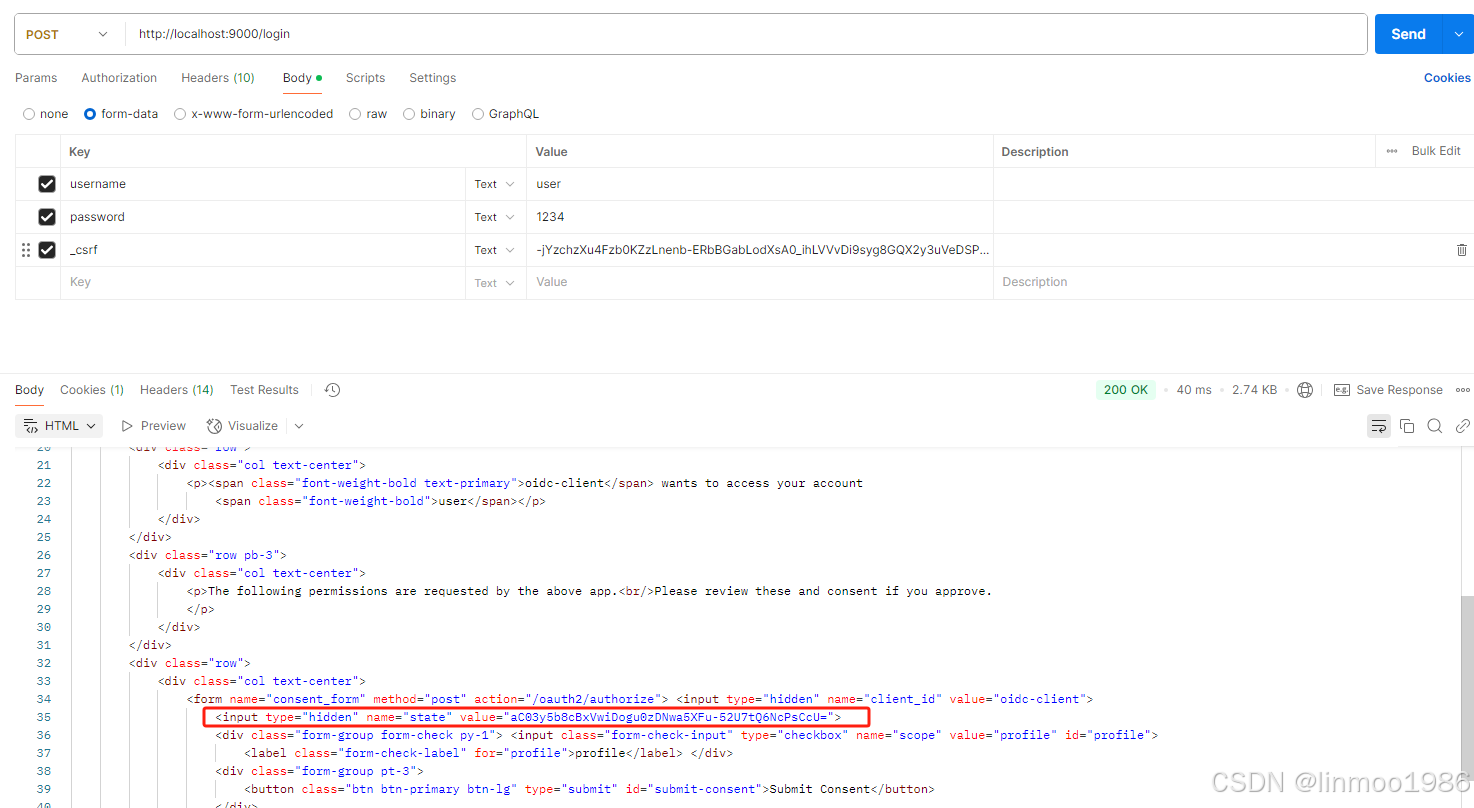
再次请求授权码code
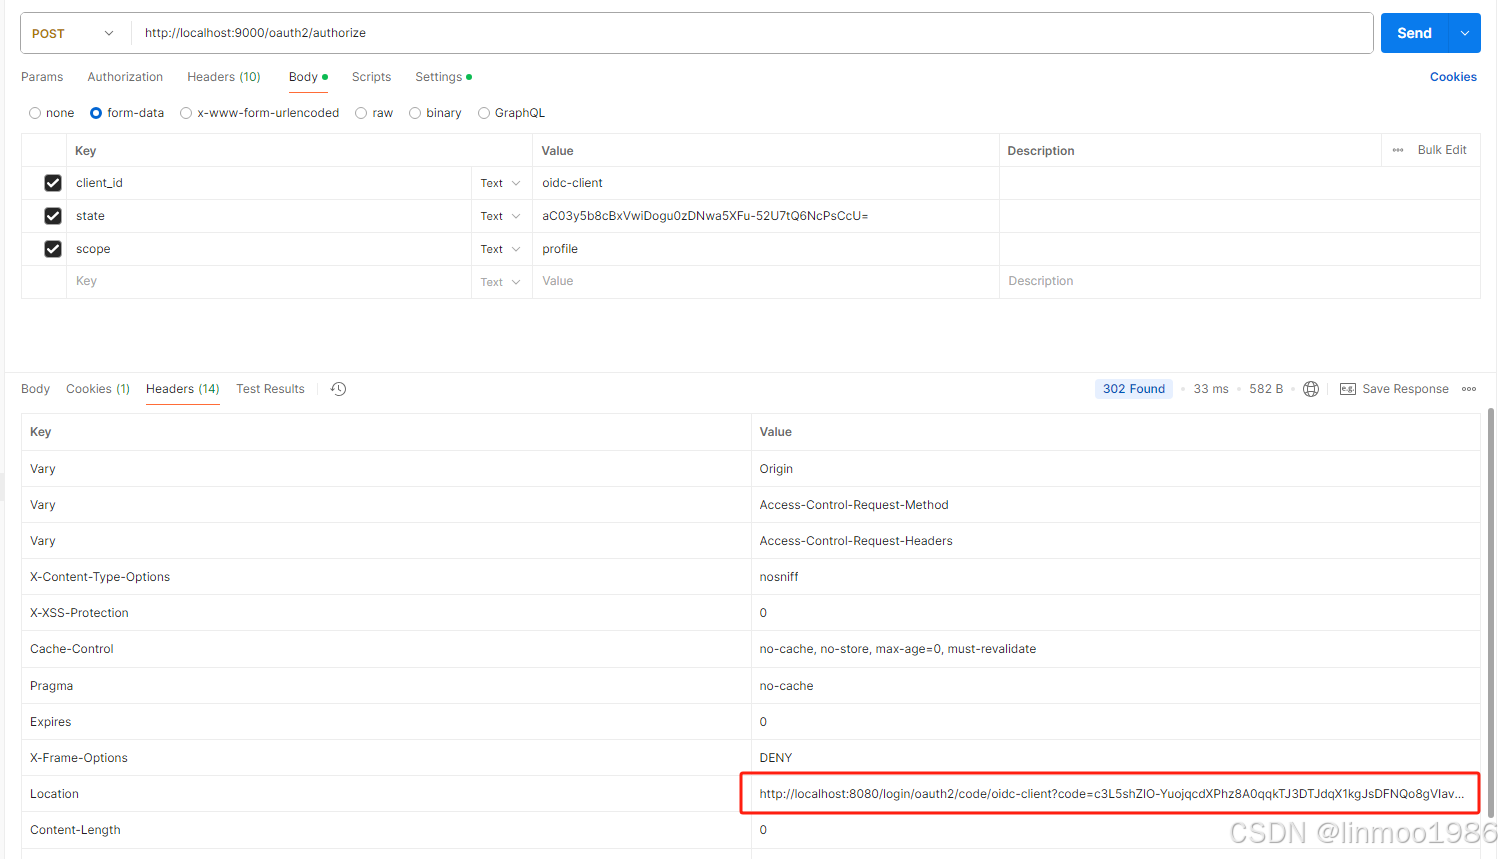
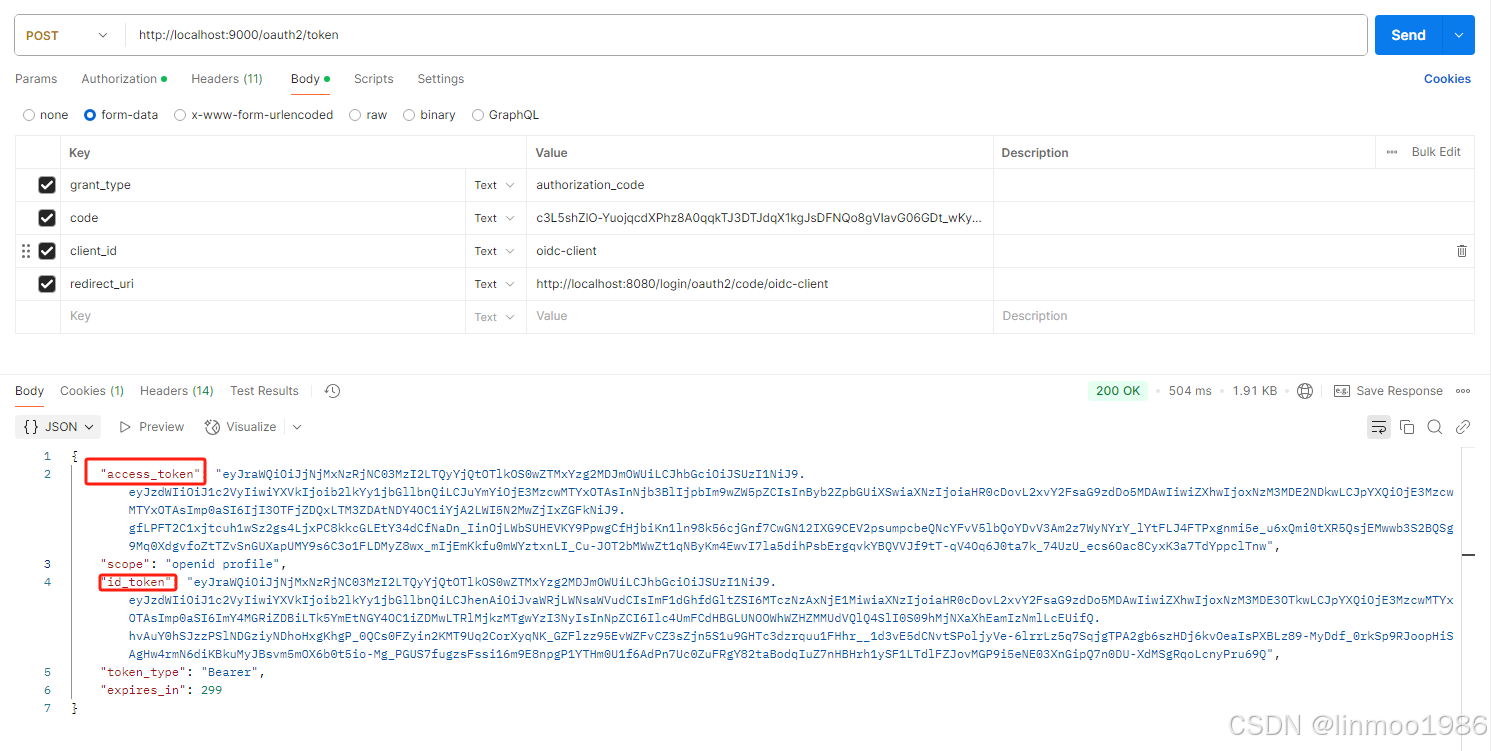
获取token
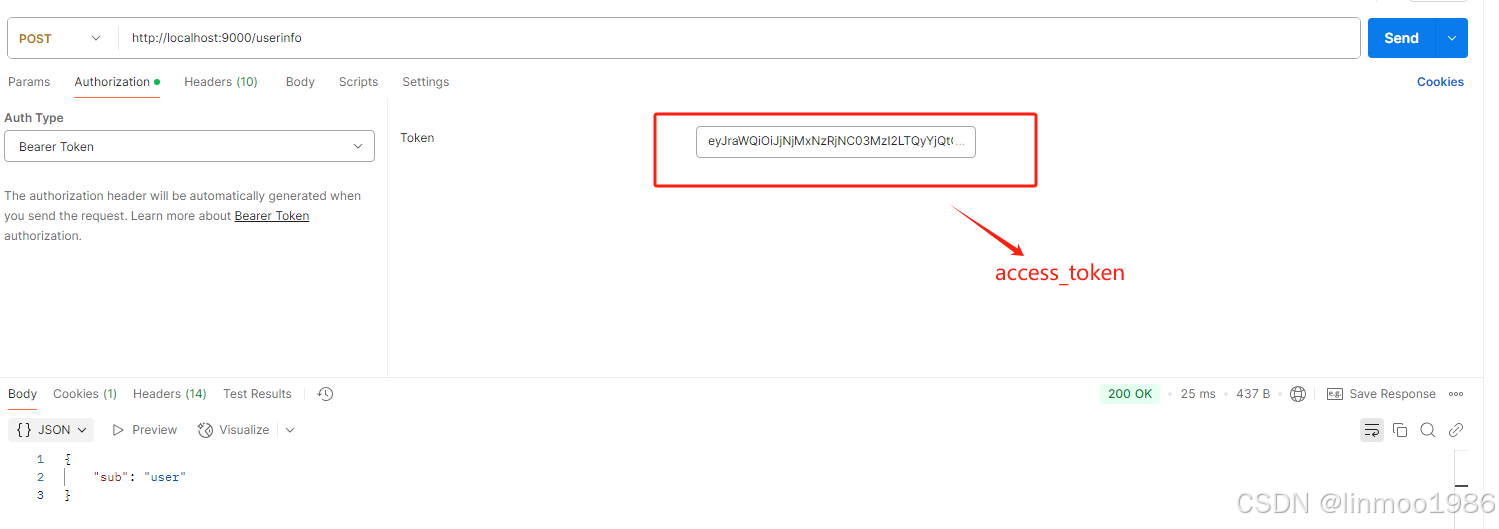
6)获取用户信息
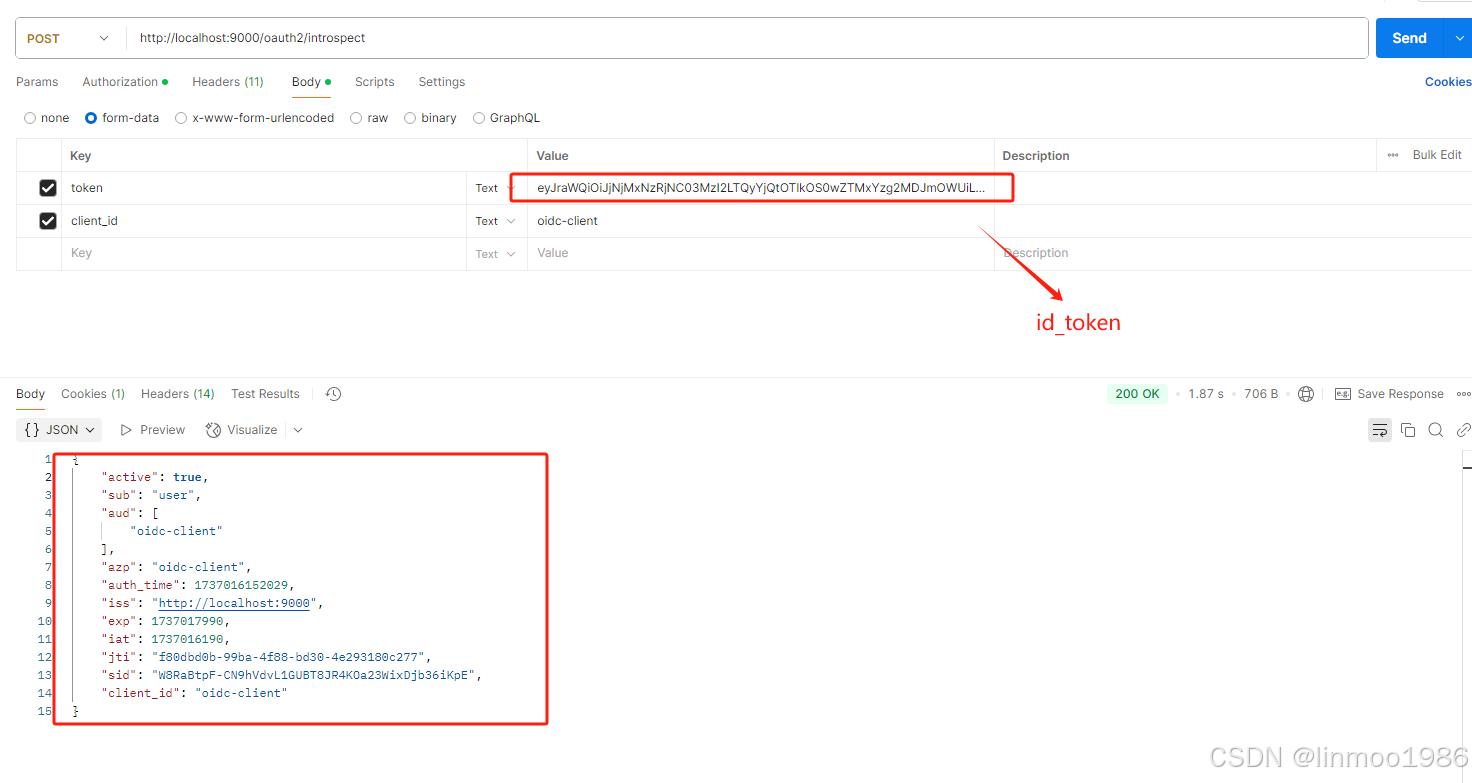
7)验证id_token
结语:本章简介了OIDC1.0协议,并使用Spring Security演示了一遍OIDC1.0协议的实现。下章我们将去窥探其原理


 3222
3222

 被折叠的 条评论
为什么被折叠?
被折叠的 条评论
为什么被折叠?
 到【灌水乐园】发言


