


本文主要介绍使用MySQL数据库过程中遇到的常见问题及相应的解决方案。
1 show databases查询结果不完整
【问题描述】:
使用“show databases”命令查询数据库信息时,查询出来的结果没有将所有的数据库信息都显示出来,如下:
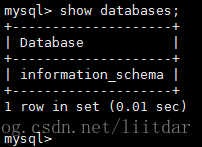
上述查询结果只显示了数据库“information_schema”,而实际上还存在其他数据库。
【解决方案】:
通常,出现这种情况是因为当前登录MySQL数据库的“用户/主机名”权限不足。使用“show grants”命令查询当前用户的权限,如下:
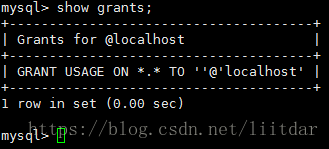
由上述结果可知:
- 当前的mysql用户,是从“localhost”主机登录到MySQL服务器的;
- 对于从“localhost”主机登录到MySQL服务器的mysql用户(无论哪个用户身份),都只有USAGE权限(即空权限)。
根据以上两条信息,得知数据库显示结果不完整就是用户/主机名权限不足导致的。为了解决此问题,需要放开相应的用户/主机名的权限。
具体的解决步骤如下:
1. 在mysql的配置文件“/etc/my.cnf”的“[mysqld]”配置下,添加“skip-grant-tables”,跳过权限检查,如下:

2. 重启MySQL服务器,如下:
systemctl restart mysqld
3. 再次连接MySQL服务器,并查看数据库信息:
[root@node1 ~]# mysql
Welcome to the MySQL monitor.  Commands end with ; or \g.
Your MySQL connection id is 3
Server version: 5.6.40 MySQL Community Server (GPL)

Copyright (c) 2000, 2018, Oracle and/or its affiliates. All rights reserved.

Oracle is a registered trademark of Oracle Corporation and/or its
affiliates. Other names may be trademarks of their respective
owners.

Type 'help;' or '\h' for help. Type '\c' to clear the current input statement.

mysql> show databases;
+--------------------+
| Database           |
+--------------------+
| information_schema |
| mysql              |
| performance_schema |
| testdb             |
+--------------------+
4 rows in set (0.00 sec)

mysql>
根据上述结果可知,现在已经能够正常显示所有数据库了。
但是,这是我们跳过了权限检查的结果,而跳过权限检查可能会带来数据库安全隐患,所以我们需要通过修改“用户/主机名”的权限来从根本上解决此问题。
4. 放开对应“用户/主机名”的权限
MySQL数据库的“用户/主机名”权限信息存放在数据库“mysql”下的表“user”中,如下:
mysql> use mysql;
Reading table information for completion of table and column names
You can turn off this feature to get a quicker startup with -A

Database changed
mysql>
mysql> select host,user,password from user;
+-----------+------+----------+
| host      | user | password |
+-----------+------+----------+
| node1     | root |          |
| %         | root |          |
| ::1       | root |          |
| localhost |      |          |
| node1     |      |          |
+-----------+------+----------+
5 rows in set (0.00 sec)

mysql>
在user表中,我们看到了主机名(host)为“localhost ”的记录,通过下面的命令删除、插入该条记录,来放开其对应的权限,如下:
mysql>
mysql> delete from user where host = 'localhost';
Query OK, 1 row affected (0.00 sec)

mysql>
mysql> insert into user values('localhost', 'root', '', 'Y', 'Y', 'Y', 'Y', 'Y', 'Y', 'Y', 'Y', 'Y', 'Y', 'Y', 'Y', 'Y', 'Y', 'Y', 'Y', 'Y', 'Y', 'Y', 'Y', 'Y', 'Y', 'Y', 'Y', 'Y', 'Y', 'Y', 'Y', 'Y', '', '', '', '', 0, 0, 0, 0, 'mysql_native_password', '', 'N');
Query OK, 1 row affected (0.00 sec)

mysql> select host,user,password from user;
+-----------+------+----------+
| host      | user | password |
+-----------+------+----------+
| node1     | root |          |
| %         | root |          |
| ::1       | root |          |
| localhost | root |          |
| node1     |      |          |
+-----------+------+----------+
5 rows in set (0.00 sec)

mysql>
执行上述操作之后,就放开了主机名为“localhost ”、用户名为“root”的用户权限。
注意:上面的insert操作的内容需要根据实际情况进行设置。
5. 去掉配置文件“/etc/my.cnf”中的“skip-grant-tables”内容,重启mysql,再次登录mysql,查询数据库,观察查询结果,如下:
[root@node1 ~]# mysql
Welcome to the MySQL monitor.  Commands end with ; or \g.
Your MySQL connection id is 2
Server version: 5.6.40 MySQL Community Server (GPL)

Copyright (c) 2000, 2018, Oracle and/or its affiliates. All rights reserved.

Oracle is a registered trademark of Oracle Corporation and/or its
affiliates. Other names may be trademarks of their respective
owners.

Type 'help;' or '\h' for help. Type '\c' to clear the current input statement.

mysql> show databases;
+--------------------+
| Database           |
+--------------------+
| information_schema |
| mysql              |
| performance_schema |
| testdb             |
+--------------------+
4 rows in set (0.00 sec)

mysql> show grants;
+---------------------------------------------------------------------+
| Grants for root@localhost                                           |
+---------------------------------------------------------------------+
| GRANT ALL PRIVILEGES ON *.* TO 'root'@'localhost' WITH GRANT OPTION |
| GRANT PROXY ON ''@'' TO 'root'@'localhost' WITH GRANT OPTION        |
+---------------------------------------------------------------------+
2 rows in set (0.00 sec)

mysql>
上述结果显示,主机名为“localhost ”、用户名为“root”的用户具有的所有权限(ALL PRIVILEGES);并且在查询数据库时,也能够显示所有的数据库信息了。
2 远程客户端连接不到MySQL服务器
2.1 防火墙问题
【问题现象】:
[root@node2 ~]# mysql -h "192.168.213.130" -u root -p ""

Enter password:
ERROR 2003 (HY000): Can't connect to MySQL server on '192.168.213.130' (113)
[root@node2 ~]#
【解决方案】:
查看远程客户端以及MySQL服务器的防火墙是否开启。如果是,先关闭防火墙,再进行连接。如下:
[root@node3 ~]# systemctl status firewalld
● firewalld.service - firewalld - dynamic firewall daemon
   Loaded: loaded (/usr/lib/systemd/system/firewalld.service; enabled; vendor preset: enabled)
   Active: active (running) since Thu 2018-05-24 20:26:21 CST; 11min ago
     Docs: man:firewalld(1)
 Main PID: 651 (firewalld)
   CGroup: /system.slice/firewalld.service
           └─651 /usr/bin/python -Es /usr/sbin/firewalld --nofork --nopid

May 24 20:26:21 node3 systemd[1]: Starting firewalld - dynamic firewall daemon...
May 24 20:26:21 node3 systemd[1]: Started firewalld - dynamic firewall daemon.
[root@node3 ~]#
[root@node3 ~]# systemctl stop firewalld
[root@node3 ~]#
再次连接MySQL服务器,能够连接成功了。


 2514
2514

 被折叠的 条评论
为什么被折叠?
被折叠的 条评论
为什么被折叠?
 到【灌水乐园】发言


