


 这篇博客介绍了如何使用PyCharm创建Django项目,包括步骤1创建项目,步骤2建立用户模块,步骤3创建页面,步骤4启动并访问项目。文章详细讲解了Django的MVT架构,以及数据库模型、超级管理员账号的创建。此外,还提到了项目规范和工作原理。
django官网:https://docs.djangoproject.com/en/2.2/
- 从头开始: 概述 | 安装
- 教程: 第1部分:请求和响应 | 第2部分:模型和管理站点 | 第3部分:视图和模板 | 第4部分:表单和通用视图 | 第5部分:测试 | 第6部分:静态文件 | 第7部分:自定义管理站点
- 高级教程: 如何编写可复用的应用程序 | 为Django编写第一个补丁
发展历史: 最初是劳伦斯出版集团 研发的,用于管理其旗下的新闻网站的CMS(内容管理系统),后来被开源了
是python里面比较流行的web框架,大而全,自带admin (admin都不用开发了,我的天啊~)
架构核心思想: mvt 视图 (V 处理请求,返回页面),模型(M 与数据库交互,协同视图工作),模板 (T 渲染HTML页面,协同视图工作)
其实与mvc差不多。
pycharm创建1个django项目的过程
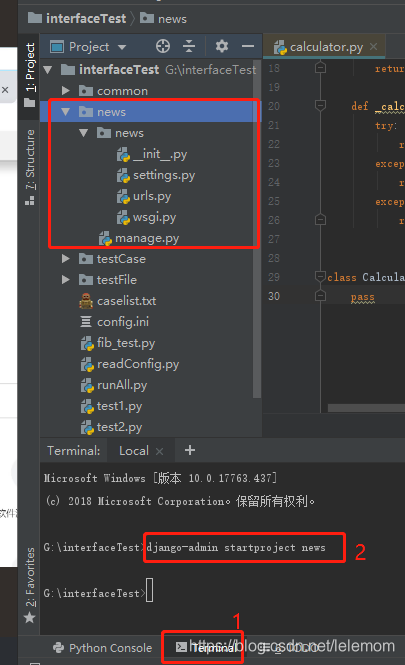
步骤1 创建项目
G:\interfaceTest>django-admin startproject news建好后目录结构如下图红框,
news/news 目录放项目的配置文件,其中settings.py项目的基本配置(数据库默认使用sqlite)。django自带后台管理系统,路径进入urls.py里面查看。账户密码用命令创建 python manage.py createsuperuser
news/manage.py 文件时整个程序的入口文件
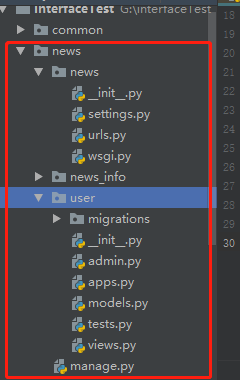
步骤2 创建不同的模块 例如user用户模块
G:\interfaceTest>cd news

G:\interfaceTest\news>python manage.py startapp news_info

G:\interfaceTest\news>python manage.py startapp user
创建后的目录结构如下图user用户模块,自动生成以下文件(自动生成的,不要改文件的名字,不然程序识别不了)
- models.py (就是mvt里面的m )放user用户模块的, 类文件
- test.py 功能模块的单元测试函数
- views.py 这个模块的视图函数
- migrations 目录 放迁移的数据库文件的
步骤3 创建第1个页面,
- V 就是: 在user模块的 views.py 新写1个视图函数,返回对应的页面
- 在urls.py配置 url与视图函数的映射
- T 就是 创建templates 目录放入你写的html文件(注意:templates是普通目录,不是package目录),在项目的settings.py 中进行增加几处配置。
- 在视图函数中返回对应的html页面
#setting.py文件里面,补上'自己定义的2个模块 user  news_info'
INSTALLED_APPS = [
    'django.contrib.admin',
    'django.contrib.auth',
    'django.contrib.contenttypes',
    'django.contrib.sessions',
    'django.contrib.messages',
    'django.contrib.staticfiles',
    'user',    #加上这行
    'news_info' #加上这行
]

#setting.py文件里面,补上'DIRS'= templates模板的路径
TEMPLATES = [
    {
        'BACKEND': 'django.template.backends.django.DjangoTemplates',
        'DIRS': [os.path.join(BASE_DIR , 'templates')],   #改这行
步骤4启动项目,访问127.0.0.1:8000/index页面
python manage.py runserver  #输入这个命令启动服务

Performing system checks...

System check identified no issues (0 silenced).

You have 14 unapplied migration(s). Your project may not work properly until you apply the migrations for
app(s): admin, auth, contenttypes, sessions.
Run 'python manage.py migrate' to apply them.
April 12, 2019 - 18:14:26
Django version 2.0.2, using settings 'news.settings'
Starting development server at http://127.0.0.1:8000/
Quit the server with CTRL-BREAK.
数据库 (Model 模型)
用django不用写sql吗,what???
models.py 定义模型class,会自己映射到数据库里面的表是啥意思? 也就是说 每1个class就对应数据库里面的一张表,
#步骤1: models.py文件内容
from django.db import models

# Create your models here.

#一个类文件就是一个表,一个属性就是一个字段
class NewsInfo(models.Model):
    title=models.CharField(max_length=50)
    content=models.TextField()


#步骤2: 然后执行如下命令 python manage.py makemigrations
G:\interfaceTest>cd G:\interfaceTest\news

G:\interfaceTest\news>python manage.py makemigrations
Migrations for 'user':
  user\migrations\0001_initial.py
    - Create model NewsInfo

#步骤3:执行python manage.py migrate,自动生成表
G:\interfaceTest\news>python manage.py migrate
Operations to perform:
  Apply all migrations: admin, auth, contenttypes, sessions
Running migrations:
  Applying contenttypes.0001_initial... OK
  Applying auth.0001_initial... OK
  Applying admin.0001_initial... OK
  Applying admin.0002_logentry_remove_auto_add... OK
  Applying contenttypes.0002_remove_content_type_name... OK
  Applying auth.0002_alter_permission_name_max_length... OK
  Applying auth.0003_alter_user_email_max_length... OK
  Applying auth.0004_alter_user_username_opts... OK
  Applying auth.0005_alter_user_last_login_null... OK
  Applying auth.0006_require_contenttypes_0002... OK
  Applying auth.0007_alter_validators_add_error_messages... OK
  Applying auth.0008_alter_user_username_max_length... OK
  Applying auth.0009_alter_user_last_name_max_length... OK
  Applying sessions.0001_initial... OK
创建超级管理员账号
http://127.0.0.1:8000/admin/login/
G:\interfaceTest\news>python manage.py createsuperuser

You have 1 unapplied migration(s). Your project may not work properly until you apply the migrations for app(s): user.
Run 'python manage.py migrate' to apply them.
Username (leave blank to use 'adm'): adm
Email address: 123@qq.com
Password:
Password (again):
This password is too short. It must contain at least 8 characters.
This password is too common.
This password is entirely numeric.
Password:
Password (again):           我输入的是我的名字拼音
Superuser created successfully.
设置语言成中文(默认是英文)
#setting.py里面修改这两处
#LANGUAGE_CODE = 'en-us'
LANGUAGE_CODE = 'zh-hans'

#TIME_ZONE = 'UTC'
TIME_ZONE = 'Asia/Shanghai'
把刚才建的表展示在admin里面
from django.contrib import admin

# Register your models here.

#admin.py文件里面加入下面两行
from .models import NewsInfo

admin.site.register(NewsInfo)

参考文章:
项目规范
View层:处理输入,输出相关的逻辑,包括参数校验,数据转换等
Manager层: 处理核心业务逻辑
Model层: 处理db操作相关逻辑
工作原理
1. 用户通过浏览器请求一个页面URL

2. 请求到达Request Middlewares中间件,中间件对request做一些预处理或者直接response请求

3. URLConf通过urls.py文件和请求的URL找到相应的View

4. View Middlewares被访问,它同样可以对request做一些处理或者直接返回response

5. 调用View中的函数

6. View中的方法可以选择性的通过Models访问底层的数据

7. 所有的Model-to-DB的交互都是通过manager完成的

8. 如果需要,Views可以使用一个特殊的Context

9. Context被传给Template用来生成页面

a. Template使用Filters和Tags去渲染输出

b. 输出被返回到View

c. HTTPResponse被发送到Response Middlewares

d. 任何Response Middlewares都可以丰富response或者返回一个完全不同的response

e. Response返回到浏览器,呈现给用户 
运行django项目
找到文件,输入命令
python manage.py migrate
Traceback (most recent call last):
  File "manage.py", line 7, in <module>
    import cat_django
ImportError: No module named cat_django
查看requirement.txt 内容如下,然后执行pip install -r /xxx/deploy/requirements.txt
celery==3.1.24
cryptography==1.7.1
cat_client==2.5.0
django-redis-cache
django-log-request-id
django==1.6.11
django-celery
gevent
gunicorn
mysql-python
pycrypto
pyffx
pymysql
xxx-django-mysqlpool>=0.3.2
pyopenssl==17.1.0
python-stdnum
pytz
redis
requests
python-baseconv
python-stdnum
xxxxx-deploy-common>=0.1.73
xxxxx-dynamic-cache==0.0.2
simplejson
supervisor
garena-common==1.0.1
email
phonenumbers
xlrd
xlwt
# add no-binary option to avoid build proto file failure
protobuf==3.3.0 --no-binary=protobuf
PyJWT
pyBarcode
huBarcode
pdfkit==0.6.1
pyyaml
schedule
python-daemon==2.1.2
XlsxWriter==1.0.2
unicodecsv
boto3==1.7.15
confluent_kafka
typing
num2words
django-transaction-hooks
setproctitle==1.1.10
pyexcelerate==0.7.3
jsonfield


 3万+
3万+

 被折叠的 条评论
为什么被折叠?
被折叠的 条评论
为什么被折叠?
 到【灌水乐园】发言


