


文章目录
推荐阅读:
【01】Netty从0到1系列之I/O模型
【02】Netty从0到1系列之NIO
【03】Netty从0到1系列之Selector
【04】Netty从0到1系列之Channel
【05】Netty从0到1系列之Buffer(上)
【06】Netty从0到1系列之Buffer(下)
【07】Netty从0到1系列之零拷贝技术
【08】Netty从0到1系列之整体架构、入门程序
【09】Netty从0到1系列之EventLoop
【10】Netty从0到1系列之EventLoopGroup
【11】Netty从0到1系列之Future
【12】Netty从0到1系列之Promise
【13】Netty从0到1系列之Netty Channel
【14】Netty从0到1系列之ChannelFuture
【15】Netty从0到1系列之CloseFuture
【16】Netty从0到1系列之Netty Handler
【17】Netty从0到1系列之Netty Pipeline【上】
【18】Netty从0到1系列之Netty Pipeline【下】
【19】Netty从0到1系列之Netty ByteBuf【上】
一、ByteBuf【中】
1.4 ByteBuf的核心API与用法
1.4.1 基础ByteBuf操作
package cn.tcmeta.bytebuf;

import io.netty.buffer.ByteBuf;
import io.netty.buffer.Unpooled;
import io.netty.util.CharsetUtil;

import java.nio.charset.StandardCharsets;

/**
 * @author: laoren
 * @description: ByteBuf基础操作
 * @version: 1.0.0
 */
public class BasicByteBufOperation {
    public static void main(String[] args) {
        // 1. 创建ByteBuf - 使用UnPooled工具类
        ByteBuf buffer = Unpooled.buffer(10);
        System.out.println("--------------初始状态--------------------");

        System.out.println("初始状态: " + bufferToString(buffer));

        // 2. 写入数据
        buffer.writeBytes("hello".getBytes(StandardCharsets.UTF_8));
        System.out.println("--------------写入5个字节后--------------------");
        System.out.println("写入5个字节后: " + bufferToString(buffer));

        // 3. 继续写入数据【测试自动扩容】
        buffer.writeBytes(" world".getBytes(StandardCharsets.UTF_8));
        System.out.println("--------------写入6个字节后--------------------");
        System.out.println("写入6个字节后: " + bufferToString(buffer));

        // 4. 读取数据
        byte[] readData = new byte[5]; // 读取5个字节
        buffer.readBytes(readData);
        System.out.println("--------------读取数据--------------------");
        System.out.println("读取到的数据: " + new String(readData, CharsetUtil.UTF_8));
        System.out.println("读取5个字节后状态: " + bufferToString(buffer));

        // 5. 标记和重置
        buffer.markReaderIndex(); // 标记读的位置
        byte b = buffer.readByte();
        System.out.println("--------------标记和重置--------------------");
        System.out.println("读取到的字节: " + (char)b);
        System.out.println("读取一个字节后状态: " + bufferToString(buffer));

        // 6. 重置到标记位置
        buffer.resetReaderIndex();
        System.out.println("--------------重置到标记位置--------------------");
        System.out.println("重置到标记位置后状态: " + bufferToString(buffer));

        // 7. 搜索操作
        int index = buffer.indexOf(0, buffer.capacity(), (byte) 'W');
        System.out.println("--------------搜索操作--------------------");
        System.out.println("找到W的位置: " + index);

        // 8. 释放资源【重要!】
        buffer.release();
    }

    private static String bufferToString(ByteBuf buffer) {
        return String.format("readerIndex=%d, writerIndex=%d, capacity=%d, readable=%d, writable=%d",
                buffer.readerIndex(), buffer.writerIndex(), buffer.capacity(),
                buffer.readableBytes(), buffer.writableBytes());
    }
}
--------------初始状态--------------------
初始状态: readerIndex=0, writerIndex=0, capacity=10, readable=0, writable=10
--------------写入5个字节后--------------------
写入5个字节后: readerIndex=0, writerIndex=5, capacity=10, readable=5, writable=5
--------------写入6个字节后--------------------
写入6个字节后: readerIndex=0, writerIndex=11, capacity=64, readable=11, writable=53
--------------读取数据--------------------
读取到的数据: hello
读取5个字节后状态: readerIndex=5, writerIndex=11, capacity=64, readable=6, writable=53
--------------标记和重置--------------------
读取到的字节:
读取一个字节后状态: readerIndex=6, writerIndex=11, capacity=64, readable=5, writable=53
--------------重置到标记位置--------------------
重置到标记位置后状态: readerIndex=5, writerIndex=11, capacity=64, readable=6, writable=53
--------------搜索操作--------------------
找到W的位置: -1
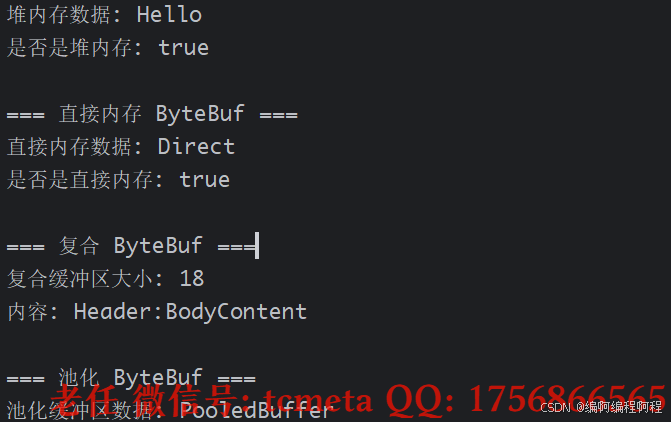
1.4.2 不同类型的ByteBuf
- 堆内存ByteBuf
- 直接内存ByteBuf
- 复合ByteBuf
- 池化ByteBuf
package cn.tcmeta.bytebuf;

import io.netty.buffer.ByteBuf;
import io.netty.buffer.CompositeByteBuf;
import io.netty.buffer.PooledByteBufAllocator;
import io.netty.buffer.Unpooled;
import io.netty.util.CharsetUtil;

/**
 * @author: laoren
 * @description: 不同类型的 ByteBuf
 * @version: 1.0.0
 */
public class DifferentByteBufTypes {
    public static void main(String[] args) {
        System.out.println("=== 堆内存 ByteBuf ===");
        demonstrateHeapByteBuf();

        System.out.println("\n=== 直接内存 ByteBuf ===");
        demonstrateDirectByteBuf();

        System.out.println("\n=== 复合 ByteBuf ===");
        demonstrateCompositeByteBuf();

        System.out.println("\n=== 池化 ByteBuf ===");
        demonstratePooledByteBuf();
    }

    /**
     * 堆内存ByteBuf
     */
    private static void demonstrateHeapByteBuf() {
        // 创建堆内存ByteBuf
        ByteBuf heapBuffer = Unpooled.buffer(10);
        heapBuffer.writeBytes("Hello".getBytes(CharsetUtil.UTF_8));
        System.out.println("堆内存数据: " + heapBuffer.toString(CharsetUtil.UTF_8));
        System.out.println("是否是堆内存: " + heapBuffer.hasArray());
        heapBuffer.release();
    }

    /**
     * 直接内存ByteBuf
     */
    private static void demonstrateDirectByteBuf() {
        // 创建直接内存ByteBuf
        ByteBuf directBuffer = Unpooled.directBuffer(10);
        directBuffer.writeBytes("Direct".getBytes(CharsetUtil.UTF_8));
        System.out.println("直接内存数据: " + directBuffer.toString(CharsetUtil.UTF_8));
        System.out.println("是否是直接内存: " + !directBuffer.hasArray());
        directBuffer.release();
    }

    /**
     * 复合ByteBuf
     */
    private static void demonstrateCompositeByteBuf() {
        // 创建复合ByteBuf
        CompositeByteBuf compositeBuffer = Unpooled.compositeBuffer();

        ByteBuf header = Unpooled.wrappedBuffer("Header:".getBytes(CharsetUtil.UTF_8));
        ByteBuf body = Unpooled.wrappedBuffer("BodyContent".getBytes(CharsetUtil.UTF_8));

        compositeBuffer.addComponents(true, header, body);
        System.out.println("复合缓冲区大小: " + compositeBuffer.readableBytes());
        System.out.println("内容: " + compositeBuffer.toString(CharsetUtil.UTF_8));

        compositeBuffer.release();
    }

    /**
     * 池化ByteBuf
     */
    private static void demonstratePooledByteBuf() {
        // 使用池化分配器
        PooledByteBufAllocator allocator = PooledByteBufAllocator.DEFAULT;
        ByteBuf pooledBuffer = allocator.buffer(20);

        pooledBuffer.writeBytes("PooledBuffer".getBytes(CharsetUtil.UTF_8));
        System.out.println("池化缓冲区数据: " + pooledBuffer.toString(CharsetUtil.UTF_8));

        // 重要:必须释放回池中
        pooledBuffer.release();
    }
}
1.4.3 引入计数与内存管理
package cn.tcmeta.bytebuf;

import io.netty.buffer.ByteBuf;
import io.netty.buffer.ByteBufAllocator;
import io.netty.buffer.Unpooled;

/**
 * @author: laoren
 * @date: 2025/9/4 15:48
 * @description: 引用计数与内存管理
 * @version: 1.0.0
 */
public class ReferenceCountingExample {
    public static void main(String[] args) {
        System.out.println("============= 引用计数示例 ===============");
        // 1. 创建ByteBuf, 初始【引用计数为1】
        ByteBuf buffer = Unpooled.buffer(10);
        System.out.println("初始引用计数: " + buffer.refCnt());

        // 2. 增加引用计数
        ByteBuf duplicate = buffer.retain(); // retain,会增加引用计数
        System.out.println("复制后引用计数: " + buffer.refCnt());

        // 3. 手动管理引用计数
        boolean released = buffer.release();
        System.out.println("第一次释放引用计数: " + released + ", 引用计数: " + buffer.refCnt());

        // 4. 再次释放
        released = buffer.release(); // 引用计数归0,正式释放
        System.out.println("第二次释放引用计数: " + released + ", 引用计数: " + buffer.refCnt());

        // 5. 异常模拟, 【尝试操作已经释放的缓冲区会导致异常产生】
        try {
            buffer.writeByte(1);
        }catch (Exception e){
            System.out.println("操作已经释放掉的缓冲区异常信息: " + e.getMessage().getClass().getSimpleName());
        }
    }
}
初始引用计数: 1
复制后引用计数: 2
第一次释放引用计数: false, 引用计数: 1
第二次释放引用计数: true, 引用计数: 0
操作已经释放掉的缓冲区异常信息: String
1.5 ByteBuf底层实现原理
1.5.1 ByteBuf的内存管理机制
ByteBuf 通过精细的内存管理机制实现高性能:
// 简化的 ByteBuf 内存管理实现
public abstract class AbstractByteBuf extends ByteBuf {
    // 读写指针
    private int readerIndex;
    private int writerIndex;
    private int markedReaderIndex;
    private int markedWriterIndex;
    private int maxCapacity;

    // 容量计算和扩展
    @Override
    public ByteBuf ensureWritable(int minWritableBytes) {
        if (minWritableBytes <= writableBytes()) {
            return this;
        }

        if (minWritableBytes > maxCapacity - writerIndex) {
            throw new IndexOutOfBoundsException("超过最大容量");
        }

        // 计算新容量
        int newCapacity = calculateNewCapacity(writerIndex + minWritableBytes);

        // 调整容量
        capacity(newCapacity);
        return this;
    }

    private int calculateNewCapacity(int minNewCapacity) {
        final int maxCapacity = this.maxCapacity;
        final int threshold = 4 * 1024 * 1024; // 4MB阈值

        if (minNewCapacity == threshold) {
            return threshold;
        }

        // 双倍扩容直到超过阈值
        if (minNewCapacity > threshold) {
            int newCapacity = minNewCapacity / threshold * threshold;
            if (newCapacity > maxCapacity - threshold) {
                newCapacity = maxCapacity;
            } else {
                newCapacity += threshold;
            }
            return newCapacity;
        }

        // 双倍扩容
        int newCapacity = 64;
        while (newCapacity < minNewCapacity) {
            newCapacity <<= 1; // 左移一位相当于乘以2
        }

        return Math.min(newCapacity, maxCapacity);
    }
}
1.5.2 内存池化实现
Netty 的内存池化机制通过 PooledByteBufAllocator 实现, 之后【详细讨论】.
核心源码如下所示:
// 简化的内存池实现原理
public class PooledByteBufAllocator extends AbstractByteBufAllocator {
    // 内存池核心数据结构
    private final PoolArena<byte[]>[] heapArenas;
    private final PoolArena<ByteBuffer>[] directArenas;

    // 线程本地缓存,提高分配性能
    private final ThreadLocal<PoolThreadCache> threadCache =
        new ThreadLocal<PoolThreadCache>() {
            @Override
            protected PoolThreadCache initialValue() {
                return new PoolThreadCache();
            }
        };

    @Override
    protected ByteBuf newHeapBuffer(int initialCapacity, int maxCapacity) {
        // 从线程本地缓存或内存池分配
        PoolThreadCache cache = threadCache.get();
        PoolArena<byte[]> arena = cache.heapArena;

        if (arena != null) {
            return arena.allocate(cache, initialCapacity, maxCapacity);
        }
        return new UnpooledHeapByteBuf(this, initialCapacity, maxCapacity);
    }
}

// 内存池arena管理不同大小的内存块
class PoolArena<T> {
    // 不同大小的内存块列表
    private final PoolSubpage<T>[] tinySubpagePools;
    private final PoolSubpage<T>[] smallSubpagePools;
    private final PoolChunkList<T> q050;
    private final PoolChunkList<T> q025;
    private final PoolChunkList<T> q000;
    private final PoolChunkList<T> qInit;
    private final PoolChunkList<T> q075;
    private final PoolChunkList<T> q100;

    // 分配内存
    PooledByteBuf<T> allocate(PoolThreadCache cache, int reqCapacity, int maxCapacity) {
        // 根据大小选择不同的分配策略
        if (reqCapacity <= 16) {
            // 微小内存分配
            return allocateTiny(cache, reqCapacity, maxCapacity);
        } else if (reqCapacity < pageSize) {
            // 小内存分配
            return allocateSmall(cache, reqCapacity, maxCapacity);
        } else {
            // 大内存分配
            return allocateNormal(cache, reqCapacity, maxCapacity);
        }
    }
}
测试示例:
package cn.tcmeta.bytebuf;

import io.netty.buffer.ByteBuf;
import io.netty.buffer.ByteBufAllocator;
import lombok.extern.slf4j.Slf4j;

/**
 * @author: laoren
 * @description: 扩容机制
 * @version: 1.0.0
 */
@Slf4j`
public class ByteBufDemo02 {
    public static void main(String[] args) {
        ByteBuf buffer = ByteBufAllocator.DEFAULT.buffer();
        log.info("buffer: {}", buffer);

        // 模拟扩容一下
        String s = "";
        for (int i = 0; i < 300; i++) {
            s += 'b';
        }

        System.out.println("------------------");
        buffer.writeBytes(s.getBytes());
        log.info("buffer: {}", buffer);
    }
}
16:05:06 [INFO ] [main] c buffer: PooledUnsafeDirectByteBuf(ridx: 0, widx: 0, cap: 256)
------------------
16:05:06 [INFO ] [main] c PooledUnsafeDirectByteBuf(ridx: 0, widx: 300, cap: 512)
1.5.3 扩容机制
扩容规则:
- 只在写操作时扩容:当
writerIndex即将超过当前容量时触发扩容。- 不会自动缩容:ByteBuf 容量可以增长,但不会因读取而自动缩小。
- 最大容量限制:每个 ByteBuf 都有
maxCapacity,超过会抛出异常。- 扩容后原数据保留:扩容不会丢失已有数据,readerIndex 和 writerIndex 相对位置不变。
当写入数据超过当前容量时,ByteBuf 会自动扩容:
- 计算新容量(确保大于等于所需容量且不超过 maxCapacity)
- 创建新的缓冲区(容量为新计算的容量)
- 将旧缓冲区的数据复制到新缓冲区
- 释放旧缓冲区
核心扩容逻辑(简化版):
int newCapacity = calculateNewCapacity(minNewCapacity);
ByteBuf newBuf = alloc().buffer(newCapacity);
newBuf.writeBytes(this, readerIndex(), readableBytes());
this.release();
return newBuf;
- 扩容触发条件
- 以下写方法在空间不足时会自动扩容
ByteBuf buf = Unpooled.buffer(16); // 初始容量16

buf.writeByte(1);        // OK
buf.writeInt(12345678);  // OK
// 当剩余空间不足时自动扩容
buf.writeBytes(new byte[100]); // 触发扩容

// 当调用writeXxx()系列方法写入数据时,若当前可写空间(writableBytes())不足以容纳待写入数据,会触发扩容。具体判断逻辑:
// if (待写入字节数 > writableBytes()) → 触发扩容
- 显式调用
ensureWritable()
ByteBuf buf = Unpooled.buffer(16);
buf.ensureWritable(100); // 确保至少有100字节可写空间,不足则扩容
- 扩容算法【核心规则】
Netty 使用 幂次增长 + 阈值控制 的策略,具体规则如下:
- 扩容增长策略: Netty 的扩容基于
AbstractByteBufAllocator中的calculateNewCapacity算法:
public int calculateNewCapacity(int minNewCapacity, int maxCapacity) {
        checkPositiveOrZero(minNewCapacity, "minNewCapacity");
        if (minNewCapacity > maxCapacity) {
            throw new IllegalArgumentException(String.format(
                    "minNewCapacity: %d (expected: not greater than maxCapacity(%d)",
                    minNewCapacity, maxCapacity));
        }
        final int threshold = CALCULATE_THRESHOLD; // 4 MiB page

        if (minNewCapacity == threshold) {
            return threshold;
        }

        // If over threshold, do not double but just increase by threshold.
        if (minNewCapacity > threshold) {
            int newCapacity = minNewCapacity / threshold * threshold;
            if (newCapacity > maxCapacity - threshold) {
                newCapacity = maxCapacity;
            } else {
                newCapacity += threshold;
            }
            return newCapacity;
        }

        // 64 <= newCapacity is a power of 2 <= threshold
        final int newCapacity = MathUtil.findNextPositivePowerOfTwo(Math.max(minNewCapacity, 64));
        return Math.min(newCapacity, maxCapacity);
    }
根据提供的 calculateNewCapacity 方法代码,可以总结出 Netty 中 ByteBuf 的扩容规则如下:
参数校验:
- minNewCapacity 必须为非负数
- minNewCapacity 不能超过 maxCapacity
阈值定义:
- 扩容阈值为 CALCULATE_THRESHOLD(4 MiB)
等于阈值的情况:
- 如果 minNewCapacity 等于阈值,则直接返回该阈值
超过阈值的情况:
-
当 minNewCapacity 大于阈值时,不进行倍增扩容
-
而是按阈值大小进行增量扩容:
-
计算 minNewCapacity 除以阈值的整数倍部分
-
如果加上一个阈值后不超过 maxCapacity,则增加一个阈值
-
否则直接设置为 maxCapacity
-
小于阈值的情况:
-
当 minNewCapacity 小于阈值时:
-
确保容量至少为 64
-
找到大于等于该值的最小 2 的次幂作为新容量
-
新容量不超过 maxCapacity
-
-
这种扩容策略旨在平衡内存使用效率和性能:
小容量时使用指数增长(2 的次幂),快速满足需求
大容量时使用线性增长(按 4MB 增加),避免过度分配内存
-
不同实现类的扩容行为
-
PooledByteBuf(池化)-
扩容时从内存池申请新的更大块内存。
-
原内存块归还到池中。
-
扩容成本较高(涉及池管理),但整体内存利用率高。
-
-
UnpooledHeapByteBuf(非池化堆内存)-
直接创建新的
byte[]数组。 -
复制原数据到新数组。
-
扩容成本 = 数据复制开销。
-
-
UnpooledDirectByteBuf(非池化直接内存)-
调用
PlatformDependent.allocateDirectNoCleaner()分配新内存。 -
使用
PlatformDependent.copyMemory()复制数据。 -
手动管理旧内存释放(通过
freeDirect())。
-
-
CompositeByteBuf(复合缓冲区)-
不进行传统扩容,而是通过添加新的组件(
ByteBuf)来容纳更多数据。 -
调用
addComp()或writeBytes()时自动添加新组件。 -
避免数据复制,性能更高。
-
-
CompositeByteBuf composite = Unpooled.compositeBuffer();
composite.writeBytes(new byte[1024]); // 自动添加组件,无需复制
- 最大容量限制
每个 ByteBuf 都有最大容量限制,超过会抛出异常:
ByteBuf buf = Unpooled.buffer(16, 128); // 最大容量128

buf.ensureWritable(200);
// 抛出: java.lang.IllegalStateException: writerIndex(16) + minWritableBytes(200) exceeds maxCapacity(128)
- 默认最大容量:
Integer.MAX_VALUE(2GB - 1) - 可通过构造函数或 allocator 配置限制。
- 手动扩容行为
- 预分配足够容量(推荐)
// 避免频繁扩容
ByteBuf buf = Unpooled.buffer(1024); // 预分配1KB
- 使用
ensureWritable()控制
buf.ensureWritable(512, false); // 第二个参数为false:不强制扩容,返回状态
if (buf.writableBytes() < 512) {
    // 手动处理扩容或拒绝
}
- 自定义 Allocator 控制行为
PooledByteBufAllocator allocator = new PooledByteBufAllocator(
    true,     // useDirectBuffers
    1,        // nHeapArena
    1,        // nDirectArena
    8192,     // pageSize
    11,       // maxOrder
    8,        // tinyCacheSize
    32,       // smallCacheSize
    4,        // normalCacheSize
    8192,     // chunkSize
    1048576   // directMemoryCacheAlignment
);
- 性能建议
| 建议 | 说明 |
|---|---|
| ✅ 预估容量并预分配 | 减少扩容次数,避免内存拷贝 |
✅ 频繁写入使用CompositeByteBuf | 零拷贝扩展 |
| ✅ 生产环境使用池化 | 减少 GC 和内存分配开销 |
| ⚠️ 避免小容量频繁写入 | 如从buffer(8)写入大量数据会多次扩容 |
| ❌ 不要依赖自动扩容处理大文件 | 应分块处理或预分配 |
- 调试扩容行为
ByteBuf buf = Unpooled.buffer(16);
System.out.println("初始容量: " + buf.capacity());

buf.writeBytes(new byte[100]);
System.out.println("写100字节后容量: " + buf.capacity());

buf.writeBytes(new byte[500]);
System.out.println("再写500字节后容量: " + buf.capacity());

System.out.println("最大容量: " + buf.maxCapacity());
初始容量: 16
写100字节后容量: 128
再写500字节后容量: 1024
最大容量: 2147483647
- 总结
| 特性 | 说明 |
|---|---|
| 扩容时机 | 写操作空间不足或调用ensureWritable() |
| 扩容算法 | 16/64/512 字节对齐,幂次增长 |
| 最大容量 | 受maxCapacity限制,超限抛异常 |
| 不自动缩容 | 容量只增不减,需手动trim()或释放重建 |
| 复合缓冲区 | 通过添加组件扩展,避免复制 |
| 性能建议 | 预分配、用池化、避免小缓冲写大数据 |
📌 核心口诀:
小步对齐,幂次增长;
写满即扩,上限防爆;
复合添加,零拷贝好;
预分配优,性能不掉。
1.5.4 扩容示例
package cn.tcmeta.bytebuf;

import io.netty.buffer.ByteBuf;
import io.netty.buffer.Unpooled;
import io.netty.util.CharsetUtil;

/**
 * ByteBuf扩容过程演示示例
 * 展示不同写入场景下的自动扩容机制
 */
public class ByteBufExpansionDemo {
    public static void main(String[] args) {
        // 创建初始容量为32,最大容量为1024的ByteBuf
        // 选择32是为了演示小容量时的翻倍扩容
        ByteBuf buf = Unpooled.buffer(32, 1024);
        printBufferStatus(buf, "初始状态");

        // 场景1:写入少量数据,不触发扩容
        byte[] smallData = "small data".getBytes(CharsetUtil.UTF_8);
        buf.writeBytes(smallData);
        printBufferStatus(buf, "写入" + smallData.length + "字节后(不扩容)");

        // 场景2:写入数据触发第一次扩容(32 → 64,小于64时翻倍)
        byte[] data1 = new byte[25]; // 当前可写空间:32-10=22,需要25 → 触发扩容
        buf.writeBytes(data1);
        printBufferStatus(buf, "写入25字节后(第一次扩容)");

        // 场景3:写入数据触发第二次扩容
        byte[] data2 = new byte[35];
        buf.writeBytes(data2);
        printBufferStatus(buf, "写入35字节后(第二次扩容)");

        // 场景4:写入大量数据,直接扩容到所需容量
        byte[] bigData = new byte[100];
        buf.writeBytes(bigData);
        printBufferStatus(buf, "写入100字节后(直接扩容到所需容量)");

        // 场景5:演示超过最大容量的情况
        try {
            byte[] tooBigData = new byte[800];
            buf.writeBytes(tooBigData);
        } catch (IndexOutOfBoundsException e) {
            System.out.println("\n触发异常: " + e.getMessage());
            printBufferStatus(buf, "异常后的状态");
        }

        // 释放缓冲区
        buf.release();
    }

    /**
     * 打印缓冲区当前状态
     */
    private static void printBufferStatus(ByteBuf buf, String step) {
        System.out.printf("[%s] 容量: %d, 读指针: %d, 写指针: %d, 可读字节: %d, 可写字节: %d%n",
                step,
                buf.capacity(),
                buf.readerIndex(),
                buf.writerIndex(),
                buf.readableBytes(),
                buf.writableBytes());
    }
}
[初始状态] 容量: 32, 读指针: 0, 写指针: 0, 可读字节: 0, 可写字节: 32
[写入10字节后(不扩容)] 容量: 32, 读指针: 0, 写指针: 10, 可读字节: 10, 可写字节: 22
[写入25字节后(第一次扩容)] 容量: 64, 读指针: 0, 写指针: 35, 可读字节: 35, 可写字节: 29
[写入35字节后(第二次扩容)] 容量: 128, 读指针: 0, 写指针: 70, 可读字节: 70, 可写字节: 58
[写入100字节后(直接扩容到所需容量)] 容量: 256, 读指针: 0, 写指针: 170, 可读字节: 170, 可写字节: 86
1.6 内存管理
1.6.1 内存回收
关于内存管理的一些建议:
- 由于 Netty 中有堆外内存的 ByteBuf 实现,
堆外内存最好是手动来释放,而不是等 GC 垃圾回收- UnpooledHeapByteBuf 使用的是 JVM 内存,只需等 GC 回收内存即可
- UnpooledDirectByteBuf 使用的就是直接内存了,需要特殊的方法来回收内存
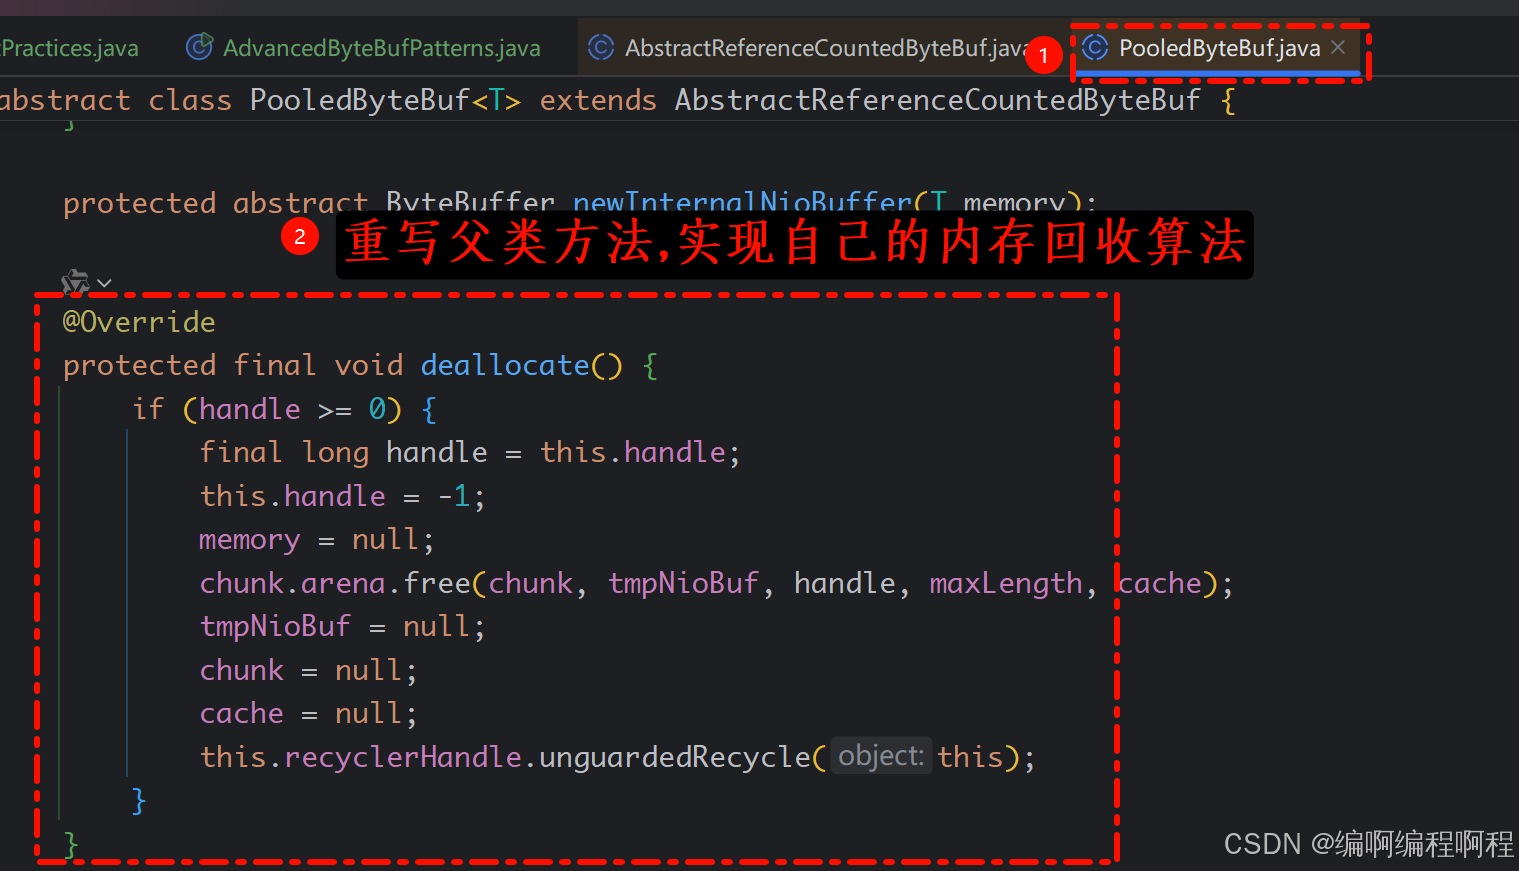
- PooledByteBuf 和它的子类使用了池化机制,需要更复杂的规则来回收内存
内存回收核心方法:
protected abstract void deallocate();
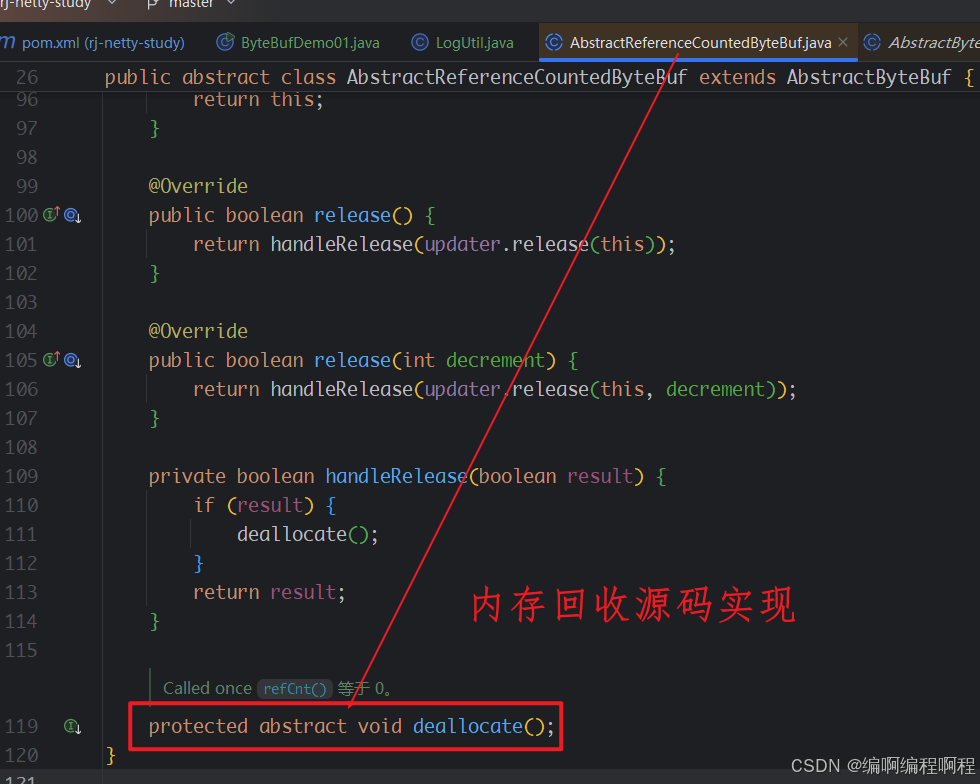
不同的ByteBuf实现类,去各自实现即可:
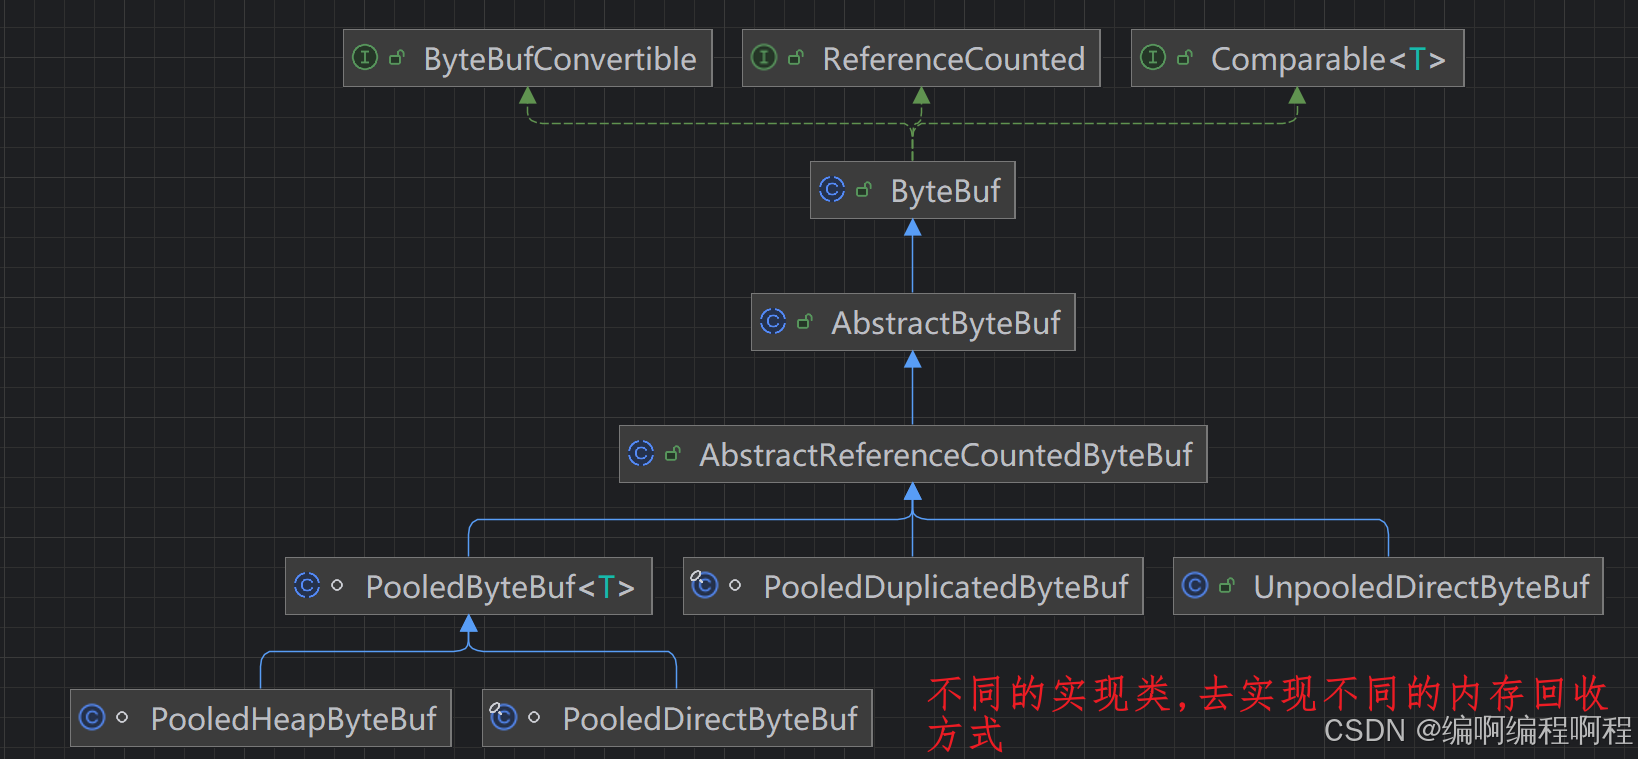
以PooledByteBuf为例
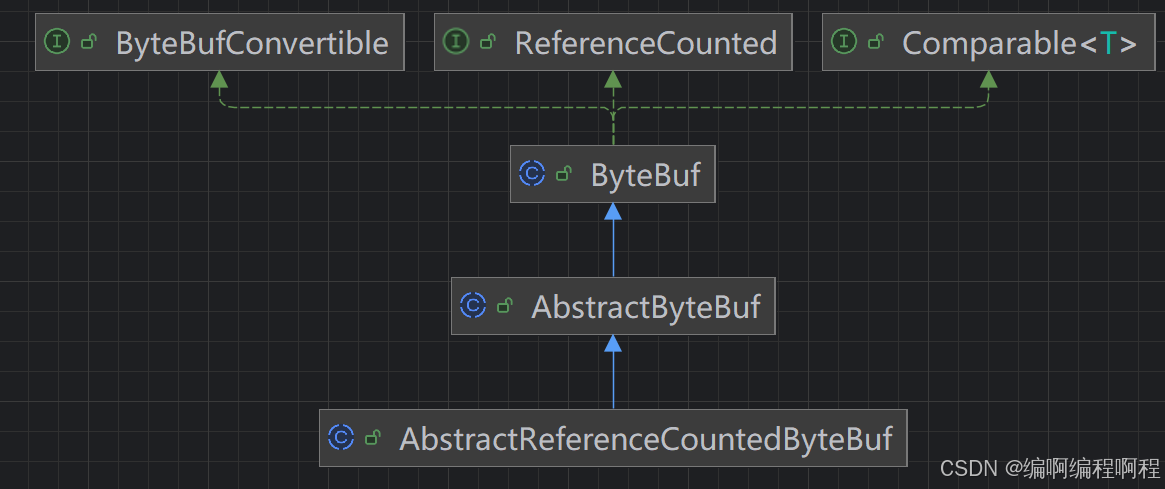
Netty 这里采用了引用计数法来控制回收内存,每个 ByteBuf 都实现了 ReferenceCounted 接口
public abstract class ByteBuf implements ReferenceCounted, Comparable<ByteBuf>, ByteBufConvertible {}
- 每个 ByteBuf 对象的初始计数为 1
- 调用 release 方法计数减 1,如果计数为 0,ByteBuf 内存被回收
- 调用 retain 方法计数加 1,表示调用者没用完之前,其它 handler 即使调用了 release 也不会造成回收
- 当计数为 0 时,底层内存会被回收,这时即使 ByteBuf 对象还在,其各个方法均无法正常使用
谁来负责 release ?如果按照如下方式来实现?
ByteBuf buf = ...
try {
    ...
} finally {
    buf.release();
}
因为 pipeline 的存在,一般需要将 ByteBuf 传递给下一个 ChannelHandler,如果在 finally 中 release 了,就失去了传递性(当然,如果在这个 ChannelHandler 内这个 ByteBuf 已完成了它的使命,那么便无须再传递)
内存释放原则
谁是最后的使用者, 谁就负责release- 所以一般是在
tailHandler当中进行释放.
源码分析如下所示:
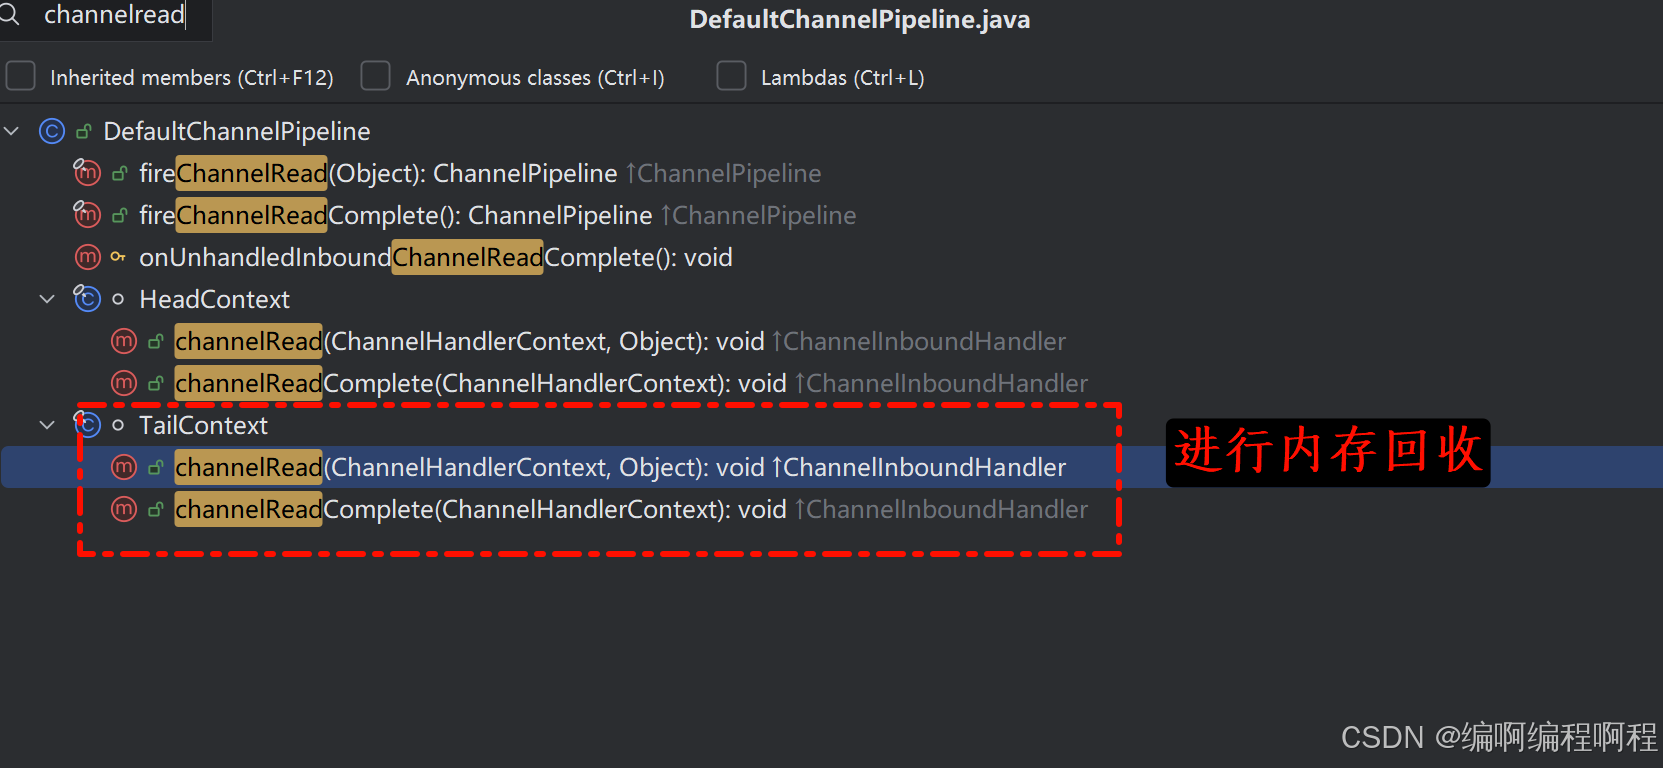
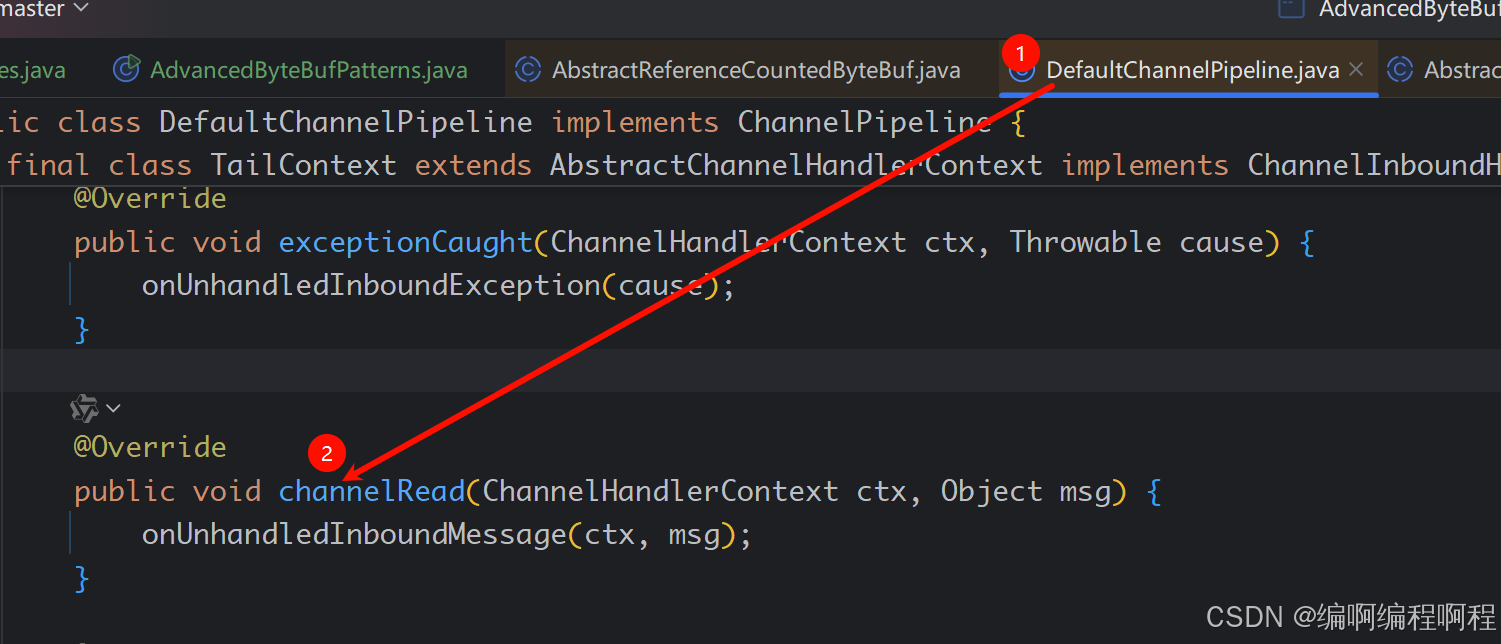
相关方法:
@Override
public void channelRead(ChannelHandlerContext ctx, Object msg) {
    onUnhandledInboundMessage(ctx, msg);
}

protected void onUnhandledInboundMessage(ChannelHandlerContext ctx, Object msg) {
    onUnhandledInboundMessage(msg);
    if (logger.isDebugEnabled()) {
        logger.debug("Discarded message pipeline : {}. Channel : {}.",
                     ctx.pipeline().names(), ctx.channel());
    }
}

protected void onUnhandledInboundMessage(Object msg) {
    try {
        logger.debug(
            "Discarded inbound message {} that reached at the tail of the pipeline. " +
            "Please check your pipeline configuration.", msg);
    } finally {
        ReferenceCountUtil.release(msg);
    }
}
最终释放代码:
public static boolean release(Object msg) {
    if (msg instanceof ReferenceCounted) {
        return ((ReferenceCounted) msg).release();
    }
    return false;
}
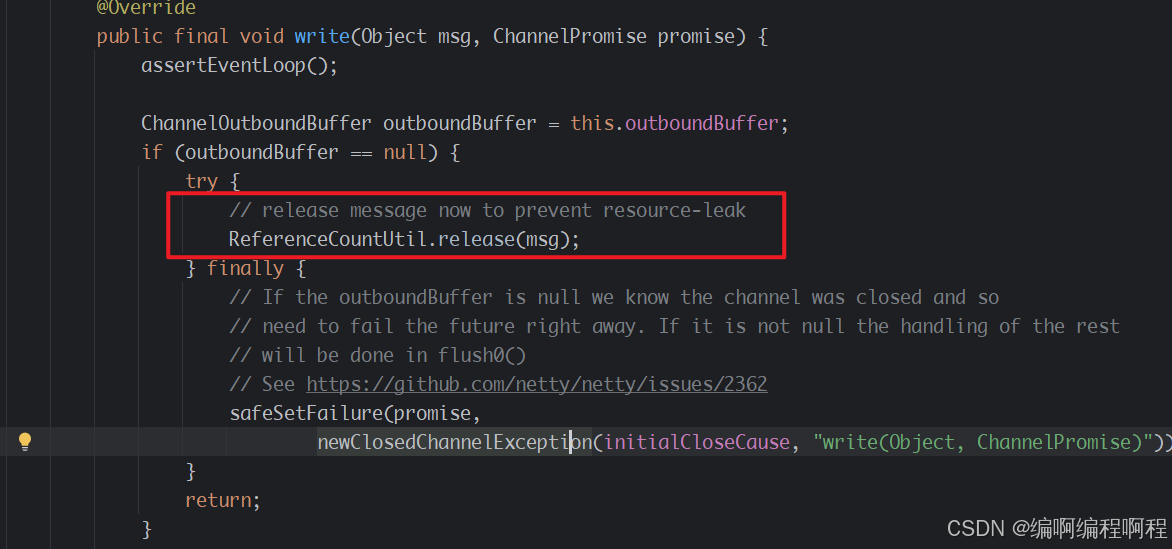
HeadContext释放ByteBuf相关代码:
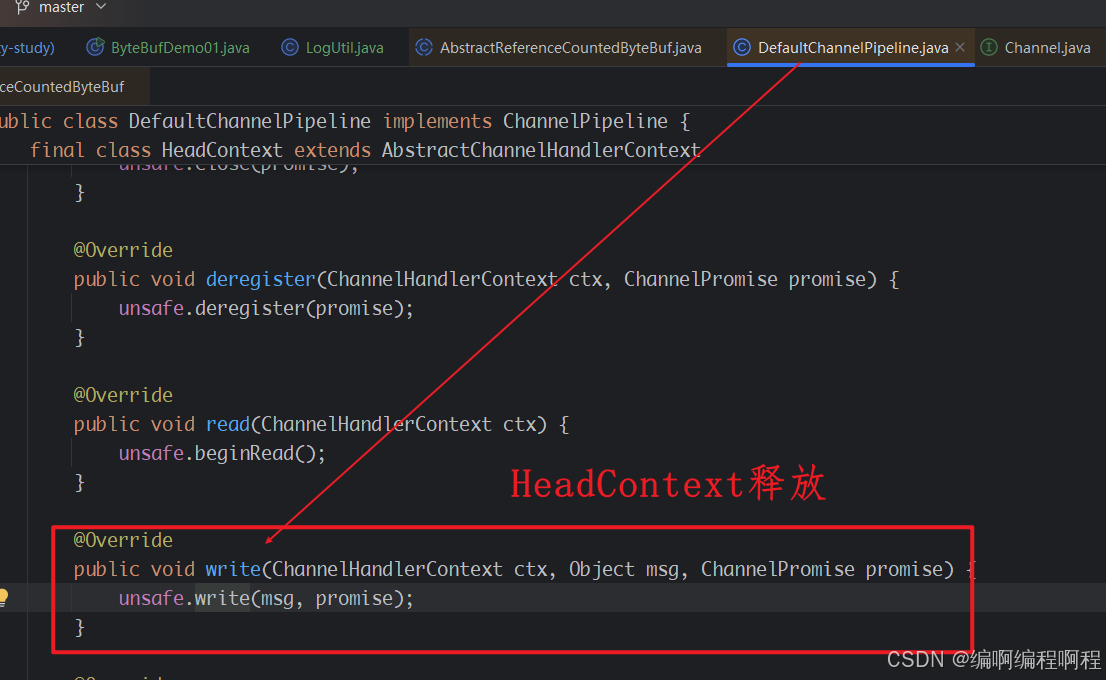
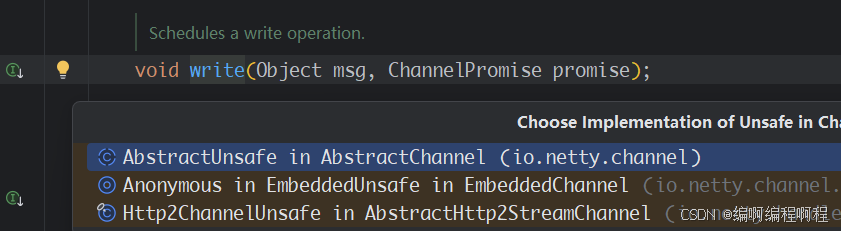
 public final void write(Object msg, ChannelPromise promise) {
            assertEventLoop();

            ChannelOutboundBuffer outboundBuffer = this.outboundBuffer;
            if (outboundBuffer == null) {
                try {
                    // release message now to prevent resource-leak
                    ReferenceCountUtil.release(msg);
                } finally {
                    // If the outboundBuffer is null we know the channel was closed and so
                    // need to fail the future right away. If it is not null the handling of the rest
                    // will be done in flush0()
                    // See https://github.com/netty/netty/issues/2362
                    safeSetFailure(promise,
                            newClosedChannelException(initialCloseCause, "write(Object, ChannelPromise)"));
                }
                return;
            }
public static boolean release(Object msg) {
    if (msg instanceof ReferenceCounted) {
        return ((ReferenceCounted) msg).release();
    }
    return false;
}
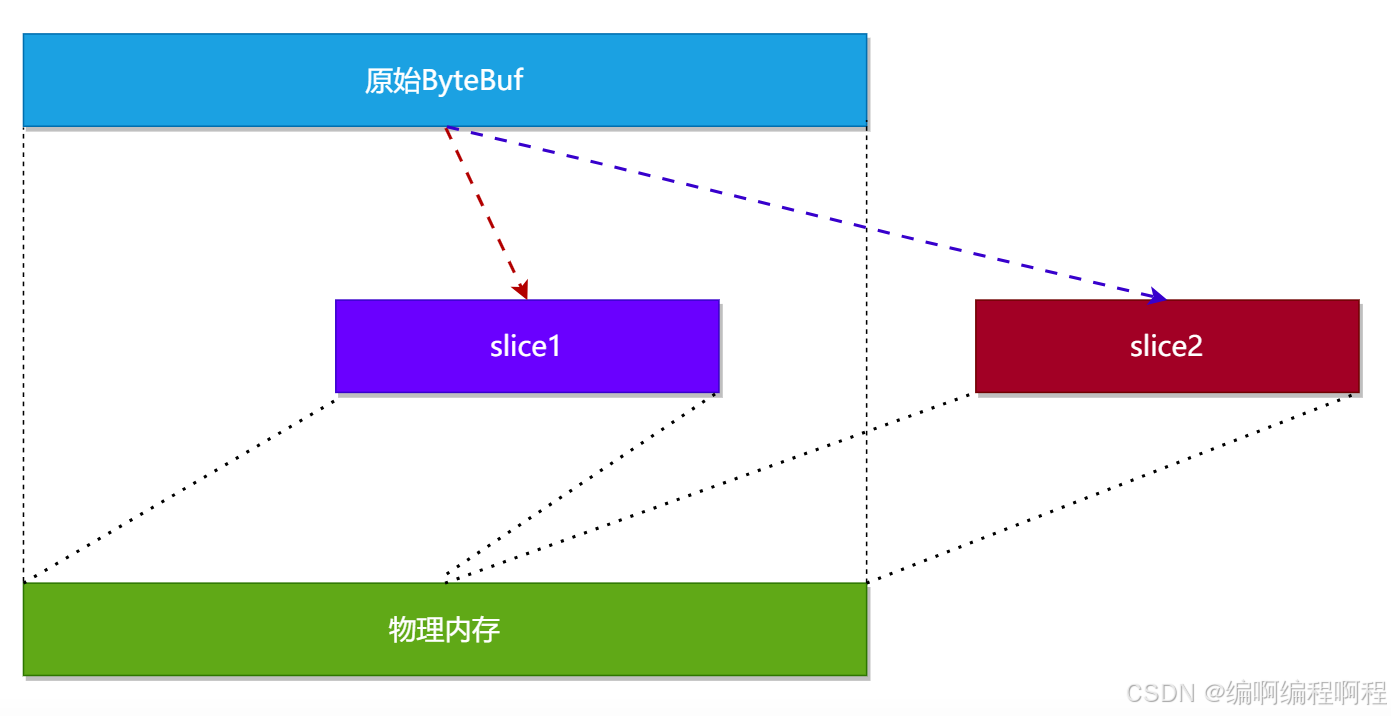
1.6.2 slice
【零拷贝】的体现之一,对原始 ByteBuf 进行切片成多个 ByteBuf,切片后的 ByteBuf 并没有发生内存复制,而是使用原始 ByteBuf 的内存,切片后的 ByteBuf 维护独立的 read,write 指针.
slice() 是 Netty ByteBuf 中的一个核心方法,它创建原始缓冲区的一个零拷贝视图。这个方法返回一个新的 ByteBuf 对象,该对象与原始缓冲区共享底层存储数据,但拥有独立的读写指针和标记。
slice 方法的核心特性:
- 零拷贝:不复制底层数据,只是创建数据视图
- 共享数据:与原始缓冲区共享同一块内存区域
- 独立指针:拥有独立的 readerIndex、writerIndex 和标记
- 只读支持:可以创建只读切片
- 引用计数:增加原始缓冲区的引用计数
// 创建从当前readerIndex开始到writerIndex结束的切片
ByteBuf slice();

// 创建从指定索引开始,指定长度区域的切片
ByteBuf slice(int index, int length);

// 创建只读切片
ByteBuf readSlice(int length);
示例:
package cn.tcmeta.bytebuf;

import io.netty.buffer.ByteBuf;
import io.netty.buffer.ByteBufAllocator;
import io.netty.buffer.ByteBufUtil;

/**
 * @author: laoren
 * @description: slice() 方法
 * @version: 1.0.0
 */
public class ByteBufDemo03 {
    public static void main(String[] args) {
        ByteBuf buffer = ByteBufAllocator.DEFAULT.buffer(10);
        buffer.writeBytes(new byte[]{1, 2, 3, 4});
        // 读取一个字节
        buffer.readByte();
        // 查看内存结构: Netty提供的工具类
        // ByteBufUtil.prettyHexDump( buffer)
        System.out.println(ByteBufUtil.prettyHexDump( buffer));
    }
}

这时调用 slice 进行切片,无参 slice 是从原始 ByteBuf 的 read index 到 write index 之间的内容进行切片,切片后的 max capacity 被固定为这个区间的大小,因此不能追加 write;
package cn.tcmeta.bytebuf;

import io.netty.buffer.ByteBuf;
import io.netty.buffer.ByteBufAllocator;
import io.netty.buffer.ByteBufUtil;

/**
 * @author: laoren
 * @description: slice() 方法
 * @version: 1.0.0
 */
public class ByteBufDemo04 {
    public static void main(String[] args) {
        ByteBuf buffer = ByteBufAllocator.DEFAULT.buffer(10);
        buffer.writeBytes(new byte[]{1, 2, 3, 4});
        // 读取一个字节
        buffer.readByte();
        System.out.println(ByteBufUtil.prettyHexDump(buffer));

        // 调用slice() 方法, 创建一个新的ByteBuf
        ByteBuf sliceByteBuf = buffer.slice();
        System.out.println(ByteBufUtil.prettyHexDump(sliceByteBuf));

        // 使用原始的buffer再读取一个字节
        buffer.readByte();
        System.out.println(ByteBufUtil.prettyHexDump(buffer));

        // 查看sliceByteBuf的状态
        System.out.println(ByteBufUtil.prettyHexDump(sliceByteBuf));

    }
}
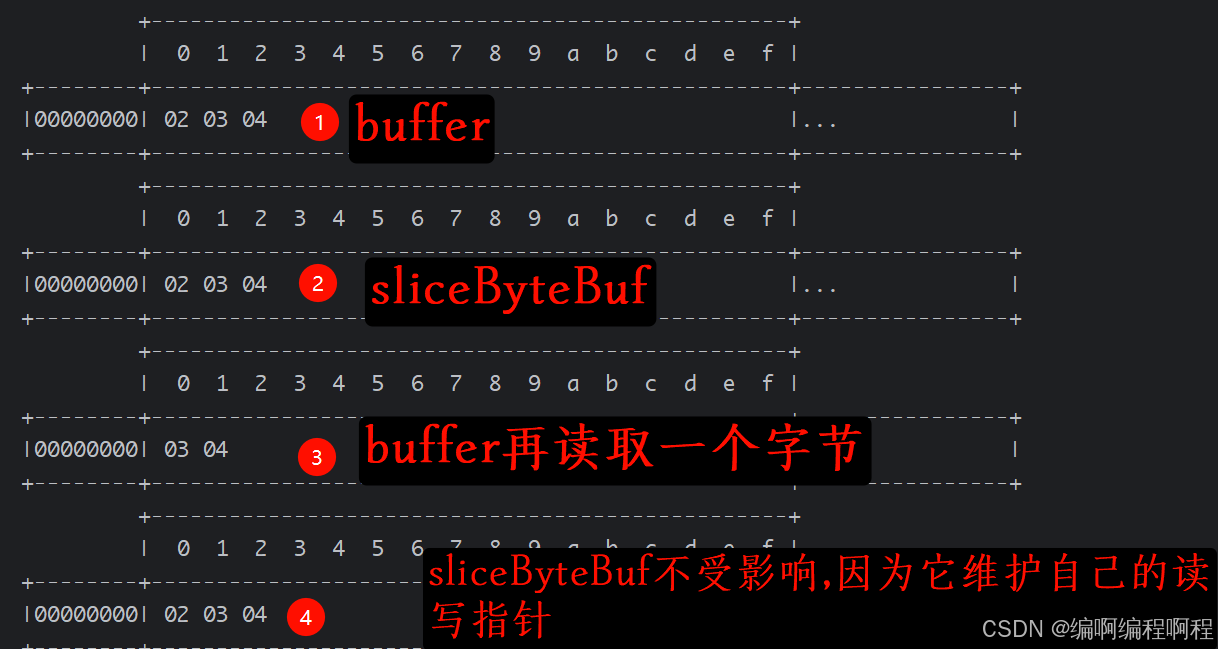
这时的 slice 不受影响,因为它有独立的读写指针;
如果slice被更改了,则原始的ByteBuf也会更改【反之亦然】.因为使用的是同一块内存.
package cn.tcmeta.bytebuf;

import io.netty.buffer.ByteBuf;
import io.netty.buffer.ByteBufAllocator;
import io.netty.buffer.ByteBufUtil;

/**
 * @author: laoren
 * @description: slice() 方法
 * @version: 1.0.0
 */
public class ByteBufDemo05 {
    public static void main(String[] args) {
        ByteBuf buffer = ByteBufAllocator.DEFAULT.buffer(10);
        buffer.writeBytes(new byte[]{1, 2, 3, 4});
        // 读取一个字节
        buffer.readByte();
        System.out.println(ByteBufUtil.prettyHexDump(buffer));

        // 调用slice() 方法, 创建一个新的ByteBuf
        ByteBuf sliceByteBuf = buffer.slice();
        System.out.println(ByteBufUtil.prettyHexDump(sliceByteBuf));

        // 使用原始的buffer再添加一个
        // buffer.writeByte(5);
        // System.out.println(ByteBufUtil.prettyHexDump(buffer));
        // System.out.println(ByteBufUtil.prettyHexDump(sliceByteBuf));

        // slice, 从原始 ByteBuf 的 read index 到 write index 之间的内容进行切片
        // 切片后的max capacity被固定为这个区间的大小,因此不能写了
        // sliceByteBuf.writeByte(5);

        // 使用原始的buffer再修改一个字节
        // buffer.setByte(1, 8);
        // System.out.println(ByteBufUtil.prettyHexDump(buffer));
        // System.out.println(ByteBufUtil.prettyHexDump(sliceByteBuf));

        // 使用sliceByteBuf再修改一个字节
        sliceByteBuf.setByte(1, 6);
        System.out.println(ByteBufUtil.prettyHexDump(buffer));
        System.out.println(ByteBufUtil.prettyHexDump(sliceByteBuf));
    }
}
1.6.3 duplicate
【零拷贝】的体现之一,就好比截取了原始 ByteBuf 所有内容,并且没有 max capacity 的限制,也是与原始 ByteBuf 使用同一块底层内存,只是读写指针是独立的
// 返回共享此缓冲区的整个区域的缓冲区。修改返回的缓冲区或此缓冲区的内容会影响彼此的内容,同时它们维护单独的索引和标记。此方法不会修改 readerIndex 此缓冲区的 或 writerIndex 。
// 读取器和写入器标记不会重复。另请注意,此方法不会调用 retain() ,因此引用计数不会增加。
// 返回:
//一个缓冲区,其可读内容等效 slice()于 .但是,此缓冲区将共享基础缓冲区的容量,因此允许在必要时访问所有基础内容
public abstract ByteBuf duplicate();
package cn.tcmeta.bytebuf;

import io.netty.buffer.ByteBuf;
import io.netty.buffer.ByteBufAllocator;
import io.netty.buffer.ByteBufUtil;

import java.util.concurrent.TimeUnit;

/**
 * @author: laoren
 * @description: duplicate() 方法
 * @version: 1.0.0
 */
public class ByteBufDemo06 {
    public static void main(String[] args) {
        ByteBuf buffer = ByteBufAllocator.DEFAULT.buffer(10);
        buffer.writeBytes(new byte[]{1, 2, 3, 4});
        System.out.println(ByteBufUtil.prettyHexDump(buffer));

        ByteBuf duplicateByteBuf = buffer.duplicate();
        log( duplicateByteBuf);

        duplicateByteBuf.readByte();
        log(buffer);
        log(duplicateByteBuf);


        duplicateByteBuf.writeBytes(new byte[]{5, 6, 7, 8, 9, 10});
        log(buffer);
        log(duplicateByteBuf);
    }

    public static void log(ByteBuf buffer) {
        System.out.println("***************************************************************************************");
        System.out.println("readIndex = " + buffer.readerIndex() + " , writeIndex = " + buffer.writerIndex() + " , 容量: " + buffer.capacity());
        System.out.println(ByteBufUtil.prettyHexDump(buffer));
    }
}
         +-------------------------------------------------+
         |  0  1  2  3  4  5  6  7  8  9  a  b  c  d  e  f |
+--------+-------------------------------------------------+----------------+
|00000000| 01 02 03 04                                     |....            |
+--------+-------------------------------------------------+----------------+
***************************************************************************************
readIndex = 0 , writeIndex = 4 , 容量: 10
         +-------------------------------------------------+
         |  0  1  2  3  4  5  6  7  8  9  a  b  c  d  e  f |
+--------+-------------------------------------------------+----------------+
|00000000| 01 02 03 04                                     |....            |
+--------+-------------------------------------------------+----------------+
***************************************************************************************
readIndex = 1 , writeIndex = 4 , 容量: 10
         +-------------------------------------------------+
         |  0  1  2  3  4  5  6  7  8  9  a  b  c  d  e  f |
+--------+-------------------------------------------------+----------------+
|00000000| 02 03 04                                        |...             |
+--------+-------------------------------------------------+----------------+
***************************************************************************************
readIndex = 0 , writeIndex = 4 , 容量: 10
         +-------------------------------------------------+
         |  0  1  2  3  4  5  6  7  8  9  a  b  c  d  e  f |
+--------+-------------------------------------------------+----------------+
|00000000| 01 02 03 04                                     |....            |
+--------+-------------------------------------------------+----------------+
***************************************************************************************
readIndex = 1 , writeIndex = 10 , 容量: 10
         +-------------------------------------------------+
         |  0  1  2  3  4  5  6  7  8  9  a  b  c  d  e  f |
+--------+-------------------------------------------------+----------------+
|00000000| 02 03 04 05 06 07 08 09 0a                      |.........       |
+--------+-------------------------------------------------+----------------+
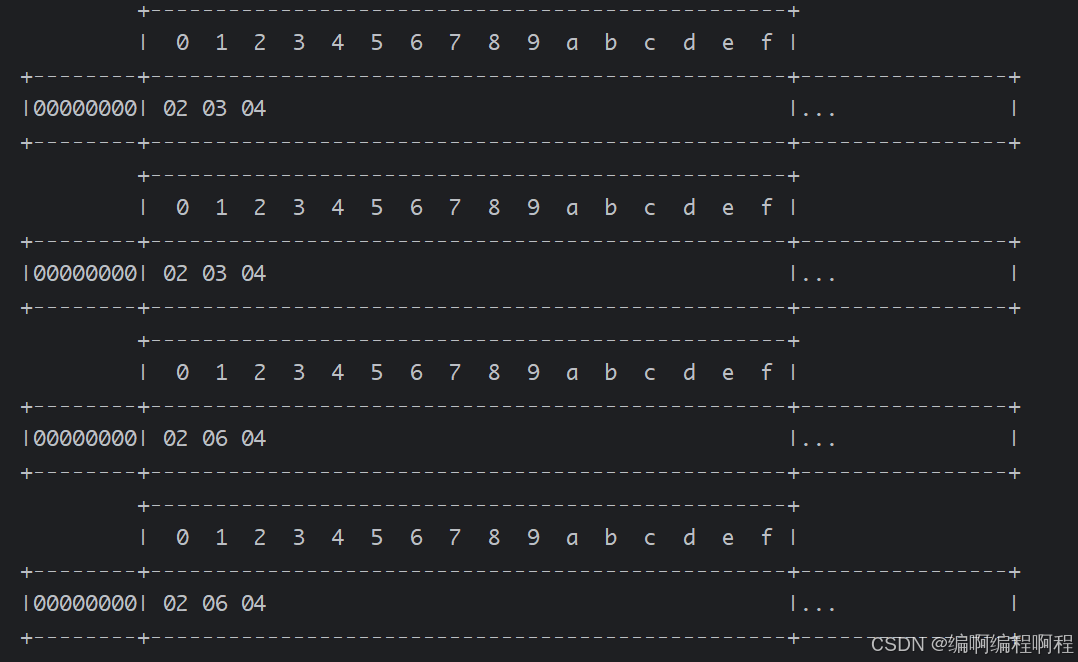
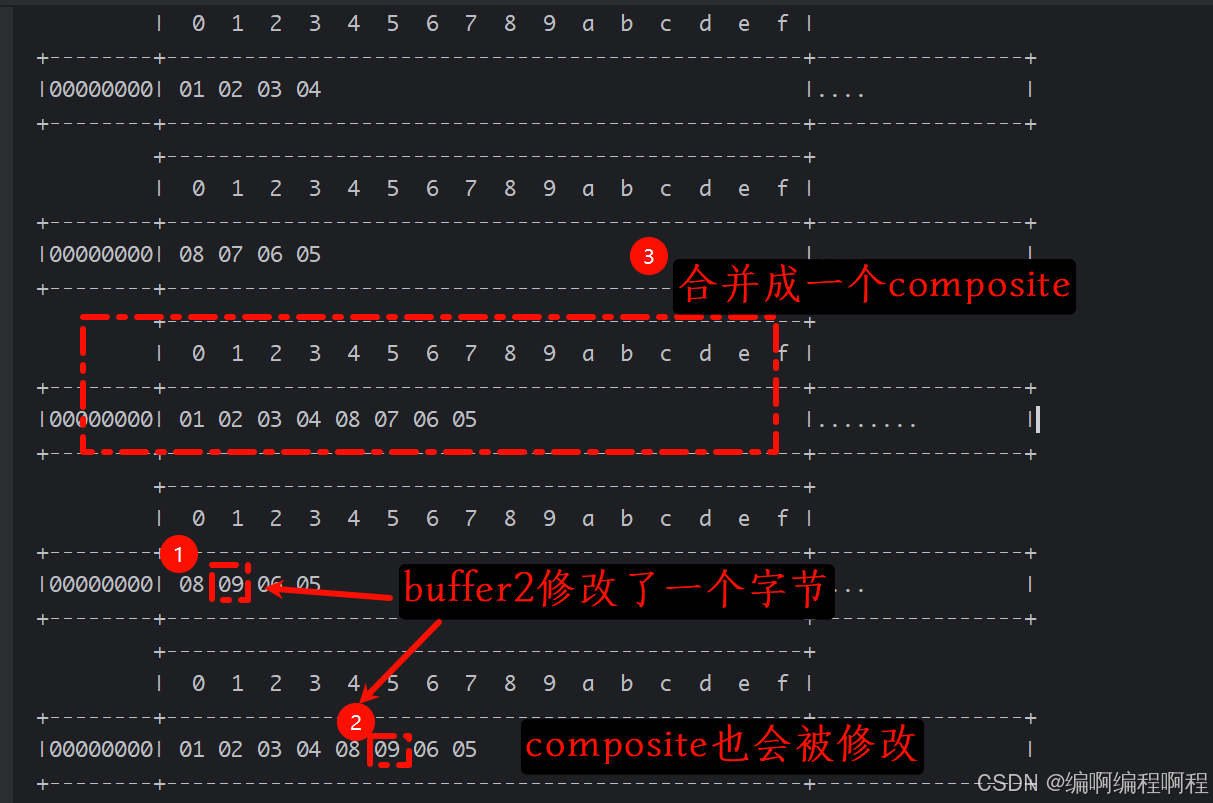
1.6.4 CompositeByteBuf
【零拷贝】的体现之一,可以将多个 ByteBuf 合并为一个逻辑上的 ByteBuf,避免拷贝
package cn.tcmeta.bytebuf;

import io.netty.buffer.ByteBuf;
import io.netty.buffer.ByteBufAllocator;
import io.netty.buffer.ByteBufUtil;
import io.netty.buffer.CompositeByteBuf;

/**
 * @author: laoren
 * @description: CompositeByteBuf
 * @version: 1.0.0
 */
public class ByteBufDemo07 {
    public static void main(String[] args) {
        ByteBuf buffer1 = ByteBufAllocator.DEFAULT.buffer(5);
        buffer1.writeBytes(new byte[]{1, 2, 3, 4});
        System.out.println(ByteBufUtil.prettyHexDump(buffer1));

        ByteBuf buffer2 = ByteBufAllocator.DEFAULT.buffer(5);
        buffer2.writeBytes(new byte[]{8, 7, 6, 5});
        System.out.println(ByteBufUtil.prettyHexDump(buffer2));

        CompositeByteBuf compositeByteBuf = ByteBufAllocator.DEFAULT.compositeBuffer();
        compositeByteBuf.addComponents(true, buffer1, buffer2);
        System.out.println(ByteBufUtil.prettyHexDump(compositeByteBuf));

        buffer2.setByte(1, 9); // buffer2修改一个字节, compositeByteBuf也会修改
        System.out.println(ByteBufUtil.prettyHexDump(buffer2));
        System.out.println(ByteBufUtil.prettyHexDump(compositeByteBuf));
    }
}
1.6.5 wrapperdBuffer
Unpooled是一个工具类,类如其名,提供了非池化的 ByteBuf 创建、组合、复制等操作这里仅介绍其跟【零拷贝】相关的 wrappedBuffer 方法,可以用来包装 ByteBuf
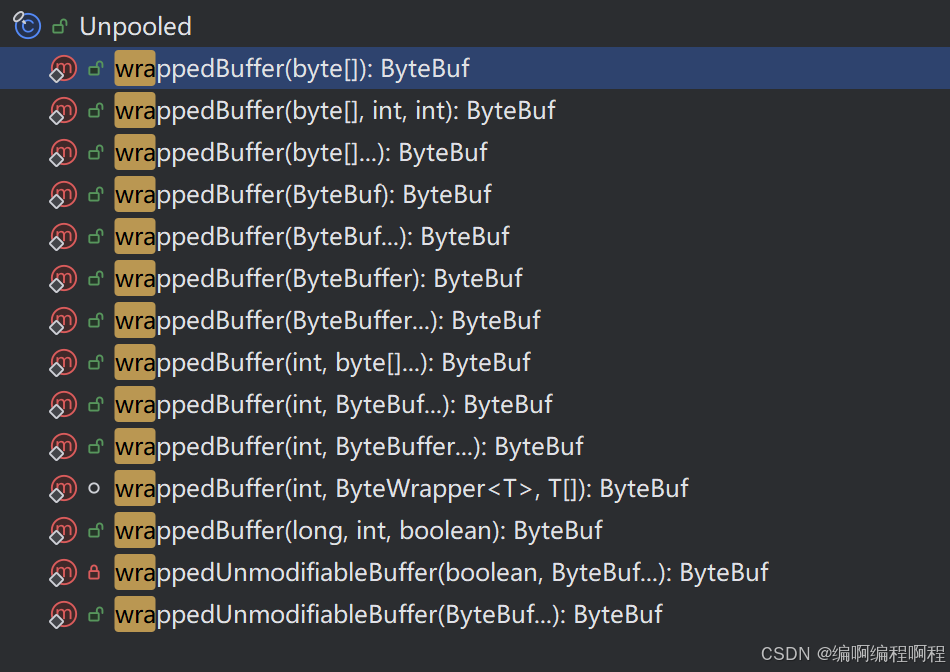
static <T> ByteBuf wrappedBuffer(int maxNumComponents, ByteWrapper<T> wrapper, T[] array) {
    switch (array.length) {
        case 0:
            break;
        case 1:
            if (!wrapper.isEmpty(array[0])) {
                return wrapper.wrap(array[0]);
            }
            break;
        default:
            for (int i = 0, len = array.length; i < len; i++) {
                T bytes = array[i];
                if (bytes == null) {
                    return EMPTY_BUFFER;
                }
                if (!wrapper.isEmpty(bytes)) {
                    // 底层调用了【CompositeByBuf】
                    return new CompositeByteBuf(ALLOC, false, maxNumComponents, wrapper, array, i);
                }
            }
    }
    return EMPTY_BUFFER;
}
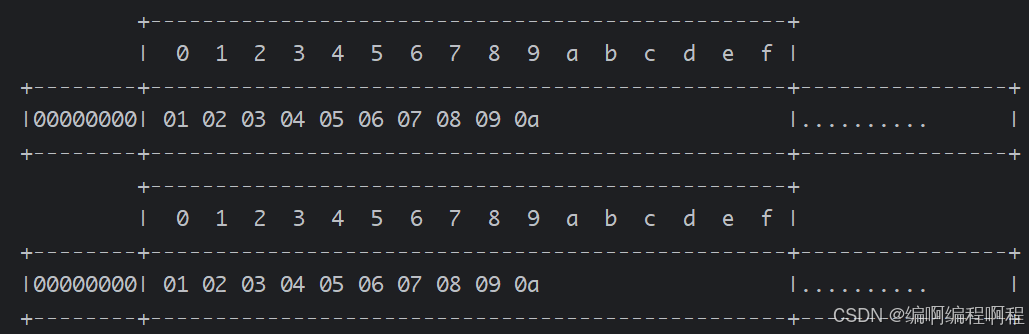
public class UnPooledDemo01 {
    public static void main(String[] args) {
        ByteBuf buf1 = ByteBufAllocator.DEFAULT.buffer(5);
        buf1.writeBytes(new byte[]{1, 2, 3, 4, 5});

        ByteBuf buf2 = ByteBufAllocator.DEFAULT.buffer(5);
        buf2.writeBytes(new byte[]{6, 7, 8, 9, 10});

        // 包装一下ByteBuf的个数超过一个时,【底层会调用CompositeByteBuf】
        ByteBuf buf3 = Unpooled.wrappedBuffer(buf1, buf2);
        System.out.println(ByteBufUtil.prettyHexDump(buf3));

        // 使用wrappedBuffer包装一下普通的字节数组,底层也不会发生【数据拷贝】
        ByteBuf buf4 = Unpooled.wrappedBuffer(new byte[]{1, 2, 3, 4, 5, 6}, new byte[]{7, 8, 9, 10});
        System.out.println(ByteBufUtil.prettyHexDump(buf4));
    }
}
1.6.6 copy
会将底层内存数据进行深拷贝,因此无论读写,都与原始 ByteBuf 无关


 1128
1128

 被折叠的 条评论
为什么被折叠?
被折叠的 条评论
为什么被折叠?
 到【灌水乐园】发言


